Learn the details on how you can transport user-defined ad-hoc reports from development to quality to production in your SAP ERP HCM implementation. Follow this process when you want certain reports (queries) transported and available to all users in all environments. For example, this approach is useful if you create a report in ad-hoc, but you want to keep a baseline back-up version of it in all environments and SAP clients (i.e. instances within a given environment).
Key Concept
Ad-hoc query (or SAP Query) within SAP ERP HCM is a common reporting platform that you can use in your projects use to eliminate the need for custom reporting. Many projects create these custom reports, but then quickly lose them due to users saving over them or deleting them.
Ad-hoc query (transaction code S_PHO_48000513) is a reporting tool within SAP ERP HCM that allows users to create reports by choosing their own selection and output parameters. Many projects use ad-hoc query to report on both Organizational Management and Personnel Administration data within SAP ERP HCM while eliminating the need for custom reports. Many projects also use ad-hoc query when reporting within SAP InfoSets (Figure 1).
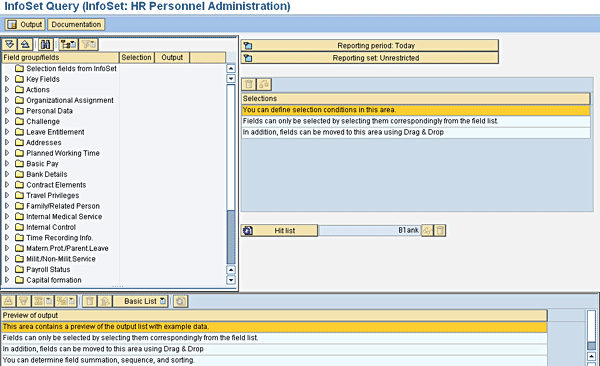
Figure 1
Initial screen for Ad-Hoc Query
To use the basics of ad-hoc query, create one InfoSet for each logical database that is in scope. Three common InfoSets that you should create in any project are:
- Personnel Administration/HR Master Data (PNP) InfoSet: This is related to creating a common data source for your Personnel Administration module in SAP ERP HCM (logical database PNP). The PNP logical database in SAP stores all employee-specific infotypes, which can be extremely beneficial for reporting purposes. Figure 1 shows an example view of the PNP InfoSet.
- Organizational Management (PCH) InfoSet: This is related to creating a common data source for your Organizational Management module in SAP ERP HCM (logical database PCH). The PCH logical database in SAP ERP HCM stores all Organizational Management objects and infotypes.
- Personnel Administration/HR Master Data with concurrent employment/management of global employment build in (PNPCE) InfoSet: You should create this InfoSet if concurrent employment or management of global employment is in scope for your project. The PNPCE logical database is an extension of the PNP logical database and includes new functionality delivered with these modules. You should always create this InfoSet for new implementations.
For example, in Figure 2, a user can output key fields such as Company code, Personnel area, Personnel subarea, Organizational unit, and Position based upon a selection criteria of Personnel number. This is available standard within the PNP or PNPCE InfoSets.
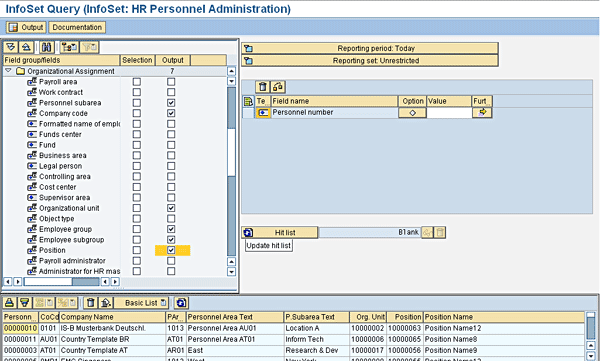
Figure 2
Example screen in ad-hoc query illustrating the use of user-specific selection and output criteria.
Query Areas: Global vs. Standard
Within ad-hoc query, there are two layers in which you can execute and save a report: the global area and the standard area. Both of these query areas are delivered in SAP ERP HCM and are built to support implementation needs on how reports are available within a system.
When reports are in the global query area, they are available to all instances (i.e., SAP clients) within the same environment. For example, if you have three SAP clients within your development environment (e.g., client 100 - build, client 110 – test, and client 120 – data), a report saved in one client is available to all clients. Once the user saves a report within the global area, it automatically requests a transport, which allows for migration to other environments. Although this may sound beneficial, it can be problematic if multiple system users are saving their own reports. After a while, the system has several reports and you don’t know which reports are in use and if they are duplicated or changed from their original state.
To work around this, the other option to using the global area is to use the standard query area. The standard query area is client specific, meaning that it is only available to a specific client (let’s say the test client from above example). This is more beneficial if you have multiple users who create their own ad-hoc reports or make changes to ad-hoc reports that were created specifically for an implementation. The sidebar “Tips for Using Ad-Hoc Queries” illustrates how to navigate between query areas when you create reports in transaction SQ01 (Query tool) (Figure 3).
Note
When you create new queries, you must assign them to a query user group. All users within the query user group have access to the queries.
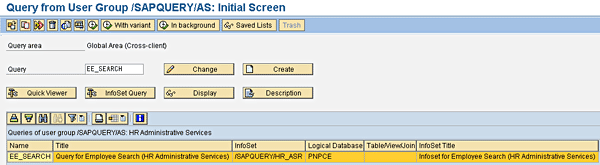
Figure 3
Transaction SQ01 allows users to create user-defined queries that are available within ad-hoc query
Possible Ways to Store and Migrate Ad-Hoc Reports
There are three major ways to use the query areas for ad-hoc reporting. The options in the next sections describe the advantages and disadvantages related to each as well as step-by-step instructions on how to use each option.
Note
Do not follow these options if you want several versions of a report and you want users to be able to save their own specific selection screen parameters. If you do not want to use the global area in your development, quality, and production environments, you can also move queries within environments and SAP clients by creating queries in the standard area and exporting the reports to a manual transport or file (using report RSAQR3TR).
Option A: Report Within the Global Area in SAP Query
Some organizations choose to do all of their ad-hoc reporting within the global area of SAP Query (transaction SQ01 or ad-hoc query). While this has some benefits, there are disruptive implications with choosing this direction. As I previously mentioned, when you create and save reports within the global area, they are available to all clients (instances in the environment) in the same environment. This can quickly cause issues by having erroneous reports in the global area which are being modified or duplicated by users within the system. You should only use the global area for baseline queries and very few users should have access. Keeping the global area locked down to your power users and production support is best as it ensures you have a clean reporting area with delivered and customer-specific baseline reports.
To use this option, follow these steps:
Step 1. Create a report in the development system within the global area environment and assign it to a specific user group
Step 2. Save the report to a transport/package and transport
Step 3. Log a request with Basis to move the transport to the quality and production environments
Option B: Report Within the Standard Area in SAP Query
Some companies choose to do all of their ad-hoc reporting within the standard area of ad-hoc query or SAP Query. This is beneficial as long as only one user needs the report. However, there is the added risk that a baseline report is not being kept as it was originally designed (i.e., user changed selection criteria or output). All users should be doing their daily reporting in the standard query area as very few users would have access to the global area.
One risk with storing your reports in the standard area and avoiding the global area is that you do not store a master version of your ad-hoc report for back-up purposes. For example, if your project had specific ad-hoc reports created that were complex to set up, it is best to protect these baseline reports such that few users can modify them. If they are only in the standard area, any user can access the report (if they have access to the query user group) and modify the master version or even delete it.
Note
If users create their own user-specific queries (not considered project-wide baseline queries to be used by several users), it is okay to store these only in the standard area.
To use this option, follow these steps:
Step 1. Create a report in the development system within the standard area environment by going into ad-hoc query (transaction S_PH0_48000513). Click Save once completed. Figure 4 shows a sample saved query.
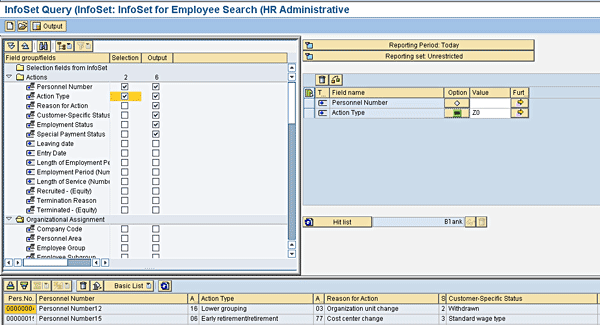
Figure 4
Sample report in Ad-Hoc Query
Step 2. Once saved, go to the transport tool within the InfoSet: Initial Screen transaction (transaction SQ02) and export the newly created report to a manual transport by using the SAP Query: Transport tool (Figure 5).
Note
Transaction SQ02 allows users to create their own InfoSets within SAP ERP HCM as well as provides the capability to transport user groups, InfoSets, and queries through the SAP Query: Transport tool (this is related to program RSAQR3TR).
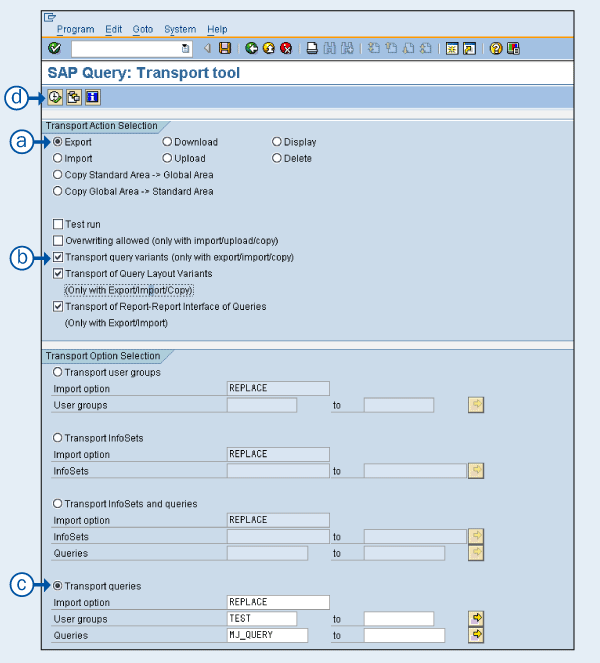
Figure 5
SAP Query: Transport tool with export selections
Here are the steps for exporting the report (the letters below correspond to the letters in Figure 5):
- A: Choose the Export option, which instructs the SAP ERP HCM system to create a transport request
- B: Choose the bottom three checkboxes pertaining to transporting query layout interfaces. This ensures all components of your query are selected.
- C: Select the Transport queries option. Set the Import option to Replace, which overwrites any existing queries with the same name. Choose User groups and the Queries to transport.
- D: Click the execute icon or press F8. The system provides the transport number.
Another option is to create the report in the standard area and download the report as a file (not using the transport system). You also do this with transaction SQ02. To do this, choose Download instead of Export in step A. Save the file to your local desktop and then upload in the new environment.
You may want to explore download versus export if you do not want to relate your ad-hoc report to an SAP transport. This is sometimes the case when you want to have an electronic file saved in a local directory to report back-ups. For example, if you have 20 ad-hoc reports in your SAP ERP HCM system, you could have separate files for each one that you can easily refer to for recovery purposes.
Step 3. Request the Basis team to move the transport to the quality and production environments. You receive the transport number upon executing the report above at the completion of step 2.
Note
You can skip step 3 if you downloaded the report as a file to your local machine.
Step 4. Once the Basis team moves the respective transport, go to transaction SQ02 (InfoSet screen) and initiate the SAP Query Transport Tool. The transport tool then allows you to select the Import function. This automatically imports the report to the standard area within the environment (Figure 6).
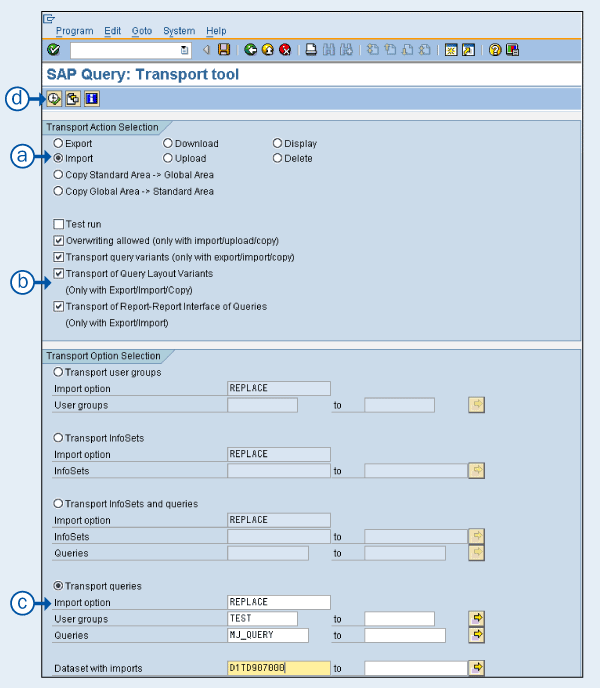
Figure 6
SAP Query Transport Tool with import selections
Here are the steps for importing the report:
- A: Choose the Import option. This instructs SAP ERP HCM to import a report based upon your transport.
- B: Choose the Overwriting allowed and bottom three checkboxes pertaining to transporting query layouts interfaces. This ensures all components of your query are selected and imported.
Note
If your query is new and not in the target environment (environment to which you’re copying the report), then you do not need to select Overwriting allowed.
- C: Select the Transport queries option. The Import option should be set to Replace (overwrites any existing queries with same name). Choose user groups and the queries to transport.
- D: Click the execute icon or press F8
Note
The above steps should happen in all necessary environments (development, quality, and production). Because you're working in the standard area, these changes are user specific and are not replicated in all users within the environment.
Step 5. Go to transaction SQ01, Query Area standard area, and look within the appropriate user group to ensure new reports are available.
Option C: Report via a Hybrid Approach
An alternative to options A and B is to follow a hybrid approach. By creating your baseline queries in the global area, you essentially create your master version where few people have access to modify it. When the query is complete and ready for use, you then export the query to the quality and production environments and copy the query from the global area to the standard area.
This eliminates the disadvantages described in the first two options. First, your projects end up with a clean global area that only has master versions of project-wide reports (read-only reports). Second, you are copying the master versions to a standard area, where users can access them daily and save their own versions if needed. If someone modifies or accidentally deletes a project-wide query, a power user could quickly copy the master report again from the global area to the standard area.
Here are the steps for using the hybrid option:
Step 1. Create a report in the development system within the global area environment and assign it to a specific user group.
Step 2. Save the report to a transport.
Step 3. Log a request with Basis to move the transport to the quality and production environments.
Step 4. Once Basis transports, a power user (users with transaction SQ01/SQ02/SQ03 access) ensures that the new report is within the global area and in the proper user groups.
Step 5. Ask a user to transport the report to the standard query area by running program RSAQR3TR (SAP Query: Transport Tool) and copying the report from the global area to the standard. This should happen in all necessary environments (development, quality, and production).
Step 6. Go to transaction code SQ01 and within the appropriate user group, ensure the new report is available.
As you can see, projects can follow several approaches to storing and using SAP ad-hoc reports. Based on past experiences, I recommend using the hybrid approach as it ensures consistency and integrity of your project-wide reports. Some additional key takeaways that you should follow:
- Never grant users of the reports access to the global area (as they could change the master reports). They should only have access to reports in the standard area.
- Only power users or a reporting support team should have access to the global area.
- If users want to have their own variations of a report, they should not save their versions with the same report name. They need to rename the files with a predefined naming convention.
- If only certain users should have access to certain reports, additional user groups are needed.
Tips for Using Ad-Hoc Queries
Here are some helpful tips for accomplishing specific tasks when using ad-hoc query or SAP Query. I previously made references around toggling between the standard and global area. Here, I explain how to accomplish key tasks.
To toggle between the global and standard query areas, go to Environment > Query Areas with SQ01, SQ02, or SQ03 (Figure A).
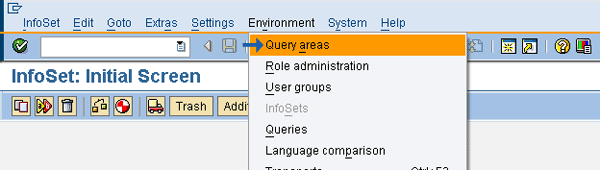
Figure A
Toggling between Query Areas (global versus standard)
To toggle between user groups, click on the other user group icon (highlighted with an arrow) and choose the appropriate group (
Figure B).
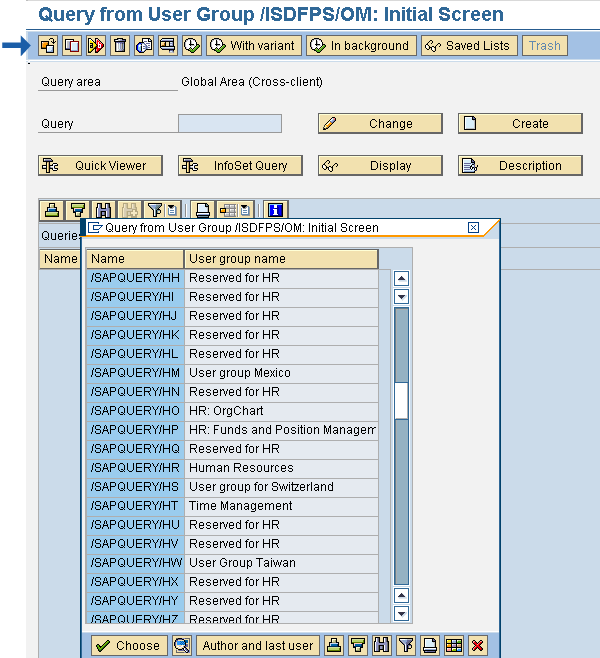
Figure B
Toggle between user groups
To transport queries from the global area to the standard area, go to transaction SQ02 and click the transport (truck) icon (
Figure C). This is related to the hybrid approach I describe. The SAP Query: Transport tool screen appears (
Figure D). Pay particular attention to the different selection options as it drives what you copy.
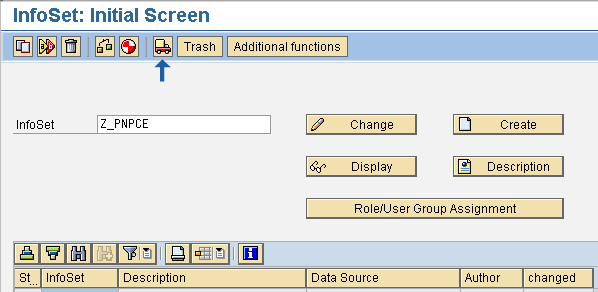
Figure C
InfoSet Initial Screen (transaction SQ02)
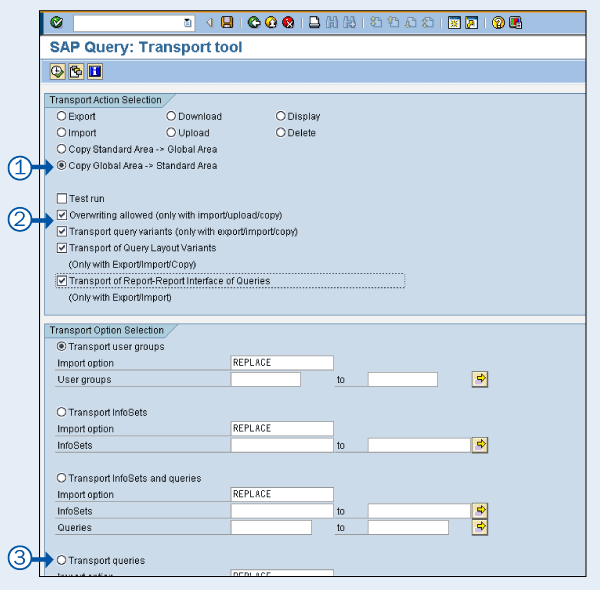
Figure D
SAP Query Transport Tool with setting to move queries from global to standard area
Below are the steps to move reports from the global area to the standard area:
Step 1. Choose the Copy Global Area -> Standard Area radio button.
Step 2. Check the four check boxes related to overwriting and transporting reporting variants.
Step 3. Select the Transport queries radio button and choose Import option REPLACE, User groups (as needed), and report names.
Mark S. Jackson
Mark Jackson has been working with SAP ERP HCM for more than 12 years and specializes in SuccessFactors Employee Central and the SAP ERP HCM Personnel Administration and Organizational Management modules. He has had numerous experiences with implementing and leading SAP ERP HCM and SuccessFactors globally and is a subject-matter expert in defining global templates for SAP/SuccessFactors implementations.
You may contact the author at Mark.S.Jackson@gmail.com.
If you have comments about this article or publication, or would like to submit an article idea, please contact the editor.