A strong cost center hierarchy is necessary for analyzing your company's performance. If your structure is not meeting your needs, try this 11-step process to develop a new, more effective cost center hierarchy. This process is best suited for small- to medium-sized companies.
Key Concept
A company must have a logical grouping of costs to analyze the month- to-month results. To establish a strong hierarchy, keep in mind these basic cost center objectives:
- Provide consistency in reporting.
- Give plant organizations freedom in the way they manage their activities.
- Reflect the activities within the organization.
I find that some companies underestimate the amount of preliminary work necessary to develop their hierarchical structures. As a result, the shortcomings of cost center and profit center hierarchies quickly become apparent. A common mistake, for example, is to omit a key part of the business from the hierarchy. This dilemma inspired me to develop an 11-step approach for small- and medium-sized companies to create a new cost center hierarchy. I would not suggest attempting this with a large company due to the complexity of interfaces and configuration changes that would be required.
Strong cost center and profit center hierarchies are necessary for results analysis. Your company must have a standard hierarchy before it can have a clearly organized reporting structure. The key is to understand the company's structure and the activities performed in your operations. The following is a list of the types of activities that occur and how cost centers could be grouped:
- Preparing in-process or intermediate products to be placed in inventory
- Packing (producing salable finished goods)
- Warehouse and shipping
- Logistics, including production planning, managing raw and packing material, releasing
orders for materials, scheduling delivery, and managing materials to meet production demands
- Quality assurance for raw and packing materials via sampling online and testing inside or outside the organization
- Human resources
- Purchasing
- Information systems
- Maintenance
- Administration
- Finance and accounting
Get It Right the First Time
Once you have your cost center hierarchy in place, you can link it to your profit center hierarchy. The profit center hierarchy should reflect your segment, line of business, or brand P&L reporting structure. If your profit center hierarchy is set up properly, you will be able to view a company code P&L statement as well as specific business P&L statements within the company code. You can set up alternative hierarchies to address specific reporting issues, but for overall company code and brand reporting, it is critical to avoid confusion by getting your standard hierarchies correct up front.
This brings me to why I needed to change one client company's standard hierarchy. During its analysis, it failed to delineate a critical piece of its business as a separate brand. When its original hierarchy was established, the costs incurred for this forgotten brand were being lumped into existing cost centers that were feeding into a different brand's P&L. As a result, it was necessary to create a new profit center for its brand P&L reporting needs. This new brand profit center required its own set of cost centers for collecting the various activities associated with the separate brand.
Such a decision must not be made lightly, because changing the hierarchy once the system has gone live is not a simple task. Before making this decision, a company must analyze all of the touch points in configuration, master data setup, and integration between interfaces (e.g., payroll). For example, on material, order, and cost center master data, you need to change profit center assignments for all the master data and cost objects affected by the change.
Another key touch point for cost centers is the OKB9 table, which is used frequently as a way to have specific cost elements automatically post to specific cost centers. If a company is using OKB9, then this table must be updated for any new cost element or cost center alignment that may change due to the addition of new cost centers. Other key adjustments needed because of this change involve creating new assessment and distribution cycles for allocations, as well as creating new purchase orders (POs) to replace the POs assigned to the old cost centers.
With these points considered, I believe that if your company is small- to medium-sized, you can successfully change your hierarchy using the following 11-step process. I'm assuming that you will have already determined what the new hierarchy should be.
Note
Be conscious of the hierarchical links to cost centers if you are using the HR function. These links may create issues with the integration between the HR organizational structure and the linkage to the new cost centers. These same concerns should also be taken under consideration if you are using the fixed assets functionality and work center links for product costing.
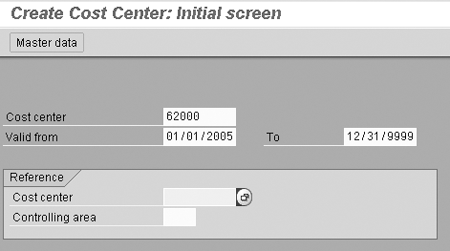
Step 1. Create the new cost centers. Use the existing copy functionality. Go to transaction KS01 to create the new cost centers (Figure 1). While copying from an existing cost center, align the new cost center with the new profit center. The cost center also needs to be aligned within the existing cost center hierarchy. This may require the creation of new cost center groups in which to assign the new cost centers.

Figure 1
Enter new cost center and copy from the cost center to be replaced
Step 2. Run and print report S_ALR_87013624 (cost centers: fiscal year comparison) for the month being changed. This report is used for reconciliation purposes to validate the balances moved to the new cost centers.
Step 3. In the existing cost centers, use the where-used function to determine which assessment/distribution cycles will be affected by the change. Remember: Assessment cycles use a secondary cost element for allocating costs, whereas a distribution cycle uses the primary cost elements to identify the costs.
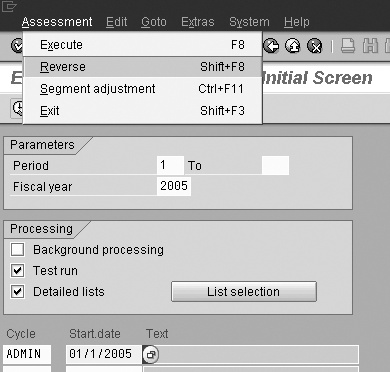
Step 4. Reverse assessments (KSU5) for the respective month (Figure 2). Assessments and distributions are used to allocate dollars from overhead/support- type cost centers to operational-type cost centers, to charge the organization's departments appropriate portions of the overhead. After running the reversal, analyze all cost centers to validate that the assessment reversals posted properly.

Figure 2
To reverse the cycle, pull down the Assessment menu and select Reverse
Most companies won't want to lose the detail that is still in the old cost centers. Therefore, I used distribution cycles to move the dollars from the old cost centers to the new cost centers. A distribution cycle allows the allocation of costs on the same primary cost element for which the original costs were posted. In history, the original documents are still linked to the old cost centers, but by using distribution cycles to move spending to the new cost centers, the year-to-date balances are then included in the new hierarchy. This allows for better analysis of cost center spending, because the costs in the new cost center will be posted to primary cost elements via the distribution cycle.
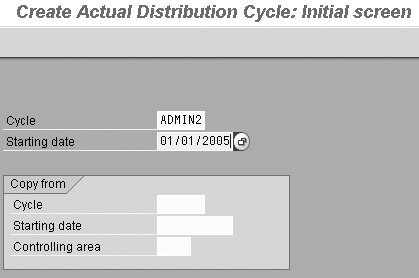
Step 5. Create distribution cycle (KSV1) to move dollars from the old cost centers to the new cost centers (Figure 3).

Figure 3
Key in the name of your distribution cycle and the start date
Step 6. In preparation for using distribution cycles to post dollars in the new cost centers from the old cost centers, you must create a journal (FB50) posting $1 in one of the cost elements that is going to have dollars passed to it in the new cost center. The distribution cycle looks for a value in the cost center before it passes any money to it. If there is no money in the receiving cost center, then the system does not distribute the dollars. Posting the one dollar from the old cost center to the new cost center, in essence, starts the distribution process.
Step 7. Execute the distribution cycles (KSV5) in the period being adjusted. After running the distribution cycle to move the dollars, the actual detailed spending is still linked to the old cost center, but the new cost center contains actual spending year-to-date under the same cost elements.
Step 8. Edit assessment cycles (KSU2) and change old cost centers to new cost centers.
Step 9. At month-end, you are ready to post assessments (KSU5). These assessments are similar to your originals that were developed for budgeting purposes. The difference is that you now are assessing on the new cost center hierarchy.
Step 10. Run cost center reports and compare the old with the new to confirm all of the dollars were properly moved.
Step 11. Validate that all dollars were moved properly. Execute report S_ALR_87013624 for the new cost centers and compare the balances to the printed reports for the old cost centers that were generated during step 2. Once you have determined that the new cost center hierarchy is working, you can sit back and enjoy your new design.
Note
If you are using SAP Business Information Warehouse (SAP BW) or SAP Strategic Enterprise Management for planning, you also have to extract the new master data and the changed transaction data to add to BW.
Daniel Goodhart
Daniel Goodhart has been a manufacturing accounting professional for the past 18 years. He has two BS degrees in accounting and information processing systems. Daniel has worked with SAP since 1996. He’s traveled in North America, Costa Rica, Japan, and Belgium, implementing and troubleshooting issues in FI/CO, Product Costing, CO-PA, and maintenance order costing. Daniel has given many training and speaking engagements promoting the attributes of SAP. You can visit his Web site at www.daniel-goodhart.com.
You may contact the author at webmaster@daniel-goodhart.com.
If you have comments about this article or publication, or would like to submit an article idea, please contact the editor.


