Eliminate unnecessary data entry and streamline the actions process using fast entry for actions. Learn how to configure your system to optimize the fast entry for actions functionality.
Key Concept
SAP’s fast entry for actions (transaction PA42), allows a user to place various fields from multiple infotypes on one interface screen for faster processing.
Fast entry for actions simplifies the actions process and reduces the number of fields that the end user views. Using fast entry for actions functionality, you can select specific fields from various infotypes to place on one screen. This helps streamline data entry for infrequent users and ensures that they only update what they need to update.
You can use SAP actions for tasks such as hiring an employee, terminating an employee, and placing an employee on a leave of absence. SAP actions set the employment status information and ensure that end users see all of the infotypes that they must maintain for a specific process. When you enter a new employee into the system, you must maintain multiple infotypes, including the employee’s name, address, pay, and tax information. However, when performing simpler actions that do not require as much data, you may want to display fewer infotypes. Fast entry for actions saves time and prevents errors in such cases.
Note
Fast entry for actions differs from fast entry. Transaction PA70 (fast entry) creates one infotype for multiple people. Transaction PA42 (fast entry for actions) creates multiple infotypes for one person. For more information on transaction PA70, see the article, “Fast Entry Demystified,” by Dawn Burns.
For instance, specialists entering a leave or return from leave of absence might not have authorization to maintain any other actions in the system. You may want to limit the data that they can access to prevent them from accidentally changing a value on an infotype screen, since they might not be familiar with the dependency of data within the system.
The leave of absence group might need to enter one specific date type onto the date specifications infotype 0041, but they should not be able to change or see any other date information on that infotype. If you were to use an SAP standard action through transaction PA40, users would display the entire date specifications infotype. This would allow end users to see all of the other date types and potentially change a value that they shouldn’t. The only way to avoid this is to create user exits or to use fast entry for actions, transaction PA42, to display only relevant fields.
The fast entry for actions functionality exists in R/3 Release 4.0 and up. The fast entry for actions functionality in SAP R/3 4.6C differs dramatically from previous releases, so I will focus on the functionality and configuration steps that apply to R/3 Release 4.6C and beyond. Let’s use a real-life business scenario to explore the pros and cons of using the fast entry for actions functionality.
Leave of Absence Scenario
Company X needs to monitor leave of absence information in its SAP R/3 system. The company wants to record the employee’s leave of absence and monitor the length of the leave. For example, employee X goes on a maternity leave with a doctor’s note stating that she will be away from work for six weeks. Her leave begins on October 3, 2005, and she plans to return to work on November 14, 2005.
You should add this date into the monitoring of dates infotype (0019) so you can send employee X’s manager a reminder that the employee should return to work. One optional step that you could do is to create a workflow to send the manager a reminder the week before the employee returns so that the manager can follow up with the employee. The company policy is not to pay employees on a leave of absence. Because the employee will remain in her position, you only need to update the employee into an employment status in the actions record (infotype 0000) to state that she is now inactive and to create a monitoring of dates record (infotype 0019) so that the system triggers a workflow to the employee’s manager.
Maintain the Leave of Absence
The disability specialist could maintain employee X’s record as described using actions or fast entry for actions. Using standard actions functionality, the disability specialist would perform the following steps:
Step 1. Go to the actions transaction (PA40) as shown in Figure 1.
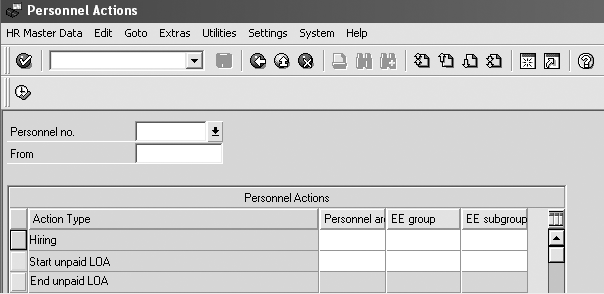
Figure 1
Use transaction PA40 to maintain a leave of absence
Step 2. Enter the personnel number, the begin date of the leave, and select the Action Type 21 Start unpaid LOA/Interruption. Select the execute icon.
Step 3. The R/3 system displays the actions screen (infotype 0000). Verify that the employment status displays inactive (Figure 2). Enter a reason for the leave of absence, A1 (Maternity leave) in this example. Save the data.

Figure 2
Figure 2 Choose your action type
Step 4. The system displays the monitoring of dates screen (infotype 0019). Enter the task type and the reminder date into this infotype screen (Figure 3). Do not change any other information on the monitoring of dates infotype record. Save the data.
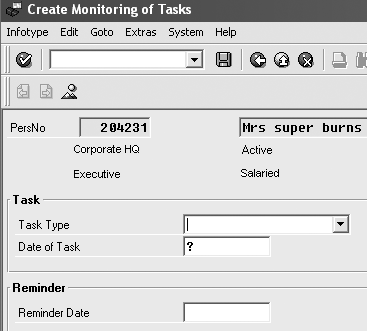
Figure 3
Enter the task type and the reminder date
The disability specialist could instead use fast entry for actions and follow these steps:
Step 1. Go to the fast entry for actions transaction (PA42) shown in Figure 4.
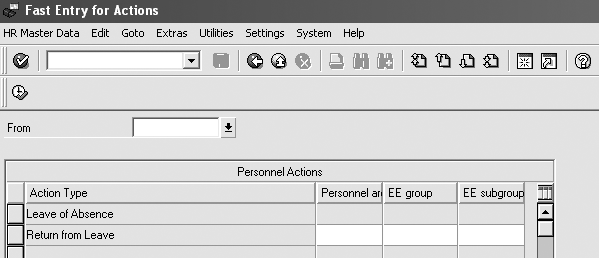
Figure 4
Set the leave of absence date
Step 2. Enter the begin date of the leave and select the Leave of Absence action. Select the execute icon.
Step 3. The R/3 system displays the Fast Entry for Actions screen. Enter the personnel number, a reason for the leave of absence, the task type, and reminder date, then verify that the employment status displays inactive. Save the data (Figure 5).

Figure 5
Enter your leave of absence data and save
Even though this is a simple example, you could add many more infotypes or infotype fields to the Fast Entry for Actions screen. Displaying the required information on one screen eliminates the end users’ need to jump from infotype screen to infotype screen or potentially enter information into incorrect fields.
Fast entry for actions can greatly reduce end-user training time. One of the major drawbacks to using fast entry for actions is the initial system configuration time. Let’s examine the benefits and drawbacks of fast entry for actions, and then I’ll explain how to configure it.
Pros of Fast Entry for Actions
The main benefit is its simplicity: The R/3 system displays all of the relevant fields on one screen.
Another advantage of this functionality is its flexibility. If the field is not a required field on the infotype, the user can select the Further Data check box from this screen to enter more information. In my example, say there is a custom field at the bottom of the monitoring of dates screen (infotype 0019) called Not qualified for FMLA. You only check this field for individuals who did not meet the minimum qualifications of the Family and Medical Leave Act (FMLA). Employee X was only employed with company X for three weeks before she went on her maternity leave, so she was not covered by FMLA. The R/3 system should track this information for reporting purposes.
In this case, the disability specialist could select the Further Data check box on the Fast Entry for Actions Leave of Absence screen to display the full monitoring of dates infotype, then indicate that employee X doesn’t qualify for FMLA. The Further Data feature allows users to maintain extra data without needing to go to the Maintain Master Data screen (transaction PA30). In addition, you don’t have to confuse users by adding rarely used information such as the Not qualified for FMLA check box to the Fast Entry for Actions Leave of Absence screen.
If you use the fast entry for actions functionality, you could use a Business Add-In (BAdI) to distinguish between enhancements that can have no more than one implementation. You can use BAdIs to perform validation checks prior to saving the data on the database. You might want to check that the reminder date is greater than the valid from date. If you were performing a standard action via transaction PA40 (actions), you would have to enter this type of check into a user exit for infotype 0019.
Cons of Fast Entry for Actions
If you do not add a required field to the Fast Entry for Actions screen, the R/3 system displays the full infotype screen so that the user can enter the missing required field entry. For example, if you forget to add the action reason, which is a required field (in table T588M), the system automatically displays the actions screen (infotype 0000) so that the user can enter this information and then save the record. This could be an issue because you might not want users to see the complete infotype 0000 screen. You might not want them to see that they could modify the position field.
Note
If you do not select a required field as defined by table T588M to display on your screen, then when the user saves, the fast entry screen displays the infotype screen that contains that required field. For example, if you do not put the action reason on the fast entry screen, the system displays an infotype 0000 screen after you save so that the user enters a value into this field before saving that infotype record.
Another drawback is that if you mistype the fast entry for actions information, you cannot simply re-execute the Fast Entry for Actions screen like you can the normal actions screen (transaction PA40). Instead, you need to go to the Maintain Master Data screen (transaction PA30), select the Utilities option from the menu, and select the change entry/leaving date to adjust the action information. Depending on what you need to change, you might be able to simply navigate to the necessary infotype screen via the Maintain Master Data screen.
If you wish to default values into the Fast Entry for Actions screen, for example, task type, you need to have a technical team member code this in the BAdI’s Process Before Output (PBO) functionality.
Create the Fast Entry for Action Item
Here are the configuration steps to create the fast entry for action item:
Step 1. Go to the IMG and create the action via menu path Personnel Management>Personnel Administration>Customizing Procedures>Actions. You set up this action as you would set up transaction PA40 (actions).
Step 2. Define the order of the action. Follow the menu path Personnel Management>Personnel Administration>Customizing Procedures>Actions>Change action and choose the Action option. You need to indicate the 02 option because it relates to a fast entry action. If you choose 01, the system displays the actions that you configured earlier via transaction PA40.
Step 3. Enter transaction OG42 in the transaction code box. This is the customizing tool for fast entry for actions.
Step 4. Select the fast entry action that you wish to create. See Figure 6, the Customizing Tool for Action Fast Entry screen.
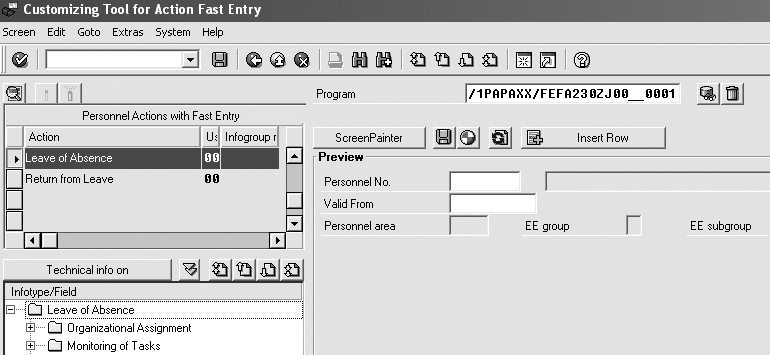
Figure 6
Select an infotype on the Customizing Tool for Action Fast Entry screen
Step 5. Open the infotype folder you wish to use. All of the infotypes that you configured for the action sequence appear in the bottom left corner. Open the infotype folder to see the listing of fields that you can display on the Fast Entry for Actions screen. Double-click on a field to place it onto the Fast Entry for Actions screen. The system automatically adds the field to the screen (Figure 7).
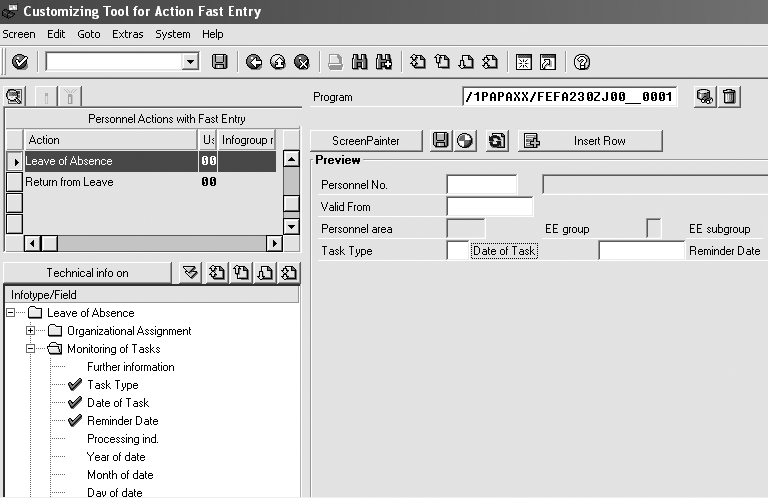
Figure 7
Update your screen via the Customizing Tool for Action Fast Entry screen
The fast entry screen does not automatically indicate what field is a required field in the transaction OG42 interface screen. If you want to indicate that a field is required on the fast entry screen, a technical ABAP resource would need to code this using the check fields BAdI. The fast entry for actions program automatically includes this BAdI when generating the Customizing Tool for Action Fast Entry screen.
Step 6. To change the way the fields appear on the Fast Entry for Actions screen, select the ScreenPainter button shown in Figure 7. Then you can use the screen editor to move the fields by dragging and dropping them where you want them on the screen.
Step 7. Return to the Customizing Tool for Action Fast Entry screen (transaction OG42). Name your program Z_LOA using the Program name field, save, and then click on the generate icon. Generating the program creates an entry in table T529F that links the action to the program name. If this does not occur, you receive an error stating that there’s no entry on this table when you go to transaction PA42 and select fast entry for actions. If you need to enter the value in the T529F table directly, use transaction SM30.
Step 8. Go to the Object Navigator screen (transaction SE80) to view your program. Type in the name of the program you just created in the Customizing Tool for Action Fast Entry screen (transaction OG42) into the Program name field in Object Navigator.
Step 9. View the code that R/3 automatically generated for you. Select the paper with glasses icon next to the program name in Figure 5.
Step 10. If needed, change the BAdI. If you wish to make changes to the BAdI, have a technical team member who is familiar with object-oriented (OO) programming change the BAdI via menu path Personnel Administration>Personnel Management>User Interfaces.
Dawn Burns
Dawn Burns is an SAP-certified human resources senior consultant and Quality Assurance Manager and HR Consultant with Howrey LLP. She is a former SAP Human Resources instructor for SAP America and has more than 12 years of experience in human resources and information technology.
If you have comments about this article or publication, or would like to submit an article idea, please contact the editor.


