BusinessObjects 4.0 includes functionality that allows users to schedule Web Intelligence and Crystal Reports documents, refresh them automatically, and send them to specific destinations. In addition, the events feature controls the execution of reports by waiting until a trigger within the system is fired. Learn how to use all these features to save time, effort, and money when scheduling reports and creating events.
Key Concept
The scheduling feature in BusinessObjects 4.0 gives end users control over when a Web Intelligence or Crystal Reports document included in the system is executed with a refresh of data. Additionally, scheduling allows the end user to determine the destination and recipients of the updated documents. Events is another feature of BusinessObjects 4.0 that controls the execution of schedules by forcing the schedule to wait for a system trigger to successfully occur.
BusinessObjects 4.0 includes functionality that allows documents and queries to be scheduled and refreshed automatically with specific target destinations. In addition, the events feature controls the execution of reports by waiting until a trigger within the system is fired.
This ability to schedule reports in advance is useful for refreshing reports at off-hours or when system activity is very low. It allows reports to include the necessary data that users require in a timely manner. This functionality is especially useful for long-running reports, users requiring reports at off-hours, or when many reports need to be refreshed at the same time. This functionality is also a helpful timesaver for users because they aren’t required to manually run the reports every time.
Scheduling can be configured so that the reports automatically execute after a file is loaded on the BusinessObjects server. In addition, reports can be executed in a particular order. Both Web Intelligence (also known as WebI or WEBI) and Crystal Reports documents can be automated using this scheduling feature.
Note
This article covers how to schedule Web Intelligence and Crystal Reports documents in advance. Advance scheduling for Web Intelligence or Crystal Report documents that access an SAP BW query is no different from scheduling any other Web Intelligence or Crystal Report document. Unfortunately, BusinessObjects dashboards cannot be scheduled in advance.
Both the BI Launchpad and Central Management Console (CMC) tools of BusinessObjects 4.0 provide the functionality to schedule reports and have the reports automatically be refreshed according to calendar date and time. In addition, each time a report is scheduled, a new report instance is created. An instance is a version of the reports that contains data from the time the report was executed. Scheduling and viewing instances ensure that reports have the most up-to-date information available for viewing, printing, and distributing. I explain how to configure and use these functionalities to be more efficient when running these types of reports.
Note
Before reading this article, users should have existing knowledge of either BI Launchpad and CMC tools of BusinessObjects 4.0.
Schedule a Document in the BI Launchpad
Using BusinessObjects 4.0 you can schedule a document to execute automatically at specified times. By scheduling a document the latest information can be made available for viewing, printing, and distributing. For example, you can schedule a report object document to run every night so that it’s available first thing in the morning. In addition, you can distribute the report to users for easy viewing via email, File Transport Protocol (FTP), or file location.
On the Documents tab in BI Launchpad, locate and select the report that you want to schedule. (In this example, I choose the Consolidated Income Statement report to illustrate this functionality.) Right-click to open the context menu and click the Schedule option, as shown in Figure 1.
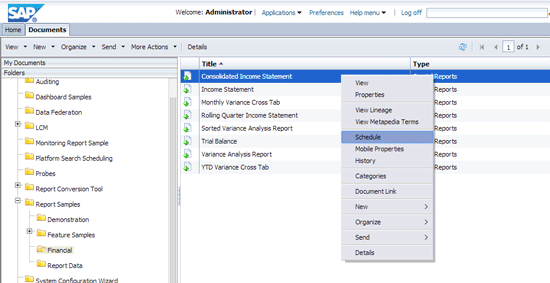
Figure 1
Open the Schedule option in BI Launchpad
The Schedule dialog box opens with multiple tabs and options (Figure 2). In the bottom right of the box (and all included tabs) you see the Schedule and Cancel buttons. Click the Schedule button when all the settings on the multiple tabs are set and the report is ready to be scheduled for execution. Select the Cancel button at any time to close out of the Schedule dialog box without scheduling the report for execution.
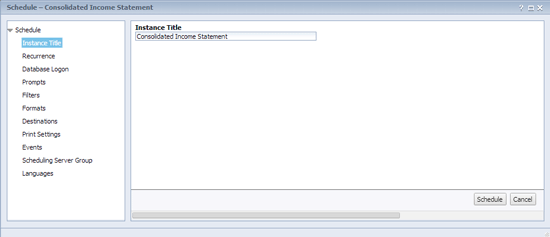
Figure 2
Check or rename the instance title
The first tab in the Schedule dialog box is the Instance Title (Figure 2). Click this tab and the screen on the right opens with only one option—the option to change the name of the instance of the report. Instance titles are useful if the same report is scheduled to run several times with different parameters and recipients. This makes identifying a specific version of the scheduled document easier.
The second option is the Recurrence tab (Figure 3). This tab allows you to schedule when the report will be executed. In my example I choose Weekly from the Run object drop-down list of options. This action opens the screen in Figure 4.
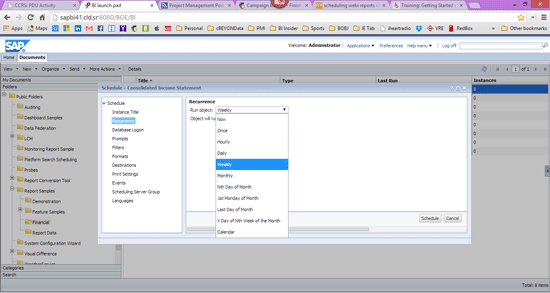
Figure 3
Select the frequency for the report to be run
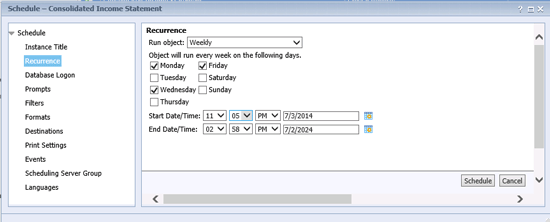
Figure 4
Select the exact days, dates, and times to run the report
Figure 4 shows the settings that appear when the Weekly option in the Run object drop-down is selected (in the Recurrence tab of the Schedule dialog box). In this screen you can select which day of the week to run the report, as well as the start and end dates and times for how long a period the report should be run.
The other options for running a report include:
- Now
- Once
- Hourly
- Daily
- Weekly
- Monthly
- Nth Day of the Month
- 1st Monday of Month
- Last Day of Month
- X Day of Nth Week of the Month
- Calendar
Each of these options has specific settings that appear when the option is selected. Calendars are set up by the BusinessObjects administrator in the CMC and include customized lists of schedule dates.
The third tab on the Schedule dialog box is the Database Logon option (Figure 5). Some documents and reports require database logon settings to be updated before the document or report can be successfully executed. In most cases, the database logon settings do not need to be updated to execute the documents and reports. Many Crystal Reports, however, require database logon information to be entered if the Crystal Report accesses a data source directly rather than connecting to a universe as a universe contains the database logon information. Web Intelligence documents do not require database logon information to be entered as they always connect to a universe rather than directly to a data source. Database configuration properties for a document are set within the CMC. However, a user can choose to override the default database for the document and chose a different database for the document instance that the user is scheduling.

Figure 5
Set the database logon option
The fourth tab is the Prompts option (Figure 6). A prompt is a report property that can be configured to limit or filter the data that a report retrieves. When a user runs the report, a prompt requests the user to enter a value for a required parameter prior to running the report. Subsequently, the report is refreshed, but is filtered by the value of the prompt parameter at the time of the run.

Figure 6
Select the Prompts option
To update the value of the prompts for the report execution, click the Edit Values… button in Figure 6. This action opens the Prompts pop-up window (Figure 7) in which you can modify the prompt values for the report. Make your entries and then click the OK button to save your changes.
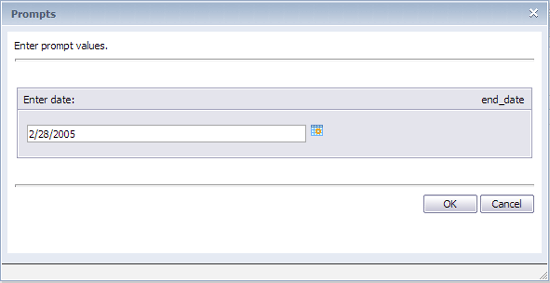
Figure 7
Edit the prompt values
The fifth tab is Filters (Figure 8). The Filters option creates a subset of the records from the source database tables and limits the records that are included in the report. Report filters are a useful way for the report to include only necessary and relevant data for the specific execution of the report. Filters are typically designed in a report as the report is being created. They can include both database fields and prompt values.
By default, the Filters tab displays the filters that have been designed in the report. However, as the report is being scheduled, these default report filters can be modified. You have to manually enter filters within either the record selection or group selection boxes. There are no additional windows or additional wizards to help with the entry of filter values.
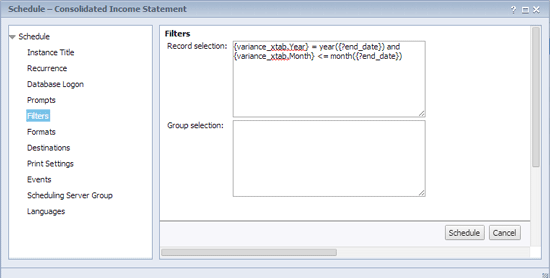
Figure 8
Set the report Filters options
The sixth tab is Formats (Figure 9). This option allows you to create the scheduled report in a specified file format. In this way the report consumer can receive the report in a file format that is relevant to the way the consumer uses the report. For Crystal Reports documents, the following file formats can be selected for scheduling:
- SAP Crystal Reports
- SAP Crystal Reports read only (RPTR)
- Microsoft Excel (97–2003)
- Microsoft Excel (97–2003; data only)
- Microsoft Excel (2007; data only)
- Microsoft Word (97–2003)
- Portable Document Format (PDF)
- Rich Text Format (RTF)
- Microsoft Word editable (RTF)
- Plain Text
- Paginated Text
- Tab Separated Text (TTX)
- Comma Separated Values (CSV)
- XML
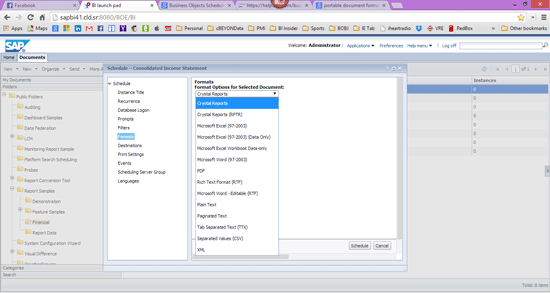
Figure 9
Select the file format
When a file format other than SAP Crystal Reports is selected, the export preserves much of the report formatting so that the report export has a similar look and feel to that of a format of SAP Crystal Reports export.
For Web Intelligence documents, the following file formats can be selected for scheduling:
- Web Intelligence
- Microsoft Excel
- PDF
The seventh tab is Destinations. It controls the location that the report is sent to after it is executed. Available destinations depend on which destinations have been enabled by the BusinessObjects system administrator in the CMC tool and on which destination the user has rights to access. It is possible to send documents and reports to the following five destinations: Default Enterprise Location, BI inbox, Email, FTP Server, or File System. I discuss each in more detail below.
Default Enterprise Location (Figure 10): This is determined by the BusinessObjects system administrator and set within the CMC. The default location is typically an output file repository server (FRS), but the system administrator can change this to be a different location. If this location is chosen, the end user does not need to enter any other settings.

Figure 10
The report destination options
BI Inbox (Figure 11): Documents and reports can be sent automatically to the inbox of any user or group of users of the BusinessObjects system. The inbox for a user is found within the BI Launchpad tool on the home and documents pages. Sending a document to this location makes the document easy to find for users who need to access the content of the document.
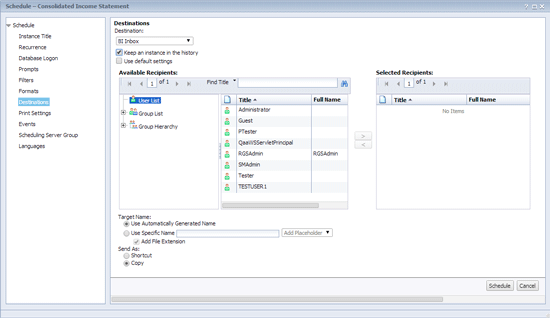
Figure 11
The BI Inbox destination options
Email (Figure 12): Documents and reports can be sent automatically to the email inbox of anyone who has an email address. Then the report can be opened from the email client of the inbox of the user who receives the document. A link to the document can be included in the text of the email, or the document can be added as an attachment to the email.
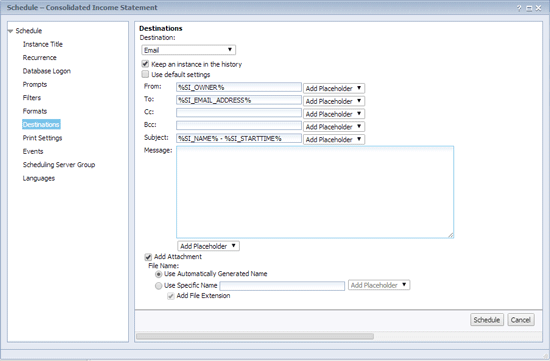
Figure 12
The Email destination options
FTP Server (Figure 13): Documents and reports can be sent automatically to a location or directory on an FTP Server. FTP is a standard network protocol used to transfer files from one host server to another host server using a client-server architecture and separate control and data connections between the client and the server. The user can then open the document from the FTP server location that contains the document.
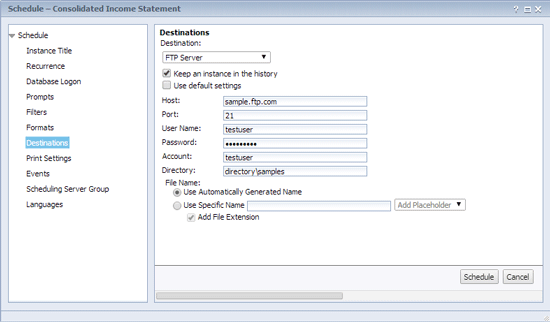
Figure 13
The FTP Server destination options
File System (Figure 14): Documents and reports can be sent automatically to a location, directory, or shared on a file server within the organization’s network. The user can then open the document from the file server location that contains the document.
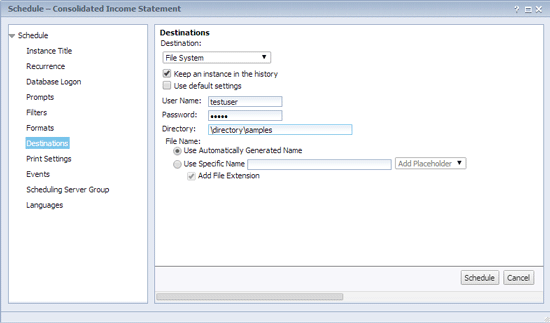
Figure 14
The File System destination options
The eighth tab is called Print Settings (Figure 15). The Print Settings contains options for formatting and printing the instance of a Crystal Reports after the report has been generated. It offers the option of printing either to a PDF or Crystal Reports format, as well as specifying the exact printer to send the report to or specifying the page layout of the report.

Figure 15
Select the print settings
The ninth tab is called Events (Figure 16). The Events option restricts the execution of the report and schedules execution of the report until the respective event has occurred. This is helpful when reports need to execute in a certain order or need to wait for a particular file to be loaded onto the server to be used as a data source for the report. In addition, the completion of report execution can trigger an event that is used as a waiting event for another report.
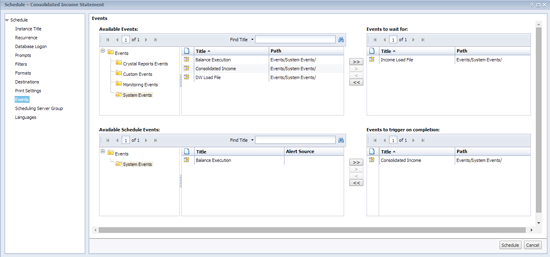
Figure 16
Select the event settings
The tenth tab is the Scheduling Server Group (Figure 17). This option allows the default scheduling server to be specified for the execution of the report. Options include using the first available scheduling server, giving preference to a scheduling server in a particular server group, or only using servers in a selected group. Most of the time, the Use the first available server option is chosen as this allows the report to be executed in any of the scheduling servers within the entire BusinessObjects environment.
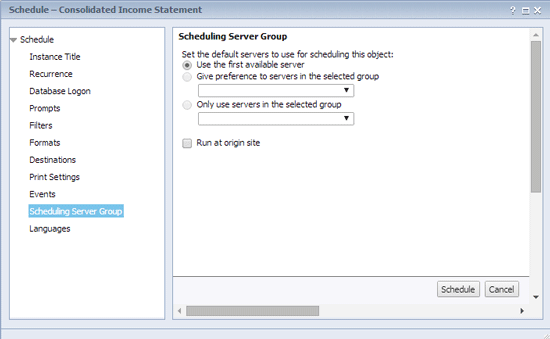
Figure 17
Select the server group settings
The last tab is Languages (Figure 18). This option allows the report to be generated for a particular locale. A locale is a set of parameters that defines the user's language, country, and any special variant preferences that the users want to see in their particular user interfaces.
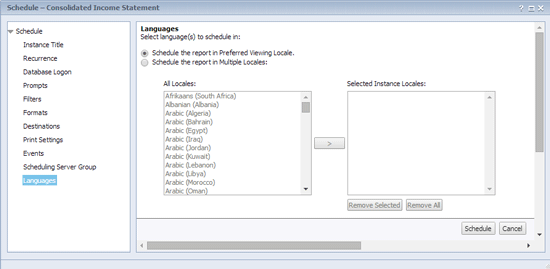
Figure 18
Select the language options
Now that I’ve covered all the report scheduling options, following is an explanation of how to view the previously scheduled document instances. Viewing previously scheduled document instances by an end user can be performed by viewing the history of a document.
View the History of a Document in BI Launchpad
When a scheduled report runs successfully, a report instance is created. A report instance is a version of the report document containing the data available at the time the report was run. Therefore, later instances contain more recent data. Report instances are extremely important because they are able to be rendered to the user in a few seconds as opposed to a live retrieval of the data that might take more time. Users can see a list of report instances by looking at a document’s history. They also can view any historical instance.
On the Documents tab in BI Launchpad, locate and select the report that you want to schedule, right-click to open the context menu, and click History as shown in Figure 19.
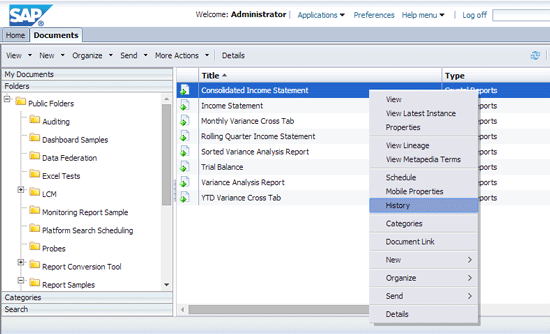
Figure 19
Select the History option for a document in BI Launchpad
This action opens the History dialog box (Figure 20). This screen contains a list of a report instances along with the instance date, time, title, status, created by, type, and report parameters. From this dialog box, you can select and view a specific report instance.
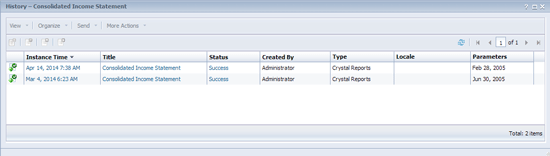
Figure 20
List of report instances
Configure Events in the CMC
Events are controls within the BusinessObjects system that regulate the execution of scheduled reports. Events are administered within the CMC of a BusinessObjects system. Events can also be referred to as triggers as they are related to actions that occurred on the BusinessObjects server.
Within BusinessObjects, there are three types of events:
- Custom Event: This type of event is also referred to as a manual event, and it only includes two properties: names and events. The only way to trigger a custom event is through the use of the BusinessObjects solution deployment kit (SDK). The SDK provides the basis for integration of documents with other applications through the use of custom code development.
- File Event: This type of event is triggered when a new file is placed in a directory on the BusinessObjects server. Additionally, the file event is triggered only when a file is placed with a specified directory on the server. When the file that is specified in the file event properties is created, the file event is triggered. For example, C:/eventfiles/test.txt is the file name specified within the properties of a file event. When a new file named test.txt is placed in the directory C:/eventfiles, the file event is triggered.
- Scheduling Event: This type of event is used to execute a report after the successful completion of another report. The scheduling events definition has three actions in it: success, failure, and success or failure. Scheduling events are usually defined to define event chains. For example, report 2 executes only after report 1 has been executed successfully.
To configure and create new events, log on to the CMC. In the Define section, click the Events link as highlighted in Figure 21. This action opens the Events screen shown in Figure 22.
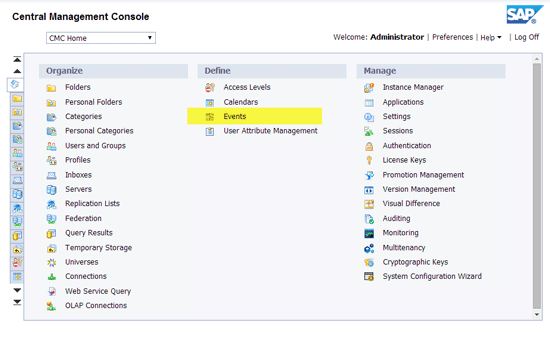
Figure 21
Select the Events link
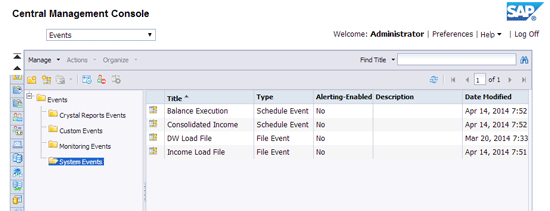
Figure 21
Select the Events link
In Figure 22, click Manage at the top of the screen on the left. This action opens the menu options in Figure 23. To create a new event, click New > New Event. A pop-up screen appears (Figure 24).
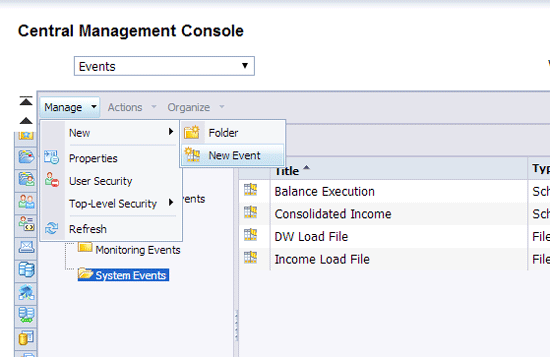
Figure 23
Select New Event
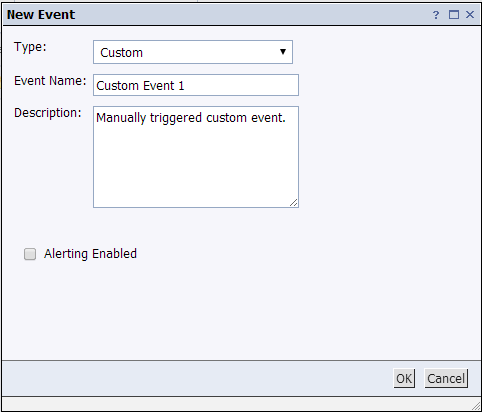
Figure 24
Create a custom event
To create a custom event, select Custom from the Type drop-down options and enter in the Event Name and Description as shown in Figure 24. Select the Alerting Enabling check box if an alert notification of the event being triggered should be sent to the My Alerts folder in the BI Launchpad of all users who are subscribed to the document. Then click the OK button. To create a file event, select File from the Type drop-down options and enter the Event Name, Description, Server, and File Name (the directory) shown in Figure 25. Click the OK button again.
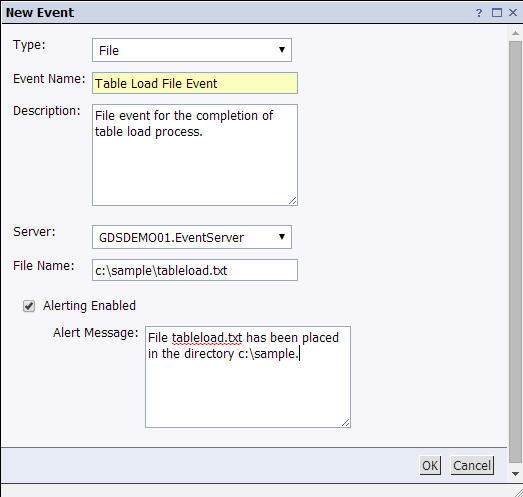
Figure 25
Create a file event with alerting enabled
Select the Alerting Enabled check box if an alert notification of the event being triggered should be sent to the My Alerts folder within BI Launchpad of all the users who have subscribed to the document. The My Alerts folder in BI Launchpad is shown in Figure 26.
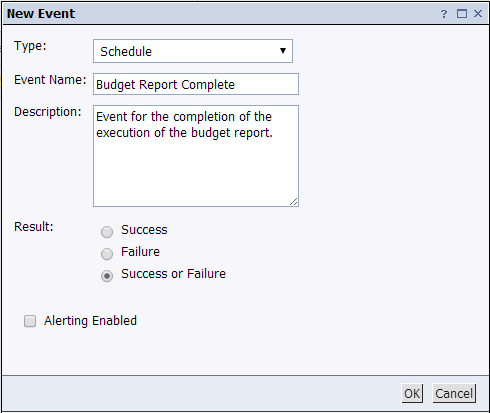
Figure 26
My Alerts folder in BI Launchpad
To create a scheduled event, select Schedule from the Type drop-down options (Figure 27). Enter the Event Name and Description. Select your desired result-type radio button option (e.g., Success, Failure, Success or Failure) and click the OK button.
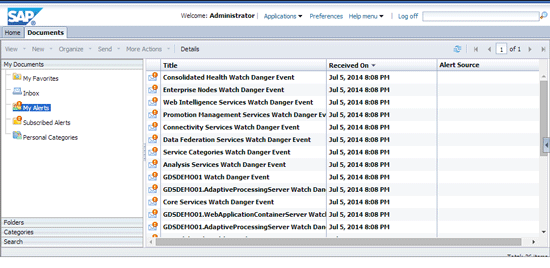
Figure 27
Create a scheduled event
Adam Getz
Adam Getz currently serves as a Manager, Business Intelligence for CGI Federal. In this position, he is leading a large business intelligence and data warehousing implementation for a federal client. He is a thought leader in the field of information technology and an expert in the deployment of leading business intelligence, database management, and data integration products. He has presented at a variety of local, national, and international events, including the 2006 BusinessObjects International Conference, 2007 Oracle BIWA Summit, 2008 Oracle Open World, and 2010 and 2011 ASUG SAP BusinessObjects User Conferences. In addition, Adam is the creator and main author of bi-insider.com, a website, portfolio, and blog that provides rich technical and functional content to business intelligence and data warehousing professionals. He has also published numerous technology white papers that have focused on various topics within business intelligence and data warehousing. Adam currently serves as the chairperson of the Washington DC Business Objects User Group.
You may contact the author at adagetz@yahoo.com.
If you have comments about this article or publication, or would like to submit an article idea, please contact the editor.