Get a clear picture of how to set a characteristic InfoObject as a master data InfoProvider in SAP NetWeaver BW 7.30. See how to load the delta of master data from SAP ERP Central Component to the master data InfoObject. You can do this without affecting the lock of the master data InfoObjects while loading the deltas. This is mainly useful when there are multiple lookups on master data from different transactional DataStore objects and InfoCubes.
Key Concept
In multiple instances, users need to look up master data because there is a slim chance that all the required fields are supplied as the attributes of the master data. For example, one requirement could be that the shelf life date of the material be stamped in the InfoCube while loading the transactional data. This information is not available in the transactional DataSource. You have to look up the data from the DataStore object (DSO) that has the master data of the material, for example shelf life of the material, as the attribute of 0material. This can be easily achieved by a new feature in SAP NetWeaver BW 7.30, which has a lookup on the DSO feature in the update rules while loading the transactional data.
While loading transactional data to InfoCubes or DataStore objects (DSOs), in most projects you also need to stamp or look up master data values. That includes master data attributes — such as shelf life of the material, best used-before date, tax code, and sold-to-party — and any attribute of the master data, such as 0material or 0customer. This information may not be available in the transactional DataSource, and you then have to fetch it from the InfoObject. However, when master data is activated after the delta load, the InfoObject is locked during the activation. Lookup on a DSO is faster when compared with lookup on an InfoObject as per the Layered Scalable Architecture.
In some cases, when you are loading or activating the master data, the lookup may fail or cause a delay. In that case, you can use my method of loading the master data directly into the DSO from the master data DataSource. You can do a lookup on the DSO and create another transformation between the DSO and the master data InfoObject. When the Data Transfer Process (DTP) is triggered, the entire master data is loaded from the DSO to the InfoObject. This DTP between DSO and InfoObject can be delta or full based on the business requirement.
To implement my method, you first set up the InfoObject as a master data InfoProvider 2, and then create a DSO to load the master data. Follow these steps:
- Set up 0material as a master data InfoProvider
- Create a custom DSO that is similar to the master data InfoProvider 0material for loading
- Create a transformation between the master data DataSource (0material_attr) and the custom DSO
- Create a DTP to load the master data into the DSO that you can use for lookup while loading transaction data
- Create a transformation between the DSO and 0material to load the delta from the DSO to 0material
Convert an InfoObject to a Master Data InfoProvider
You first need to convert InfoObject 0material to a master data InfoProvider. Initially, the InfoObject is in the InfoObjects category when you log on to the administrator workbench screen via transaction RSA1 (Figure 1).
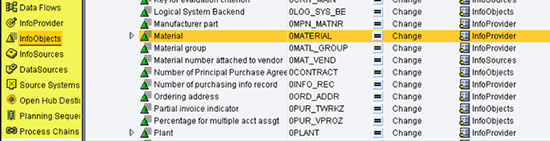
Figure 1
The default screen when you log on to SAP NetWeaver BW 7.30
Highlight the InfoObject you need to set up for master data and right-click to see the context menu. Go to the InfoProvider option for 0material. Select the InfoArea in which you need to insert the master data InfoObject. After clicking the InfoProvider button in the left pane, you can browse using the scroll bar.
Right-click any application component. In my example, I highlighted Cross-application Master Data (Flexible Update) and then right-clicked to display the context menu. Select Insert Characteristic as InfoProvider and right-click it (Figure 2). This is the first step to set up an InfoObject as master data.
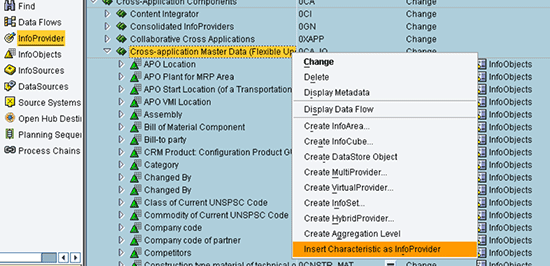
Figure 2
Select Insert Characteristic as InfoProvider from the menu
You get the popup Assign InfoArea to an InfoObject (Figure 3), in which you need to either select the InfoObject from the drop-down menu or enter the name of the InfoObject directly, which in my example is 0material. Click the green check mark.
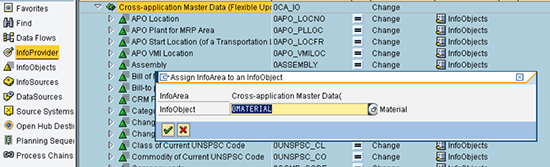
Figure 3
Assign an InfoObject to an InfoArea
In the next popup, you need to add the InfoObject to a transport to move the changes from development to quality and later to the production environment (Figure 4).
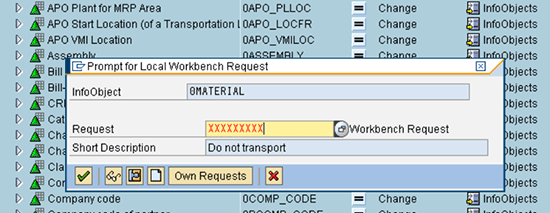
Figure 4
Collect the changes to a transport
If you have assigned a wrong 0material characteristic to the application component by mistake, you can delete it by the process shown in Figure 5. Right-click the characteristics to go to the screen in Figure 5. Right-click the InfoObject and select Switch Off InfoProvider Property.
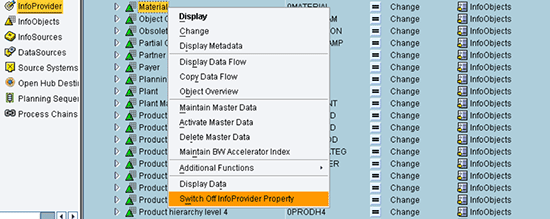
Figure 5
Reassign a wrongly assigned InfoProvider screen
Now that the InfoObject is assigned as master data, you create a DSO with the same attributes as the master data InfoObject. You need to customize all the necessary changes to the InfoObject, such as adding any navigation or other attributes, before proceeding further.
Create a DSO
Create a custom DSO that is similar to the master data InfoProvider 0material for loading. Select the required InfoArea shown in Figure 3. Right-click it (Figure 6) and then click Create DataStore Object.
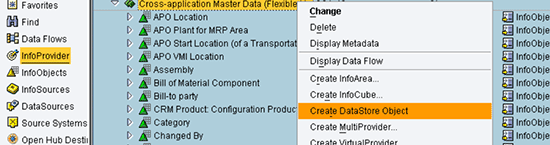
Figure 6
Create a DSO
Enter the Ztechnical name of the DSO with the relevant description, such as the description Material MD DSO in my example, as shown in Figure 7. The Ztechnical name is a reference name you give to the new DSO. Click the create icon  to go to the screen in Figure 8.
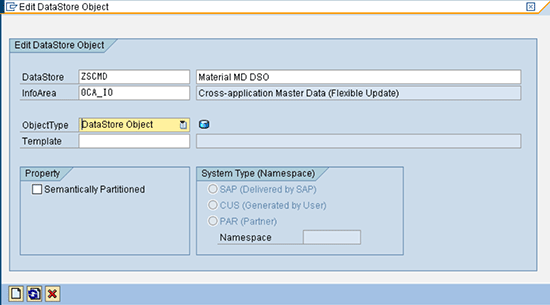
Figure 7
Name the DSO
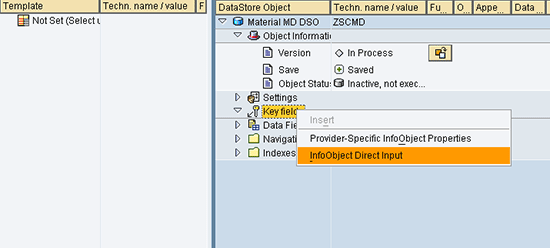
Figure 8
Select InfoObject Direct Input from the menu
I have named the DSO ZSCMD, but it can be anything that meets the user requirements. The zsomedso name acts in the same way as 0material with all the fields and navigation in it. Right-click the Key field option of the DSO in Figure 8. Select InfoObject Direct Input as the main characteristic InfoObject, which takes you to Figure 9. This is the key field that has a unique combination of key figures. If you are creating the same structure for 0customer master data, you need to put 0customer as the Key field. In my example, it is 0material, and therefore you enter 0material as the Key field (Figure 9).

Figure 9
Add 0material
After you add the InfoObjects, click the green checkmark to go to Figure 10. Right-click the Data Fields button and choose InfoObject Direct Input. You see a popup window in which you manually enter all the attributes of the 0material. This has only 20 fields at a time, so you need to manually enter all the attributes of the 0material in sequence starting from the first to the last field. Repeat this task until all the fields are added to the DSO. To do so, open another session and double-click 0material. Click the Attribute tab (Figure 11).
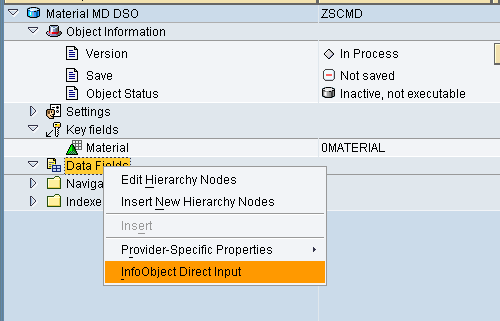
Figure 10
The second step to add InfoObjects to a DSO
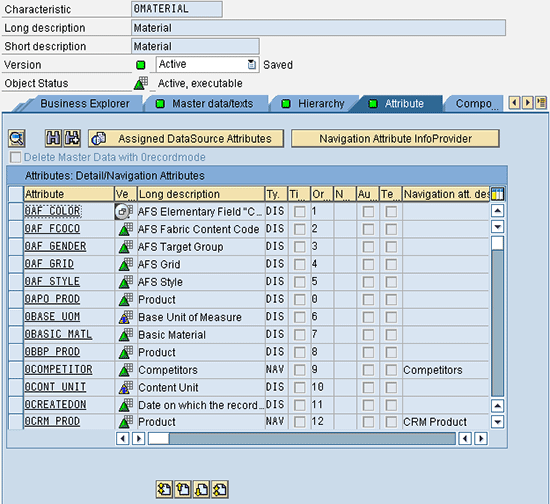
Figure 11
Attributes of the master data
Copy the attributes in Figure 11 and paste them in the DSO shown in Figure 9. After adding all the InfoObjects, click the checkmark in Figure 9, which takes you to Figure 10. Repeat this until all the InfoObjects from the master data are copied to the DSO in the Data Fields’ popup window. Press Enter. Figure 12 shows the attribute list. Figures 13 and 14 show the completed steps. The InfoObjects are successfully copied to each of them and are the same.
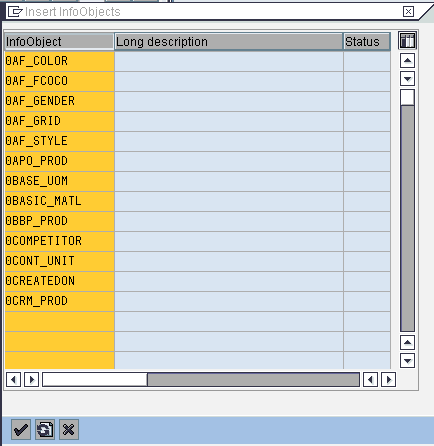
Figure 12
A completed DSO after adding master data attributes
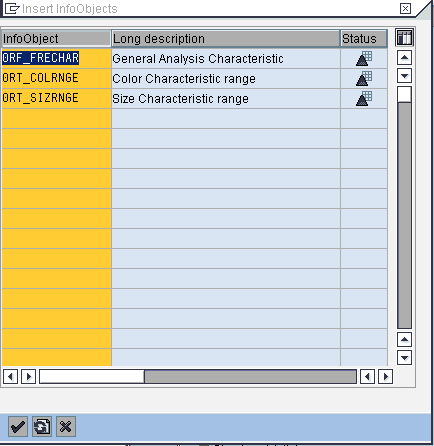
Figure 13
A comparison of attributes of 0material with the ones added to the key fields of the DSO
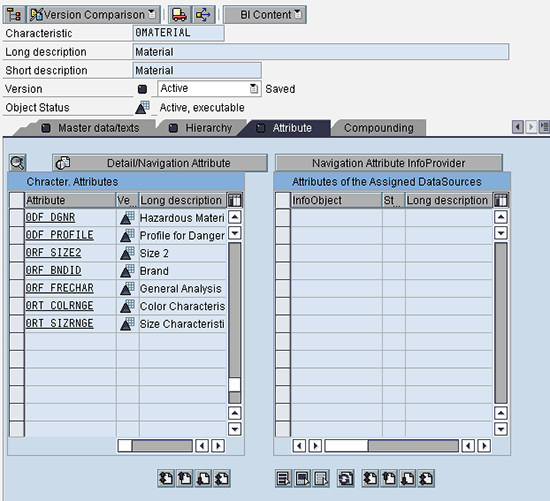
Figure 14
The last 0material attribute 0RT_SIZRNGE is same as the one in the DSO shown in Figure 13
Figure 14 shows the reference to the InfoObjects when you scroll down with the scroll bar shown in Figure 11. Figure 15 is the result after all the above processes are completed and the copying of the InfoObjects from 0material is done. In Figure 16, click the copy option from the context menu on the screen and select it.
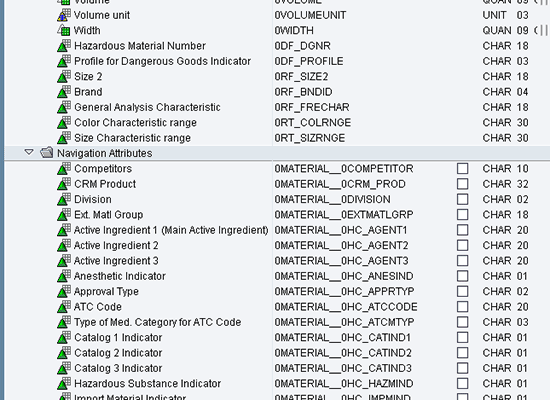
Figure 15
A completed DSO with all the attributes of master data 0material
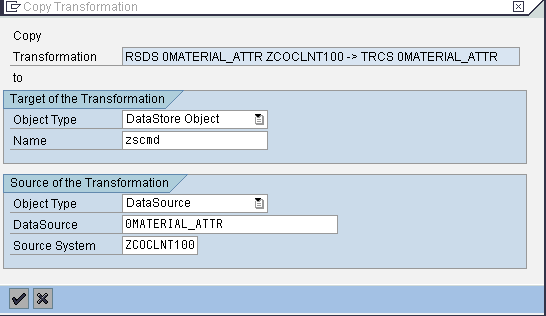
Figure 16
Copy the transformation of the 0material to the new DSO
Click the check mark, which brings you to the next screen (Figure 17). Click the activate icon  (not showing on screen).
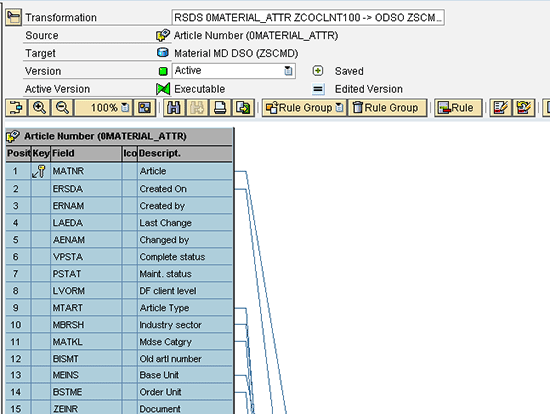
Figure 17
An activated transformation
Close the screen Figure 17, which brings you to the screen in Figure 18. You can select either a delta or a full load based on your requirements from the 0material DataSource. Right-click the Data Transfer Processes button in Figure 18 to go to Figure 19. Click the check mark.

Figure 18
The 0material DTP screen
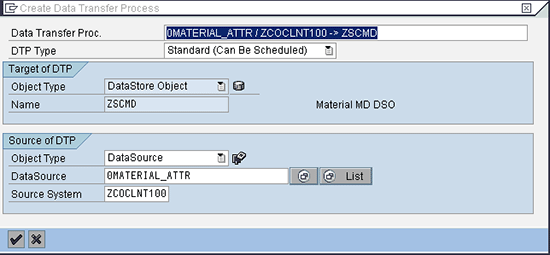
Figure 19
The DTP screen
Select either the delta or full extraction option from the drop-down menu in the Extraction Mode field in Figure 20. In my example, the field has Delta in the current selection.
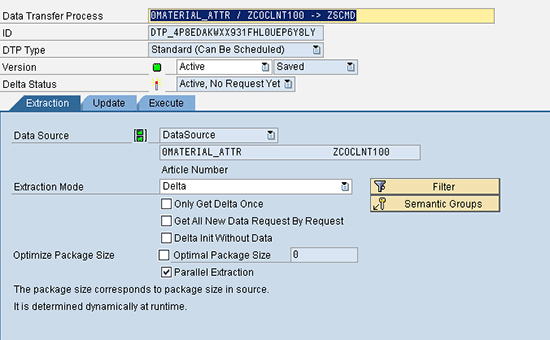
Figure 20
Select the extraction mode
The final data flow looks like what you see in Figure 21, which shows the data flow from the DataSource to the DSO. You can create a similar transformation between the DSO and 0material to move the data loads from the DSO.

Figure 21
The data flow of the newly created DSO
Manohar Poorsala
Manohar Poosarla is an SAP BI lead consultant working for Accenture in Bangalore, India. He has extensive cross-functional experience and has worked on different SAP GFT, roll-off, and support projects. His experience includes technical leadership of SAP BI-BW projects, end users’ interactions for requirements gathering and analysis, translation of user requirements into technical specifications, designing of logical data models, source data capturing mechanisms, data integrity procedures, and overall data warehouse implementation strategies.
If you have comments about this article or would like to submit and article idea, please contact the BI editor.
You may contact the author at pmanohar555@gmail.com.
If you have comments about this article or publication, or would like to submit an article idea, please contact the editor.




 Premium