Standard business object types allow you to build workflows based on their functionality. However, you might encounter situations in which the available functionality of the objects does not fit your organization’s needs. Learn how business object types can be enhanced in SAP CRM 7.0 to support your specific business requirements for automated SAP Business Workflow processes.
Key Concept
SAP Business Workflow supports and automates your business processes. Workflows are based on business object types from the Business Object Repository. In the steps of a workflow, you can define how these underlying objects are processed. You can alter business object types to fit your particular needs without modifying the SAP-standard object types.
Many business process requirements are specific to your company needs. This is especially the case when it comes to automated business processes implemented using SAP Business Workflow. One example is a simple release or approval procedure that requires the involvement of one or several users. This is a common scenario in sales processes. A sales representative is ready to release a sales order but requires an approval for this step. The person responsible for the approval should be automatically determined based on the setup of your sales organization. Furthermore, the workflow task should be assigned automatically to this person and the person should be notified.
In this example, the procedure depends on your internal processes (when to initiate the process) and sales organization (who is responsible). It likely requires additional functionality that is not delivered out-of-the-box with SAP CRM. A prerequisite for modeling such a workflow procedure is that the missing functionality is added. This can be done by enhancing the underlying business object type in the Business Object Repository (BOR).
I will provide a summary of the steps needed to enhance a business object type with the goal of using it in your own workflows. I will also discuss adding new methods and new events. ABAP skills are required to implement new methods in a business object. A good understanding of SAP CRM data structure is also very helpful. Note that this article applies to SAP CRM 7.0.
I will cover how to do the following:
- Create a new business object type as a sub-type of a standard object type
- Delegate the standard object type to sub-type
- Add events to the new object type
- Add methods to the new object type
In addition, I will provide an example of a method implementation (see the sidebar “Example of a Method Implementation”) and discuss the final steps to complete the process.
Create a New Business Object Type as a Sub-Type of a Standard Object Type
First, you need to identify the relevant SAP business object and prepare it for the enhancements. You can create, review, and change business objects using transaction SWO1 (the business object builder). However, none of the business objects delivered by SAP should be changed because this would change the functionality. Instead, you should create a sub-type of the existing business objects. As a sub-type, a business object inherits all the functionality of the original business object.
For my example, I enhanced the SAP CRM sales transaction object type BUS2000115. To create a sub-type, go to transaction SWO1 and enter the original object type in the Object/Interface Type field. Then, click the Subtype button (highlighted in Figure 1). A pop-up screen similar to the one in Figure 1 appears. You must fill in all the fields in this screen. An example of the details I entered is shown in Figure 1 for object type ZOT2000115.

Figure 1
Pop-up screen with the required data to create a sub-type of the object type BUS2000115
Delegate the Standard Object Type to Sub-Type
After the sub-type is successfully created, the original business object needs to be delegated to ensure that all SAP CRM sales transactions are based on the business object type ZOT2000115 instead of BUS2000115.
The delegation of an object type is global and unique. Therefore, the same object type cannot be delegated twice and there cannot be multiple levels of delegation. A delegation takes effect immediately. For existing sales transactions, the business object type is evaluated at runtime for all business object type-specific functionality. As a result, the new business object type is used once the delegation has been defined. However, as long as none of the inherited components (e.g., events or methods) are changed, there is no effect on existing sales transactions. If any of the inherited components need to be redefined, you must first carefully evaluate the potential effect on the previously implemented business scenario.
Access the maintenance dialog for the delegation from the initial screen of transaction SWO1. Follow menu path Settings > Delegate to open the Customizing Object Types view. You can see an overview screen where all the existing delegations are shown in a list. To create a new entry, simply switch to change mode and click the New Entries button. You are asked to enter the original Object type, the responsible person, and the Delegation type (Figure 2).

Figure 2
Settings for the delegation of the business object type BUS2000115 to the sub-type ZOT2000115
With these settings in place, SAP CRM now always uses the new object type for sales transactions. However, no new functionality has been added yet. In the next section, I’ll cover how to enhance the business object. Note that all steps are performed in the change mode of transaction SWO1 for the new object type ZOT2000115.
Add Events to the New Object Type
Business object type events are used within the SAP business workflow to either initiate the workflow or to communicate information to a workflow that is registered to an event in a wait step. A wait step is assigned to one specific event of a business object. In this step, the workflow waits until the event is raised before it continues.
All inherited events are grouped in the Events branch of the business object ZOT2000115 (Figure 3). To create a new event, you can either right-click the Events branch and select Create, or set the cursor on the Events and click the Create button. With either option, a pop-up screen displays and allows you to specify the technical name of the event, a more general name, and a description. For example, I created a new event called TriggerMyWorkFlow.

Figure 3
First step of the creation of a new event
For each event input, you can define parameters. Access the parameter maintenance by selecting the new event and clicking the Parameters button or by right-clicking the event and selecting Parameters. You are presented with a list of all previously defined parameters of the event, if there are any.
The Create button gives you the option to create new parameters. When creating a new event, the system asks if you want to “Create with ABAP Dictionary field proposals?” This means that you can select a field of an existing ABAP dictionary structure as a reference. All the information in this field is copied automatically to the event data. If you choose no, you must enter the details manually.
An example of a manually specified parameter that represents a business partner ID is shown in Figure 4. If the Multiline check box is selected, the parameter is created as a table of the selected data type. Instead of selecting an ABAP dictionary reference, you can also define a parameter as a business object. For the example of a business partner, this is object type BUS1006.

Figure 4
Details of a manual event parameter definition
Add Methods to the New Object Type
You can call a method of a business object directly with a task step in a workflow. By adding new methods to a business object, new functionality is provided for use in workflows. Essentially, a new method is added in the same way as a new event (except that methods are grouped in the Methods branch).
In this case, the business object builder does not ask for an ABAP Dictionary type reference, but for a function module instead: you see a message reading “Create with function module as template.” If you are aware of an existing function module that provides the functionality you are looking for, you can specify it. In all other cases, you have to specify the details yourself (similar to the steps in the event creation). In addition, the method has to be classified as synchronous or asynchronous and as a dialog method or not a dialog method. The synchronous flag indicates that the method is executed synchronously by the workflow. If you plan to use the method in a workflow that runs in the background, make sure that the Dialog check box is not selected.
Note
There are several other settings, such as the result parameter and result type, that won’t be discussed here. These settings are not required for enhancing a business object with the purpose of using it in a workflow. A detailed discussion of all possible settings is beyond the scope of this article.
A method can also have import and export parameters, and these parameters can be classified as mandatory or not mandatory. The parameter definition for methods is similar to the definition for events.
Once the method and parameters have been created, you need to implement the business logic. To do so, select the newly created method and click the Program button. The business object builder asks you if a template implementation should be generated (Figure 5). Click Yes. This is helpful because all the import and export statements for the parameters are generated automatically.

Figure 5
First step of the implementation of a new method in a business object
After the template has been generated, you have to add your specific business logic as ABAP coding in the method. I describe the ABAP logic in the sidebar, “Example of a Method Implementation.”
Tip!
At runtime, the workflow is executed by the workflow user in the background. This makes error analysis complicated. An easy way to debug a workflow at runtime is to add an infinite loop in the coding of the business object methods, which can be accessed from transaction SM66 (global work process overview) in debugging mode. A convenient way to switch debugging on and off is to base the infinite loop on a user parameter.
Final Steps to Complete the Process
The status of each new event and new method needs to be set to implemented. In Figure 6, you can see a small icon next to the new method FindRespEmployee that indicates this hasn’t happened yet.

Figure 6
Menu path to change the status of an object type component
You can perform the status change by following menu path Edit > Change Release Status > Object Type Component > To implemented (Figure 6). This step only needs to be performed once for each event and method. The status of the object type needs to be changed to implemented as well, and you can do this by following menu path Edit > Change Release Status > Object Type > To implemented.
Example of a Method Implementation
I’ll outline how to structure the ABAP logic in this section. I cover standard SAP function modules, the order in which they are used, and the most important import parameters for each of the function modules. However, this section does not explain the ABAP logic line by line. To complete the implementation of the business object method, ABAP programming skills are required for the definition of local variables and to connect the four different blocks with each other.
A common requirement for a workflow procedure is to determine a responsible employee or manager based on the SAP CRM organizational model. An example of an organizational structure with several levels, positions, and manager positions can be seen in Figure A. You can easily implement such a requirement using ABAP logic within a new method in the business object. I’ll show you an example of how this might look. Note that this example only looks for employees assigned to the manager position in the organizational model.
The ABAP logic that I describe is structured into four blocks:
- Identification of the organizational unit to which the processor of the transaction is assigned in the SAP CRM organizational model
- Identification of the organizational unit to which the responsible person is assigned on the same or a higher level of the organizational structure
- Identification of the manager position that is assigned to the organizational unit determined in the previous step
- Identification of the business partner assigned to the manager position
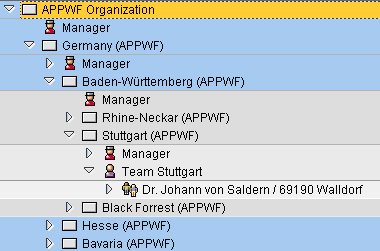
Figure A
Example of an organizational model in SAP CRM spanning several levels
The information to start with is the employee for whom the responsible person should be identified. This is the import data with which you start your ABAP logic. The first step is to obtain the organizational unit of this employee. In
Figure A, this is the organizational unit called Stuttgart (APPWF).
SAP provides a function module that you can use to evaluate the organizational structure called RH_STRUC_GET. The import parameter values that are necessary to use the function module in this case are the object type BP (the business partner), the object ID (the business partner number of the business partner [BP] assigned to the Team Stuttgart position in Figure A), and the evaluation path. The definition of all evaluation paths can be seen in transaction OOAW. An evaluation path that returns the organizational units of a user or business partner is US-BP-OO. Note that because the definition of the evaluation paths in transaction OOAW is not easily comprehensible, you can use transaction PPST to test all parameters for their effects on the function module RH_STRUC_GET.
A good way to restrict the result list is to specify the value of the technical depth of the structure. The value 3 returns only the organizational unit that the business partner is assigned to. After implementing the function call as described above, your ABAP logic will return the information of the organizational unit to the employee that is assigned.
Once the organizational unit of the employee has been identified, the next step in the ABAP logic is to identify the organizational unit of the manager. This depends on which manager you want to identify. It can be the manager assigned to the corresponding position of the same organizational unit, the manager of the next higher level in the organizational unit, or a manager of an even higher level.
In general, a best practice is to identify the next higher organizational unit with the same function module as before (RH_STRUC_GET). This time the import parameters are different. The organizational unit identified in the previous step is the input for the object ID parameter. The value for the object type parameter is O, an organizational unit. The evaluation path parameter is also different because this time the connection between two organizational units must be evaluated.
For example, you can use the evaluation path O-O. An example for the ABAP coding for this step can be seen in Figure B. If you need to access one of the next higher levels in the organizational model instead, you can simply implement your ABAP logic so the step described in this paragraph is repeated again. You have to repeatedly call the function module as many times as the number of levels in the organizational structure hierarchy that you want to move up.
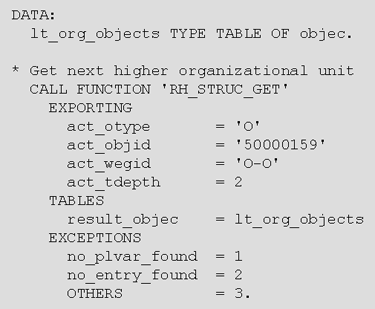
Figure B
Use of function module RH_STRUC_GET to get the next organizational unit
Once the organizational unit of the manager has been identified by your ABAP logic, you need to retrieve the manager position assigned to the organizational unit and the business partner ID assigned to this position. You can use the function module RH_GET_LEADING_POSITION to get the manager position of an organizational unit. This is a very straightforward implementation of ABAP logic and describing it is beyond the scope of this article.
Finally, obtaining the business partner ID requires two additional steps. First, you must determine the central person assigned to the position. Once again, function module RH_STRUC_GET is well-suited for this task. The manager position returned by the previous step is the value of the input parameter for the object type and object ID. The value A008 for the evaluation path parameter gives you the central person assigned to the position. The second step is to call function module CRM_OBJECTBUPA_GETBUPA to see the business partner ID of the position. With the business partner ID, you can now access detailed business partner data and implement any additional steps in your ABAP logic that you might require.
Dr. Johann von Saldern
Dr. Johann von Saldern is a senior consultant with six years of SAP experience, specializing in SAP CRM (both functional and technical). Johann has worked on projects in Europe, the US, and Asia in many industries such as high tech, consumer products, financial services, and the public sector. His years of project experience have also found him taking on various roles in projects, spanning from project manager and team lead to system architect and technical/design lead. In these roles, he has designed and implemented complex SAP CRM-based solutions in the areas of marketing, sales, and service.
You may contact the author at johann.vonsaldern@ecenta.com.
If you have comments about this article or publication, or would like to submit an article idea, please contact the editor.