/GRC
Understand the core SAP QM Audit Management processes. The core transforms audit processes by structuring the way audits are performed companywide and by structuring the lists of questions for each type so that everyone grades by the same measurements. Review the key core processes within SAP QM Audit Management and see a demo of each of the steps showing the key screens and reports.
Key Concept
SAP QM Audit Management was originally developed for the SAP Customer Relationship Management (CRM) module and then adapted to SAP Supplier Relationship Management (SRM). It was later adapted in SAP ERP in release SAP ERP 4.7. There have since been two enhancement releases for more functionality in SAP ERP Central Component (ECC) 6.0 and enhancement package 4. By the time it was adapted into SAP ERP Quality Management (QM), the processes had already been well exercised in CRM and SRM.
Too many companies have loose audit processes and may even have different processes per plant or sub-organization. The actual audit types, audit questions, and audit process steps in most cases should be the same across the organization. SAP Quality Management (QM) Audit Management can provide companies with a platform for standardizing and simplifying audit processes.
You can break the audit process into four sub-processes (Figure 1):
- Master data setup/configuration
- Scheduling
- Audit processing
- Corrective action
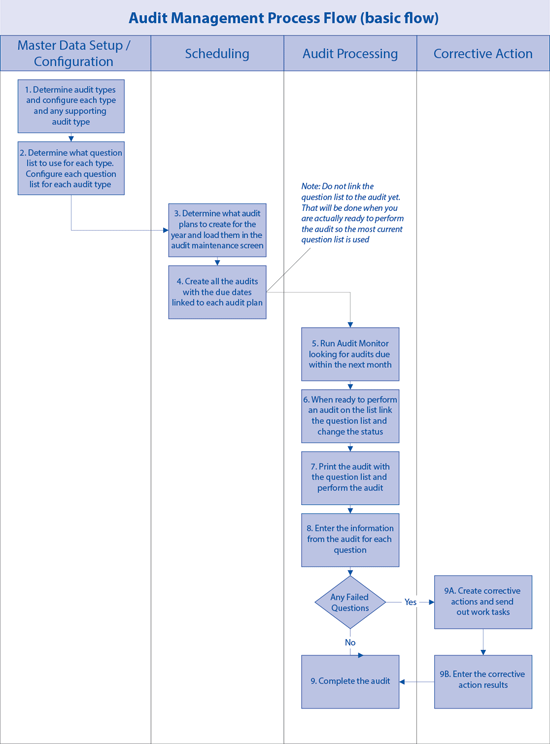
Figure 1
Audit management process flow
Master Data Setup/Configuration
To set up and configure master data, you need to complete two steps:
Step 1. Determine the audit types. The green boxes in Figure 2 are examples of audit types.
You need to assemble a team to look at all the audit types across the organization to determine what types need to be used. This list should then be
sent out to the organization with the justification for each type. If you plan to eliminate any audit types, you need to explain why. After the audit types
are agreed upon across the organization, you configure them in your SAP system.
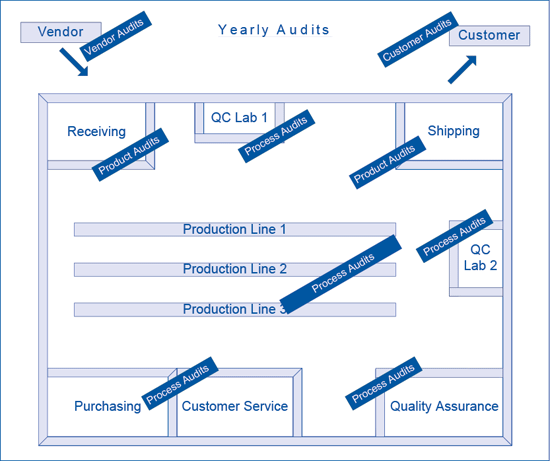
Figure 2
Examples of audits performed within an organization
Step 2. Determine question lists. Once all the audit types are determined, the job of developing standard question lists per audit type begins. These are
the questions asked along with any additional comments when the actual audit is performed. This process can take some time because often the actual audit question lists throughout an organization vary depending on location. In most cases there is no reason why an organization would use different questions lists for the same type of audits. However, standardizing each question list requires getting everyone to agree and convincing some to give up their specific questions.
The key is to assemble a small team to be in charge of standardizing each question list per type. This team assembles all the lists within the organization and looks at what needs to be included. The team then sends that list back to the organization to get approval for using it as a standard list. The first cut may have some feedback for adding or changing, but after a few rounds, the standard question lists are ready.
Note
If there are five audit types there should be five audit question lists. This model provides the most flexibility by audit type. This could lead to a further
breakout of audit types if the question lists do not fit cleanly, either because of having too many or too few questions per audit type. Once this process is
complete, if possible, have the organization implement the corporate questions lists in the legacy system so that when you implement SAP Audit Management users are already accustomed to the new lists.
Scheduling
Scheduling involves two more steps.
Step 3. Determine audit plans for the year. Audit plans are groupings to identify similar audits that need to be performed throughout the year. In most cases these groupings are already in place in the legacy system. Trying to standardize the audit plans throughout the organization requires some flexibility per facility, but the audit plans still need to be within the same general grouping. Here are some examples of groupings:
- Raw material
- Vendor audits
- Contract vendor audits
- Product audits
- Process audits
- Customer audits
The same team that assembled the audit question lists can also be assigned to standardizing the audit plans for an organization. The basic audit plan groupings should be the same across the organization. During the actual scheduling of audits, the grouping process starts to be plant specific because of the different materials, vendors, products, and processes.
Step 4. Link the actual audits with due dates to the audit plans. This linking requires looking throughout the year and deciding when specific audits need to be conducted. Next, enter the audit, audit name, due date, and person responsible into the audit maintenance screen. Do not attach the question list yet. Do that closer to the audit because the question list may change, and it's key to use the most current question list.
Figure 3 is an example of scheduling audits throughout the year. The example oversimplifies the process, but it shows the importance of developing an audit schedule for the year.

Figure 3
An example of scheduling audits throughout the year
Audit Processing
The audit processing section has five steps:
Step 5. Identify the audit that is due. The Audit Monitor is run ahead of time to see what audits are coming due. The Audit Monitor is a worklist used to manage audit processing such as audits that are due, persons assigned to the audit, or the progress of corrective actions. Review the list to ensure the audit dates are achievable for the time period.
Step 6. Pull in the audit question list that is specific to the audit. When you are getting close to conducting the audit, link the applicable question list to the audit. This is performed while inside the audit by selecting the Assign Question List function and then selecting the question list suitable for the audit type.
Step 7. Print the audit question list and perform the audit. If possible walk through the audit online entering the results, comments, and attachments. If that is not possible, then print out the audit with all the questions and boxes. In some cases the environment may not be suitable for entering the results, comments, and attachments online. Therefore, in those cases, you need to enter them on the printout and enter them into the
system later.
Step 8. Enter the results from the actual audit. If the results, comments, and attachments were entered online during the actual audit this step is already done. If not, enter the information from the printout into the online audit. Also, be sure to attach any documents or pictures that were taken during the audit. If there were any failed questions entered, you can create a corrective action to ensure the failed items are corrected before closing out the audit.
Step 9. Complete the audit. When all the questions have been entered and any corrective actions have been closed, the audit is complete and you can close it.
Corrective Actions
Steps 9A and 9B. If there were any failed questions while entering the audit results, you have the option of opening corrective actions —
either at a general level just to note them or on a detailed level that then requires you to take an action, follow up, and close it. The detailed corrective
actions are managed using the Audit Monitor. You select the Corrective Actions button and user ID of the person looking for actions assigned to them.
Demo: Audit Management
Following is a demo of each of the audit management processes with actual SAP QM Audit Management screens. Other key settings are available, but in this demonstration, I focus on core processes.
Master Data Setup/Configuration
Step 1. Determine audit types. Look at all the audits that are conducted throughout the organization and choose which ones should be done. At that point you are able to decide which ones to set up.
I recommend that once the audit types are determined that you create Z versions (in Figure 4 see examples Z1 and Z2) of the audit types so that you can clearly define which ones are being used. You can then customize the needed settings. To create a new audit type follow
configuration menu path Cross-Application > Audit Management > Audit Definition > Audit Type. Enter the new Audit Types specific to your
requirements.
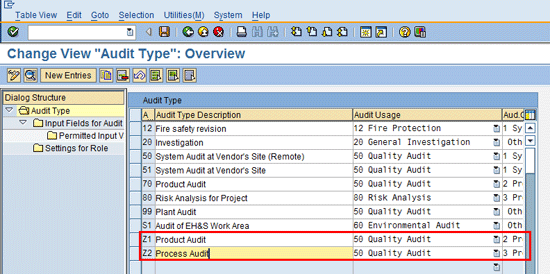
Figure 4
Audit type configuration screen
Step 2. Develop Audit Question Lists. Follow menu path Logistics > Quality Management > Audit Management > PLMD_AUDIT. Select the Question List option and double-click it (Figure 5). Next, enter the Question List Header information (Figure 6). After you enter the question list, you can start to assign questions. Right-click the Vendor Audit Question List and then click Create and Question from the pop-up dialog box (Figure 7). Now enter the Question details (Figure 8).
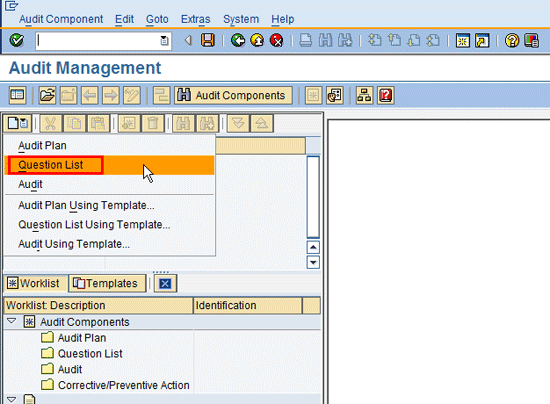
Figure 5
Select the Question List option
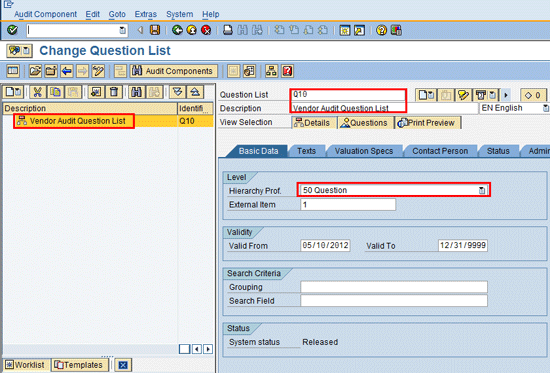
Figure 6
Enter the Question List header information
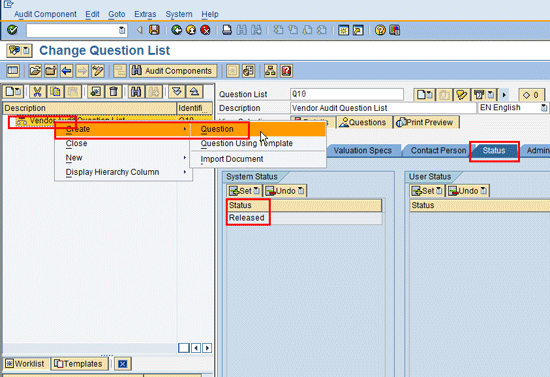
Figure 7
Create the Question option
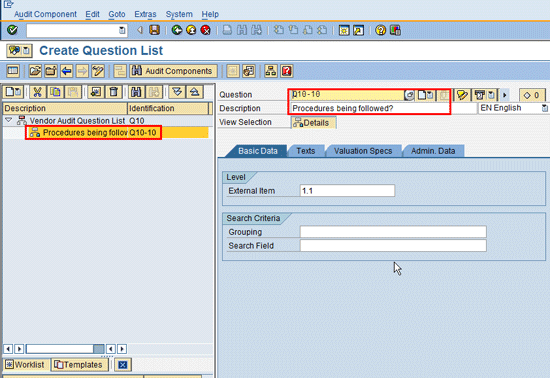
Figure 8
Add question details
Scheduling
Step 3. Determine audit plans for the year and enter them into the audit maintenance screen. Follow menu path Logistics > Quality Management > Audit Management > PLMD_AUDIT. Select the Audit Plan option (Figure 9). Next, enter the Audit Plan Header information (Figure 10). Figure 11 shows examples of multiple audit plans.

Figure 9
Select the Audit Plan option

Figure 10
The audit plan detail screen
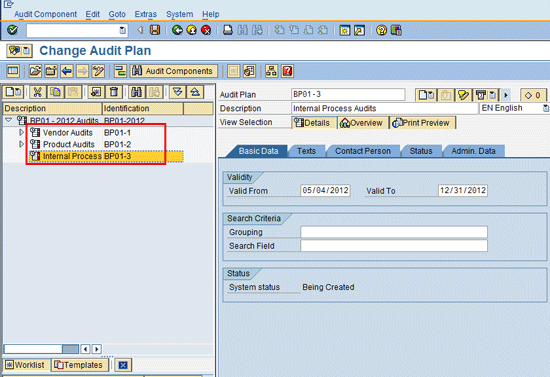
Figure 11
An example of multiple audit plans
Step 4. Link the actual audits with due dates to the audit plans. Enter them into the audit maintenance screen. You also need to know the planned start dates so that there is a schedule to manage for the year. Follow menu path Logistics > Quality Management > Audit Management > PLMD_AUDIT. Select the Audit option by right-clicking the Audit Plan and double-clicking Audit (Figure 12). Enter the Audit detail information (Figure 13). Note at this point you do not link the Questions List to the audit. You do this when you are ready to do the actual audit so that you get the most current question list.
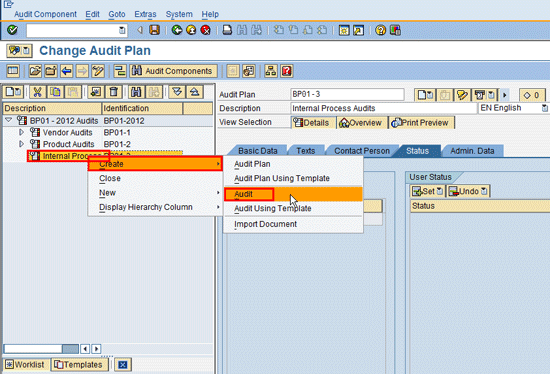
Figure 12
Select the Audit option
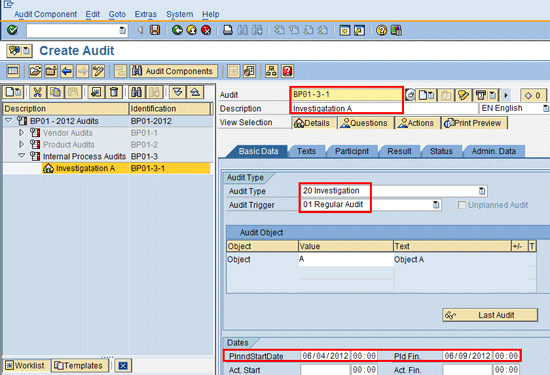
Figure 13
The audit detail screen
Audit Processing
Step 5. Identify the audits that are due. After linking the audits to the audit plans, you monitor what audits are becoming due to prepare for them. Follow menu path Logistics > Quality Management > Audit Management > PLMD_AUDITMONITOR. Select the Audits button, To Be Processed button, and Detailed Search button. Enter the From and To Date range for audits you wish to see due (Figure 14). Click the
execute icon to display the Audits due. Highlight the audit you wish to work on and then select the Audit Component button to go into the audit (Figure 15).
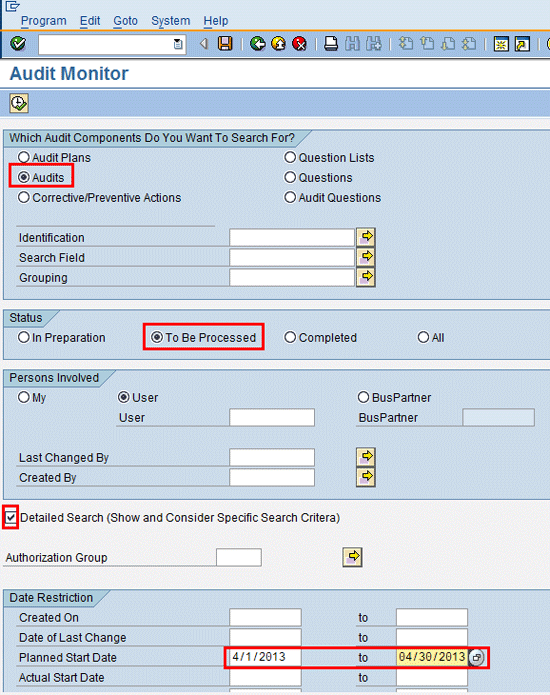
Figure 14
The Audit Monitor selection screen
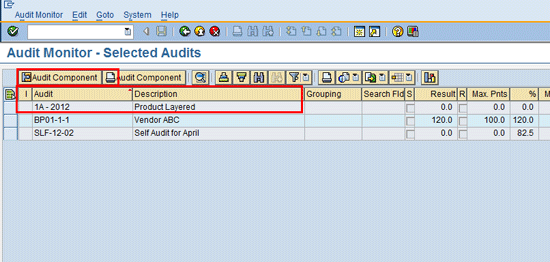
Figure 15
The Audit Monitor selection list
Step 6. Pull in the audit question list specific to the audit. For each audit that is due pull in the most current question list. Highlight the Audit and then select the Create > Assign Question List option (Figure 16). Next, use the question list search screen to pull in the correct question list (Figure 17) and select the question list for the audit (Figure 18). Figure 19 shows the question list with the questions underneath.
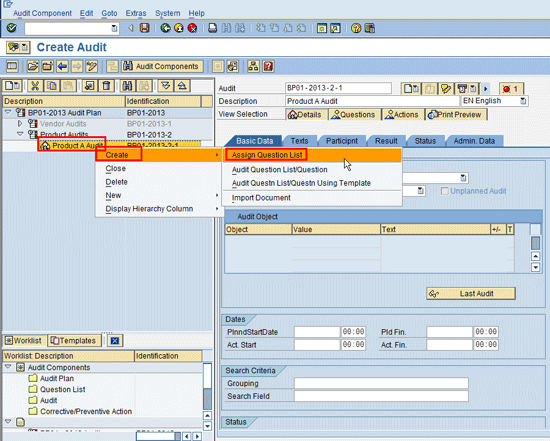
Figure 16
Select the Assign Question List option
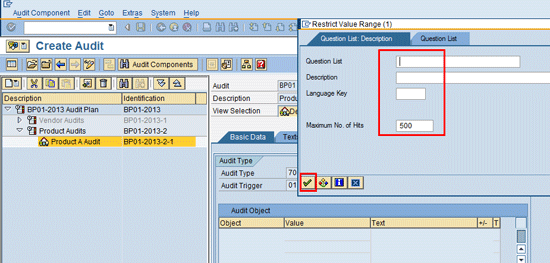
Figure 17
The Question List search screen
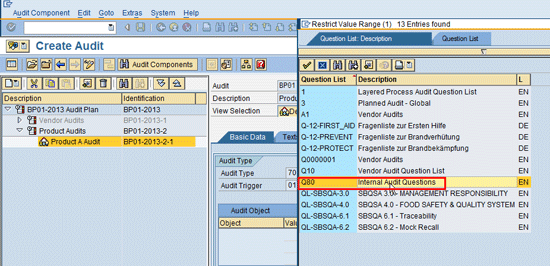
Figure 18
Question Lilst search results
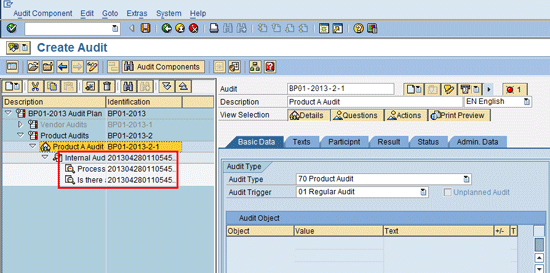
Figure 19
An example of questions linked to the Question List
Step 7. Print the audit question list and perform the audit. Once the question list is linked to the audit, you may want to print the audit form to fill out during the audit. Note: If possible it is best to enter information directly into the SAP Audit screens while conducting the audit to ensure it is entered correctly, but if that is not possible, then the hard copy is the next best option. Highlight the audit and then click the Print Preview button to ensure it is OK. Now click the print icon (Figure 20).

Figure 20
An audit printout
Step 8. Enter the results from the actual audit with comments, any attachments, and a valuation proposal for each item. The valuation proposal translates into a score for each item and then an overall score for the audit. Follow menu path Logistics > Quality Management > Audit Management > PLMD_AUDITMONITOR (Figure 21).
Select the Audits button and the To Be Processed button. Enter data in the BusPartner ID and Planned Start Date fields. Click the execute icon to retrieve your audits for the week (Figure 21). Next, highlight the line for the audit you are working on and click the Audit Component button (Figure 22). In the next screen, enter a rating for each audit question in the fields under the Valuation Proposal column (Figure 23). (The valuation proposal ratings can be defaulted to the desired answer and then you need to change it only if there is an exception.) When all the questions (valuation proposals) are entered, click the Valuate Audit tab to receive an overall audit score (Figure 24).
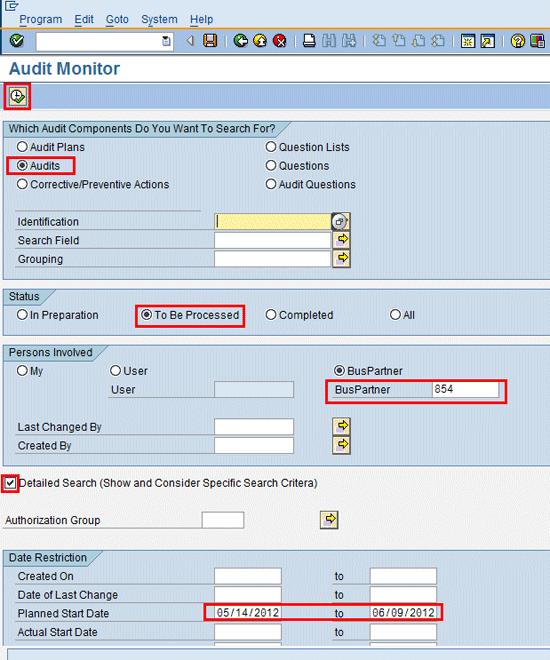
Figure 21
The Audit Monitor selection screen
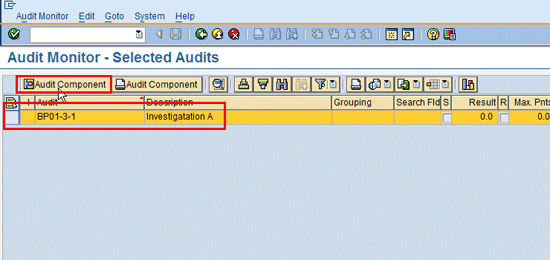
Figure 22
The Audit Monitor selection list
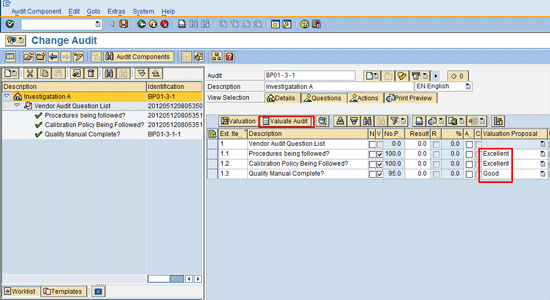
Figure 23
The Audit Results entry screen
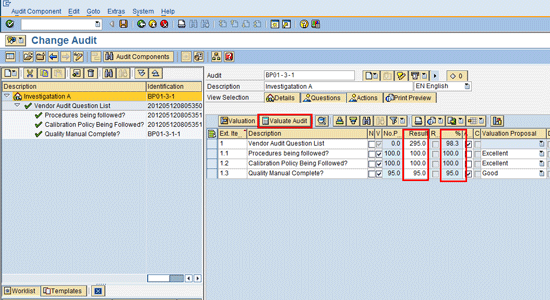
Figure 24
An audit score
Step 9. Complete the audit. At this point all the questions have been valuated and any corrective or preventive actions have been closed out. Now the audit is ready for a final report and sign-off signature. This is not a digital signature. You just click the Signature tab, which sets a status. Then you set the audit status to closed so that it no longer appears on the Audit Monitor as open.
Highlight the audit line and then click the Details button (Figure 25). Next, click the Create Report button to review the final report (Figure 26). A message asks if you want to print the report. Click the Yes button (Figure 27). Review the report. If everything is OK click the Signature button for final approval (Figure 28). In the next screen, click the Status tab and set the audit status to Complete (Figure 29).
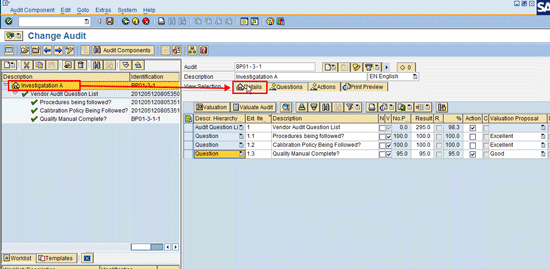
Figure 25
Audit details selection
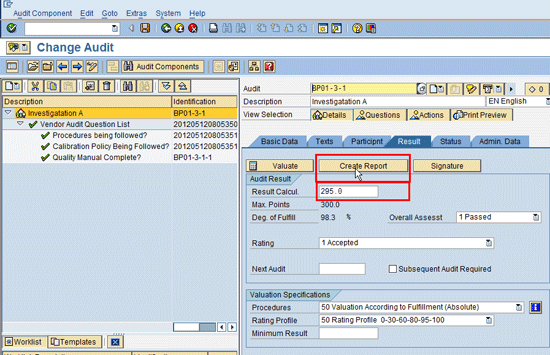
Figure 26
Print final audit report option
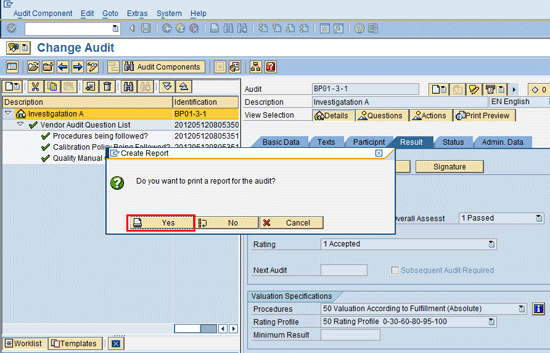
Figure 27
Audit prompt to print
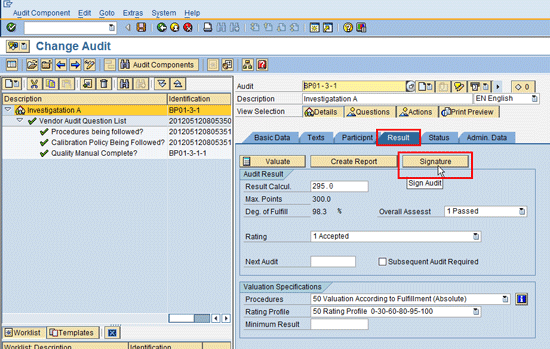
Figure 28
Signature approval selection
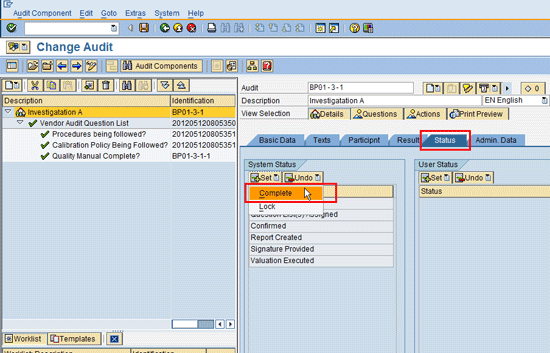
Figure 29
The audit status
Corrective Actions
Step 9A. Now you create corrective actions. If any of the results failed when you were recording the audit results, you can enter a general failure or you can open a corrective action with further processing. Follow menu path Logistics > Quality Management > Audit Management > PLMD_AUDIT.
Highlight the question that failed and click the Valuation button (Figure 30). Next, either enter a general comment about the failure or open a corrective action by clicking the Corrective and Preventive Action button (Figure 31). In the next screen enter a description of the problem and the required due date for the correction (Figure 32). Click the Texts tab to enter any instructions (Figure 33). Click the Contact Persons tab to enter who is responsible for the correction (Figure 34). Click the Status tab to ensure that the status is set to Outstanding (Figure 35).
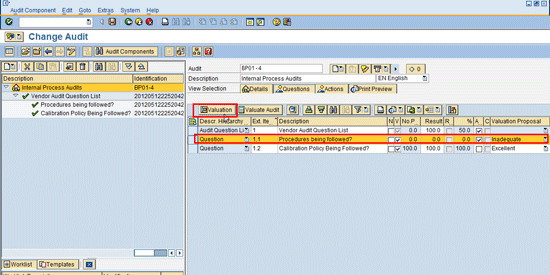
Figure 30
Select the line needing corrective action
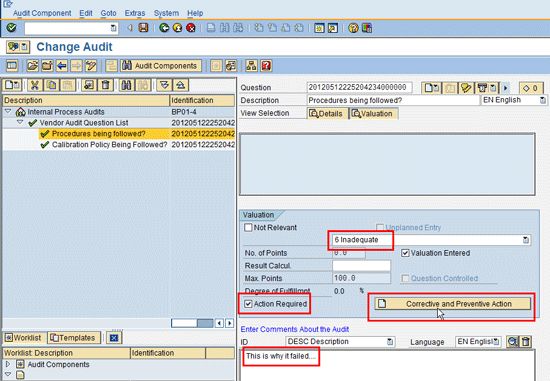
Figure 31
The corrective action overview screen
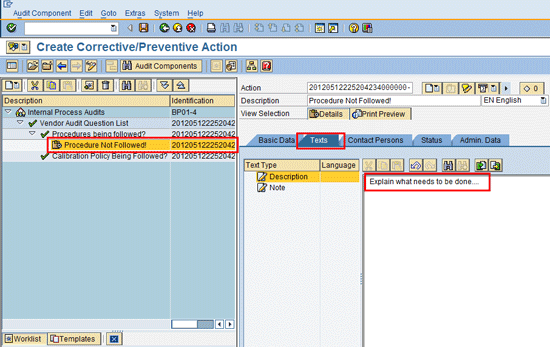
Figure 33
The corrective action comment screen

Figure 34
The corrective action assignment screen
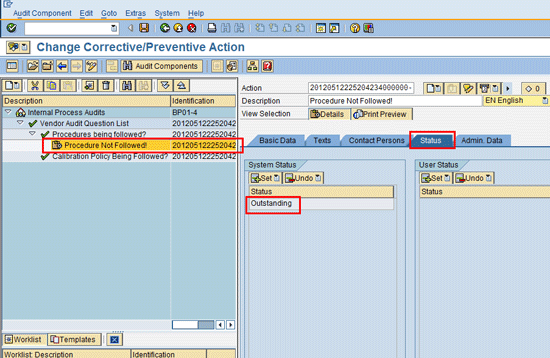
Figure 35
The corrective action status screen
Step 9B. If a corrective or preventive action was triggered, the person assigned needs to enter the findings and correction actions that were performed to ensure that the failure is corrected. The item is then closed out. Follow menu path Logistics > Quality Management > Audit Management > PLMD_AUDITMONITOR.
Select the Corrective/Preventive Actions button and the To Be Processed button. Enter the number of the business partner assigned to the corrective action in the BusPartner field. Click the execute icon (Figure 36). The corrective actions that are due are displayed. Highlight the line you wish to work on and then click the Audit Component button to go into the item (Figure 37). Once in the item enter any notes about the corrective or preventive actions that were performed (Figure 38). Click the Status tab and select the Confirm status to let the auditor know the corrective action is done (Figure 39). The auditor then reviews it, and if it is approved, sets the status to Completed (Figure 40). (Note: The auditor completes this last step, but to show where it is set, I include
it here.)
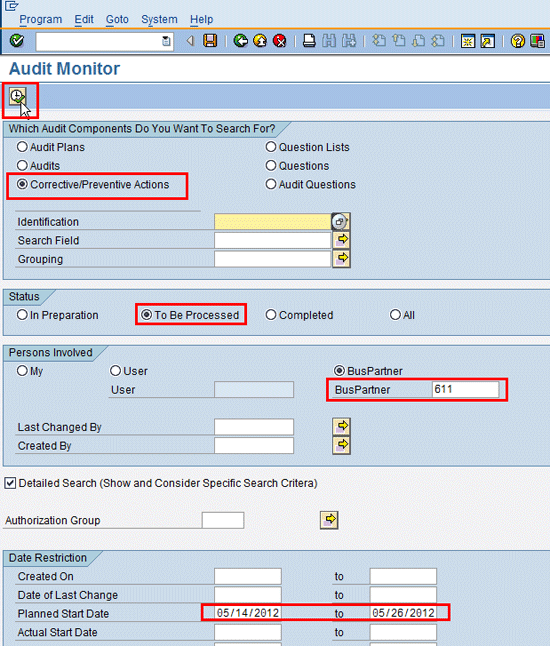
Figure 36
The Audit Monitor selection screen
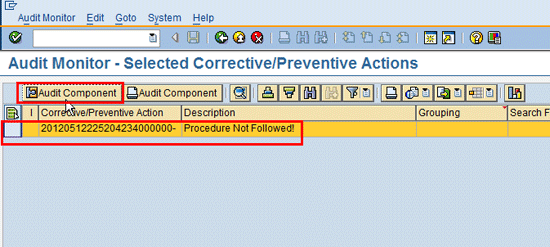
Figure 37
The corrective action selection screen
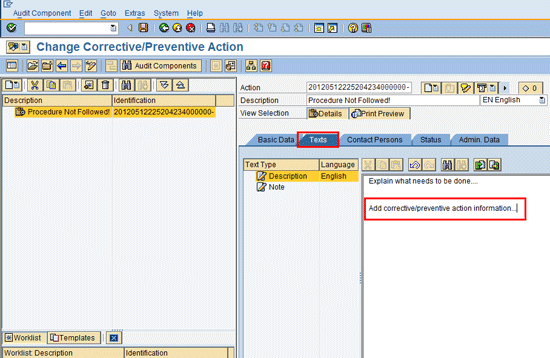
Figure 38
The corrective action comment screen
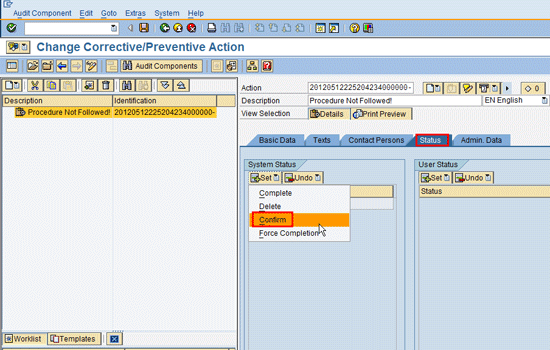
Figure 39
The corrective action status screen
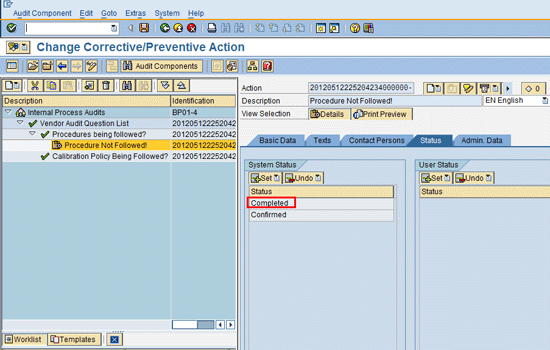
Figure 40
Status set to completed
Doug TenBrock, Sr.
Doug TenBrock is a senior SAP QM consultant with QMS Inc. He has been delivering successful SAP QM and Materials Management (MM) implementations since 1996.
You may contact the author at dtenbrock@qmsinc.com.
If you have comments about this article or publication, or would like to submit an article idea, please contact the editor.