Follow these simple instructions to report on your custom hierarchical matrix.
Key Concept
An InfoSet is the backbone to all queries you run through SAP Query and InfoSet Query. It is a collection of field groups with combined data fields that make up the reportable data set. Think of it as an Access database that you would use to query tables. Any time you add a custom object in your SAP system, you have to add those objects to your InfoSets as an additional field so they are reportable for your users.
To report off your organizational structure, you might choose to use Organizational Management (OM). However, custom objects that you set up in OM will not be available in your predefined logical databases. You can establish relationships using custom objects (object types that don’t come standard within SAP) for functional areas to build a company-wide hierarchical matrix. Once you’ve built this matrix (which I explained in “Build a Reporting Hierarchy for Your Org Structure Using Custom Objects” in the HR hub of SAPExperts), you must add those objects to your InfoSets so they are reportable in InfoSet Query and SAP Query.
To add these objects, you need to have the proper authorization to add basic code to your InfoSets. Some companies only let their IT groups make this type of change and others allow their functional analysts to do this.
InfoSet Details
Typically most people use a predefined logical database as their data source when defining an InfoSet. The standard logical databases that are delivered with SAP HR are PNP, PNPCE, PCH, and PAP. These databases contain only standard SAP fields so any time you add a custom object you must manually add these objects to your InfoSets if you want them to be available to your users for reporting. These additional fields are typically referred to as Extras within your InfoSets because they do not exist in your data source, your logical database.
Figure 1 shows a sample InfoSet for employee data that I built from a logical database. The left panel contains all infotypes (tables) available within the standard delivered PNPCE logical database, also referred to as data fields. The right panel contains all of the field groups that are available for users to report on. When users create queries they only have these fields available to choose from. If you do not want users to access a particular field, you should make sure that the field does not exist in any of the field groups.
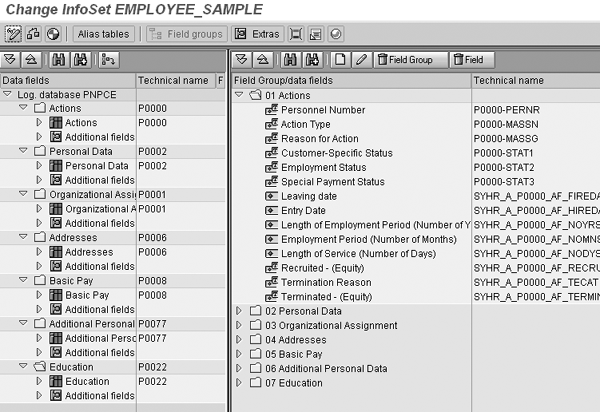
Figure 1
Example of a general employee data InfoSet
If you followed the instructions from part 1, then you should have added your 9F Group, 9K Unit, and 9L Division objects, created all necessary relationships to build your hierarchy matrix, and assigned those objects to org units. Next, you add those objects to your InfoSets, making them reportable objects.
Step 1. Create additional fields in your InfoSet for each of your objects: Group, Unit, and Division. Add extras to InfoSets by going to the InfoSet initial screen, transaction SQ02. Figure 2 shows the InfoSet: Initial Screen where I chose the EMPLOYEE_SAMPLE InfoSet to add these objects. Click on the Change button to go to the InfoSet maintenance window.

Figure 2
Choose the EMPLOYEE_SAMPLE InfoSet
In this step, set up two additional fields for each object, one to contain the object ID itself and the second to store the text for that ID. This helps improve runtime on your queries. To accomplish this, use the sequencing functionality.
To begin, select the InfoSet to which you are adding these objects, and then click on the Change button. This takes you to the maintenance mode for that InfoSet. At the Change InfoSet main screen, select the data field group folder to which you are adding the field. Then click on the Extras tab to retrieve a list of extras that already exists in that InfoSet. Figure 3 shows a list of extras that exists in my EMPLOYEE_SAMPLE InfoSet under the Organizational Assignment field group. I’ll add additional fields here.

Figure 3
Extras in the Organizational Assignment field group
All InfoSets that you have built from a logical database have standard extras that are defaulted for InfoSets. The extras shown in Figure 3 are defaulted for this InfoSet.
Click on the Create icon in the Extras tab in Figure 3. This brings up the Create Additional Information pop-up screen in Figure 4 where you define the field to add. Let’s first set up the additional field for the 9L division object ID, and then the additional field to capture the name of that division. Enter technical name z_DivID into the Name field. The technical name is what you refer to when you add code to these fields. You can choose any name you want. Select the Additional field button to add this field to your InfoSet. Then, click on the continue  icon.
icon.
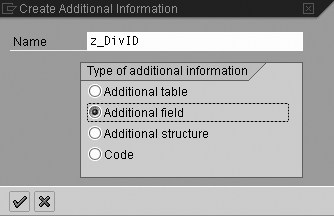
Figure 4
Create the z_DivID field
Next, define the parameters for your additional field. Field parameters specify information about the field, such as data type and length. Table 1 provides a list of parameters with meanings.
| Long text |
Sequence of code |
| Header |
Header that is displayed on reports |
| Format type |
Field type, such as character and numeric |
| Format length |
Length of the field |
| Output length |
Length of the field that is displayed on reports |
| Like reference |
Used to reference a field similar to the one you’re creating. All formats of this field apply. |
| Sequence of code |
Sequence in which the field code should be executed |
|
| Table 1 |
Field parameters and meanings |
In Figure 5, I’ve assigned parameters to the Division ID field. I have chosen to use the LIKE Reference of HRP1000-OBJID because this field should have the same format as the OBJID field in table HRP1000, meaning the type, length, and output length are formatted exactly the same as the division ID. Entering the LIKE Reference automatically defaults that information for you. The object ID value comes directly from this table. The code sequence of 1 means no other field has to be determined before you can get the value of the Division ID.
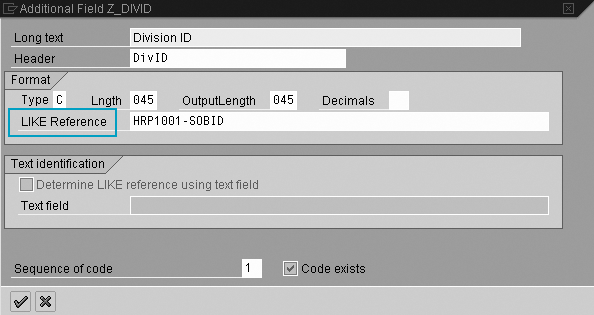
Figure 5
Parameter values for Division ID
Step 2. Add code to the additional field. The code is the source for retrieving the data back in your field. In the Extras maintenance window, select the additional field you have added, and then click on the coding for addition  icon shown in Figure 6.
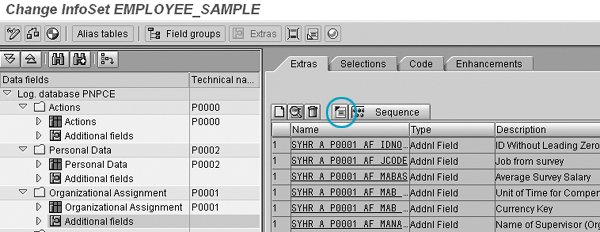
Figure 6
Add code behind your field
The code maintenance screen displays where you enter all pertinent code necessary to retrieve the value for the 9L Division ID field. For this field, take the org ID from infotype 0001 (P0001-ORGEH) and get the Division ID that relates to that org unit. Refer to Figure 7 for code to do this.
Note
P0001-ORGEH is the technical name for the org ID in the organizational assignment table PA0001 for a specific team member. This field is also already part of the organizational assignment data field group.
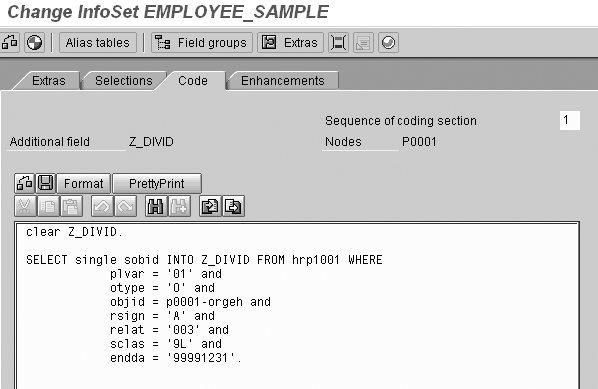
Figure 7
Code for Division ID
Check your code for errors by clicking on the check coding  icon in your coding screen. If your system finds any errors, it displays them in the Error message tab at the bottom of your coding window. If your code has no errors, then click on the save icon.
Next, you add an additional field that stores the name of the division. Follow the same instructions to add the additional field, using the technical name Z_DIV_NAME. At the parameters screen, use HRP1001- STEXT as your LIKE Reference because this is the field in the HRP1000 table that stores the object text. Figure 8 shows the parameters to assign for Division Name.
Tip!
Remember, if you choose to leave the LIKE Reference field blank you need to provide the formats of your field (type, length, output length). Entering the LIKE Reference automatically defaults that information for you.

Figure 8
Parameters for the Division Name field
Notice this field uses a Sequence of code of 2. This means there is a predecessor field that you must calculate before you can determine the Division Name. In this case, the Division ID must exist first.
Next, add code to the Division Name field to return that value. Refer to Figure 9 for code that accomplishes this. During this stage of processing, use the Division ID field (z_DivID from Figure 4) to return the name of that object from HRP1000.
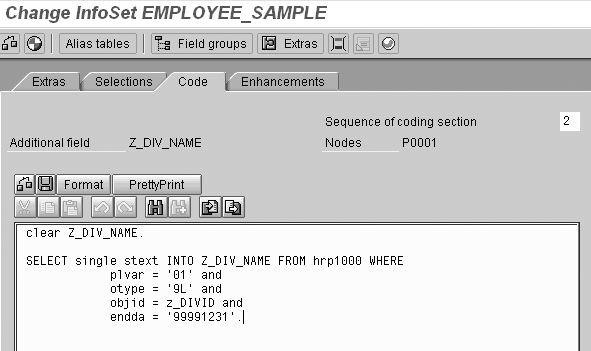
Figure 9
Code for division name
Continue setting up the remaining additional fields: Unit ID, Unit Name, Group ID, and Group Name. Refer to Figures 10 through 13 for a complete list of parameter values and code that you can use for these remaining fields.
| Z_UNITID |
Unit ID |
HRP1001-SOBID |
2: Dependent upon division ID |
clear Z_UNITID.
SELECT single sobid INTO Z_UNITID FROM hrp1001 WHERE
 plvar = '01' and
 otype = '9L' and
 objid = Z_DIVID and
 rsign = 'A' and
 relat = '003' and
 sclas = '9K' and
 endda = '99991231'.
|
|
| Figure 10 |
Add field Z_UNITID |
| Z_UNIT_NAME |
Unit Name |
HRP1000-STEXT |
3: Dependent upon unit ID |
clear Z_UNIT_NAME.
SELECT single stext INTO Z_UNIT_NAME FROM hrp1000 WHERE
 plvar = '01' and
 otype = '9K' and
 objid = Z_UNITID and
 endda = '99991231'.
|
|
| Figure 11 |
Add field Z_UNIT_NAME |
| Z_GROUPID |
Group ID |
HRP1001-SOBID |
3: Dependent upon unit ID |
clear Z_GROUPID.
SELECT single sobid INTO Z_GROUPID FROM hrp1001 WHERE
 plvar = '01' and
 otype = '9K' and
 objid = Z_UNITID and
 rsign = 'A' and
 relat = '003' and
 sclas = '9F' and
 endda = '99991231'
|
|
| Figure 12 |
Add field Z_GROUPID |
| Z_GROUP_NAME |
Group Name |
HRP1000-STEXT |
4: Dependent upon group ID |
clear Z_GROUP_NAME.
SELECT single stext INTO Z_GROUP_NAME FROM hrp1000 WHERE
 plvar = '01' and
 otype = '9F' and
 objid = Z_GROUPID and
 endda = '99991231'.
|
|
| Figure 13 |
Add field Z_GROUP_NAME |
Step 3. Add the additional fields to field groups. Now that you have added all of your new object types as additional fields, you need to add those fields to your field groups that you want displayed as reportable in queries. Because you only need to see the group, unit, and division names in queries, you should not move the object ID fields to the field groups. Remember, what you put in the field groups is available to users as they run reports from the InfoSet.
First, switch to the Field groups window if you are not there by clicking the Field groups button at the top of your InfoSet maintenance screen in Figure 14. Find the fields you have added in the data fields panel under Organizational Assignment>Additional Fields. Select the Group Name field and drag it to the Organizational Assignment field group in the right panel. You can place this field in any field group that is logical for your organization. Continue to move the remaining fields to your field groups. Before exiting the InfoSet you must click on the Generate button to complete your changes.

Figure 14
Switching to the Field groups window
Step 4. Test it. You should now have all of your custom fields set up in your InfoSet and should test it by running a query against your InfoSet. Include all fields in your query to ensure they are working properly. Figure 15 shows a sample of data that was run from InfoSet Query using the employee InfoSet.
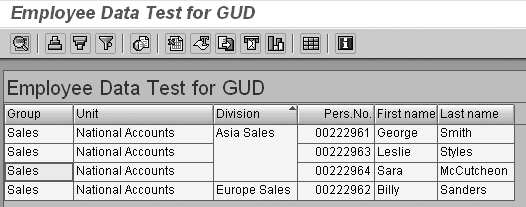
Figure 15
Sample of data that was run from InfoSet Query using the employee InfoSet
Heather Clubb
Heather Clubb is a senior business analyst for HRIS. She has more than seven years of experience in designing, maintaining, and implementing HR modules. She has been involved with several data conversions and a reimplementation of HR modules. Heather’s expertise lies within Personnel Administration, Organizational Management, Recruitment, Training & Event Management, and SAP Query. She spoke at the HR 2006 and the Reporting & Analytics 2006 conferences. Heather also earned a BS degree in information systems.
If you have comments about this article or publication, or would like to submit an article idea, please contact the editor.