Discover the best way to design reports to be published in SAP Business Planning and Consolidation and how to configure the publisher to generate the data snapshots that you need. Learn how to:
• Create workbooks to be published
• Configure the publication template
• Use the wizard
• Display the results
Key Concept
Book publication is a new feature in SAP Business Planning and Consolidation (SAP BPC) 10.0 that generates PDF files from Excel worksheets. The PDFs with static data can then be viewed very quickly by paging through the PDFs with the Book Viewer from the Web Client.
Most reporting in SAP Business Planning and Consolidation (SAP BPC) is performed in Excel via the SAP Enterprise Performance Management (SAP EPM) add-in on live data. Users open Excel reports, refresh the data, view the initial result set, and then proceed with more analysis as needed by changing member selections or changing the axis dimensions.
Book publication is an important option when it comes to distributing reports in SAP BPC because it provides quick flash reports based on static data. There are four key advantages of book publication:
- The data snapshots are generated for the users in background jobs before they log in.
- There is no need to refresh data; therefore, the user can go through data sets very quickly.
- Because the data is static, the users have a stable data set to perform their analysis.
- The book viewer, a separate Internet Explorer session for viewing the PDFs, provides an easy-to-use interface with drop-downs for variable dimensions.
Next, I discuss how to create an Excel report in the SAP EPM Report Editor for publishing. The Report Editor is the user interface in the SAP EPM add-in used to create new reports.
Create Workbooks to Be Published
In the Excel interface of the SAP EPM add-in, you need to use an SAP BPC connection because book publication is only available for SAP BPC connection types.
After connecting to SAP BPC, I begin by using the New Report option in the SAP EPM ribbon. Next, I drag the account dimension into the rows and time into the columns. Both of these have their member selection set to Context-Member and Children by default.
For example, a member selection of member and children for 2013.Q1 would include the member 2013.Q1 and the 2013.Jan, 2013.Feb, and 2013.Mar children. When reports are created, the initial member selection is member and children by default.
By using the context option for a report to be published, I can use the publication wizard to control members in the results. In other words, the context option is like using a variable.
The requirement is to generate a set of books for entity and product combinations. For example, you want to be able to view all the combinations of BMW car dealerships in the Northeast and the models they sold. Therefore, both entity and product need to be placed into the page axis. When the report is published, a PDF for the specified entity and product combinations is generated. All remaining dimensions are also placed into the page axis so that users can see their values in the report output in what I call the header area. Figure 1 shows the report output in Excel (I typed in the dimension names in cells A1 to A5).
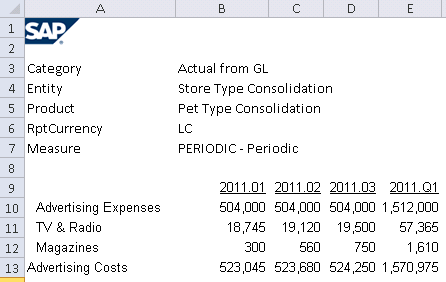
Figure 1
EPM report to be published with Entity and Product in the page axis
All unused sheets need to be deleted to improve runtimes. The book publisher attempts to publish all sheets in a workbook.
In the SAP EPM tab, click the Save button and select the BOOKS folder to save the report (Figure 2). This first workbook is called Expense in this case.

Figure 2
Saving the Expense workbook to be published to the BOOKS folder
My scenario also calls for a data set by currency (Figure 3). The second report is called Expense by Currency (LC is the local currency).
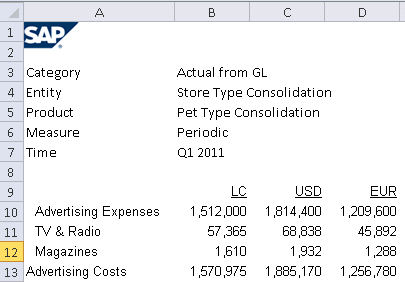
Figure 3
The Expense by Currency report
Now I discuss the publication template.
Configure the Publication Template
In the SAP EPM ribbon, I click the New Template button to get started. In the publication template (Figure 4) the fields that end with an asterisk (*) are required.
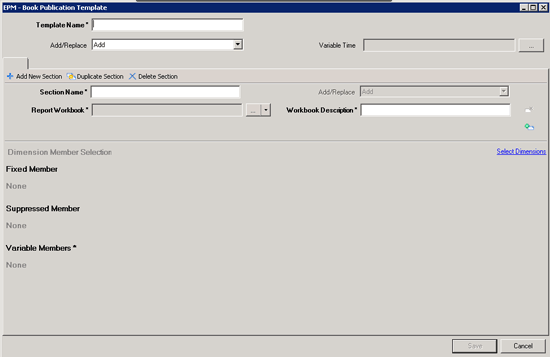
Figure 4
EPM – Book Publication Template before configuration
Before I explain all these settings, I examine the template from a high level. The book publication template has a header area at the top that includes the Template Name, the Add/Replace option, and the Variable Time. The Add/Replace setting and the Variable Time can be used for all sections of the template. These sections are used to select workbooks to publish and to indicate the dimension members for which you plan to publish them. For example, section 1 could include a profit-and-loss report, whereas section 2 could contain a balance sheet report. Now I start the configuration steps.
I use a template named Sales Expense Template. For the Add/Replace option, I choose Replace. Because publication runs periodically, the Replace option means that only the latest book is available at any time. This setting applies to all sections of the template.
Note
The Add option adds to the list of published templates every time the wizard is executed. The remaining Add/Replace option allows you to specify the Add/Replace setting by section.
Each section contains one or more workbooks as well as the fixed, suppressed, and variable members. I choose my Expense workbook.
The Variable Time is set to 2011.Q1. This applies to all sections by default and results in the report columns of 2011.01, 2011.02, 2011.03, and 2011.Q1. (Remember the member selection for the time dimension in the report is Context-Member and Children.)
The first section is called Personal Expense. The first Report Workbook, Expense, is selected from the BOOKS folder. The first Workbook Description is Personal Expense. The second Report Workbook, Expense by Currency, is selected from the BOOKS folder.
The second Workbook Description is Personal Expense by Currency. In the Selected Dimensions dialog, I select the following fixed dimensions: Category, RptCurrency, Measures, and P_ACCT (Figure 5). Fixed members are treated as constants by the publication wizard.
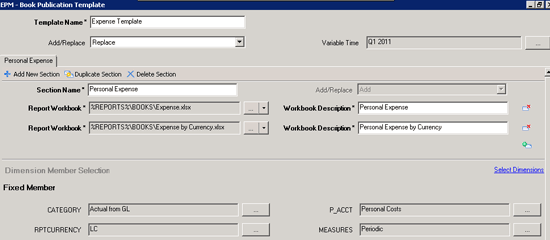
Figure 5
The EPM – Book Publication Template after configuration
I can see the fixed dimension members in Figure 5. Because P_ACCT is set to the parent account Personal Costs, Personal Costs and its children appear in the rows based on the row member set of Context-Member and Children. The children of Personal Costs include Personnel Expense, Wages and Salaries, and Social Contributions.
Under Variable Members, the dropdowns can be used to access the Selected Dimensions dialog. There I made Entity and Product variable. A separate PDF is generated for every combination of the variable dimension members. In Figure 6, I select the base level members of midsized stores along with two products.
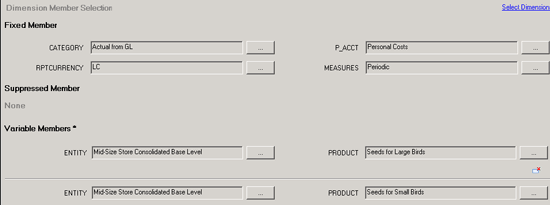
Figure 6
The EPM – Book Publication Template Dimension Member Selection
The Suppressed Member area can be used to exclude selected members if needed. However, in the example shown in Figure 6, I did not select any.
Section 2 is the same as section 1 except it is for Advertising Expense instead of Personal Expense. All I have to do is click Duplicate Section, change the workbook descriptions. and switch the P_ACCT selection to Advertising Expense as you can see in Figure 7.
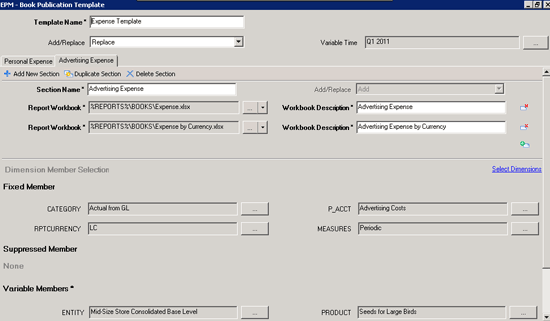
Figure 7
The EPM – Book Publication Template Advertising Expense section
I save the template file as the Expense Template in the MANAGEBOOK folder (Figure 8).
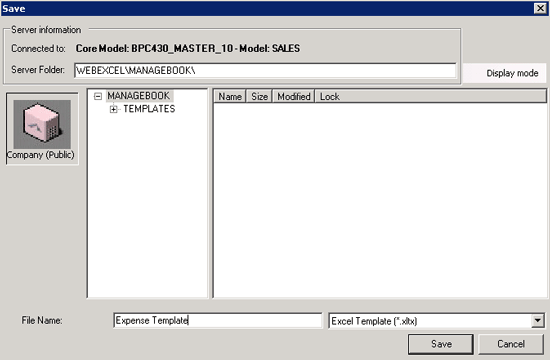
Figure 8
Saving the book publication template
This file name is visible to the users.
Use the Wizard
Books can be published as often as you need (e.g., daily or weekly). You can choose the Publish Now or Schedule the Publication options (Figure 9).
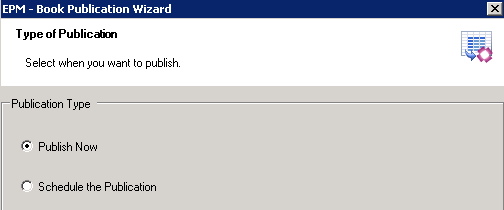
Figure 9
EPM – Book Publication Wizard: Publish Now selected
When publishing is carried out by the administrator, he or she can choose the Publish to PDF Format option (Figure 10). Selecting this option generates a set of PDFs to the Web client public library that users can then view with the book viewer.
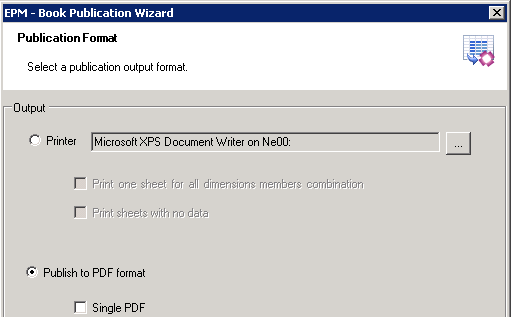
Figure 10
EPM – Book Publication Wizard: Publish to PDF format selected
The screen shown in Figure 10 also includes the Printer options. In addition, if the administrator selects the Publish to PDF Format option and the Single PDF box, a single PDF is generated to a file share.
When the administrator proceeds to the next step, he or she has the option next to Current Team, to send the PDFs to the Company (Public) folder or to a team folder (Figure 11). The administrator then selects the template (EXPENSE TEMPLATE.XLTX in this case) along with the sections to publish (e.g., Personal Expense and Advertising Expense).

Figure 11
EPM – Book Publication Wizard: EXPENSE TEMPLATE and the Personal Expense and Advertising Expense sections selected
After you click the Next button, the summary log (Figure 12) appears. This log includes the workbooks selected by section and the number of PDFs to be generated.

Figure 12
EPM – Book Publication Wizard: Summary of PDFs to be published
After you click the Next button, the process of generating the PDFs is started (Figure 13).
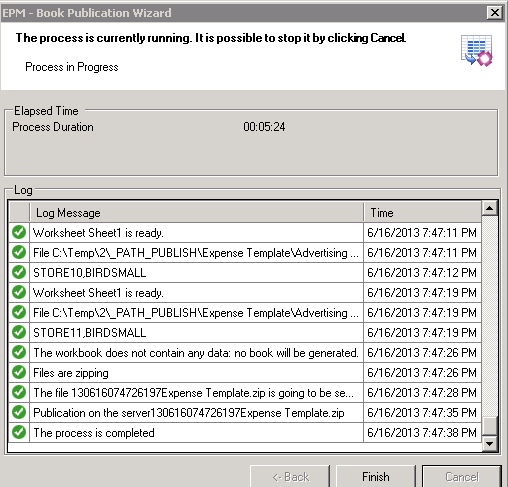
Figure 13
EPM – Book Publication Wizard: worksheets published
Note
Any combinations with no data are skipped.
Once the process is finished, you can go to the Web client to see the PDFs in the Book Viewer.
Display the Results
In the Web client’s public library you can see the two sections (PERSONAL EXPENSE and ADVERTISING EXPENSE) have indeed been published (Figure 14).
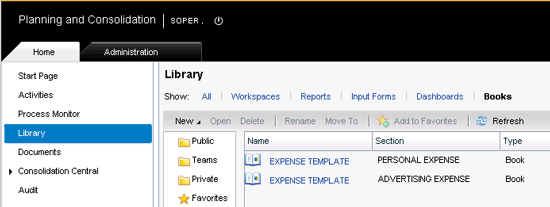
Figure 14
Web Client Public Library with Books displayed
If I select the PERSONAL EXPENSE, for example, I am taken to a separate Internet Explorer session in what is called the Book Viewer. Now I can use the drop-downs to select variable dimension members and display the results by workbook.
If I hover my cursor near the top of the PDF, several icons for options appear in the gray oval: save, print, shrink, expand, and show Adobe Reader Toolbar (Figure 15).
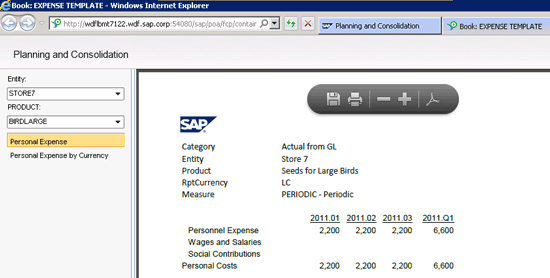
Figure 15
Book Viewer – Personal Expense is displayed
In addition to the drop-downs, I can also choose either the Personal Expense workbook or the Personal Expense by Currency workbook. For example, Figure 16 shows the selection of Personal Expense by Currency.
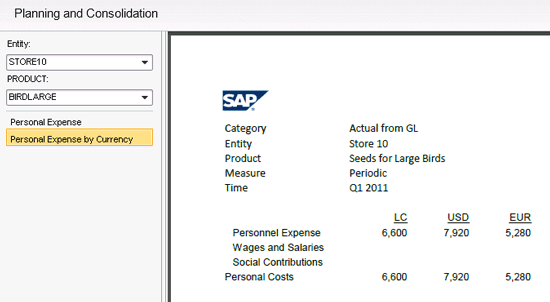
Figure 16
Book Viewer – Personal Expense by Currency is displayed
Charles "Tim" Soper
Charles “Tim” Soper is a senior education consultant at SAP. For the last 17 years, he has been teaching SAP classes on a variety of topics in financial and managerial accounting, business warehouse, business consolidations, and planning. He is the planning and consolidation curriculum architect and has written SAP course manuals. He also works as an SAP Senior Educational Consultant. Early in his career, he worked for Eastman Kodak Company in Rochester, NY, as a senior financial analyst. He has an undergraduate degree in economics and an MBA in finance from the University of Rochester.
You may contact the author at Charles.Soper@sap.com.
If you have comments about this article or publication, or would like to submit an article idea, please contact the editor.