Learn how to activate a work in process (WIP) batch and how to use it achieve an N:N batch traceability on a single production order. See how to activate the WIP batch functionality and the necessary customizing settings to use it.
Key Concept
The work in process (WIP) batch is used to keep the batch traceability on a production order when several batches of raw material are consumed and several batches of finished product are generated.
Batch traceability is a key functionality not only in the chemical and food industries but also in almost all industries. SAP delivers the batch where-used list (transaction code MB56) in SAP ERP Central Component (ECC). The where-used list enables you to trace the batch from the finished product to the raw material (top down) or from the raw material to the finished product (bottom up).
I focus on the work in process (WIP) batch functionality that is available in ECC for production and process orders in enhancement package 4. More specifically, I explain how to enhance the batch where-used list to show a link between each raw material batch consumed and the respective finished product batch produced on a production order.
This transaction works perfectly in most cases. However, there is a limitation on a production order with N:N batches. On this specific case, it is necessary to consume several batches of raw material, generating one batch of finished product for each batch of raw material. On a standard production order, there is no link between the raw material batch consumed and the finished product batch received; therefore, the batch where-used list would determine all the batches of raw material for each batch of the finished product.
Consider a scenario that involves a simple production order with two operations and a single component. For this order, you consume the batches RM_BATCH_1 and RM_BATCH_2 of the raw material and generate the batches FG_BATCH_1 and FG_BATCH_2 of finished product.
Now after you execute transaction code MB56 to generate the top-down batch where-used list for FG_BATCH_1, you can observe on the results screen that both batches of components were determined (
Figure 1).
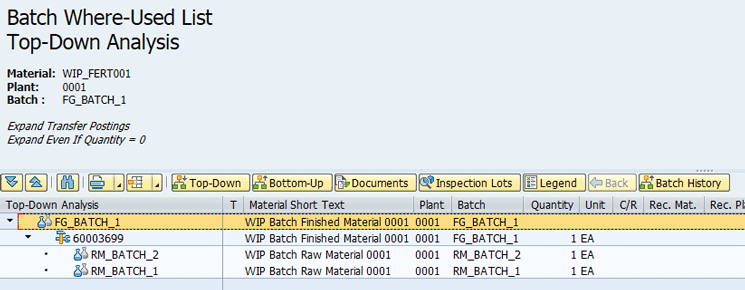
Figure 1
Batch where-used list for batch FG_BATCH_1
The same thing happens when you generate the where-used list for FG_BATCH_2, so it is clear that you cannot identify exactly which batch of raw material was used to produce each batch of finished product (
Figure 2).
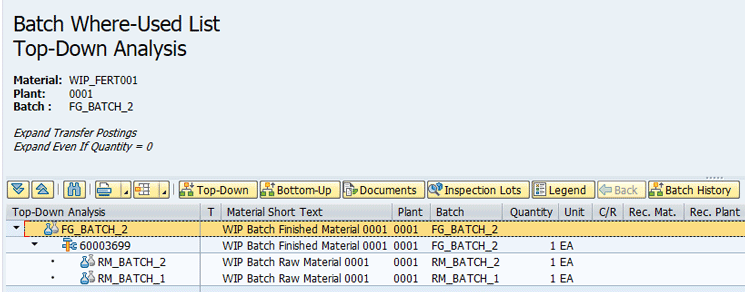
Figure 2
Batch where-used list for batch FG_BATCH_2
Consider, for example, that a problem was detected in one of the raw material batches after the production. In this case, it would not be possible to identify exactly which batch of finished product was produced with this problematic batch of raw material.
On previous releases, the only solution for this scenario was to create separate production orders for each raw material batch, but that would require more bureaucracy and manual work.
As of ECC enhancement package 4, the WIP batch functionality delivers a solution for this scenario, with some additional advantages.
How to Activate the WIP Batch Business Function
There are two business functions related to the WIP batch functionality: LOG_PP_WIP_BATCH, delivered in enhancement package 4, and LOG_PP_WIP_BATCH_02, delivered in enhancement package 5. For the basic use of the WIP batch and for the scenario that I describe, it is only necessary to activate the first business function. However, I also recommend the activation of the second business function, as it brings additional functionalities for the WIP batch (including inventory valuation, use with documentary batches, and use on an order split).
The activation is carried out on the Switch Framework (transaction code SFW5), and it is very simple. You just need to select the business function and click the Activate Changes button (
Figure 3). This business function brings additional customizing activities and changes on standard screens. The activation of this business function cannot be reverted, which means that these changes cannot be undone on the system.

Figure 3
Activation of the business function
After the confirmation of the business function activation, a background job is triggered. To see the progress, execute transaction code SE37 and view details in the Job Overview screen (
Figure 4).
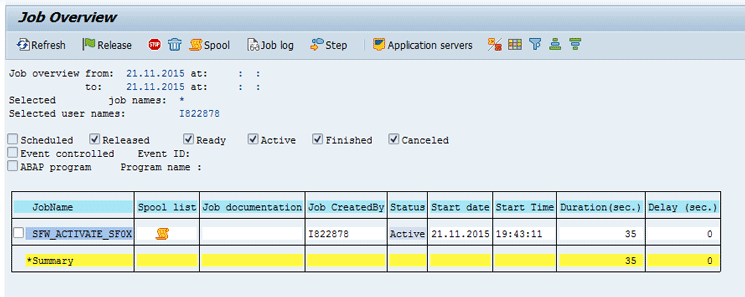
Figure 4
Background job with the business activation
WIP Batch Customizing and Master Data Prerequisites
After the business function activation, it is also necessary to activate the WIP batch functionality in customizing. To complete this step, execute transaction code OMCWB. In the screen that appears, select the Active radio button (
Figure 5) and click the save icon (not shown) to save the results. Note that this change cannot be reverted after you save it, which means that, once you allow the use of the WIP batch functionality on your system, it is not possible to get back to the original state in which WIP batches can’t be used.
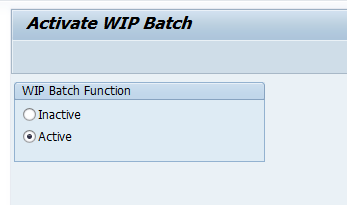
Figure 5
Select the Active radio button and save the results
Another prerequisite is to activate the Original Batch Reference Material in customizing. To complete this step, execute transaction code OMT0. In the initial screen that appears (
Figure 6), select the Original Batch Reference Material indicator and click the save icon (not shown) to save it (it is not necessary to change any other setting on this customizing transaction).

Figure 6
Original Batch Reference Material activation in customizing
Activating the Original Batch Reference Material indicator in customizing adds an OB Management (original batch management) field in the material master Work scheduling tab (
Figure 7).
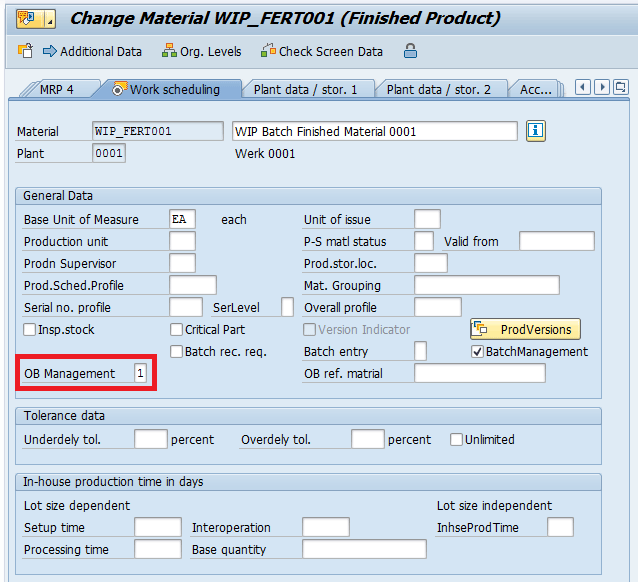
Figure 7
Original Batch Management in the material master
The value of the OB Management field must be set to 1 (allowed) for the finished product, but it is not necessary to set any value for the raw material.
Now that you have already activated WIP batch and original batch management functionalities in customizing, you need to create a new confirmation profile. Because the WIP batch information must be posted during the production order confirmation, your confirmation profile will include the WIP batch-specific subscreens.
To find the confirmation profile customizing, execute transaction code OPK0. In the screen that appears (
Figure 8), copy the standard confirmation profile SAP001 by selecting this entry and clicking the copy icon.
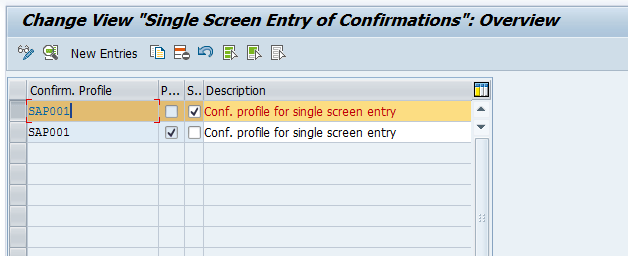
Figure 8
Copy the standard profile SAP001
In the next screen (
Figure 9) you include areas 8285 (WIP Batch: Goods Receipts), 8290 (WIP Batch: Goods Issues), and 8295 (WIP Batch: WIP Batch Entry) to the newly created WIPBATCH confirmation profile.
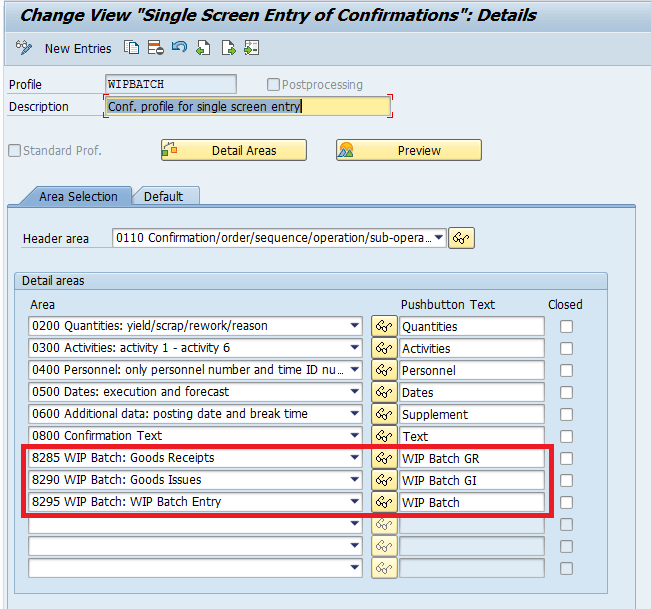
Figure 9
Areas included on the confirmation profile
To use the confirmation profile created by default to post a confirmation on transaction CO11N, you must select the Standard Prof. (standard profile) check box on the initial screen of transaction OPK0. However, because WIP batch is a very specific functionality that may not be used on all the scenarios, there is another alternative. For each user who posts a confirmation using WIP batch, you can add this confirmation profile to the user parameters. User parameters are used to store user-specific settings. The transaction code to add a new user parameter is SU3, the parameter to be used is CORUPROF, and the value is the confirmation profile previously created, in this specific case WIPBATCH (
Figure 10).
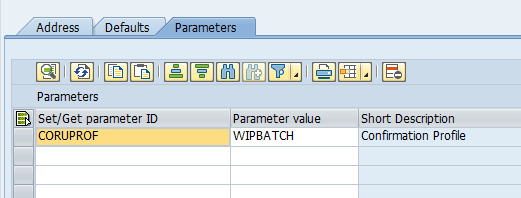
Figure 10
User parameter CURUPROF = WIPBATCH
Now that you have added the confirmation profile to the user parameters, the customizing master data settings are completed and you can create an order and post the confirmations using WIP batches.
How to Post an Order Confirmation Using WIP Batches
Consider the example shown in
Figure 11 of a regular production order displayed in the screen that appears after you execute transaction code CO02. This screen shows two operations in the Operation Overv. (operation overview) section and a single component in the Objects section.

Figure 11
The Production Order Change screen includes a regular production order with two operations and one component
Following the standard confirmation process without WIP batches, your batch where-used list would be exactly as shown in
Figures 1 and
2, if you post several goods issues and goods receipts. It means that, without the WIP batch, you cannot identify exactly which batch of raw material was consumed for each batch of finished product.
To post the confirmation using WIP batches, you need to create a link between the raw material and the finished product. It is not necessary to make any change on the production order header or components. You can go directly to the order confirmation.
You will notice some of the following details when posting a confirmation using a WIP batch confirmation profile:
- The button to display the goods movements overview is not displayed when using your confirmation profile.
- The goods receipt goods movement is always proposed, even if automatic goods receipt is not set for the order.
- The goods issues goods movements is always proposed, even if the backflush indicator is not set for your components.
- All the goods movements are proposed without quantity.
Execute transaction code CO11N. In the screen that appears (
Figure 12) post a new confirmation of 1 EA for operation 0010, with a goods issue of the same quantity of batch RM_BATCH_1 of the raw material RM_BATCH_1 and the goods receipt of the WIP batch. Because the raw material will be consumed, you add the quantity of component consumed and the batch on the area WIP Batch GI.

Figure 12
Posting the raw material goods issue
Figure 13
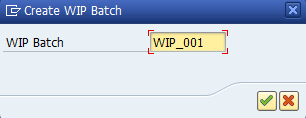
Figure 13
Create a WIP Batch
This action opens a screen that displays the WIP batch you created (
Figure 14). Observe that a new entry is added to the section WIP Batch, where you must input the WIP batch quantity on the field Yield. After that, you click the save icon (not shown) to save the confirmation.

Figure 14
WIP Batch created
The next step is to post a confirmation for operation 0020. Because it is the second and last operation of your order, you consume the WIP batch created previously and post a goods receipt of the finished product batch.
As already explained previously in this section, the goods receipt movement is proposed by default in the WIP Batch GR tab; however, it is proposed without quantity, so you need to input the quantity. After that, you must select the goods receipt item and the respective WIP batch. Now click the WIPB->GR button shown in
Figure 15.

Figure 15
Assign a WIP batch with a goods receipt
With this process, you are creating a link between the goods receipt batch and the WIP batch. The system then displays a pop-up screen in which you can define the goods receipt batch (
Figure 16).
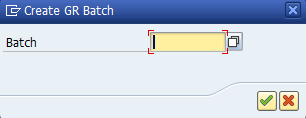
Figure 16
The pop-up screen to create the finished product batch
This confirmation can now be saved and, as the WIP batch was already linked to the raw material, it means that you have a link between the raw material and the finished product material.
Now you repeat the same steps described in
Figures 12,
13, and
14, posting a new confirmation for operation 0010, but this time consuming batch RM_BATCH_1 and creating the new WIP batch WIP_002.
The second confirmation for operation 0020 is slightly different from the first one.
When you are posting the second confirmation for operation 0020, after the creation of the link between the WIP batch and the goods receipt, you post the goods receipt using a different batch. To complete this step, you must enter the name of the batch in the field under the WIP Batch column (
Figure 17). After you enter the new batch, a new line is automatically added to the area WIP Batch GR and you can then save the confirmation. Click the save icon (not shown) to save the confirmation.

Figure 17
Second confirmation for operation 0020
Because the system does not know beforehand which batch of raw material will generate each batch of finished product, the assignment must be performed manually for each confirmation.
Analyzing the Batch Where-Used list Using WIP Batches
You have posted two different confirmations for each order operation, consuming different batches of raw material and receiving different batches of finished product. Now I explain how to use the batch where-used list for the finished product.
In principle, the results are very similar to the very first example in which the WIP batches were not used. For the batch FG_BATCH_4, both batches of raw material are displayed, as if both were consumed to generate this batch of finished product (
Figure 18).
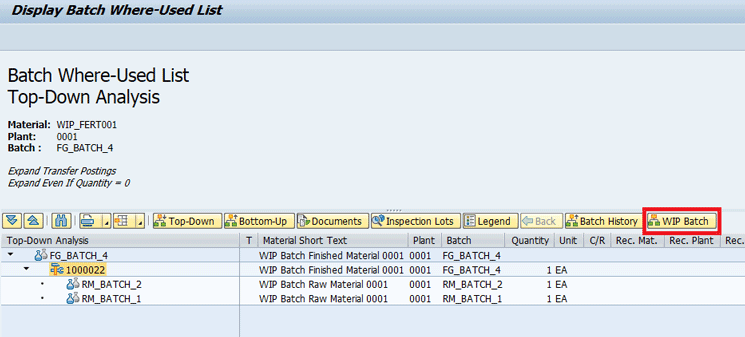
Figure 18
The WIP Batch button on the batch where-used list
However, there is a WIP Batch button on the batch where-used list menu. If you select the order and click this button, you see the relationships between the goods receipt and the goods issue (
Figure 19).

Figure 19
The batch where-used list for WIP batches
Note that in
Figure 19 the WIP batch acts exactly as a link between the raw material and the finished product batch. This kind of batch traceability is the greatest advantage of using the WIP batches on this scenario, as you can identify exactly which batch of raw material was consumed for each batch of finished product.
Consider, for example, if your vendor requests the recall of the raw material due to a problem on a batches. You would be able to identify exactly which batch of finished product was created with the problematic raw material batch, avoiding a recall of all the batches produced on the same order.
Additional Benefits of the WIP Batch Functionality
Besides allowing an N:N traceability on a production order, there additional benefits of using WIP batches.
Consider, for example, a production order with several operations and a long lead time. The component goods issue is posted on the first order operation and, after that, there is no more visibility of the material on stock. Usually, you can only track the order progress following the operation status. On older releases, if you would like to have more visibility of the semi-finished products, you would have to create a new material code and create additional production orders for the semi-finished material, which would lead to a higher level of complexity on the order management and more materials to manage on stock.
Now, using WIP batches, you can track the order progress following the order WIP batches. It means that you can simulate the semi-finished goods receipt using WIP batches, so that you can have more control of what is being produced and still using a single production order.
Additionally, you can use the batch classification with WIP batches, so it is possible to map the characteristics of those intermediate steps of your production order.
The use of WIP batches is also possible on an externally processed order operation in which the semi-finished product must be sent to the subcontractor. On a standard production order, there is no reference to a semi-finished material within the order to be sent. However, you can use WIP batches to map this scenario and send them to be externally processed.
The WIP batch functionality closes a gap on the production order processing and there are several different possibilities for using this functionality. If you are facing any problem on the WIP Batch implementation, I suggest you read SAP Note 1473025, which answers the Frequently Asked Questions about this topic.
Caetano Almeida
Caetano Almeida is a computer engineer with an MBA in IT management. He has more than nine years of experience in production planning, with the last six years working at SAP Support, where he supports SAP customers and writes documentation and correction notes.
You may contact the author at
caetano.almeida@outlook.com.
If you have comments about this article or publication, or would like to submit an article idea, please contact the
editor.


