Step through a process for moving 7.0 logon page development components (DCs) synched in SAP NetWeaver Development Infrastructure to 7.3 DCs without using a code migration tool available in SAP NetWeaver Developer Studio 7.3. Learn the basics of PAR, WAR, and EAR files so you can easily develop new custom logon pages without getting stuck in old SAP NetWeaver Development Infrastructure 7.0-based DCs.
Key Concept
The SAP NetWeaver Portal 7.3 logon page is based on a Web Archive (WAR) file instead of a Portal Archive (PAR) file. However, if you take a closer look at PAR, you understand that PAR itself is a type of Web archive. In this way, the base of the 7.3 logon page is no different from 7.0 logon pages.
A lot of things changed since the release of SAP NetWeaver Portal 7.3. One of the major changes is you have to migrate 7.0-based applications to 7.3 by using the migration tool available in SAP NetWeaver Developer Studio (NWDS) 7.3. You can easily migrate Web Dynpro Java applications with this tool.
For Portal Archive (PAR)-based applications, SAP provides a separate PAR migration tool. But what about logon pages? Logon pages are often the focus of portal implementations, with organizations looking to create user-friendly appearances without thinking as much about the functionality. 7.3 logon pages are no longer based on PAR files. They are now shipped in a Web Archive (WAR) file, which is further dependent on an Enterprise Archive (EAR) file. Is there a way in which you can work on WAR-based development components (DCs) and yet keep old customizations from 7.0 intact so you don’t have to perform all that work again?
I’ll present a step-by-step procedure to develop new WAR-based DCs and provide the flexibility to keep your customizations intact from your 7.0 DCs. I’ll start by explaining the basics of a WAR file and how it is similar to a PAR file. Then you can see how this similarity allows you to create WAR-based logon page DCs, copy custom files from a 7.0 DC into a new WAR-based DC, and deploy WAR-based DCs via EAR DCs. To complete the tasks in this article, you need an SAP NetWeaver Portal license, SAP NetWeaver Development Infrastructure (NWDI), and NWDS 7.3 with Support Package 6 or enhancement package 1.
The article covers four major steps:
- Step 1. Create the Web application project and enterprise application project
- Step 2. Import the standard logon page WAR
- Step 3. Add configuration, runtime references, and code
- Step 4. Deploy the DCs
Step 1. Create the Web Application Project and Enterprise Application Project
Before you create any component, it is important to mention that you are not going to create any local components. Instead, you are going to create a project. In default configuration, go to LocalDevelopments > MyComponents in the Development Infrastructure perspective of NWDS. This default configuration is identical with NWDI tracks, which are versioning mechanisms that maintain application change history and deployment history. Therefore, you get the feel of working on the NWDI track itself.
Go to NWDS and go to the Open Perspective pop-up screen (
Figure 1). Launch the Development Infrastructure perspective.
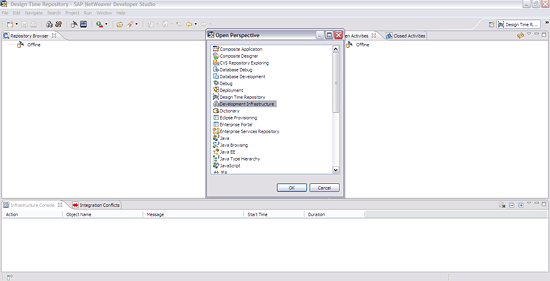
Figure 1
Launch the Development Infrastructure perspective
Default Configuration is already present in the Component Browser pane of the Development Infrastructure perspective as the MyComponents [demo.sap.com] selection in the LocalDevelopment configuration (
Figure 2). In this configuration, you notice a default component in which you can create DCs needed for the logon page application. Note that you cannot move this development into the NWDI track because all the DCs created in MyComponents are available locally. Nevertheless, the process of creating the DC remains the same as that of NWDI configuration or working with NWDI tracks.
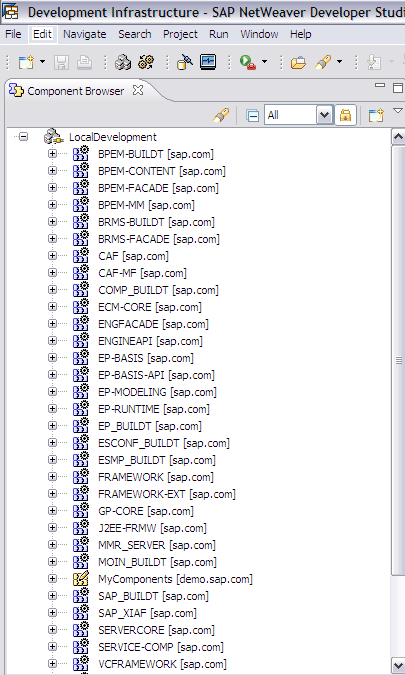
Figure 2
Local Development Infrastructure configuration
Create a Web Module DC
Before I explain the process of Web module creation, note that you can create either a Web module or EAR DCs first. There is no fixed sequence. However, if you create a Web module DC first, then NWDS fetches a reference to the Web module DC while creating the EAR DC. That means you do not have to bother referencing the Web module DC in the EAR DC. This is important because the file named application.xml exists and you have to reference the logon page Web module in this EAR project so you can actually set a custom logon page property from SAP NetWeaver Administration. However, if you choose not to create an EAR DC separately, then you get an option to create an EAR DC automatically while creating a Web module DC.
I’ll start with the process of creating a Web module (
Figure 3). Select MyComponents, right-click it, and then select New > Development Component. This produces the screen in
Figure 4.
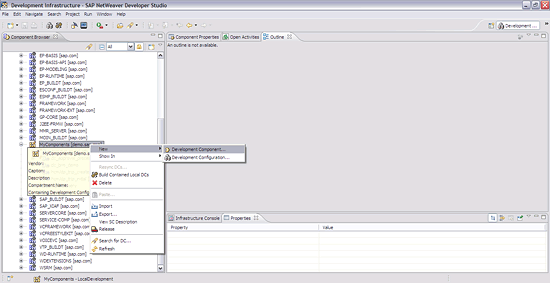
Figure 3
Create a new DC
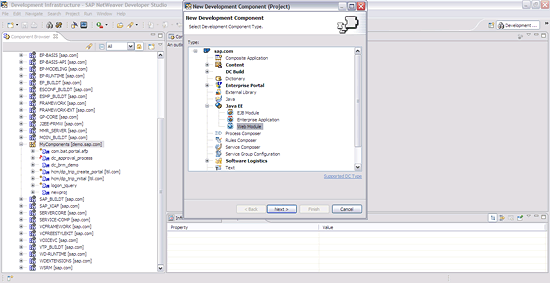
Figure 4
Choose a type of DC as a Web module
In the Java EE type, select Web Module as a type and click Next to bring up the screen in
Figure 5. Provide the necessary details, such as name and a meaningful caption, and click the Next button.
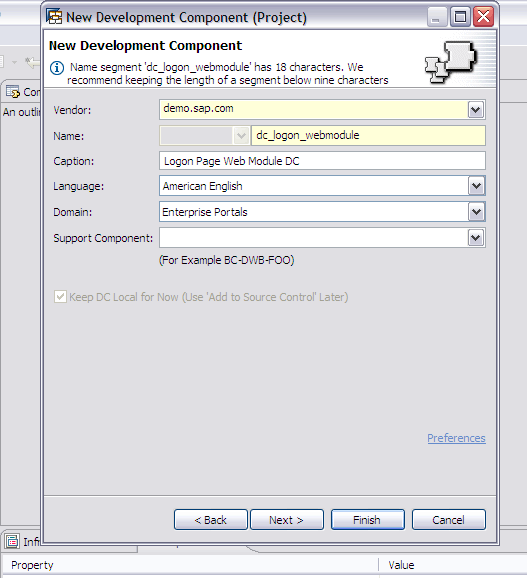
Figure 5
Fill out required details to create a new DC
Now comes the most important part. Java EE Version by default is set to 5.0. However, the Logon Page framework in SAP NetWeaver 7.3 Portal is based on Java EE 1.4 and not on 5.0, so you should change it to 1.4 (
Figure 6).
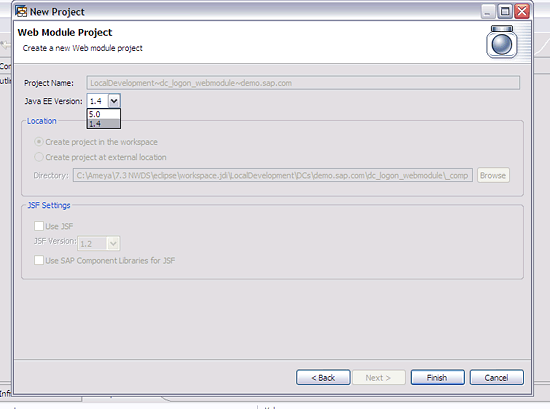
Figure 6
Select Java EE version 1.4 instead of default 5.0
Note that 7.3 Portal officially supports Java EE 5.0, but Logon Page framework is an exception, so it is important you make this change. Once you are done with Web Module DC creation, you can see the project structure in the Project Explorer view (
Figure 7).

Figure 7
Typical project structure of a Web Module DC
Next, you need to create an EAR DC. Navigate to the Development Infrastructure perspective, right-click MyComponents, and select New > Development Component (
Figure 8). Select Enterprise Application as a type of DC.
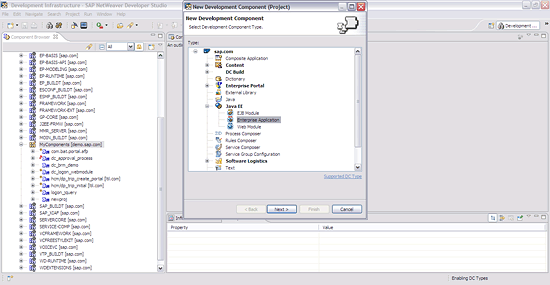
Figure 8
Create a DC of type Enterprise Application
Fill in the details, such as the name and caption, and click the Next button (
Figure 9).
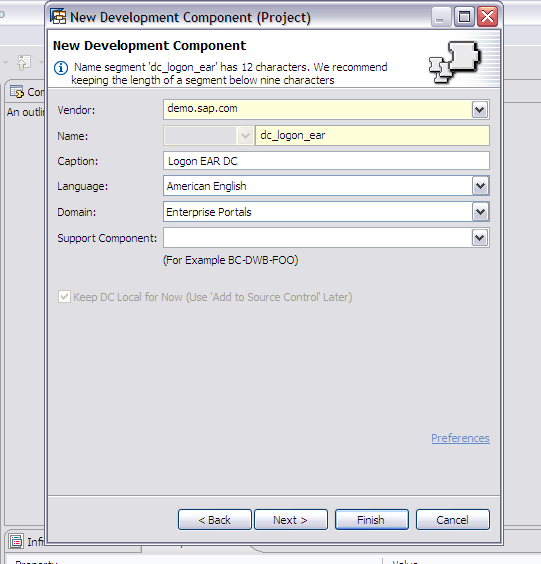
Figure 9
Fill out required details to create a new DC
Then the New Project pop-up screen appears (
Figure 10). Change the Java EE Version to 1.4 so both DCs are in synch.

Figure 10
Select Java EE version 1.4 instead of default 5.0
At this time, the wizard allows you to select and refer to existing Web module DCs (
Figure 11). Because you have already created a Web module, you can choose it in the Referenced Projects section. Click the Finish button.
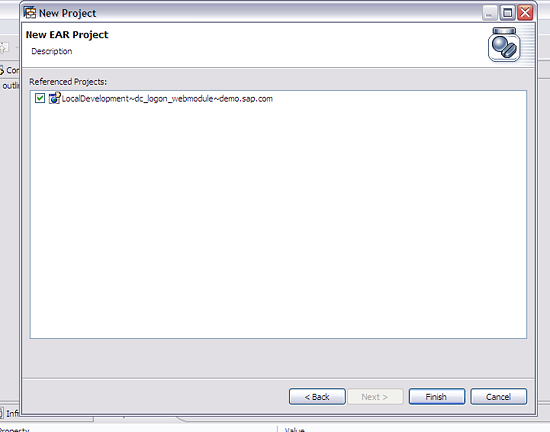
Figure 11
Select a Web module DC as a reference project
At this point, you have created both Web module and enterprise application DCs. In
Figure 12, you can see the project structure of both DCs in the Project Explorer view.
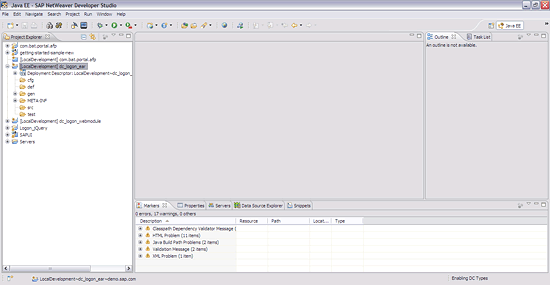
Figure 12
The typical project structure of an EAR DC
Step 2. Import the Standard Logon Page WAR
You have created the project skeleton, and now it is time to import the standard logon page WAR. Even though you created a Web module, you still want to import the WAR because the WAR itself is a Web module, and you need to make sure that your Web module DC is the same as the WAR so everything works as expected. In the Project Explorer view, right-click the project and select Import > WAR file (
Figure 13).

Figure 13
Import the standard WAR file
From your desktop, select the standard logon page WAR file tc~sec~ume~logon~ui.war (
Figure 14).

Figure 14
Browse your local directory to import the standard WAR file
Do not make any change to the default data. In the EAR membership section, select the Add project to an EAR check box. At this point, you have created an EAR project, so you can select it from the EAR project name drop-down (
Figure 15). Click the Next button.
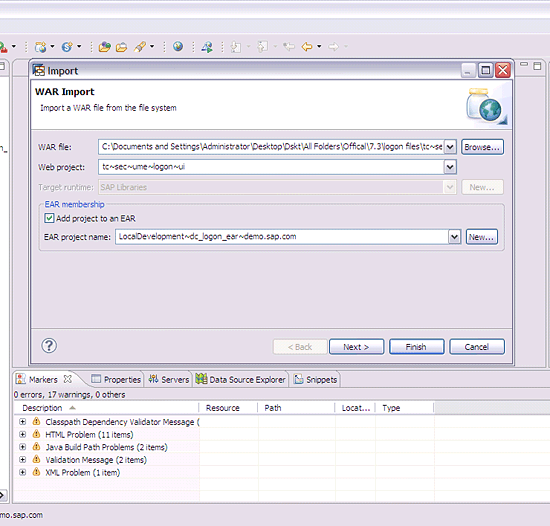
Figure 15
The WAR import wizard showcasing the Web module and associated EAR DC to be created
In the prompt shown in
Figure 16, do not select the check box for any Web libraries. If you select any of the Web libraries in this prompt, NWDS creates a separate project for the selected Web library, and you do not need a project to be created for any of the libraries. Instead, you have to add Web libraries in the external Java archive file (JAR) dependency. In the case of NWDI, you have to add new JARs into the library DC and rebuild and deploy it so the 7.3 DC can refer to the required libraries. Adding a local reference is not a recommended way of adding a JAR dependency.
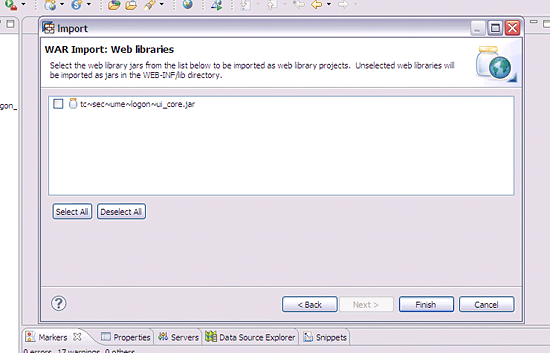
Figure 16
Import Web libraries as a separate project
Now add required JARs to the Java Build Path of the Web Module DC. As shown in
Figure 17, right-click the Web Module DC and select Properties.
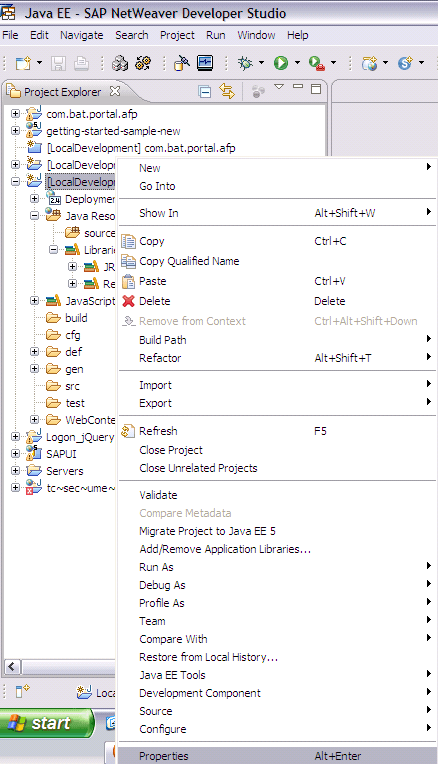
Figure 17
The properties of a DC
Select the Libraries tab and click the Add Library… button (
Figure 18). You should get a pop-up window as shown in
Figure 19. Select the option for EAR Libraries and click the Next button.
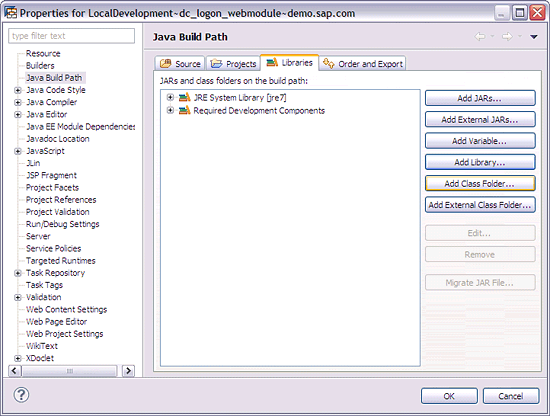
Figure 18
DC properties showcasing libraries added as dependencies
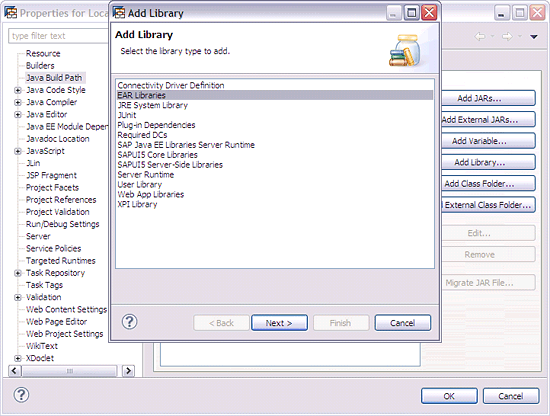
Figure 19
Select EAR Libraries to add EAR JARs
At this point, the EAR Libraries prompt shows the message in
Figure 20. All resources under META-INF are non-Web resources because these resources cannot be accessed via an HTTP request.
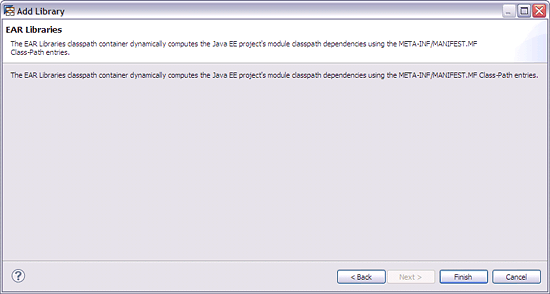
Figure 20
EAR libraries confirmation prompt
Click the Finish button, which takes you back to the Add Library screen (
Figure 21). Select SAP Java EE Libraries Server Runtime and click the Next button.

Figure 21
Select SAP Java EE libraries to add server runtime JARs
Select SAP Libraries and click the Finish button (
Figure 22). Note that you do not have to handpick individual libraries for EAR and SAP; the system adds all required libraries on its own.
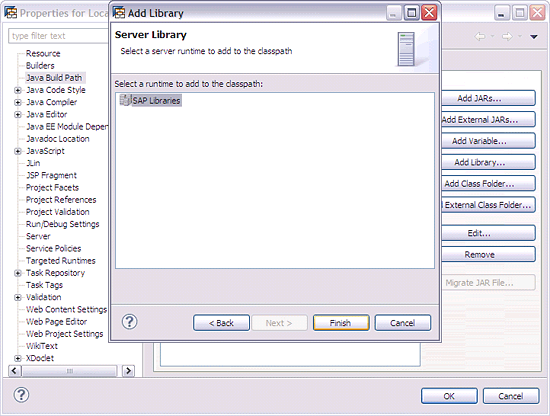
Figure 22
Add standard SAP libraries
Now you need to add external JARs to your project. In addition to the afore-mentioned system JARs, there are other JARs required to resolve class references in 7.3 Web module DC. One example is logon local class. Without adding external JAR files separately, you get a compilation error. While working with NWDI, instead of adding an external JAR, you have to add new JARs into the library DC, rebuild, and deploy.
Click the Add External JARs button and you can browse and select required JARs (
Figure 23). Select tc~sec~ume~logon~logic~api.jar to add into the Java Build Path.

Figure 23
Browse to select a logon logic API JAR file
Now you need to add Web App Libraries into the Web module DC. Click Add Library… and select Web App Libraries (
Figure 24).
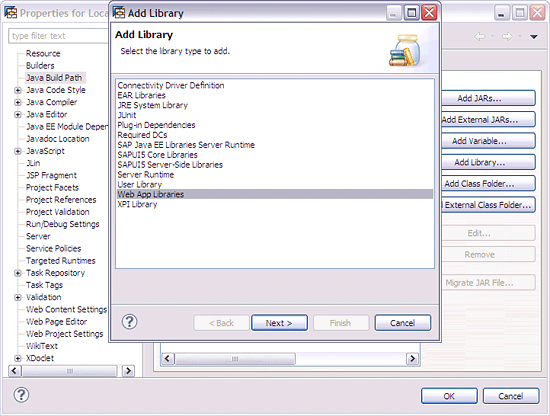
Figure 24
Add Web application libraries
Select the Web module DC from the drop-down menu (
Figure 25).

Figure 25
An Add Library prompt showing to which project libraries will be added
Now you have done the basic groundwork, added references, and added required libraries into your projects. You can now safely move ahead to compare the project structure of the Web Module DC and that of the imported WAR file project. You need to compare them because they need to work perfectly when you want to migrate your old 7.0 logon page DC to the 7.3-based DCs. Because the WAR itself is a Web module deployed as a Web application archive, you can copy and paste all missing resources in the Web Module DC from the WAR project. Remember, logon page logic, JSPs, and web.xml are deployed as a part of the Web Module DC. You do not deploy the WAR project because you need a DC and not a local application deployment.
Take a look at the basic project structure of both projects as shown in
Figure 26. The WAR project contains logon JSP files and other resources. You have to carefully compare the folder structure and add resources from the WAR project into Web Module DC. Begin by copying the CSS and Layout folders from the WAR project into the Web Module DC.
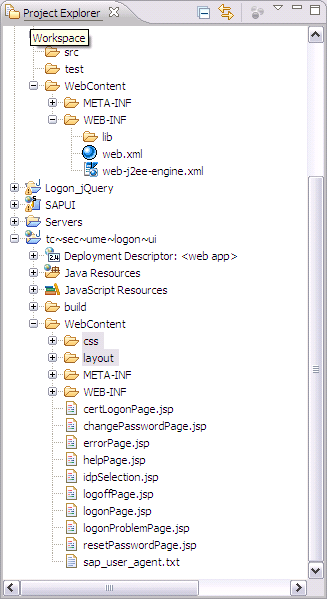
Figure 26
The typical project structure of a standard WAR file project
Both folders are copied in the Web Module DC and now you need to add buildinfo.xml, JARs in the WEB-INF folder, and all JSP files into the Web Module DC (
Figures 27,
28, and
29).
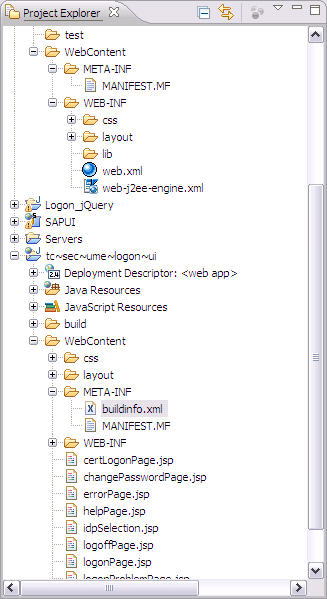
Figure 27
Copy resources under META-INF from standard WAR DC into a custom Web module DC

Figure 28
Copy the JAR available under the lib folder from standard WAR DC to custom Web Module DC
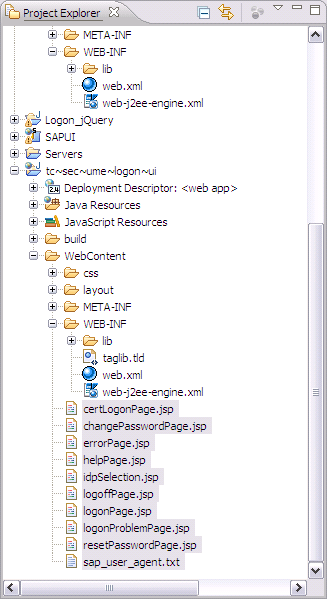
Figure 29
Copy JSP files
When you have NWDI-based 7.0 DC, you should copy JSP files and resources from the 7.0 DC instead of copying from the standard WAR DC.
Follow a similar process for the rest of the resources. You have to be cautious while copying and pasting the resources. Make sure that you do not paste any resource outside its parent folder. This may lead to deployment conflicts.
Note also that in
Figure 29 I have copied JSP files that contain logon logic and customizations from the WAR project. However, when you move your logon page customizations, changes, and logic from 7.0 DCs to 7.3, you have to copy JSPs from the 7.0 logon page DC to the Web Module DC based on 7.3. In short, all you need is the Web Module DC and the 7.0 logon page DC. In fact, you can still deploy the Web Module DC even if you do not import the WAR file into NWDS. The only reason I have imported the WAR file here is I do not have the 7.0 logon page DC in my system. However, do not feel lost. If you have access to the 7.0 logon page DC, then do not import the WAR file. Instead copy resources from the 7.0 DC to the 7.3 Web Module DC.
Step 3. Add Configuration, Runtime References, and Code
Before you go any further and deploy 7.3 DCs, there are a few pieces of configuration, runtime references, and code snippets you need to add in both Web Module and Enterprise Application DCs. Without following what comes next in this section, you cannot deploy 7.3 DCs successfully.
Web.xml
You can identify this file with portalapp.xml, which is a deployment descriptor, as is web.xml in the case of the Web Module. If you try to open any of the JSP files, you notice the following error produced by every JSP (
Figure 30).
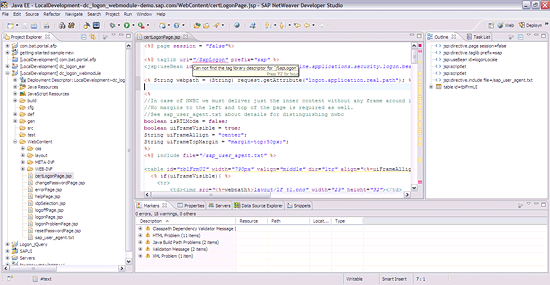
Figure 30
Source of a certLogonPage.jsp showing errors
The error states that the system can’t find the tag library descriptor for /SapLogon. You get this error because JSP files cannot locate a taglibrary file: taglib.tld in the WEB-INF folder of the Web Module DC project structure. That is simply because you created a basic Web Module DC and taglib.tld needs to be added manually. You can download a standard taglib.tld file in the installation directory of your portal and paste into your project. However, you still have to write a reference to this library in web.xml. Open the Web.xml file from your Web Module.
Figure 31 shows the default Web.xml file and you can quickly note that there is no reference for taglib.tld file in this file.
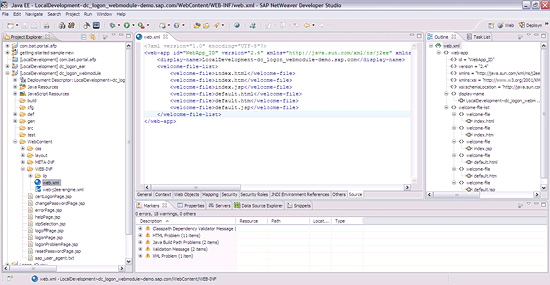
Figure 31
The source of a Web.xml file
As shown in
Figure 32, you need to add code starting from and including the <jsp-config>….</jsp-config> tags into the Web.xml file. For the ease of use, I have shared the entire code below.
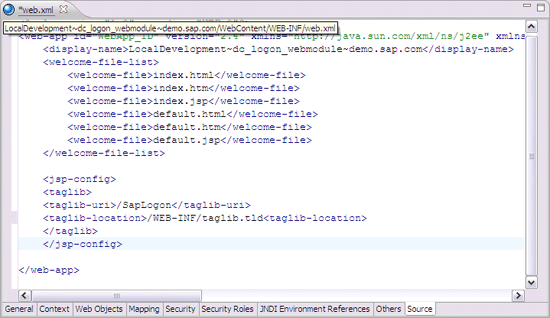
Figure 32
Taglib referencing in Web.xml
<jsp-config>
<taglib>
<taglib-uri>/SapLogon</taglib-uri>
<taglib-location>/WEB-INF/taglib.tld</taglib-location>
</taglib>
</jsp-config>
Save changes made in the file, and there are no more taglib errors in the JSP file.
Application.xml and Application-j2ee-engine.xml
Application.xml and application-j2ee-engine.xml are the two files you find in the Enterprise Application DC. Remember that you changed the Java EE Version of both DCs from 5.0 to 1.4. Let’s assume that by oversight you forgot to do this. You have already created both DCs and now when you expand the Enterprise Application DC to make changes in the application.xml and application-j2ee-engine.xml files, you cannot find these files in the project structure. You can see these files in figures in this article, but when you create these DCs of your own, you cannot find both of the required files.
Remember also that you did not copy resources into the Web Module DC. Naturally, you either copy these files from some other project or try to create a simple file with the .xml extension. Yet, you cannot the resolve the deployment error or find an option to set the context root property. If you are in the situation I just described above, make sure that you have created a DC with Java EE Version 1.4. For version 5.0, NWDS does not create both files, and even if you try to copy or create, you cannot deploy the DC. Delete the DCs, revert all activities, and recreate them with Java EE Version 1.4 only. Assuming you have created DCs based on Java EE version 1.4, let’s move forward and make the required changes.
Create a Hard Reference to com.sap.security.core.logon
Open the application.xml file in the Enterprise Application DC and click the green + icon (
Figure 33).
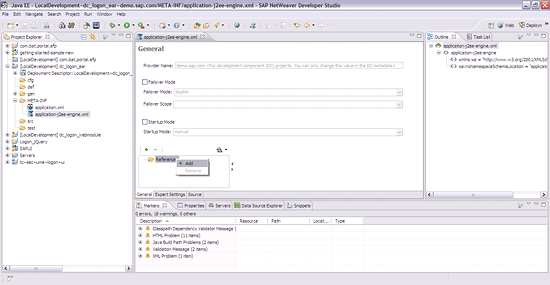
Figure 33
Add new reference to com.sap.security.core.logon
Right-click References and select Add to insert a new reference. You should get the screen shown in
Figure 34 upon performing this action. Click Create New and fill in the properties as shown in
Figure 35.

Figure 34
Choose Create New to add a new reference
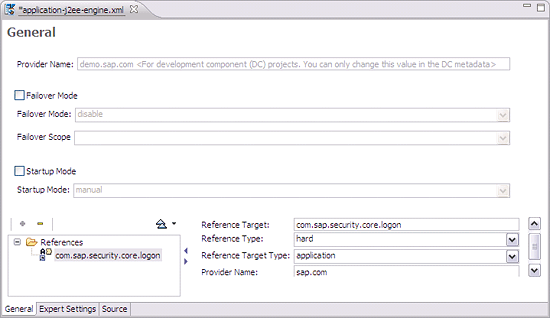
Figure 35
Module details of application-j2ee-engine.xml
Do not change the value of property Provider Name to your client domain. This reference is not client specific and, therefore, needs to refer to standard SAP dependency.
Add DC Level Dependency
Navigate to the Development Infrastructure perspective in NWDS and add the DC level dependency for the Web Module and Enterprise Application DCs. As shown in
Figure 36, you are adding the Web Module DC as a dependent DC to Enterprise Application DC. Select the check boxes for Deploy Time and Runtime, and save your choices.
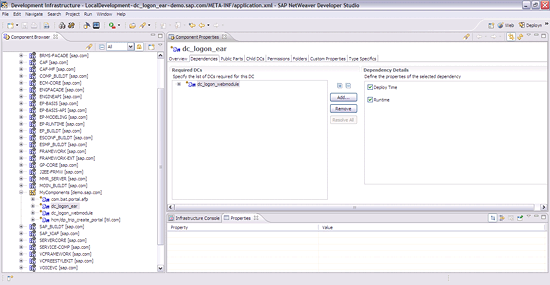
Figure 36
Add a Web module DC as a dependent DC into EAR DC
Add the Web Module to the Enterprise Application DC
Adding the Web Module to the Enterprise Application DC is the final step in the process. Expand the project structure of the Enterprise Application DC and open the file application.xml (
Figure 37).
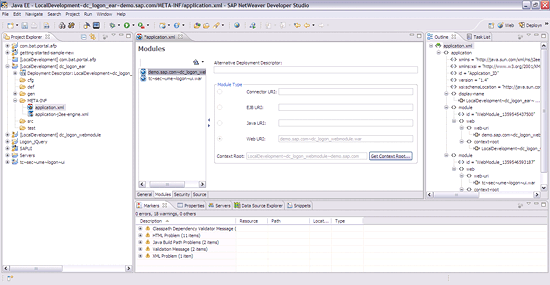
Figure 37
Web modules available in application.xml
Make sure you add DC level dependency. Otherwise, you are sure not to find the reference to the Web module DC in the Modules section of the application.xml file.
As shown in
Figure 37, select the referenced Web Module in the Modules section and make a note of the property value of Context Root. Copy this value in a notepad. You need this value to be maintained in SAP NetWeaver Administration so when you launch the portal URL, instead of the standard logon page, your custom logon page is loaded. In short, the context root is the property that governs which logon page is to be rendered.
Step 4. Deploy the DCs
Now it’s time to deploy. Do you deploy both DCs? No, you don’t need to — and you cannot. If you try to deploy the Web Module DC, you notice that when you right-click Web Module DC, the option for DC deployment is grayed out. However, the same option is enabled for Enterprise Application DC. Note that the Web Module DC needs to be deployed as a reference DC of the Enterprise Application DC. When you deploy the Enterprise Application DC, NWDS automatically fetches the Web Module DC and deploys them together.
That said, there is another way to deploy the Web Module DC. Follow this method only if you do not intend to use NWDI. Deploying with NWDI is fairly well understood, so I won’t cover it in this article.
Navigate to the Deployment perspective in NWDS (
Figure 38).
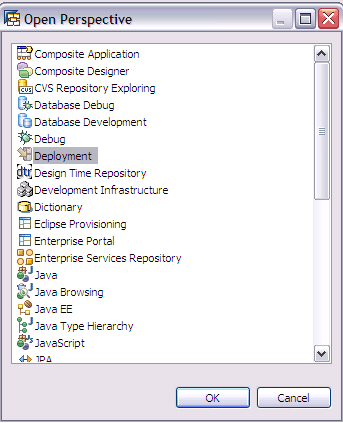
Figure 38
Navigate to the Deployment perspective
In the repository explorer, you find the server on which you want to deploy your DC. In the Deployment List section, click Import to select the DC to be imported and deployed (
Figure 39).

Figure 39
Select Import to add the DC you want to deploy directly
Select Workspace as an import source and click the Next button (
Figure 40).

Figure 40
Select Workspace so deployment can be referred to DCs available in the workspace
Select your Web Module DC from the list as shown in
Figure 41 and click the Finish button. This imports the Web Module DC in the deployment list. You can deploy the selected DC by clicking the Start button available in the Deployment List section (
Figure 42).
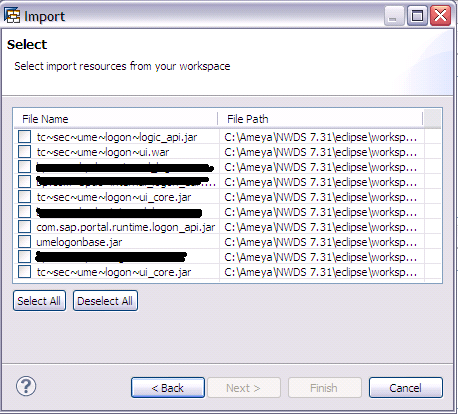
Figure 41
Select Web Module DC

Figure 42
Confirm and click Start to begin direct deployment
Ameya Pimpalgaonkar
Ameya Pimpalgaonkar is a senior SAP architect. He specializes in SAP Netweaver Portal, SAP BPM, BRM, MDM, and SAP Mobile. His interests include UI and front-end technologies, SAPUI5, Responsive Design, and integration of modern technologies with SAP UI. He has also worked on HTML5, CSS3, and jQuery. Ameya is also a certified usability analyst from HFI, USA.
You may contact the author at
ameya85@gmail.com.
If you have comments about this article or publication, or would like to submit an article idea, please contact the
editor.


