Currently many companies are interested learning how they can minimize the manual data entry for HR records. Using the automatic mass change function provided by SuccessFactors Employee Central, users will make fewer errors while maintaining data, especially for HR records. Learn the details about how you can perform mass changes on employee records for job relationships, how to mass change the relationships at multiple levels in the hierarchy, and how and when to use this requirement to help you do your job better, faster.
Key Concept
The mass change functionality offered by SuccessFactors Employee Central is a process that allows you to change the job relationship values or records in bulk. You have the ability to process a mass change of the employee’s master data at the organizational level during organizational restructuring. This process avoids users having to change or modify the values on individual records manually. You are not only allowed to change the relationships at one level up but are allowed to make changes at up to two levels (direct reports and second-level reports) and for the whole team.
SuccessFactors Employee Central provides mass change functionality to change the job information and job relationships’ objects. An employee’s relationship to the HR manager or administrator or any custom relationships apart from a direct manager is maintained at the job relationship portlet level. In general, it is common for many employees to share the same HR manager or administrator, and the mass change functionality helps users because it enables them to make changes in bulk instead of having to update employee records individually.
In the Admin Tools screen of Employee Central, select the Manage Mass Changes option from the Employee Files section. When you select the Create New button, the Manage Mass Changes screen (Figure 1) appears where you can configure the Manage Mass Changes according to your requirements.
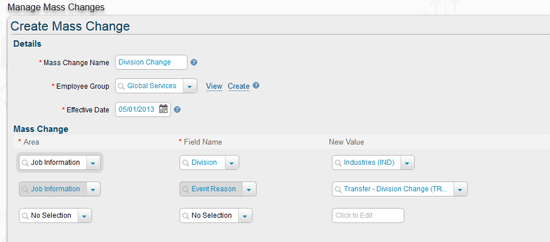
Figure 1
Mass change configuration screen
Select the Employee Group field from the drop-down menu to filter the employee population for processing the mass change (Figure 1).
Figure 1 shows an example for a mass division change. Effective 05/01/2013, all employees who belong to the Global Services Division are moved to a new division named Industries (IND). Once this mass change transaction is completed, the Event Reason is listed as Transfer – Division Change (TRANF).
Employee Central has provided some fields under Employee Group in the People Pool section to help filter the employees. When you click the Create link next to Employee Group field (Figure 1), you get the screen in Figure 2 in which you can configure the group of employees you want to filter out from other employees in the organization.
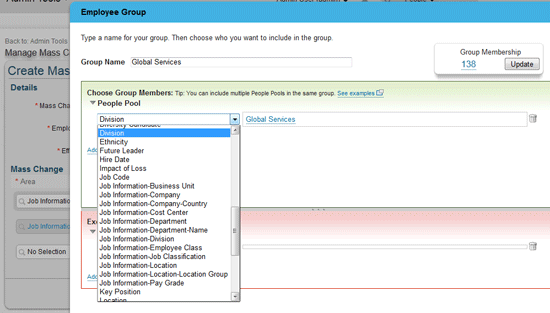
Figure 2
Create a group of employees
In my example I created the Global Services Division Group, which has 138 employees, as displayed in the Group Membership section (Figure 2). Once you run this mass change program for all 138 employees, the division changes from Global Services to Industries (IND) as per the example.
Create and Configure Mass Changes for HR Managers and Examples of the Mass Change Process
As a general business process in many organizations, when HR managers or administrators are terminated or moved to different positions, their reports are assigned to the replacing HR manager or administrator. Most other products (such as standard SAP ERP HCM) automatically follow by default the inheritance to assign the reports to the new or to the next-level HR manager or administrator in the hierarchy once the transaction is completed without any manual data entry. In SuccessFactors Employee Central, you need to maintain or update the relationships manually for reports. Most organizations try to automate master data changes as much as possible, to avoid errors as well to save time and money.
You can get away from having to manually update employees’ master data by using the mass change functionality, with some configuration, in Employee Central. If the organization follows the process of assigning HR managers according to their business unit or division, it becomes easier to select the respective business unit or division to filter out the employees and run the mass change process. However, if employees are assigned to HR managers without relating to any of the foundation objects (such as business unit, division, or region), you can use the following process to filter employees based on their HR manager.
Filter Employees by HR Manager
To filter employees according to their assigned HR manager, follow these seven easy steps in Employee Central.
Step 1. To access the Manage Mass Change screen, follow the configuration path Administration Tools > Employee Files > Manage Mass Changes to access the Manage Mass Change screen.
Step 2. Select the Create New button from the Manage Mass Changes screen (Figure 3).
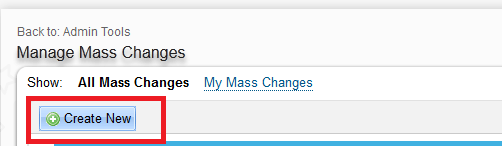
Figure 3
Create a new mass change
Step 3. Enter the Mass Change Name (in this example, the name is stored as HR Manager Mass Change).
Step 4. Create the Employee Group to filter the employees based on their HR Manager. For this, click the Create button next to the Employee Group field (Figure 4).
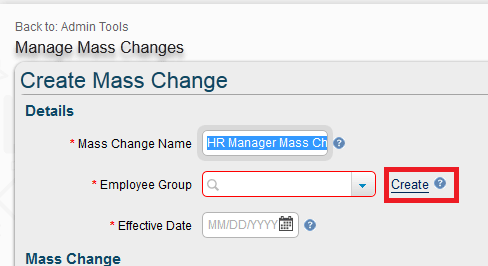
Figure 4
Create new employee group
Step 5. On the Employee Group creation screen, enter the Group Name (in this example, Manjunath Bannur HR Group) and create the new People Pool. Here, you select the People Pool object as Team View from the drop-down options (Figure 5).
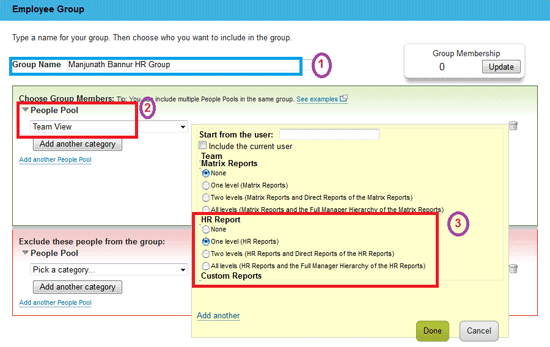
Figure 5
Employee group People Pool filter
Step 5 is important in the set-up for a new Manage Mass Change process. This step allows you to build a group to filter the employees based on the People Pool created. Employee Central provides some new categories under the People Pool section that can be selected to filter the employees better. For example, if you select the City drop-down option in the People Pool field, the system prompts you to select or enter the city name to filter the employee based on their city. If you select Beijing as the city for your instance, then the system allows you to group (filter) all the employees based in Beijing.
Box 1 (Figure 5) shows where you define the Group Name, box 2 shows the People Pool field drop-down list (where Team View is selected in my example), and box 3 shows the section where you can define the reporting levels of a group.
Box 3 also shows the relationship options, which you can change. If you select the Team option, for example, you are allowed to make mass changes to the Direct Manager level. Similarly, if you select Matrix Reports you can make changes to the Matrix Report and any custom Relationships that you have created in your organization can be selected using the Custom Reports option. Regardless of which options you choose, you are allowed to select one, two, or all levels of reports to change in the hierarchy of the user selected. With the Add another option (at the bottom left), the system provides the ability to add an additional level of filtering. For example, if you want to filter employees by their HR manager (Manjunath Bannur) and direct manager (Alberto Pinto), the system groups the employees who satisfy these two conditions into one group. Once you have made your selections, click the Done button.
Step 6. In the Start from the user field, enter the name of the HR manager (in this example, Manjunath Bannur) and under HR Report select the level of reports to which you need to make the changes (Figure 6). In this example, it’s One level (HR Reports).
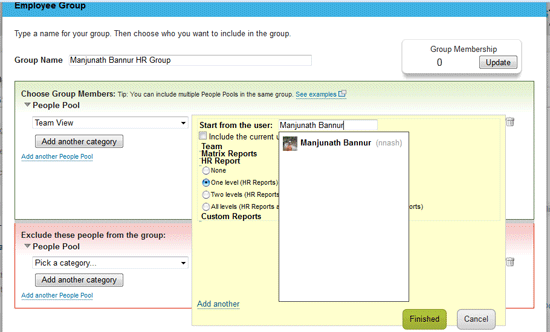
Figure 6
HR manager selection
Once you make your selections and click the Done button, the system creates a People Pool that has Manjunath Bannur as its HR manager. If you click the Update button under Group Membership (at the top right), the system retrieves and shows the number of employees who have Manjunath Bannur listed as their HR manager (Figure 7).
In the current system, Manjunath Bannur is the HR manager for 90 employees. If you click the number link in the Group Membership box, the system shows the list of employees, by name, who report to Manjunath Bannur. Click the Done button again (Figure 6) to return to the Create Mass Change screen.
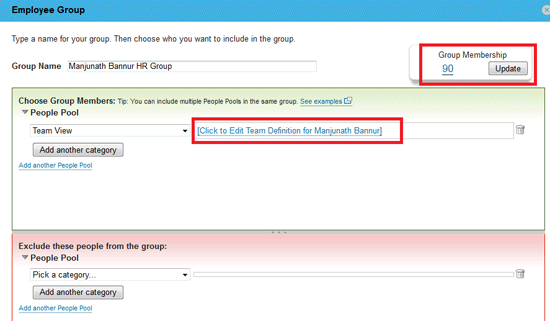
Figure 7
People Pool with HR manager reports
Step 7. Enter the final additional details in the Create Mass Change screen (e.g., the Effective Date, Area, and Field Name) and enter the New Value (Figure 8), which is the new HR manager’s name (Mark Jackson in this example). The date entered in the Effective Date field is the effective date of the change for the HR manager’s relationship for the employees’ records. In this case, the HR manager relationship is to be changed to Mark Jackson for all 90 employees, effective 05/01/2013.
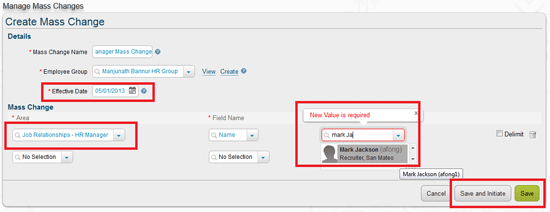
Figure 8
Select HR Manager to be changed
Click the Save button in Figure 8 to save this configuration and to process this transaction later, when required. When you click the Save and Initiate button, however, it saves the transaction and initiates the Mass Change process immediately. Once you click Save and Initiate, the system prompts you to confirm that the changes to be processed are correct. In this case, the system asks if the number of affected employees (90) is correct (Figure 9). If you select Yes, the system takes you back to the Manage Mass Change screen to view the new status of the transaction (Figure 10).
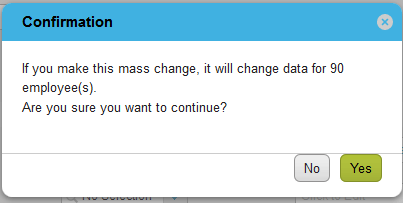
Figure 9
Confirmation screen for mass change of HR manager
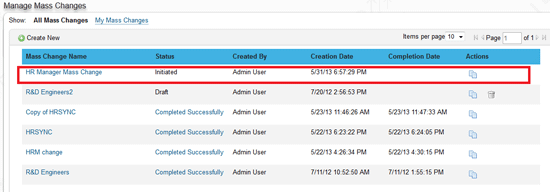
Figure 10
Mass change status change
Analysis of Report or Log Generated
Once the Mass Change job is initiated and completed, administrator users get a confirmation email along with the log file. Below are some examples of standard email messages:
- Job Initiated email confirmation: SuccessFactors system HRIS Sync [Employee Central Data Synch 5/31/13 3:58 PM] status – STARTED
- Job Completed email confirmation: SuccessFactors system HRIS Sync [Employee Central Data Synch 5/31/13 3:58 PM] status – COMPLETED
- Log file email: Mass Change HR Manager Mass Change Completed
Here is a sample email format of what is received with the log file. The email messages have the .csv files attached with the list of employees:
Click a name in the Mass Change Name column (Figure 10) to open the overview screen that shows the details on the status of the transaction (e.g., Status, Creation Date, and Completion Date), along with the log information that is sent in the email confirmation (Figure 11). You also have the option to download the file in .csv format (e.g., the Download CSV File link) to see the list of employees affected by this change.
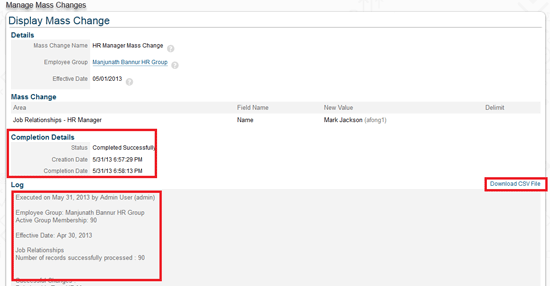
Figure 11
Mass Changes Overview screen
Manjunath Bannur
Manjunath Bannur has been in the IT industry for over 13 years working in various areas of HR, including SAP ERP HCM (for 7 years) and now SuccessFactors Employee Central. He is experienced in implementing SAP ERP HCM and Employee Central globally.
You may contact the author at mbannur@gmail.com.
If you have comments about this article or publication, or would like to submit an article idea, please contact the editor.