When a financial statement (e.g., balance sheet) is being prepared according to International Financial Reporting Standards (IFRS), the outstanding receivables should be fair valued. This means that the reported amount should reflect the expected amount to be received. Learn about a functionality SAP developed that allows you to make a fair value adjustment in your system so that your financial statements will be correct.
Key Concept
For the fair value adjustment, SAP developed valuations for the flat-rate individual value adjustment. These allow you to automatically calculate and post a flat-rate amount as a correction for the outstanding receivables. The amount depends on the number of days the receivables are overdue. The posting corrects the balance sheet and the profit and loss statement (P&L). The outstanding amounts per customer are not modified.
A certain percentage of outstanding receivables will not be received. To accurately reflect the amount that is likely not to be received, an allowance for doubtful debts is created and recorded on the balance sheet. This amount reduces the receivables balance. You define a percentage of the outstanding receivables as bad debt. The percentage depends on the number of days the amount is overdue. In the example in this article I use the following percentages:
- For receivables overdue from 60 to 90 days a provision of 3 percent is calculated
- For receivables overdue from 91 to 120 days a provision of 25 percent is calculated
- For receivables overdue from more than 120 days a provision of 100 percent is calculated
Before calculating and posting the provision, you need to configure the SAP system and change the customer master data. First I’ll explain how the configuration and master data is set up and then go through the business process.
Note
My example is from an SAP ERP Central Component (SAP ECC) 6.0 system, but it works in earlier releases as well.
Configuration and Master Data Setup
The configuration consists of two basic steps. First is defining the way the provision is to be calculated and second is defining how the provision is to be posted. You might need to perform a third configuration step to make the value adjustment field available in the customer master.
Step 1. Define the value adjustment key. The value adjustment key is used to calculate the amount of the provision. Follow customizing menu path Financial Accounting (New) > Accounts receivable and Accounts Payable > Business Transactions > Closing > Valuate > Valuations > Define Value adjustment Key. Figure 1 shows the value adjustment key I use in my example. The following explains the columns that are relevant for the calculation process.
- Value adjust.: This is the two character name of the value adjustment key. In this case I only have FR for France because my example is a French company code.
- Valuation: This is the valuation area. You can carry out closing according to various legal regulations (e.g., US GAAP or German Commercial Code) in which different valuation principles apply. To make that distinction, you can use valuation areas. In my example, I use AL, to mean all valuation areas.
- C…: This is the country key. It allows you to define the percentages per country. This can be useful because payment behavior is country dependent. Being 90 days overdue in Switzerland, for example, may indicate a different risk than being 90 days overdue in Greece. In my example this column is empty because it only concerns French customers.
- Days: This is the upper limit of the number of days overdue. When calculating the provision, you set a key date. The number of days an open item is overdue is the difference between the due date and the key date.
- Debit int. rate: This is the debit interest rate. It is the percentage used to calculate the provision.

Figure 1
Value adjustment key
Step 2. Define the accounts for the posting of the value adjustment. Use transaction OBB0 or follow menu path Financial Accounting (New) > Accounts receivable and Accounts Payable > Business Transactions > Closing > Valuate > Valuations > Define Accounts.
Figure 2 shows the selection screen of transaction OBB0. Double-click the line for the flat-rate individual value adjustment (transaction B03). A pop-up screen appears; on this you can enter the chart of accounts. When you use valuation areas, as in my example, you have to click the yellow arrow icon. Otherwise, you would just click the green check mark icon.
Note
The other options are not discussed in this article. When you have implemented enhancement packages for SAP ECC 6.0, you see additional entries as well. In my example, they are three additional lines in the group HWA (B02, B98, and B99). After implementation of the enhancement, you will also see RKK, ZKB, and ZKK. The clicking of the green arrow is applicable to all SAP releases; the clicking of the yellow arrow is only applicable when using SAP ECC.
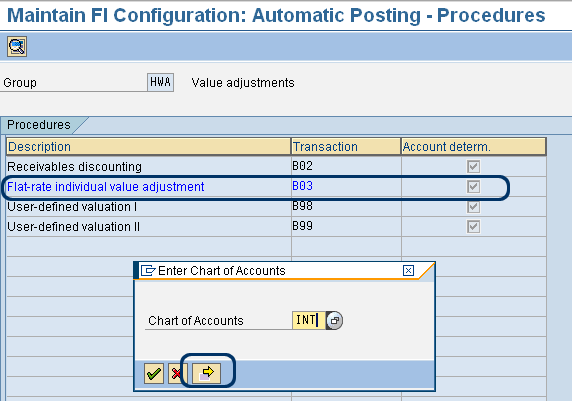
Figure 2
Selection screen of transaction OBB0
The SAP system then takes you to the screen in which you enter the general ledger accounts to be used for the adjustment posting (Figure 3). The settings depend on the reconciliation account used in the customer master. For this example, I use adjustment account 507200 and target account 56360 for all customers that have reconciliation account 55100. Account 507200 is a cost account while 56360 is a balance sheet account.

Figure 3
Accounts for the value adjustment posting
Step 3 (optional). This is only necessary if the value adjustment field in the customer master data is not available. Use transaction OBD2 or follow menu path Financial Accounting (New) > Accounts receivable and Accounts Payable > Customer Accounts > Master Data > Preparations for Creating Customer Master Data > Define Account Groups with Screen Layout (Customers) (Figure 4). Because this transaction is a very basic customizing transaction and a little bit out of scope, I won’t explain it in full detail. Per customer account group, you go to the screen where you maintain the fields for Account management and make sure that the Value adjustment key is either optional or required.
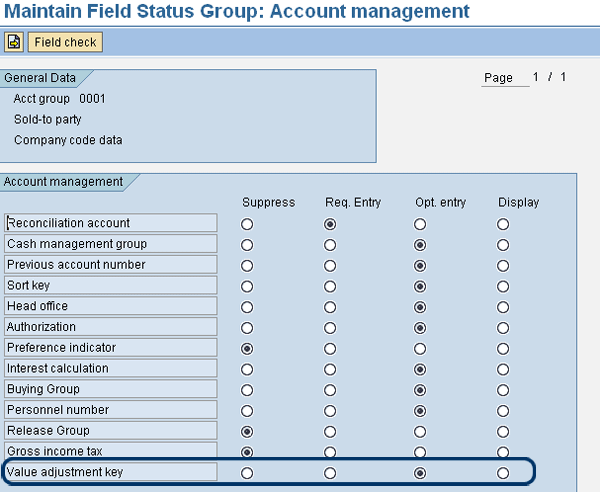
Figure 4
Customer field status maintenance
Maintain the Customer Master Data
The final preparation step is customer master data maintenance. In the customer master, you need to maintain the Value adjustment field (Figure 5). You can maintain the customer master data with transaction code FD02. Or, if you want to maintain several customers at the same time, you can also use transaction MASS. Figure 5 shows transaction FD02 with the Value adjustment key set to FR.
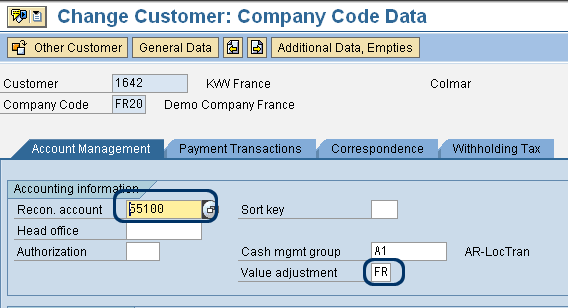
Figure 5
Maintain customer master data
After the required configuration and the customer master data maintenance, the actual value adjustment can be calculated and posted.
Transaction F107
To calculate and post the value adjustment, use transaction code F107 or follow user menu path Accounting > Financial Accounting > Accounts Receivable > Periodic Processing > Closing > Valuate > Further Valuations. Figure 6 shows the start menu of the transaction. Enter a run date and identification and then click the Maintain button to maintain the selection parameters of this transaction. As F107 is a transaction that can be used by all users, it is recommend to use an identification that makes clear whose valuation it concerns — for example, which company code, and what kind of customers, such as local or foreign customers.

Figure 6
Start menu in transaction F107
Figure 7 shows the parameter screen of transaction F107. Important parameters are:
- Key date: All documents that haven’t been cleared at this date are included in the selection
- Val. Method: This is the valuation method. You must enter a 3 for the flat-rate adjustment.
- Currency type: Enter 10 for the company code currency
- Valuation Area: If you use valuation areas, you must enter the valuation area for which you want to make the adjustment.
- Error sessn: In case of errors, a batch input session with this name is created by the system. The batch input session then allows you to correct the errors manually.
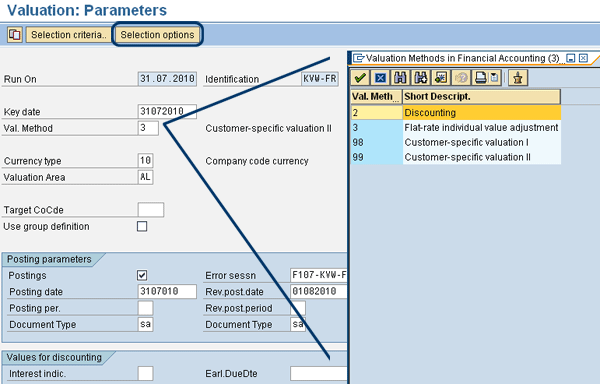
Figure 7
Parameter screen of transaction F107
The other parameters are self explanatory. Once all parameters have been entered, click the Selection options button to select the customers for which you want to make an adjustment posting. For simplicity, in my example I only select customer 1642 and deselect all vendors (Figure 8). If you don’t deselect the vendors they are shown in the logging of the transaction. As no adjustment for vendors are made anyway (that’s the logic of the program), it is no use to show them.
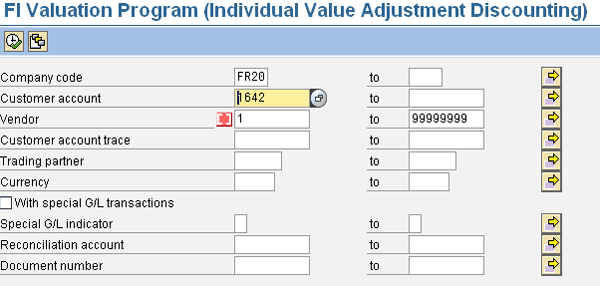
Figure 8
Selection screen of transaction F107
When all the selection criteria have been entered, click the execute icon (or press F8). This returns you to the parameter screen (Figure 7). On that screen, click the save icon to return to the start-up screen of transaction F107 (Figure 6). The screen now has an additional button called Dispatch, shown in Figure 9.
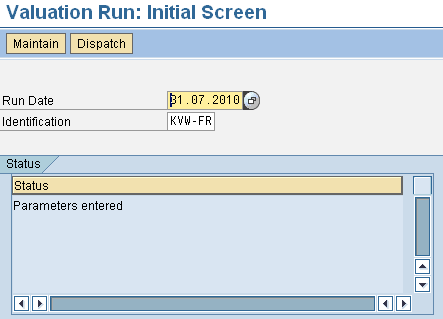
Figure 9
Initial screen of transaction F107 with the Dispatch button
Click the Dispatch button to start the execution of the program. First the transaction creates a proposal that can be adjusted. Keep pressing Enter until you can see on the status window that the status has changed into Val.run finished. Pressing Enter is just necessary to refresh the screen; it doesn’t have any other function. Once the proposed valuation adjustment is ready the initial screen of transaction F107 looks like the screen shown in Figure 10.
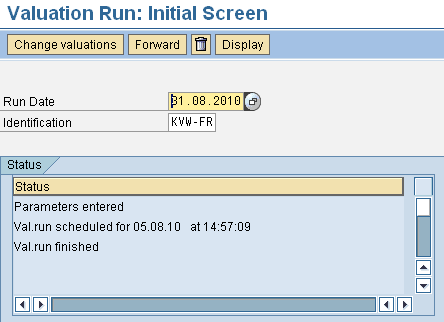
Figure 10
Transaction F107 indicating that the valuation run has finished
Click the Display button to display the proposed adjustment. The result of my example is shown in Figure 11.
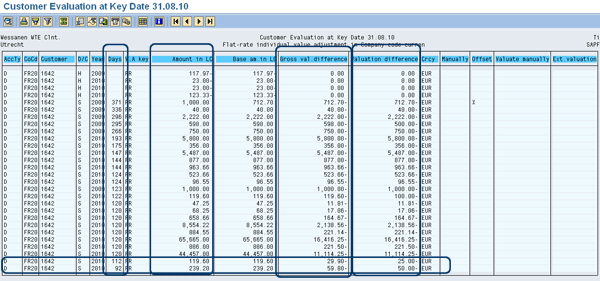
Figure 11
Valuation adjustment proposal
To explain the report, the most important columns have been marked:
- The Days column shows the number of days an open item is overdue
- The Amount in LC column shows the total amount of the open item in the company code currency. A minus sign behind the amount indicates a credit note. As this is not a risk, the program doesn’t make any adjustment for the credit notes.
- The third and fourth columns show the gross valuation difference and the net valuation difference. The difference between gross and net valuation difference is the Value Added Tax (VAT). On the lower two rows, you can see a good example of how the calculation works. The two documents are 112 and 92 days overdue. This means that an adjustment of 25% must be made according to the requirements as defined at the beginning of the article. The program calculates 25% of the original amounts and puts that in the third marked column as the gross valuation difference. The amounts still have VAT. The program subtracts the VAT amounts from the gross amount and puts the result in the fourth column as the net amount. The reason the VAT is subtracted is because there is no business risk involved in the VAT.
- The last marked column is the Offset column. An X in this column means that the adjustment amount has been reduced by credit memos. In my example, there is only one X. The value of the concerned document is € 1000. Since it is open for more than 120 days the value adjustment should also be € 1000, but in this case outstanding credit memos will be deducted first. Therefore, the value adjustment is only € 712,70. The system first subtracts all credit notes and as soon as no credit notes are left to subtract, the remaining invoices are adjusted.
After checking the reported data you return to the initial screen (Figure 10). You can either change your selection by deleting the data (click the garbage bin icon), change adjustment values manually (click the Change valuations button), or prepare the posting of the adjustment. This is what I’ll show you next.
On the screen shown in Figure 10, click the Dispatch button to prepare the adjustment posting. Keep pressing Enter until the transfer has finished. Pressing Enter only refreshes the screen. Once finished, this is indicated on the status window (Figure 12). The actual posting is not yet made; only a batch input session for creating the posting has been created.
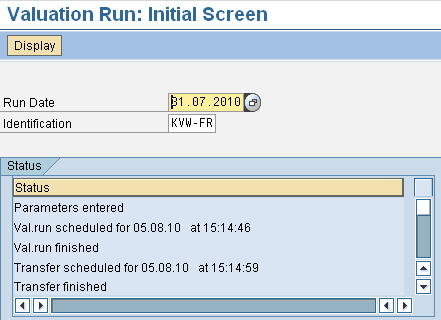
Figure 12
Transaction F107, indicating that the posting transfer run has finished
The result of the posting is shown in Figure 13 with transaction FB03. As you can see the amount in document currency (the Amount column) is zero. However, the amount in company code currency will be correct. Click the Display Currency button to see the posting in company code currency (Figure 14). Depending on your settings for displaying financial postings, you may have to select a display variant.
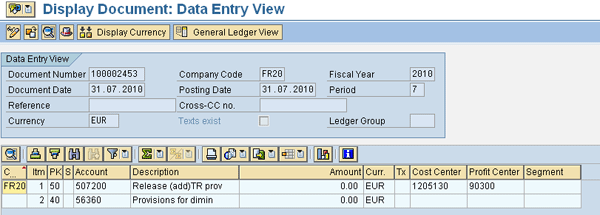
Figure 13
Posting of the value adjustment
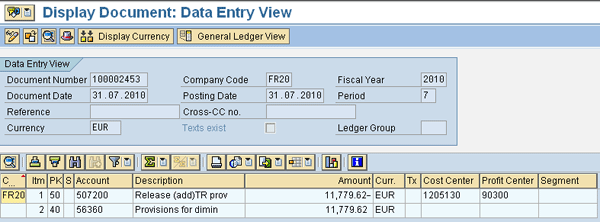
Figure 14
Posting of the value adjustment in company code currency
Additional Remarks
If you need to rerun the adjustment run, you first have to reverse the existing run. You can do this via the menu on the initial screen of transaction F107. Follow menu path Environment > Reset Data > Flat rates and valuations.
You can also use program F107 for discounting. Depending on the implementation of the enhancement packages for SAP ECC 6.0, you can also use it for provisions.
The screen may look different depending on the enhancement packages you have installed, but the functionality is the same. For example, the selection screen shown in Figure 8 may instead look like what is shown in Figure 15.
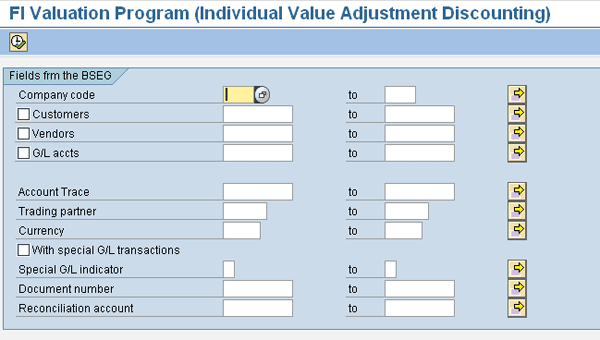
Figure 15
New selection screen of transaction F107
Kees van Westerop
Kees van Westerop has been working as an SAP consultant for more than 25 years. He has an MBA degree in mathematics and a degree in finance. Kees has been concentrating on the financial modules, especially in general ledger accounting, cost center accounting, and consolidation. He also has a great deal of experience with rollouts of kernel systems and integrating finance and logistics.
You may contact the author at keesvanwesterop@hotmail.com.
If you have comments about this article or publication, or would like to submit an article idea, please contact the editor.


