Report categories in SAP ERP HCM enable you to make changes in standard PNP and PNPCE logical database selection screens. You can add new fields or hide any unwanted default fields using simple settings and without writing a single line of code.
Key Concept
Report categories are configuration settings that enable adjustments in the standard PNP and PNPCE selection screens. You define them using a unique name. The report category option for logical database PNP and PNPCE enables you to design your own selection screens using simple customizing settings without any programming. You can then assign the report category to a custom report and the relevant screen is displayed to the user on report execution.
The logical databases PNP and PNPCE provide default screens with a set of commonly used input fields. However, in certain circumstances, these screen fields may not suffice. Users may want you to either hide or add certain fields for data input. You can use report categories to complete this task. SAP ERP HCM report category provides a number of flexible options (without the need of coding) for designing the report selection screen and displaying output pertaining to the data entered by the user.
The report category enables you to add a number of additional fields to the program selection screen. In addition, you can also simplify the look of the screen by removing existing fields, such as company code, employee group, and subgroup. These changes do not affect the coding of the programs to which the categories are assigned.
I show you how to create a new report category—either from scratch or by using an existing report category (copying it and making changes). I start with a brief discussion of the default screen shown in the logical database PNP and PNPCE when no report category is specified. Then I discuss the advantages of a report category and explore the two ways for reaching the Report Category Maintenance screen (via the IMG path and through transaction code SE38 properties or attributes). I show detailed settings in the report category creation process, and, finally, show the report category in action via assignment to a program.
Note
This article is primarily intended for functional SAP ERP HCM users as well as SAP developers of the SAP ERP HCM module. My primary focus is on master data report category classes. The configuration I describe is transportable. It must first be created in the development system, and then transported through QAS to the production system. To perform the tasks that I discuss, you need to have access to the development system and the necessary authorizations to use these transactions.
Default Screen for PNP- and PNPCE-Based Programs
As already mentioned, the logical databases PNP and PNPCE provide a default selection screen with a set of input fields. First, let’s look at the default screen that appears in the PNP screen (Figure 1).
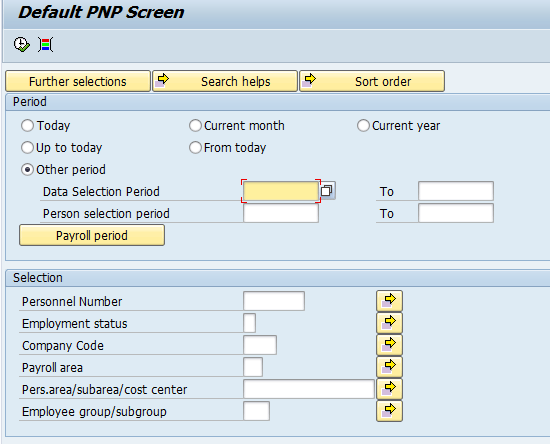
Figure 1
The PNP default selection screen
The default PNPCE selection screen is shown in Figure 2.
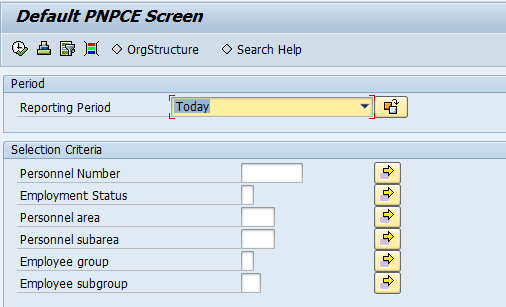
Figure 2
The PNPCE default selection screen
The input screens also include many fields. However, these input fields may or may not be required depending on whether users need to hide or add certain additional fields for data input.
Basics and Advantages of Report Category
The HR report category provides a number of flexible options—that don’t require custom coding—for designing the report selection screen.
The report category has a number of advantages:
- No programming is needed. You can create the new report category using configuration settings.
- You can create report categories for reports involving logical databases PNP and PNPCE.
- A large variety of standard report categories are available to use in your programs.
- You can easily copy existing report categories (instead of creating new ones from scratch) and then make minor modifications to suit your needs.
Accessing Report Category Maintenance Screen
I show you in detail the two ways of reaching the report category maintenance screen: using the IMG path and via the program attributes.
Method 1: Accessing the Report Category Maintenance Screen via the IMG
To create or display the report category execute transaction code SPRO and then follow IMG path Personnel Management > Human Resources Information Systems > Reporting > Adjusting the Standard Selection Screen > Create Report Categories. Then click the Create Report Categories node.
Method 2: Accessing the Report Category Maintenance Screen via Program Attributes
The second method for reaching the report category maintenance screen is via the program attributes pop-up dialog box (from transaction code SE38). While in the transaction code SE38, go to the Attributes screen as shown in Figure 3.
Note
The report category can be used for both SAP-standard and custom programs. The primary emphasis of this article is on custom reports.
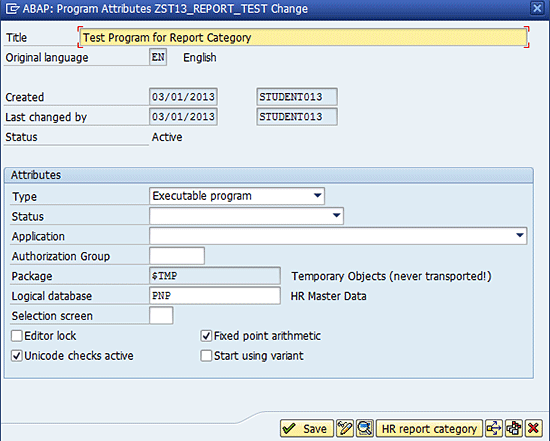
Figure 3
Program attributes
Click the HR report category button, and the Report category assignment screen appears (Figure 4).
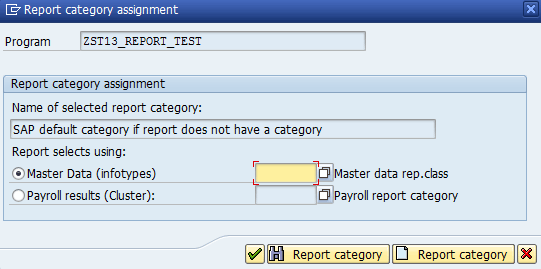
Figure 4
Report category assignment
To create a new report category, click the Report category button (Figure 4).
Note
The Space category is the default SAP system report category class.
Report Category Maintenance Screen Details
Regardless of which of these two approaches you use, a pop-up screen appears indicating that the table that you are about to maintain is cross-client. Click the Continue button in this screen. In the maintenance screen that appears (Figure 5) click the New Entries button to create a new report category.
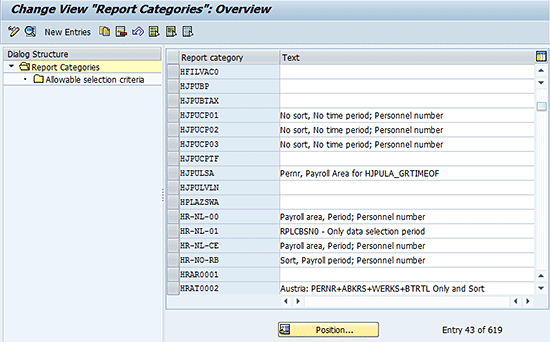
Figure 5
Maintain your new report category
In the next screen (Figure 6) enter the name of the new category and a suitable description in the Report Category field and the description field next to it. The name should start with a number from 0 to 9. In addition to fields for these new entries, the report category details screen provides you with other useful components. I discuss these components in the next section.
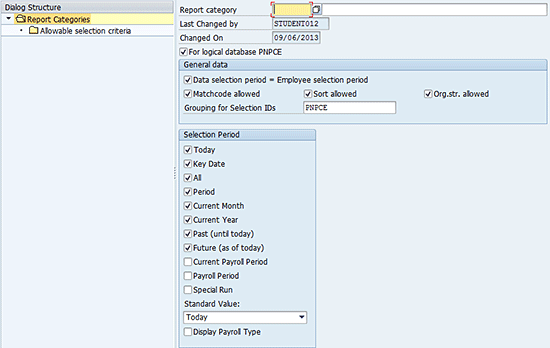
Figure 6
New report category details
General Data
Whether the report category is meant for use with the PNP or PNPCE logical database, the upper General data portion contains the fields shown in Figure 7.

Figure 7
General data fields
When these three check boxes are selected—Matchcode allowed, Sort allowed, and Org.str. allowed—the Search help, Sort order, and the Org. structure buttons are displayed, respectively, on the program selection screens (Figure 8).

Figure 8
Buttons displayed on the selection screen
If the Data selection period = Employee selection period check box (Figure 7) is selected (this is the default), a single block appears on the program selection screen that pertains to both the data and the employee selection period.
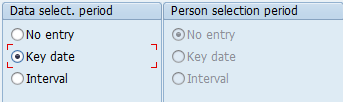
Figure 9
Data selection period
Therefore, for PNP report categories, if you select the Key date radio button in the Data select. period section (Figure 9) of the category maintenance screen, the program selection screen appears as shown in Figure 10. (The Person selection period in this case is not enabled.)
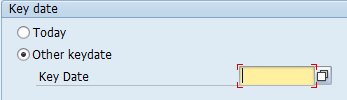
Figure 10
Key date
However, if you want to separate the data selection and the employee selection periods, do not select the Data selection period = Employee selection period check box (Figure 7). In this case, if you select the Interval radio buttons for both the Data select. period and the Person selection period (as shown in Figure 11), then the PNP selection screen appears (Figure 12).
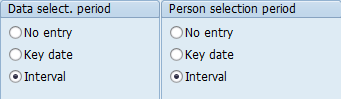
Figure 11
Choose different intervals
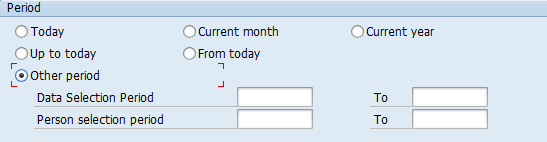
Figure 12
Data and person selection periods intervals
While defining the report category for the PNP logical database, the system also displays the Payroll Area/Period/Year section (Figure 13). If you select an option other than the No entry radio button, the Payroll period button is displayed on the program selection screen to which this report category is later assigned.
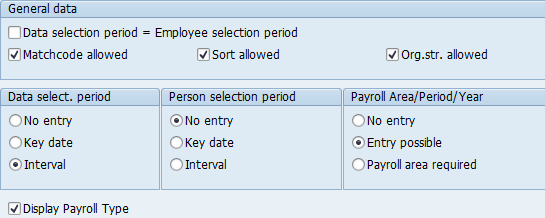
Figure 13
Payroll area and period block
In the Payroll period section of the screen (Figure 14), select the Current period radio button and then click the Period button; this displays the payroll-period-related fields.
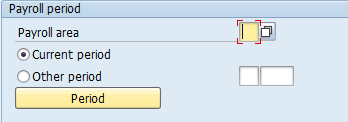
Figure 14
Payroll period selections
PNPCE-Related Settings
If you want the report category to be applicable for the PNPCE logical database, select the For logical database PNPCE check box in Figure 6. If your program (whose screen is to be adjusted according to the user’s liking) is based on the PNP logical database, then uncheck this For logical database PNPCE check box. If the PNPCE logical database has been used, the check box must be selected.
Note
To find out which logical database your program uses, execute transaction code SE38 and enter the program name. Select the Attributes radio button and click the Display button. The logical database your program is using is displayed in the Attributes pop-up screen (Figure 3).
Selecting this check box changes the Data Selection Period and Employee selection period blocks as shown in Figure 15. (This setting is used in cases where the Data selection period = Employee selection period check box is unchecked, as shown earlier in Figure 13.)
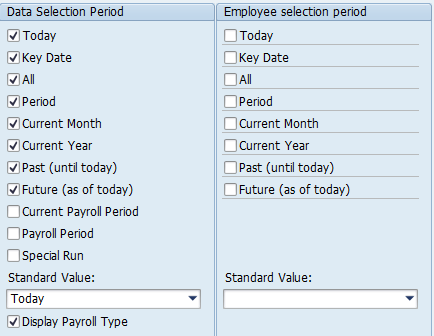
Figure 15
Data and employee selection period blocks
Select the check boxes for the various options that are to be given to the user on the selection screen. The options chosen in Figure 15 then appear on the selection screen as drop-down values in the Period field lists (for example, the Reporting Period options shown in Figure 16).

Figure 16
Reporting period options
Specify the Selection Criteria
Next, you need to specify the fields (such as Personnel Number, Action, Personnel Area, and Personnel Subarea) to be shown on the input selection screen. First, select the relevant report category; this appears on the right side of the screen (not shown). On the left side of the screen, double-click the Allowable selection criteria node under the Report Categories folder.
This displays the Select Options screen in the right pane (Figure 17). This list is initially blank. You then can specify the fields that may be included. Use the F4 help key to see the various admissible fields. Make sure the 1st page column check boxes are selected (Figure 17).

Figure 17
Select your options
In this example, I have chosen to display only the Company code and the Employee group on the selection screen. This step is the same for both PNP and PNPCE report categories.
Copy an Existing Category
From the initial screen of the create report category transaction, select an existing report category record and then click the copy icon  . Enter the new name and description in the screen that appears and specify any other settings that you want to check or uncheck, as discussed in the previous section. After you press Enter a dialog box appears (Figure 18).

Figure 18
Copy entries
The system allows you either to copy only the initial screen settings of the report category or the dependent entries (selection fields specified under the Allowed Selection Criteria). The system asks you to copy all the selection criteria fields of the original report category. Click the copy all button. All the fields in the original report category appear. You can then remove or add any other fields in the Allowable Selection Criteria and then save the new category with a new name. You can use any name as long as it is not already in use.
Assign the New Report Category to a Custom Program
The final step is to assign the new report category to a custom program. In the Report category assignment dialog screen (Figure 4), enter the newly created report category in the Master data rep.class field shown in Figure 19 and press Enter (in my example the report category is named 13Z1280). Make sure that the program is active via transaction code SE38. Enter the program name, select the Source Code radio button, and click Display. The status—Active or Inactive—appears at the top of the screen.

Figure 19
Assign the new report category
Note
The SAP system also provides an IMG option for assigning report categories to programs. The IMG path is Personnel Management > Human Resources Information Systems > Reporting > Adjusting the Standard Selection Screen > Assign Report Categories. This path enables you to assign report categories to standard programs as well. However, the focus of this article is on the approach of assigning report categories to custom programs using program attributes within the ABAP editor.
Putting It All Together
Now you put into practice all the concepts discussed previously. You have created a new report category for the PNP logical database. You have unchecked all the indicators in the General Data section. In addition, in this example, the No entry radio buttons are selected for Data select. period and Payroll Area/Period/Year (Figure 20).
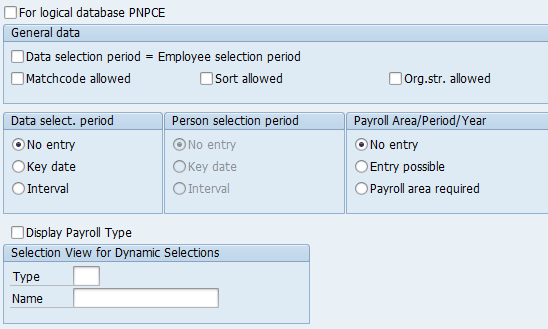
Figure 20
The report category maintenance screen
The Select Options fields are shown in Figure 21. These include Payroll area, Company Code, and Personnel Number.

Figure 21
Assign applicable select options
After you assign the report category to a program, upon execution you see the simplified Selection screen shown in Figure 22 (note the change from the default screen shown in Figure 1, which has been achieved without any programming). A program that is run without a selection period automatically fills in the start date as 01.01.1800 and an end date of 31.12.9999. As a result, the program selects all the records from the given infotype for that employee regardless of the start and end dates. Typically, this kind of program is used to print all the infotype records for the employee’s entire employment history, from the date of hire to the present.
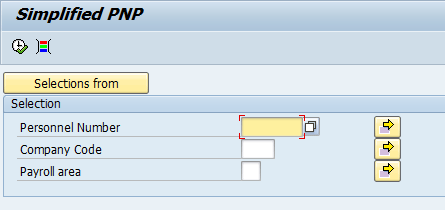
Figure 22
The simplified PNP screen
Rehan Zaidi
Rehan Zaidi is a consultant for several international SAP clients (both on-site and remotely) on a wide range of SAP technical and functional requirements, and also provides writing and documentation services for their SAP- and ABAP-related products. He started working with SAP in 1999 and writing about his experiences in 2001. Rehan has written several articles for both SAP Professional Journal and HR Expert, and also has a number of popular SAP- and ABAP-related books to his credit.
You may contact the author at erpdomain@gmail.com.
If you have comments about this article or publication, or would like to submit an article idea, please contact the editor.