Learn about the detailed process of setting up enhanced multiple counter plans in SAP Enterprise Asset Management (EAM). With this preventive plan, you can maintain assets using multiple cycle sets. Each cycle set can correspond to a specific counter-based (performance-based) reading or to the lifetime of the equipment. After meeting the defined criteria of preventive maintenance, you can create call objects (work orders or notifications) with different sets of operations predefined according to the recommendations of the manufacturers of the assets.
Key Concept
Enhanced multiple counter plan (EMCP) is one of the maintenance plans offered in SAP Enterprise Asset Management (EAM). EAM is part of SAP ERP Central Component (SAP ECC).
The business process of preventive maintenance is carried out to reduce breakdown maintenance costs, meet manufacturers’ recommendations, improve the quality of products, comply with legal requirements, and enhance capacity use. In general, the efficiency of a maintenance department is judged by key performance indicators (KPIs) such as mean time to failure and mean time between failures of technical assets.
As you increase the intensity of preventive maintenance, breakdown maintenance requirements fall, but the total cost of operations may rise. You can optimize this by formulating appropriate preventive maintenance plans according to the recommendations of asset manufacturers or industry experts.
SAP Enterprise Asset Management (EAM), also known as Plant Maintenance, has different types of preventive maintenance plans. These plans meet the preventive maintenance requirements of different types of technical assets. Enhanced multiple counter plan (EMCP) is the most versatile of all the plans that are applicable for equipment, such as automobiles or diesel generator sets. In addition to EAM, implementing Materials Management (MM), Financial Accounting (FI), and Managerial Accounting (CO) are prerequisites for completing the end-to-end process of preventive maintenance. In EAM, SAP delivers several types of maintenance plans, as shown in Table 1.
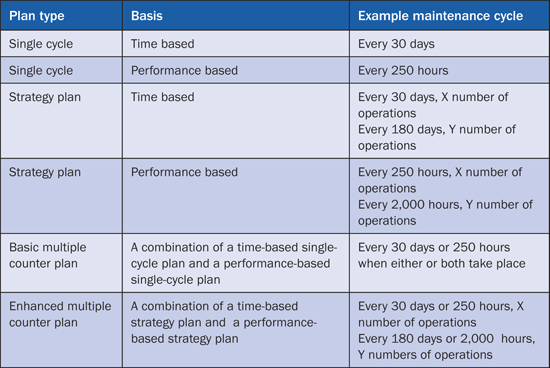
Table 1
Maintenance plan types
EMCP is an enhancement to the basic multiple counter plan in which you can have only one cycle set (for example, 30 days or 250 hours) in a plan. In a multiple counter plan, you can incorporate multiple cycle sets. You can use the assignment between cycle sets and the maintenance item to ensure that only certain maintenance items generate a call object for certain dates. If you need to use a cycle set more than once, you can define it in a repeat factor for each cycle set.
I explain the various steps required for setting up and using an EMCP with an example plan for 500 hours or 90 days and 2,000 hours or 365 days. In this maintenance plan, there are two cycle set sequences: 1 and 2. As shown in Figure 1, Cycle set Seq1 has to repeat three times and Cycle set Seq2 occurs only once.
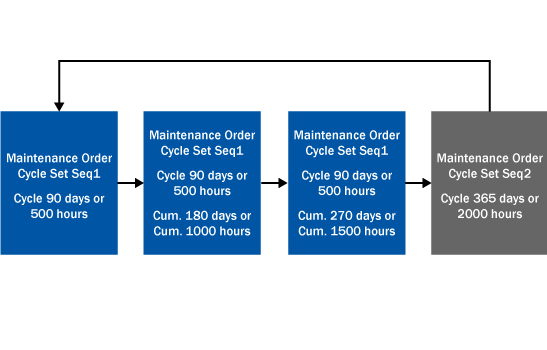
Figure 1
Cycle set sequences
Step 1. Configure the Special Function in Maintenance Planning
The first step is to activate the special function for Maintenance Planning in configuration. Follow menu path SPRO > Plant Maintenance and Customer Service > Maintenance Plans, Work Centers, Task Lists and PRTs > Maintenance Plans > Configure Special Functions for Maintenance Planning (Figure 2). Select the Enh. MultipleCounterPlan check box and click the save icon.

Figure 2
Configure a special function in maintenance planning
An information window pops up with the following message: Enhanced multiple counter plan can no longer be deactivated after the save. You receive this message because selecting the Enh. MultipleCounterPlan indicator can lead to a different program flow with a customizing table entry and may produce an incorrect result when it is unchecked later. You can leave this indicator selected even if you have decided not to use EMCP later.
Step 2. Define Cycle Sets
In transaction IP11Z, create a cycle set by clicking the New Entries button. Enter a cycle set name with a meaningful description and then click the save icon (Figure 3).
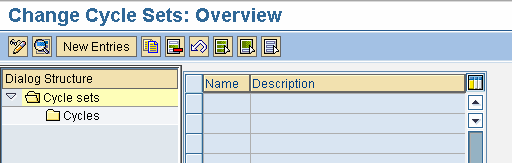
Figure 3
Define a cycle set
After saving the name and description of the cycle set, you can click the display icon, followed by change icon, and then the New Entries button to create cycles for the cycle set (Figure 4). In the cycles, you define the package number, cycle length, unit, maintenance cycle text, cycle short text, and offset. The offset of a maintenance package or maintenance cycle determines the time after which a maintenance package first becomes due. The fields Offset and OffsetShortText are optional parameters.
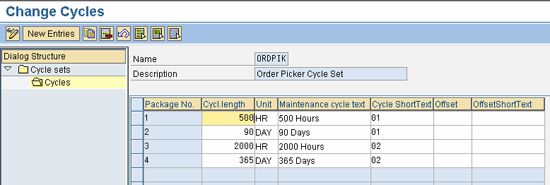
Figure 4
Cycles in cycle set
Step 3. Define Task Lists
Another prerequisite is to ensure that you create suitable task lists for cycles 500 hours or 90 days and 2,000 hours or 365 days. Task lists describe the operations with work content to be performed when you use them in maintenance work orders. You can also incorporate the spare parts requirements, production resources, and tools in the task list. There are three types of task lists: general, equipment, and functional location. I use the general task list type in my example. You can set up a profile for copying certain header default parameters to the task list, but this is optional.
To create a general task list use transaction IA05. In the screen that appears (Figure 5) use a profile to configure the default values. Use transaction OIL6 to configure the profile.

Figure 5
Create a general task list with a profile containing default parameters
Figures 6 and 7 show the header and operations views of the task list. Press Enter after selecting the profile in the initial screen (Figure 5) to move into the Header General View (Figure 6). The values for Usage (4, meaning site maintenance) and Status (4, meaning released) default from the profile. The System Condition field represents the condition of the equipment when the tasks are performed and is a consideration for capacity planning. Its values are 0 for not in operation, 1 for in operation, and M for malfunction.

Figure 6
Task list header general view with default parameters from the profile
Click the Operation button to move into the Operation Overview (Figure 7). Here the operation control key PM01 is automatically copied from the work center definition. This control key determines the type of operations (internal or external) to be carried out. The control key PM01 is for internal operations in which work is performed by internal labor. You enter the work center, maintenance plant or site, operation details, work content, and duration details.
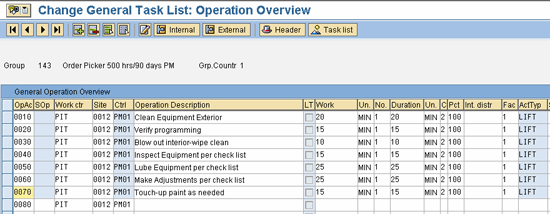
Figure 7
Define details of operations
From the Operations Overview screen, you can branch out to assign spare parts and production resources, as well as tools required for each operation. You need to create task lists for each cycle set because maintenance operations to be carried out for 500 hours or 90 days and 2,000 hours or 365 days may be different.
Step 4. Create an Enhanced Multiple Counter Plan
Now you create an EMCP with cycle set defined earlier in Figure 4. In SAP ERP 6.0 follow Easy Access menu path Logistics > Plant Maintenance > Preventive Maintenance > Maintenance Planning > Maintenance Plans > Create > Multiple Counter Plan or use transaction IP43. In the screen that appears (Figure 8) you can leave the Maintenance plan field blank if you want the maintenance number to be autogenerated from the Number Range object MPLA_NR. Alternatively, you can enter the maintenance plan number manually using a meaningful name.
The Maintenance Plan Category defines the call objects such as notifications, work orders, service entry sheets, and inspection lots that need to be generated when you run the maintenance plan manually or through a background job. You can leave the cycle set field blank or select the suitable predefined cycle set.
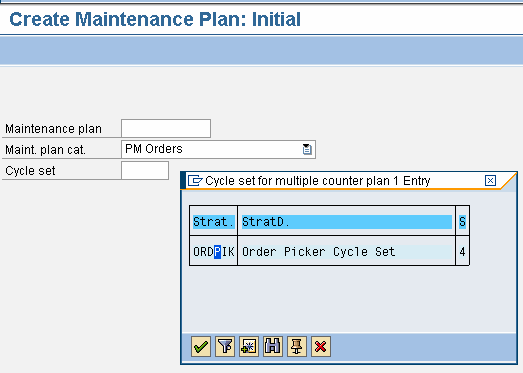
Figure 8
Choose the plan category PM Orders to generate work orders
On pressing the Enter key, the maintenance plan main screen are displayed with a header (Figure 9) and items (Figure 10). The header includes the following tabs: Maintenance plan cycle, Maintenance plan scheduling parameters, and Maintenance plan additional data. Enter a suitable description for the plan. You can see that cycle set sequence values are copied over with a Repeat Factor of 1. Enter the Cycle Set Seq. corresponding to cycles, as shown in Figure 9.
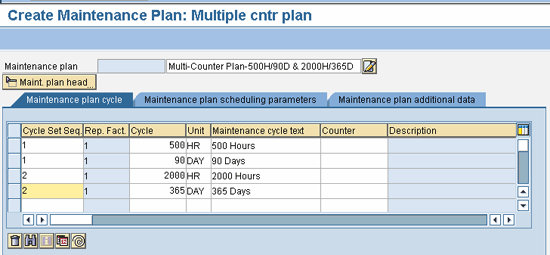
Figure 9
Copy cycles from the Cycle set
Now you can enter the first maintenance item as shown in Figure 10 for Cycle Set Seq 1. The Reference object can be Equipment, Functional Location (Functional loc.), or Assembly. Enter a suitable order type with priority (e.g., PM02) for preventive maintenance. Other parameters are pulled from the reference object.
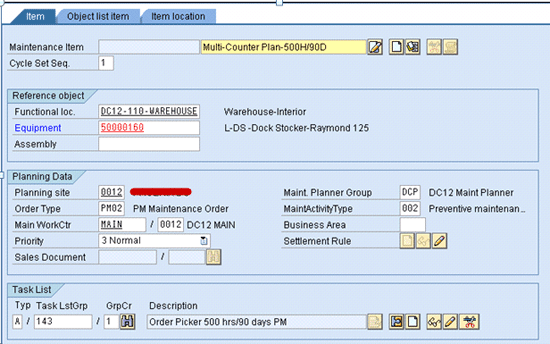
Figure 10
Assign a reference object, order type, priority, and task list
Select a task list with type and group counter by clicking the binocular icon in the Task List section. Click the execute icon in the Task List Selection screen (Figure 11).
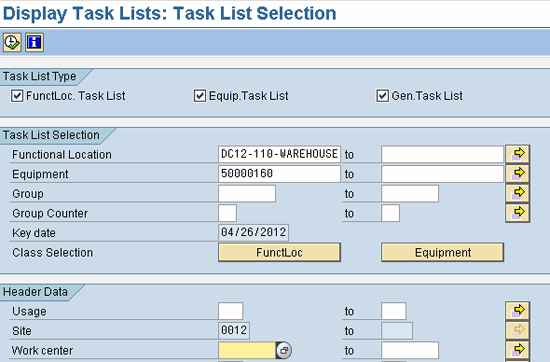
Figure 11
The Task List Selection screen prefilled with data based on a reference object
In the next screen you see several task lists (Figure 12). Select the desired task list and press Enter.
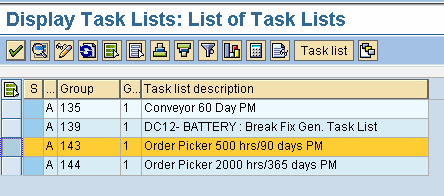
Figure 12
Select a maintenance plan
On pressing the Enter key, a counter of a reference object or equipment appears in the header, and a screen pops up where you enter the repeat factor, as shown in Figure 13. It is desirable to periodically maintain the readings of the equipment against the counter defined in the equipment master in addition to the annual estimate. A counter is a measuring point in the equipment master that is used to register cumulative readings such as run hours, miles traveled, or kilowatt hours generated.
You can also enter or modify the repeat factor by clicking the spiral icon  .
.

Figure 13
Repeat factors for each cycle set sequence
Now click the create icon in the Item tab to create a second maintenance item with Cycle Set Seq. 2 as shown in Figure 14. Note that the other parameters are the same as maintenance item 1 except the cycle set sequence and task list group (for 2,000 hours or 365 days).

Figure 14
Create a second maintenance plan item
Go to the Maintenance plan scheduling parameters tab in the Maintenance Plan header (Figure 15). Leave the Cycle Modification Factor with a default value of 1.00 and Lead float with seven days between the call date and plan date. Choose OR – Link for the Operation Type (either condition is satisfied with Days or Run Hours). Enter 730 days for the scheduling period (SchedPeriod). Select the Completion Requirmnt indicator to create the next order only after completing the predecessor. Leave the Start Date and Start Time fields with the current proposed values. You can update it when you run the maintenance plan.
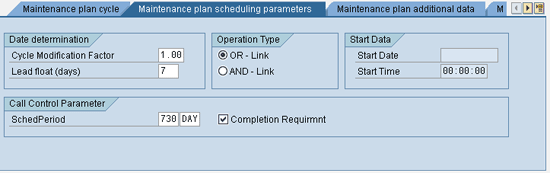
Figure 15
Maintenance plan parameters for scheduling the plan
In the Maintenance plan additional data tab, select the Sort field from possible values configured by following menu path SPRO > Plant Maintenance and Customer Service > Maintenance Plans, Work Centers, Task Lists and PRTs > Maintenance Plans > Define Sort Fields for Maintenance Plan (Figure 16). This sort field is part of the selection screen for batch scheduling of preventive maintenance jobs using transaction IP30. The field is helpful as selection criteria. Select an Authorization Group to control maintenance of plans using Authorization Group.
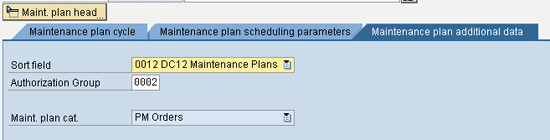
Figure 16
Create a scheduling plan
Now you have completed the maintenance plan and can save it by clicking the save icon. This activity creates a plan number using an Internal Number range object. You can change the plan using transaction IP02 (Figure 17) and display it using transaction IP03.

Figure 17
Change the maintenance plan in change mode
Step 5. Start a Maintenance Plan
Normally, you start maintenance plan manually using transaction IP10. This process can also be done using batch scheduling with transaction IP30 provided the start date and time are specified in the scheduling parameters screen. In manual start with transaction IP10, you can schedule with a start date or you can start in cycle mode. In the case of start in cycle, enter the completion date of the call number of current sequence of the cycle set. The maintenance plan starts from the next call number of the cycle set sequence (Figure 18).
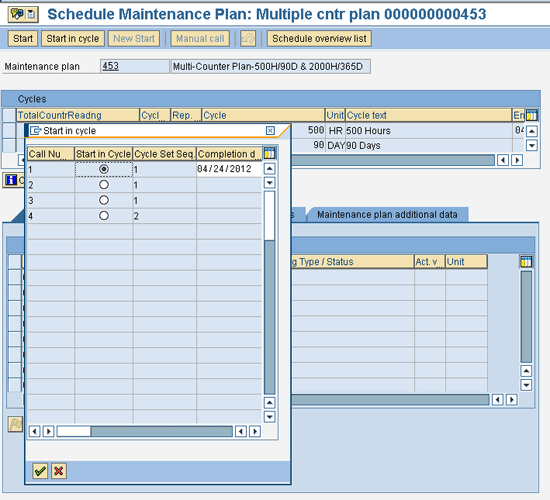
Figure 18
Start a maintenance plan in cycle
If you start or restart a plan, you specify a start date or time for the plan (Figure 19). This is the actual completion date of the previous cycle.
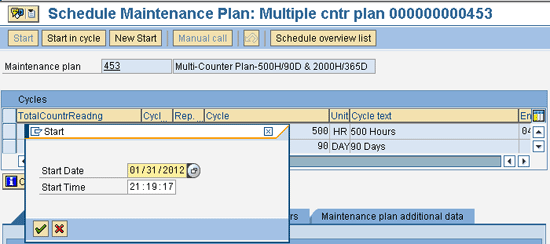
Figure 19
Start with a past date or time
Because I entered a past date and time and clicked the green check icon, the system performs a simulation showing the expected call dates and plan dates (Figure 20) covering the complete scheduling period of 730 days maintained in the maintenance plan scheduling parameters tab (Figure 15). A call object (work order for the chosen maintenance plan category in Figure 8) is expected to be generated immediately. Note the difference of seven days between the call date and plan date due to the Lead float maintained previously.
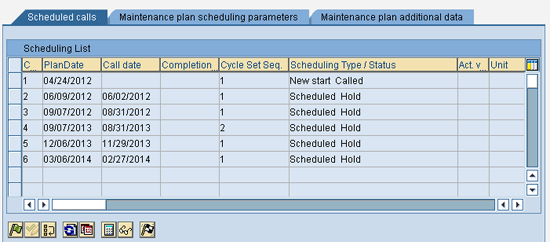
Figure 20
Scheduling list
If you click the calculator icon, a pop-up screen appears with details of the calculation (Figure 21). The lead cycle corresponds to maintenance package 1 with a planned date of 04/24/2012. This date is calculated by adding the current counter readings + 500 (next maintenance due according to maintenance cycle definition). It is projected to take place on 04/24/2012 based on the daily average readings. However, the calculation based on a date is 04/30/2012 (01/31/2012 + 90 days) that is later than 04/24/2012 (Operation type OR-link in Figure 15).
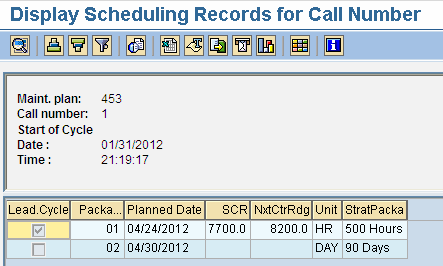
Figure 21
Scheduling records for a call number
After you click the save icon, the maintenance plan run is saved and the call object (work order) is created for 04/24/2012 as shown in Figure 22.
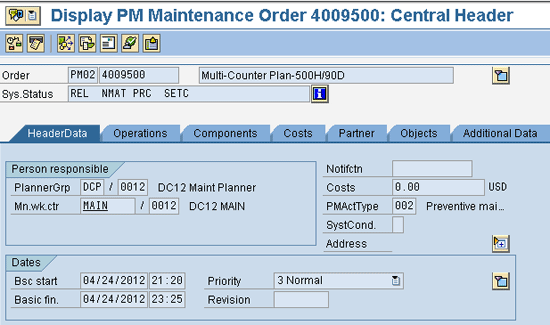
Figure 22
Preventive maintenance work order header
The operations of the work order are exactly same as the operations in task list group 143 (Figure 23) created earlier.

Figure 23
Preventive maintenance work order operations
After the initial manual start, transaction IP30 is run daily or periodically to continue the rescheduling of maintenance plans in the background. The system adjusts schedules automatically during this process in accordance with future counter readings.
Enhancement and Customization Possibilities
Many enhancements and customizations for multiple counter plans are possible:
- User exits: Classic SAP enhancement objects (SMOD objects) are delivered by the SAP system for maintenance planning. They can be located using transaction SMOD for the package IPRM (Table 2). To use them, you define an SAP enhancement project with transaction CMOD, assign an SAP enhancement object to the project, and then write ABAP code in the corresponding include within the function exit (which is predefined as a call to a function module).

Table 2
SAP enhancements and function exits for maintenance plans
- Business Add-Ins (BAdIs): Table 3 shows SAP-delivered BAdI definitions connected with the multiple counter plan. Locate them by using transaction SE18 for the package IPRM. You then can define the implementation of these BAdI definitions in transaction SE19 and write ABAP code for the predefined methods.

Table 3
Business Add-Ins for maintenance plans
- Enhancement packages: With ERP 6.0, SAP started releasing new functionalities in the form of enhancement packages. Organizations can deploy these packages and activate suitable business functions at their convenience. Table 4 shows the new functionalities delivered as part of enhancement packages that are applicable for multiple counter plans.

Table 4
Business functions for maintenance plans
To use these functionalities, you only need to activate the business functions in the Switch Framework using transaction SFW5 after the application of the relevant enhancement package. For example, I activate the business function LOG_EAM_SHIFTFACTORS in the Switch Framework using transaction SFW5 (Figure 24).
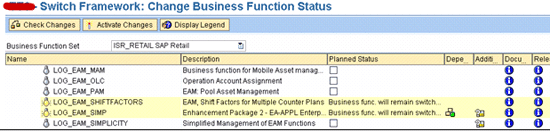
Figure 24
Business Function LOG_EAM_SHIFTFACTORS is active
Now when you create a multiple counter plan using transaction IW43 in the Maintenance plan scheduling parameters tab (Figure 25), the Shift Factor (Later/Earlier) Confirmation and Tolerance (+/-) fields appear.
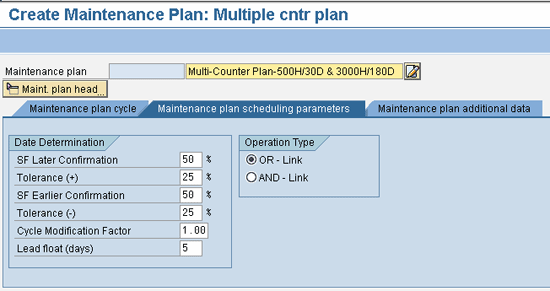
Figure 25
Shift Factor Confirmation (Later/Earlier) and Tolerance fields appear after activation of Business Function
Venu Cherupillil
Venu Cherupillil is a senior techno-functional consultant at PetSmart Inc. He has approximately 15 years of SAP experience in diverse areas of IS Retail, Materials Management, Enterprise Asset Management, Sales and Distribution, and various cross-application tools. He holds a bachelor’s degree in electrical engineering and a master’s degree in industrial management. He holds a number of certifications from SAP, including SAP Enterprise Architecture Framework. He is also an American SAP User Group presenter and is in the list of top contributors in the SAP Community Network.
If you have comments about this article or publication, or would like to submit an article idea, please contact the editor.