Are you making the transition from Universe Designer tools to the new Information Design Tool (IDT) in SAP BusinessObjects BI 4.0? Read this report by Mike McErlain to gain an understanding of how to translate your Universe Designer skills to IDT skills. See the major differences between the two tools and get an introduction to the features of the IDT that make maintaining universes easier.
Key Concept
In SAP BusinessObjects BI 4.x the .UNV universe is still supported by some tools. However, most newer information delivery tools will only support the BI 4.x version of the universe with .UNX. To work with .UNX universes requires using the Information Design Tool (IDT).
As a consultant I experience different user cultures at each site I visit. One of the common threads I’ve noticed since the release of SAP BusinessObjects BI 4.0 is the difficulty many users of the old Universe Designer have had adapting to the new Information Design Tool (IDT). Initially, I too struggled. After all, I had been using the Universe Designer since 1994, and we accomplished some interesting things together in those times.
First of all, let me be clear: I am aware that the Universe Designer has a place in BI 4.x and that anyone with a significant investment in UNV universes (UNV is the extension of Universe Designer files) can continue to maintain UNV universes to support existing content. However, SAP has made it clear that the future path to data goes through the IDT and UNX universes (UNX is the IDT’s file extension), which will power the delivery tools of the future. This arrangement leaves users with an additional consideration of how to manage existing content that uses UNV universes going forward. Undoubtedly, there are sites that will end up maintaining both a UNV version of a universe and a UNX version of the same universe to support past and future content.
The following comparison is intended to assist you in making the transition from Universe Designer (3.x) or the Universes Design Tool (4.x) and .UNV universes to the IDT and .UNX universe.
Logging on
For the purposes of this report, I am using the BI 4.x client tools installed on a Windows 7 desktop. I also am using BusinessObjects Enterprise access, so adjust accordingly if your system uses a different authentication protocol.
Let’s log into both tools simultaneously to get a side-by-side comparison of them. Things get confusing from the start: You see from the list of available tools on the start menu of BI 4.x that Universe Designer is no longer called by that name; it is now the Universe Design Tool (
Figure 1). I am not a big proponent of acronyms, so I refuse to call it UDT because that is just too close to IDT, so I refer to it as Universe Designer for this article.
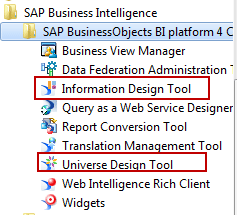
Figure 1
The Universe Deisgner is now called the Universe Design Tool in BI 4.x
Logging onto the Universe Designer
If you have been logging into Universe Designer for any time since the late 1990s, you know that the login screen hasn’t changed much since then. You select or enter the environment or repository that you are going to be working in, enter your credentials, and start a new session connected to that environment (
Figure 2).
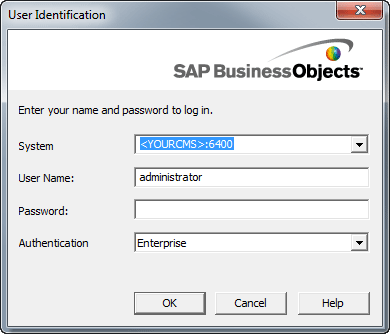
Figure 2
The Universe Designer login screen
Whether it is your production Central Management Service (CMS) or development CMS, you are limited to only one environment at a time with the Universe Designer. Once logged into the Universe Designer, you are presented with an empty palate and the typical set of toolbars (
Figure 3).

Figure 3
The Universe Designer toolbar
Logging onto the IDT
When opening the IDT for the first time, you may notice that the tool opens without prompting you for credentials to the repository (
Figure 4). The reason for that is that the IDT can support multiple connections to multiple repositories simultaneously.
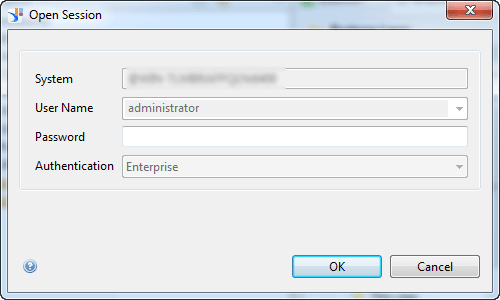
Figure 4
Repository sign-in for the IDT
Once logged onto IDT, you see an empty palate, which is quite different from that of the Universe Designer. There are two new windows: Local Projects and Repository Resources (
Figure 5). The first logon shows an empty Local Projects window, but once you start using the tool, this window will show your projects and any universe components, imported or new, that you have worked on at your workstation.
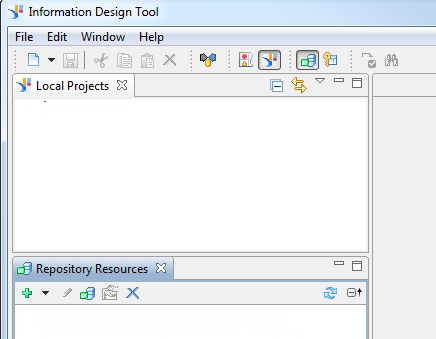
Figure 5
An IDT blank palate
IDT uses an Eclipse interface for the working environment. If you are familiar with Eclipse you will find this environment easy to work in with a lot of built-in flexibility. If you are not familiar with the Eclipse interface then this is your chance to get that exposure. I have also seen the Eclipse interface used with SAP HANA Studio. It’s likely to become some level of a standard going forward in my opinion.
Universe Designer vs. IDT — Basic Differences
Following are four basic differences:
- UNV file vs. UNX universe file components
- UNV — single connection vs. UNX — many connections
- Local projects window (IDT)
- Repository resources window (IDT)
UNV File vs. UNX Universe File Components
One of the biggest differences between the traditional UNV universes and the new UNX universes is the file format. Universe Designer had a single UNV file that stored the universe components. The IDT on the other hand has four separate file formats to support the UNX universe components.
Figure 6 shows the popular eFashions universe after the universe was imported. The three file formats .BLX, .CNS, and .DFX are created during the import process of the original .UNV universe from the repository. The fourth file format .CNX is created when a .CNS connection is published to the repository.

Figure 6
UNX file formats
Here are the new file formats:
- (.cnx/s): Contains the connection information for the UNX universe. The connections once stored in the repository can also be represented by a (.cns) file format that provides a secured shortcut to the actual physical connection. A UNX universe can now source data from multiple connections so more than one .cnx/s files may be assembled into a single UNX universe. More about this feature later.
- (.dfx): Contains the data foundation information for the UNX universe. The data foundation is made up of the tables, derived tables, aliases, joins, contexts, parameters, and lists of values for the universe.
- (.blx): Contains the business layer for the UNX universe. The business layer is the marketing name for the semantic layer, which has always been a big feature of the SAP BusinessObjects platform.
- (.unx): The final assembled file format of the BI 4 universe UNX format is visible only in the repository.
UNV — Single Connection vs. UNX — Many Connections
While the UNV universe only supported a single connection, the UNX universe can support more than one connection. This is an interesting new functionality that allows tables from separate connections to be included in a single data foundation, which is useful if you have a lot of related data in separate databases across the enterprise.
Local Projects Window (IDT)
The IDT introduces a Local Projects window used to keep local copies of universes. Storing universes locally is not a new concept. Universe Designer stored universes in a local folder that had subfolders for each repository that was accessed by the tool. The concept of a project has been added with the IDT to support collaborative development activities (
Figure 7). This makes the toolset conform to a more typical enterprise development methodology of teams building and maintaining the various components of the UNX universe.

Figure 7
New menu option
Tip!
To use the IDT start by creating a new Project folder in the Local
Projects window. This provides a place for IDT to save your work.
Click the new icon or choose File > New and choose the Project option. Supply an appropriate name and click the OK button to create the new project folder. Now you have a place for the IDT to store the universe components connection, data foundation, and business layer. I’ll talk more about those later.
Within Projects you can also have subfolders (or subprojects) so it’s very easy to segregate your work into any sensible structure to best support your normal workflow. For this article I am going to use the MyProject folder and within that project I am adding a folder that I will use to convert old UNV universes to new UNX universes. I have converted a copy of the famous eFashions UNV universe to a UNX universe for comparison purposes.
Repository Resources Window (IDT Only)
The Repository Resources window (
Figure 8) is also a new concept that did not exist in Universe Designer. In Universe Designer you can only access one repository at a time and that is defined at login time. In the IDT you can connect to any number of repositories.
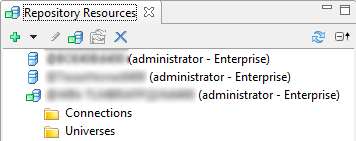
Figure 8
Repository Resource window
Be careful as the security rules apply that a single component can only belong to a single repository at one time. However, it’s easy to copy any component and publish the copy to a different repository. Of course this is not recommended as a method for life-cycle management replacement. Make sure you move your universes through the normal life cycle structure for best practices.
Universe Designer vs. IDT — Importing a Universe
Following is a comparison of the import functions.
Importing a Universe in Universe Designer
Universe Designer’s import functionality is unchanged in that it presents you a tree structured view of the repository to which you are connected (
Figure 9). You then can select the UNV universe to import. For the purpose of this article I will import the eFashions universe to compare Universe Designer and IDT when working on a familiar universe.
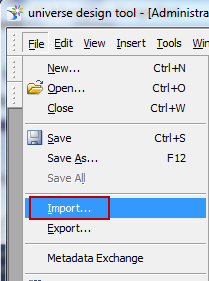
Figure 9
Import function in Universe Designer
Once the universe is imported you can see the standard Universe Designer interface shown in
Figure 10.
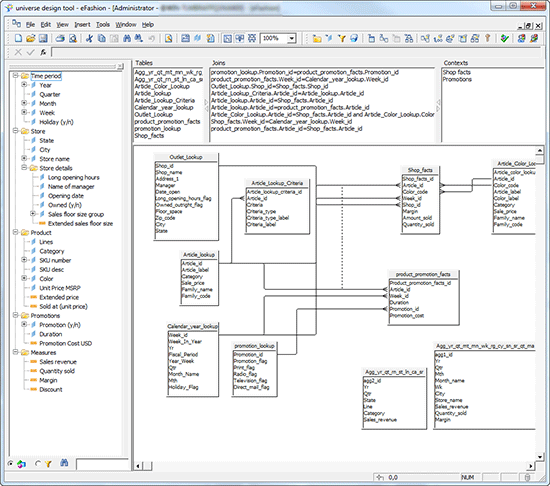
Figure 10
Designer after import operation
Importing a Universe in IDT
Importing a universe in the IDT is a little easier because of the Repository Resources window (
Figure 11). It has a graphic representation of the universe folders and the connection folders for any repository. All you need to do is establish a session to a repository to access the content.

Figure 11
IDT universe import
In the Repository Resources window I can navigate to the repository folder, select the universe that I want to work on, right-click, and choose Import. I can then select the destination Project and folder where the universe components will be copied.
A handy feature of the import process is that it always creates a subfolder in the destination project or folder that identifies the date and time of the import action (
Figure 12). This is especially handy if you are going to do shared universe development in your enterprise environment.
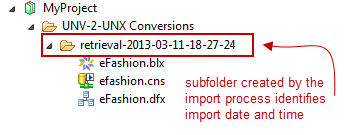
Figure 12
Import time-stamped folder
Notice that the imported universe now consists of three components with three different file extensions: .blx, .cns, and .dfx. The .blx file or business layer file contains the semantic layer, which has been a staple of universe users for years. The .cns file contains the secured shortcut version of the original physical connection, which is the .cnx file. The .dfx file is the data foundation layer containing the database schema.
Universe Designer vs. IDT — The Connection
Now that I’ve imported a universe into both tools let’s compare and contrast the common features. I’ll start by looking at the connections in Universe Designer and the IDT.
Connections in Universe Designer
Universe Designer uses the Universe Parameters dialog box to identify the connection for the UNV universe (
Figure 13). Choosing the New option here starts the connection wizard to prompt for the connection parameters. Once those parameters are supplied the connection can be saved as a secure connection in the repository. Again the interface has no provisions for multiple data sources because there is only room for one in the selection box.
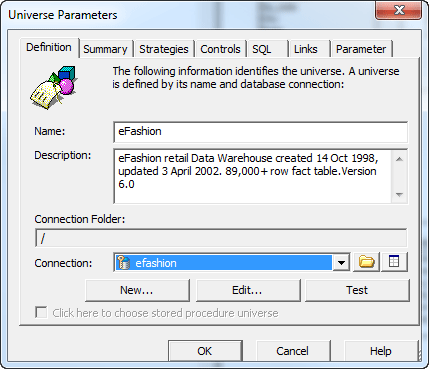
Figure 13
UNV single connection
Under the Tools menu, you can bring up a Connections interface to create and maintain connections. You can see this dialog box in
Figure 14. It lists the secured connections in the current repository. The toolbar at the top allows you to create and edit new connections.

Figure 14
UNV secured connections
Connections in IDT
Connections are not significantly different in the IDT. The biggest difference is that the connection is now saved in its own file format. There is a growing list of drivers for building connections to pretty much any conceivable data source you might be using in your organization. Along with the standard options of IBM, Microsoft, and Oracle you will also see drivers for a number of big data database appliances such as SAP HANA, Apache Hadoop HIVE, Netezza, and Teradata. There is even a driver to provide access to Salesforce.com.
Before building a new connection in the IDT you must first create a new Project folder in the Local Projects window in the IDT interface. This provides a place for IDT to save the new files associated with universes that you are working on. Everything that you work on in building a UNX universe has a separate file format.
Once the Project folder is created a new connection can be created. Right-click a location in the Local Projects window to expose the New menu where you find the Relational Connection button (
Figure 15). Clicking this option starts the new connection dialog.
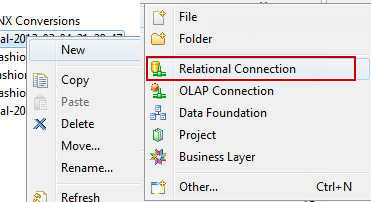
Figure 15
IDT's New options menu
IDT — New Relational Connection
The dialog asks for a unique name and a description of the new connection (
Figure 16).

Figure 16
New connection screen
The Description area provides an excellent place to document the exact purpose of every connection. Make it a best practice to spend the time when you create the connections to provide an adequate description. After supplying a concise description click Next to move to the next step of choosing the database driver that matches up with your chosen database for this connection. For this article I am going to recreate the connection to the ODBC data source for eFashions data (
Figure 17).

Figure 17
Middleware driver selection
When choosing an ODBC driver for Microsoft Access you get a drop-down list of system ODBC connections. Simply select the appropriate database and click the Next button, which takes you to
Figure 18.
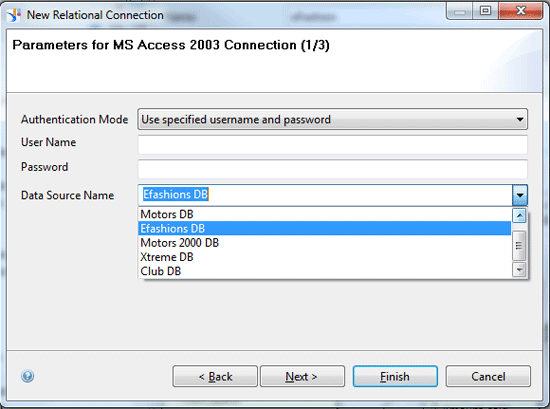
Figure 18
ODBC connection
Set the necessary parameters and then click the Finish button to create the new connection (
Figure 19). This saves a new connection in the local project folder with the .cnx extension.

Figure 19
Set the parameters
Tip!
To publish a UNX universe to a repository, the connections used in the data foundation must also be
published to that same repository. That makes good sense from a data security standpoint. Get in the habit of publishing that connection right after creating it.
During the connection publishing process a secured shortcut (.cns) is saved to the project folder. Use this secured shortcut to build the data foundation and subsequent business layer for your UNX universe. That saves you the frustration of having the universe fail to publish because the connection is not secured. Add the “build a connection then publish a connection” habit to your personal best practices. Then you’ll never have to wonder why your universe was not published because you will not build the data foundation on the local connection .cnx file instead of the secured .cns connection file.
IDT — Connection Show Values
Double-clicking a local connection file (.cnx) opens a connection window in the Eclipse environment (
Figure 20). In this window you see a Show Values tab next to the General Information tab. Click this tab to display a window that lists the columns in the selected table. Selecting a column name from the list displays the distinct values found in that column for the rows returned. The SQL query generated to display the data is listed in its own window. This SQL can be modified and the query refreshed to return a different sample. This is an extremely useful feature when working with unfamiliar data.

Figure 20
Screen shows columns in the selected table
IDT — Connection Distinct Values
Another significant improvement is included in the Distinct Values tab shown in
Figure 21. When you view this tab you are presented with a list of the table columns on the left. The number in parentheses after the column name is the number of distinct values detected in the sample. The default sample size is 200 rows but if you need a larger sample to better understand the data you can adjust the number of rows in the Max Rows control in
Figure 20.
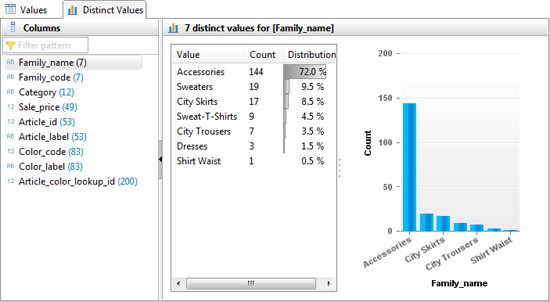
Figure 21
Number of distinct values shown
Selecting a column name in the list changes the display to the values and statistics for that column. As you can see when I choose the Family_name column a list of the distinct values is presented in descending count sequence along with a graph of the data values. This feature is one of my favorites as I frequently deal with client data to which I have only recently been introduced and I need to ramp up quickly on the data model.
Universe Designer vs. IDT — The Data Foundation
Although Universe Designer never had anything called the data foundation, it did have a graphical palate where it represented all tables and aliases in the universe along with joins and the contexts. IDT also has this functionality; it is now called the data foundation.
Universe Designer Data Foundation
Although there is technically no data foundation in Universe Designer the similar functionality to the IDT for graphically adding tables, aliases, and joins is shown in
Figure 22. I’ve also included the navigation bar you can use to find tables, joins, and view contexts within the table view area. The display can be zoomed in and out but that’s the limit of true navigation. When the table structure of the universe becomes larger and more complex this interface becomes cumbersome when changes are needed.

Figure 22
Universe Designer's version of the data foundation
IDT Data Foundation
The IDT data foundation includes families, views, and a context editor, which I now will delve into.
IDT Data Foundation — Families
Looking at the data foundation editor in the IDT the first thing that comes to your attention is the colors in the table display palate (
Figure 23). This IDT feature is called Families. You can create any number of Families that can assign table color, text color, and font to any tables in the data foundation display. This feature is handy when you have a large number of tables in the UNX universe schema.
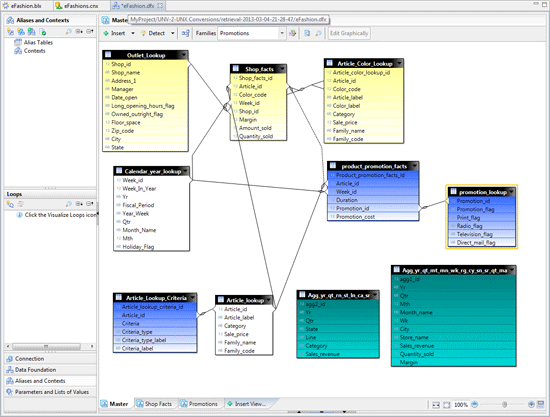
Figure 23
IDT's version of the data foundation
In the data foundation example from the eFashions universe I have used the colors to segregate the tables by contexts. The Families dialog provides an import/export facility that allows Families coloring themes to be saved so they can be reused in other UNX universes (
Figure 24).

Figure 24
Families maintenance dialog
IDT Data Foundation — Views
Another productivity-enhancing feature of the data foundation editor is the ability to create views of the schema. Each UNX has one view called the master view that contains a graphic representation of all the tables in the universe. Once additional views are created, any table or groups of tables can be added to any view by selecting the tables, right-clicking, and choosing Add to View from the menu selection. Each view is independent of the master view and the tables in a view can be rearranged in any order that makes it easier to look at the group of tables and understand how they interact with one another. When the table count starts to rise in the UNX universe you can still prepare visually appealing views to simplify complex universe structures.
In a view called Shop Facts shown in
Figure 25 you can see those tables that actually participate in the Shop Facts context in the eFashions UNX universe. I rearranged the tables within this view so I can easily see the joins between these tables without pulling out magnifying eyeglasses.

Figure 25
Shop Facts view
The other advantage of using views in the data foundation is that there is finally a reason to use the auto-arrange feature. This feature was fairly useless in Universe Designer once you had more than 20 tables in the universe. The way tables became scrambled after using this feature made it one of the least used features in Universe Designer. In the IDT I’ve noticed a marked improvement in how tables are rearranged. In
Figure 26 you can see a view I added of the tables that participate in the Promotions context. After applying the Auto arrange to the view I can see each table and each join clearly and easily.
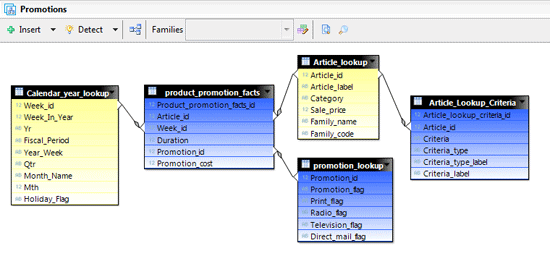
Figure 26
Promotions view
I personally find the Families and Views features tremendous new additions for navigating the data model of the universe. These features make large universe data models easier to build and maintain using the IDT instead of Universe Designer.
IDT Data Foundation — Context Editor
Context has seen a functional improvement in the IDT. The biggest of these is a change to the way the universe handles contexts. In Universe Designer if a context was added to a universe to eliminate a data loop caused by the join structure, the rule was that all joins then needed to participate in a context. That rule has changed with the IDT. Now joins that are not affected by the context do not have to be included within a context.
Figure 27 shows the definition of the shop facts context. The joins included in the context are shown with a plus sign

on the join. The joins specifically excluded by a context are shown with a minus sign

on the join. Joins that do not participate in a context have no marks displayed on the join line.
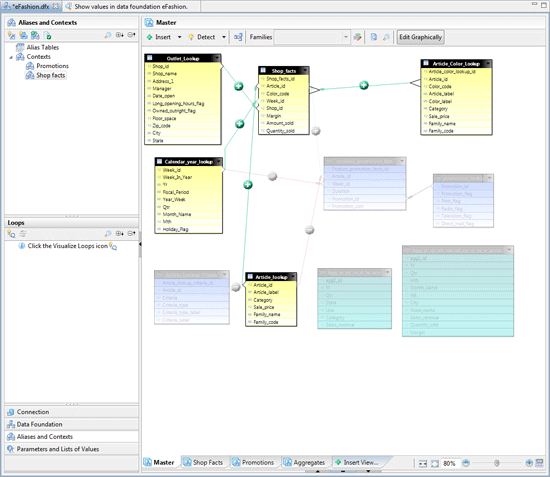
Figure 27
Joins can be excluded
IDT Data Foundation — Displaying Table Data
In the past I almost always needed some supplemental tool such as SQL Developer to view table structures, view table data, or run test queries before getting into Universe Designer to build the universe. I would invariably open both tools simultaneously to have adequate access to the data underlying a universe. With the IDT I no longer have to break out two tools to do one job.
Earlier in this article you saw the data viewing features that had been added to the Connection window when viewing a .cnx file. In the data foundation editor on top of the old Show column values and Show table values, new display features allow developers to select multiple tables in the schema and view values for all the tables selected.
This feature makes validating the join structure between any set of tables a snap. In the example in
Figure 28 I chose three tables from the schema with the cursor, right-clicked, and chose the View table values option to display the first 200 rows of the three tables selected based on the join structure defined in the data foundation.
Figure 29 with sections of the returned results shows data from all three tables.
Figure 28
Select multiple tables in the schema for data view
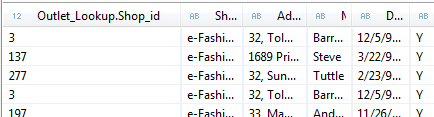
Figure 29
Data from all three tables displayed
Along with the displayed data, the SQL used to produce the results is available for tweaking. If your join structure is incorrect, this feature can be useful to adjust the structure until the results are correct and then use that to adjust the joins in the data foundation.
IDT Data Foundation — Profile Column Values
One interesting data twist added to the context menu in the data foundation is the Profile Column Values… option shown in
Figure 30. This option extends the functionality of the Show Column Values… option by counting all the unique values for the selected column and presenting them in a handy chart format (
Figure 31). When developing universes, this feature provides deeper insight to the values in a column so you can better understand the objects to be derived from a column of data. This function invokes a query to display the first 200 unique column values and a distribution count of how many times that value appears in the column. There is a Max Rows control to change the total number of unique values returned by the profiling query. If you change the Max Rows control, just click the Refresh button to rerun the profiling query. You can view the query SQL by clicking the Show Expression option or clicking the down arrow control above the chart.
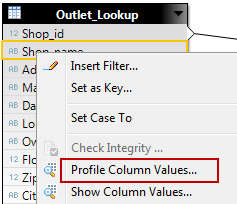
Figure 30
Option for counting unique values

Figure 31
Results shown in chart format
The default display is a pie chart showing the top 10 distinct values. The view can easily be changed to a bar chart by clicking the radio control and then the Refresh Chart button. There is also a spinner control to change the number of distinct values displayed in the chart. If you adjust the display count, simply click the Refresh Chart button to update the display.
Clicking the Values tab shows the profile results along with the associated distribution counts (
Figure 32). There are some handy filtering options on the Values display for finding specific values in the profiling data. Entering a value in the filter box quickly adjusts the display to matching values in the list. This filter box filters the subject values as well as the distribution count values and highlights the matching characters in the profile results. There is also an Add Filter option that adds a column filter control to the right of the display. The filter control has Next/Previous value controls, a slider to breeze through your list, and a drop-down box that lets you choose your favorite way to filter your profiling data list. There is also a control to save the profile results to a file if you want to share the profile with others.
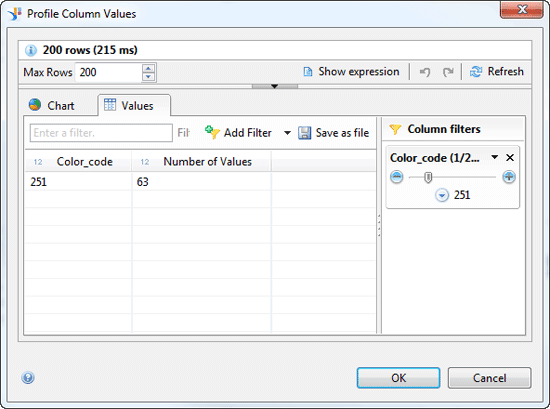
Figure 32
Filtering options
IDT Data Foundation — Calculated Columns
Hopefully by now you are beginning to see the value of a much improved developer environment for universe developers. You can take advantage of the Eclipse framework to add built-in functionality and there is room to add more as the tools mature.
Another new feature is the calculated column, which is designed specifically for universe developers who are frequently on the outside of the database administrator (DBA) firewall. That used to mean that you could not make changes to the database schema and the DBAs needed a mound of paperwork and six weeks’ notice before they would add a simple column to a database table for you. You no longer need to wait for a DBA to add a column to a table.
The calculated column feature shown in
Figure 33 allows you to add a column to any table in the universe without a DBA being involved. Simply right-click the table in need of a new column and choose the Insert Calculated Column… option.
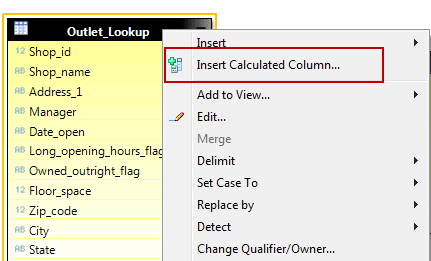
Figure 33
Option for inserting a calculated column
The dialog for adding a new column is shown in
Figure 34. All that is needed is a column name and the corresponding SQL associated with the new column. To facilitate the process the existing table columns and a set of SQL functions are made available to compose the select statement. A column name or database function can be added to the select statement using drag and drop or by a simple double-click. After composing the select statement use the validate icon

to check the syntax of the SELECT statement. Clicking the OK button adds the new column to the table with an indicator to serve as a reminder that the column is a calculated column (
Figure 35).

Figure 34
Add a column name

Figure 35
Table display shows newly added calculated column with small icon in front
Calculated columns are very useful when simplifying long or complex SQL strings. If you happen to have a complex or cumbersome SQL statement that is referenced in many different objects in the business layer it really makes sense to hide that complexity in a calculated column. Or perhaps you have SQL you know is going to be changing when a business user makes a decision, yet you have to continue development to stay on schedule and you don’t want to have to go back and change a bunch of objects when the final decision is made. Add a calculated column to build the new objects using the new column. When the final SQL is decided you only need to change the calculated column. Hovering over a calculated column in the schema diagram pops up a box with the SQL expression displayed.
There is one more feature in the calculated column I found to be handy when using the values of a column in the calculated column SQL script. Hover over any of the columns names in the list and you see a drop-down menu indicator

. Clicking this icon displays a Select Members dialog box with a list of distinct values for the selected column (
Figure 36). Select the members from the list and click the OK button to place the selected values into the current cursor location in the select script text area. When using this feature you may want to make sure that you have a big enough sample to include all the values you expect to be in the list. Adjust the Max Members limit to something appropriate if 200 won’t show the full list.

Figure 36
Select members in calculated columns
Universe Designer vs. IDT — the Business Layer
Now I will provide more information about the business layer differences.
Universe Designer’s Business Layer
The business layer (
Figure 37) is the name attached to the “objects” part of traditional BusinessObjects. This is the semantic layer where the developer insulates the user community from the vagaries of the underlying database architecture with soothing easy-to-understand names and complete, well-thought-out descriptions of the contents of the object. That description may be a little flowery for the true reality of universes thrown together in a hurry with the demand for results outstripping the need for timely, well-constructed universes. I personally like the term business layer, which hopefully will be a constant reminder to the universe developer that the business should be closely involved with the development of this layer. In fact they need to own this layer to get the maximum return on the value of the universe to the business.

Figure 37
Designer business layer
The Universe Designer business layer interface has remained mostly unchanged over the past 10 to 15 years. There are the classes that contain the objects and objects that may have detail objects that describe the dimensional object under which they are listed. At the bottom of the screen there is the radio button to switch between query objects and filter objects mode and a poorly thought-out search window for navigating among the objects. In fact, navigating among the objects can become a tedious process of opening class after subclass just to get a view of all the objects in the universe. If the universe has more than a few hundred objects navigation can become a hindrance to query building. Skilled universe developers are aware of the impact of navigation from the user perspective and learn to build class structures that reflect the frequency of use of the class structures.
The Designer tool required a separate window (
Figure 38) to support adding and changing business layer objects or filters. These windows aren’t special, but they are familiar to universe developers.

Figure 38
Designer (3.x) properties editor
IDT’s Business Layer
When you open the business layer (.blx) in the IDT, a separate window is opened for the business layer (
Figure 39). On the left side is the business layer with the universe name and the folders that contain the objects. Classes have been replaced by folders in the IDT. On the top right is the Properties editor that adapts the properties based on what is selected in the business layer panel. Below the properties is the Data Foundation display that shows the last saved version of the data foundation associated with the business layer.
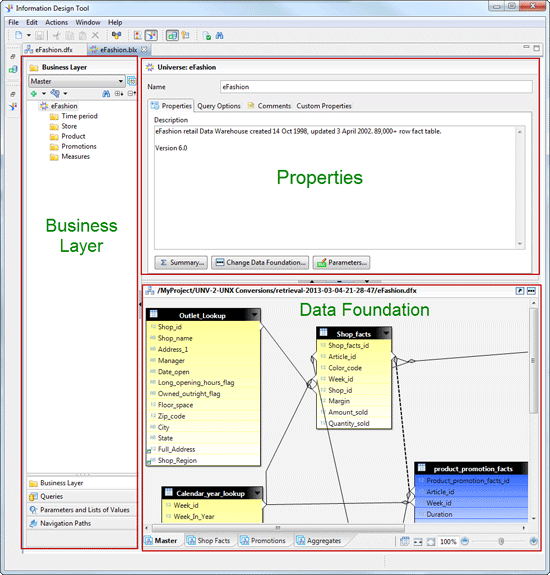
Figure 39
Business layer in the IDT
A closer look at the business layer interface shows a couple of new controls that were not present in the Universe Designer interface (
Figure 40). There is a plus sign, a wrench, binoculars, and boxed +/- signs where once there were no such options. There also is also a large drop-down menu with the word Master next to a box-on-box icon that has never been seen in Universe Designer.

Figure 40
Expanded list in IDT
Expand All/Collapse All Control
The expand all/collapse all control

simply expands or collapses all the folders in the business layer to display every dimension, attribute, and measure objects in the universe. Notice I used the IDT term attribute instead of the Universe Designer term detail. That along with the icon used to represent attributes

is a noticeable visual change with the IDT.
Insert Object Control
The insert objects icon

is a convenient, context-sensitive icon for adding new folders, dimensions, measures, filters, or attributes to the universe (
Figure 41). It is context sensitive and displays the appropriate options to choose from based on what is actively selected when you click the icon. If a dimension is selected, the menu only allows an attribute object to be added. To add a new dimension, measure, or filter you must select a folder. Universe Designer’s right-click menu always allowed developers to add new objects anytime. This is just slightly inconvenient in the IDT and it takes a little practice to adjust to this change.
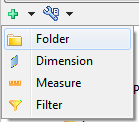
Figure 41
New item menu
Display Active Control
The display active control icon

allows the developer to hide non-active objects (
Figure 42). In Universe Designer an object could be visible or hidden. In the IDT objects can be Active (visible and available for new queries), Hidden (not visible and not available for new queries), or Deprecated (not visible, not available for new queries, but can be used in existing queries).
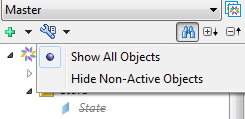
Figure 42
Method to hide objects
If you have ever edited an existing query and gotten the error message Query contains objects no longer in the universe, you’ll be happy for this new state. By changing the state to Deprecated, an object continues to exist in the universe and can be returned to existing queries but is not displayed when building new queries. This allows you to retire ineffective objects without breaking existing reports that use those objects. Deprecated objects appear in the business layer slightly grayed italics text and a strike-through on the name

.
Object Name Search
The search control icon

is quite different in the IDT and much more user friendly. Clicking the search control icon adds a drawer under the business layer that has a hot search feature, meaning that as you enter text in the box all objects containing those characters are displayed in the search list (
Figure 43). There is also a drop-down that allows the selection of which object types to be returned in the search results. Selecting a name in the search list displays the object in the business layer. This is a much more useful object name search feature than found in Universe Designer.
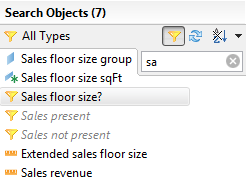
Figure 43
Search functionality
Filter Object Placement
Perhaps the single biggest usability improvement in the way universe objects are presented to the query builder is the ability to place a filter object adjacent to the dimension object they reference in the business layer (
Figure 44).
Figure 44
Convenient filter functionality
I’ve been preaching to query builders forever to use filter objects for as many key dimensions as they have in the query. Not so easily done if you have to search for the filter object. In the past the filter objects were at the bottom of a long list of objects in the query panel where they are never visible without scrolling or on a different display altogether that had to be toggled. This means you can group dimensions and their filters where you can be certain that the filter is within immediate visual perception of the query builder. This at least gives you a fighting chance the user will choose a filter for the dimension if they are next to each other in the business layer.
Business Layer Views
A new feature provides views or subsets of the folders and objects in the business layer (
Figure 45). Each business layer has a default Master view that cannot be changed. It contains every element added to that business layer. Click the New button to create a new view. Add a descriptive name for the view and then check the boxes for those folders and objects to be included in the view. The objects with check marks will be available in that view while those without will not be visible.

Figure 45
Business Layer views manager
You can create views to provide subject area focus for large universes. You can also use these views in conjunction with CMS security to provide access to specific parts of universes while securing other parts from users who have no need to access those objects.
I can see that most of my new .UNX universes going forward are going to have at least one new view called Frequently Used Objects. How about a Newly Added Objects view that highlights recently added objects for established universes? I can see a number of different uses for views, which should help universe consumers to get to the desired objects quickly.
IDT — The Properties Editor
The properties editor in the business layer is also an improvement over the Universe Designer properties that are located in different places for different properties. Not so in the IDT, where all properties are edited in the upper right of the business layer interface. Selecting an object, folder, or universe in the business layer displays the appropriate properties in the properties editor.
Universe Properties
The universe properties page has a clean, simple interface for accessing all the standard universe settings (
Figure 46). Developers should have no problem finding the corresponding settings from the Universe Designer interface.

Figure 46
Interface for accessing standard universe settings
The Summary… button pops up a list of the distinct components with counts for the business layer and data foundation components. The Change Data Foundation… button does exactly what it says, allowing the developer to select a different data foundation for the business layer. The Parameters… button provides access to query parameter settings. A drop-down menu lets the developer choose any option not in the list, add it to the list, and set its value quickly and easily.
The Query Options tab (
Figure 47) contains parameters for limiting results set rows and query execution time. It also has the toggles for allowing subqueries; complex operands; union, intersect, and minus operators; queries; and multiple SQL statements per measure. These options have easy access to the settings in the IDT.
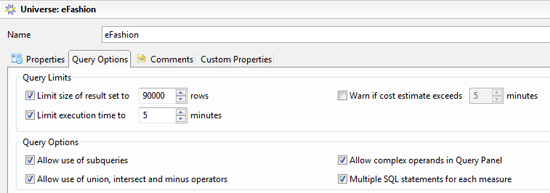
Figure 47
Query Options tab
Folder Properties
Although there is nothing to compare this to in Universe Designer, the Folder properties screen has a tool that you can use to fine-tune the arrangement of objects in the selected folder (
Figure 48).

Figure 48
Folder screen for fine-tuning arrangement of objects
Object Properties
The object properties page is similar to the Universe Designer version of the properties page for an object (
Figure 49). One of the interesting new buttons on this dialog is the Show Script… button, which displays a window with the object and the corresponding SQL.
Figure 49
Object properties screen
Synchronized Data Foundation Display
Another nice feature of the IDT interface is the properties and data foundation windows are synchronized to the current selection from the business layer (
Figure 50). Selecting an object in the business layer not only displays the selected object’s properties but also orients the data foundation display to show the table and highlight the column within the table. This functionality does not work on aggregate aware functions or other functions with multiple tables referenced in the SQL statement.
Figure 50
Synchronized data foundation display
SQL Assistant
The SQL assistant function is slightly improved with the addition of a frame for Parameters and List of Values added to the Tables, Functions, and Business Layer frames (
Figure 51).
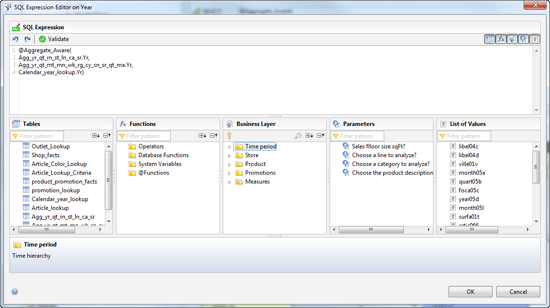
Figure 51
The SQL Assistant window
Context Menus
The original productivity improvement feature is the context or right-click menu. Right-clicking provides shortcuts to common features or functions preformed on the selected target (Figure 52). As expected, the IDT object menu provides more functionality making it possible to set state, data type, and access level of one or more objects without having to edit these objects’ properties individually.
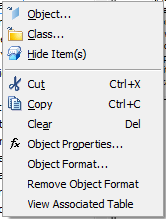
Figure 52
Designer's right-click menu
A unique feature of this menu is the Turn into Measure with Aggregation Function option (
Figure 53). Selecting this option changes the dimension object to a measure and adds the SQL aggregation function chosen from the list. Developers who like to use the drag-and-drop method to add objects to a universe will find this feature very useful.

Figure 53
IDT's object right-click menu
The one function I see missing that would be useful is Turn into Attribute, which would change the objects from a dimension to an attribute of another dimension. That means that the only way to get attribute objects in a universe is to build them manually.
IDT Business Layer Interface — Queries
During the development cycle there should always be checkpoints where you test your universe objects to make sure the correct data is returned. Test queries should also pair objects from different tables to check the join structures. The only way to test UNV universes was to use a reporting tool such as Web Intelligence (WebI) or Desktop Intelligence (DeskI, which departed in BI 4.0) to build test queries and validate results outside of Universe Designer. Not only is it inconvenient, but it’s also less likely that good testing procedures are followed when the ability to test queries is not readily available to the developer.
The IDT tool solves the testing dilemma quite nicely with the Queries drawer (for lack of a more creative term) as shown in
Figure 54. The Queries feature permits the developer to build queries against the current business layer objects. These queries are retained in a Queries drawer and travel with the UNX universe. This is a perfect place to store testing queries that can be used to validate join structures and complex objects anytime a UNX universe is changed.
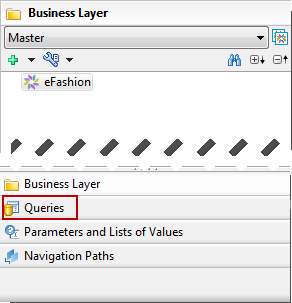
Figure 54
Queries pane
Clicking the New Query button (not shown) displays the BI 4.0 Query Panel (
Figure 55). The new panel presents the business layer objects where they can be added to the result set or the query filter. A Data Preview frame is added where the query results can be previewed by clicking the Refresh button. Developers no longer need to resort to a different tool to test query results while working in the IDT.
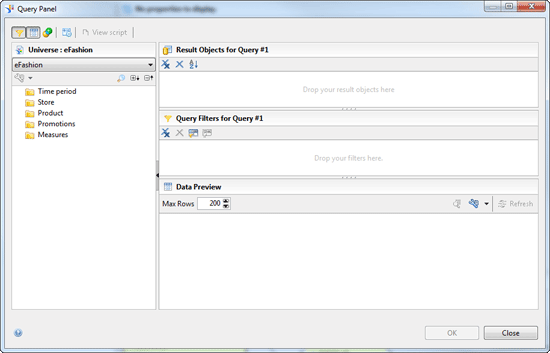
Figure 55
Query panel for BI 4.0
Lists of Values
The List of Values also has a new look and a convenient new location for managing the list of values of a UNX universe (
Figure 56). The list of values can now be based on a query panel with objects from the business layer, a custom SQL statement provided by the developer or a static list of values that can be manually entered or derived from an external source such as a spreadsheet file.
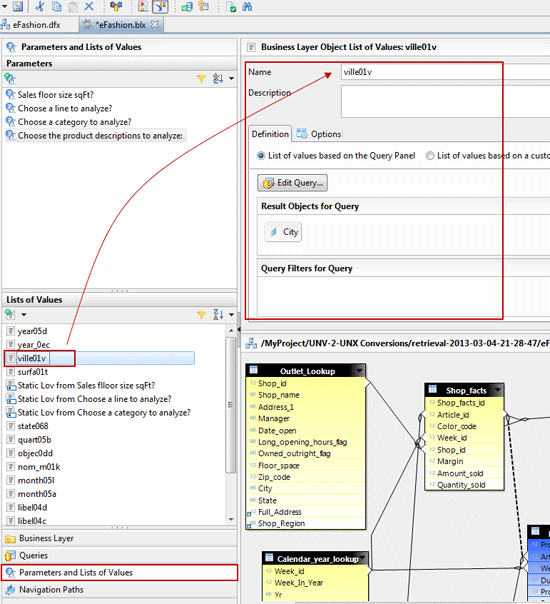
Figure 56
List of Values manager
Parameters
Parameters are a newly added feature in the IDT. Parameters are defined as variables in the business layer or the data foundation that requires a value at run time. A parameter can accept user input based on a prompt (
Figure 57) or a pre-defined input that specifies a fixed value for the parameter at run time. A parameter can also have a list of values associated with the parameters that defines the values that can be used as an input to a parameter. Alternately, the developer can select the values to be assigned to the parameter at run time (
Figure 58).

Figure 57
Parameter with prompt and list of values
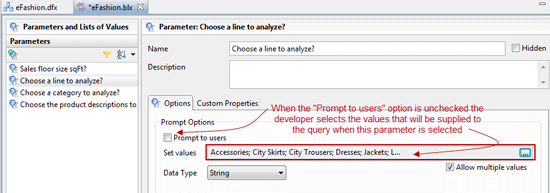
Figure 58
Same parameter without prompt
IDT Navigation Paths vs. Universe Designer Hierarchies
Hierarchies (
Figure 59) have been a part of BusinessObjects from the inception of the product yet a new name was in order for this function and the name chosen was navigation paths (
Figure 60). While the new name is an accurate portrayal of the functionality described it could have been better named drill paths or drilling sequence to connect the function with the reporting tools function implements navigation paths.
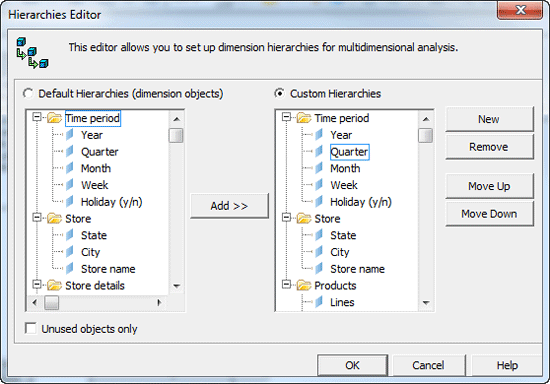
Figure 59
Designer Hierarchies editor

Figure 60
IDT Hierarchies editor
The Navigation Paths editor is now available in the business layer drawers as a function of the user presentation features. When selected, the Navigation Path editor appears where custom hierarchies can be assembled and made available to the report consumers.
Default Navigation Paths
As in Universe Designer the default navigation paths are the existing object folders and the default path is simply the order that the objects appear within the folder (
Figure 61).
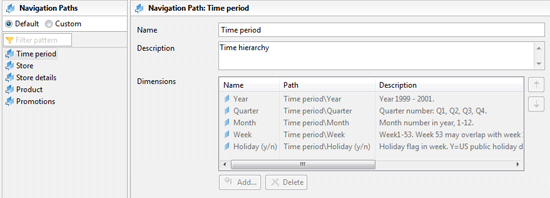
Figure 61
IDT default navigation paths
Custom Navigation Paths
As in Universe Designer the custom navigation paths can be created from any dimension objects in the business layer (
Figure 62). Start a new navigation path by clicking the add path icon

. A new navigation path is added to the list. Now all that is needed is to change the navigation path name, add a description, add objects to the path, and arrange the objects in the desired sequence. Objects can be added to the path by dragging and dropping from the Available Dimensions pane or by clicking the Add button below the list of dimensions.
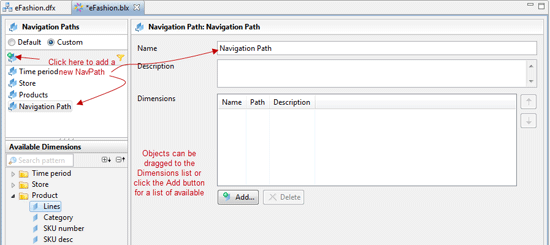
Figure 62
Custom navigation paths
IDT Navigation Options
All the various windows that can be generated by the IDT’s Eclipse-based interface can be overwhelming with opening, closing, and resizing all these windows to find the sweet spot to work on your UNX universe. Fortunately, IDT has some collapse/expand controls that make this a much easier process (
Figure 63). In fact for developers new to the IDT I suggest a brief introduction period where you may want to open an existing UNX universe and do nothing but navigate around the interface to become familiar with the tool.
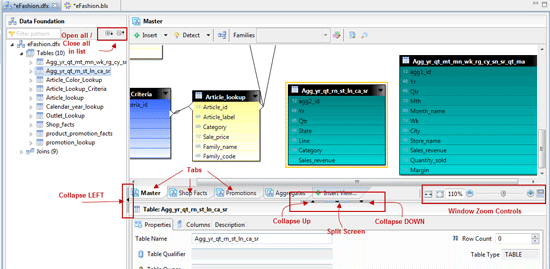
Figure 63
IDT navigational/display controls
Converting Universes from UNV to UNX
I want to talk about converting universes because it’s important to anyone moving from BusinessObjects XI 3.1 to BI 4.x.
To Convert or Not Convert
In BI 4.x UNV universes can be maintained with the Universe Design Tool (UDT), which is the client tool replacement for Universe Designer. Keeping a UNV universe in your BI 4.x deployment has only one negative connotation in the early BI 4.0 release in that a number of the new delivery tools such as Explorer and Visual Intelligence would only consume data from UNX universes. I’m just not sure if SAP will succumb to the general population with a huge investment in UNV universes and content that might convince them to add UNV connectivity to these tools.
Converting UNV universes is a business decision that must consider factors such as existing content based on .UNV universes and the cost to convert those documents to a new .UNX universe. This also has to be balanced against your BI roadmap to make sure you stay aligned with the future delivery functionality you plan to deliver to your user base. I see many installations planning to keep existing .UNVs and also creating a .UNX version of those universe. This is something you can do but remember each universe during its life cycle has maintenance costs just to be in your environment.
One of the benefits of using the IDT to maintain complex universes is that all the new functionality makes it easier to demystify them. Just using the Family feature with color schemes and views in the data foundation makes maintaining any universe easier for BI developers.
IDT Conversion from UNV to UNX
Let’s take a look at the process of converting your own UNV universes to the new UNX multi-file format. For that purpose a Convert .unv Universe… option has been provided on the file menu (
Figure 64) and on a context menu when a .UNV universe is selected in the Repository Resources (
Figure 65) pane.

Figure 64
File menu optioin for converting .unv universes
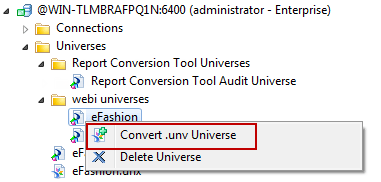
Figure 65
Context menu
In the resulting dialog box, select the .UNV file to be converted from either a local file on your workstation or a universe in the repository (
Figure 66).
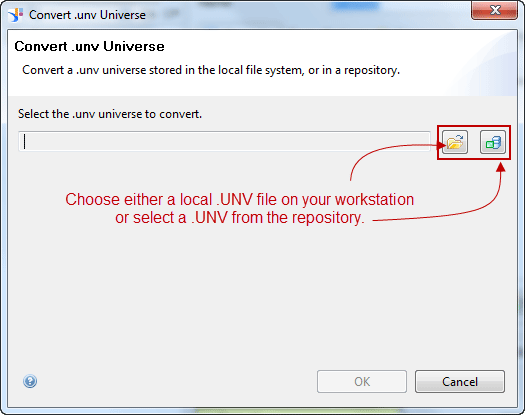
Figure 66
Dialog box for selection
After a .UNV file has been selected the next step in the dialog prompts for the repository location and a local project folder where the new files are deposited during the conversion (
Figure 67). Remember that a .UNV will be converted to a .UNX. The .UNX will be stored in the selected repository folder along with a connection (.cnx/s), a data foundation (.dfx), and a business layer (.blx), which are stored in the selected Local Project folder.
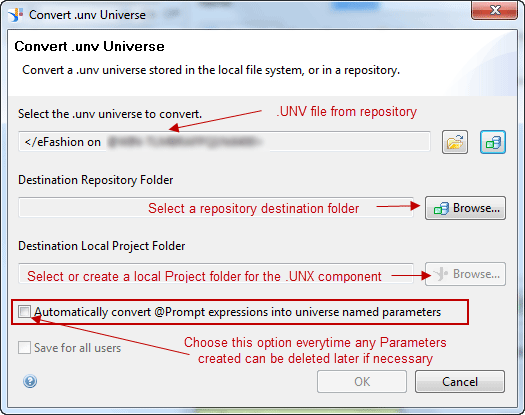
Figure 67
The Convert .unv Universe dialog
Put a check mark in the Automatically convert @Prompt expressions into universe named parameters check box. This does exactly what is says, converting @Prompt statements into named parameters. These named parameters can be deleted or modified later if no longer needed in the universe.
At the completion of the conversion process the .UNV is now segmented into the components needed: 1-.cns the secured shortcut, 1-.dfx the data foundation, and 1-.blx business layer (
Figure 68). You might be thinking after all this talk aboutUNV vs. UNX, where is the .UNX file?
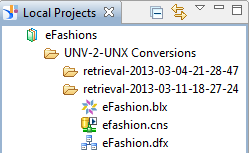
Figure 68
Where is the .unx file?
I know the first time I went through this process I was expecting a .UNX file to be produced and added to the project folder. The actual .UNX file is not created until the business layer (.blx) is published to the repository (
Figure 69). The .UNX file actually only exists in the repository when the .UNX is imported. The results are just the .cns, .dfx, and .blx.
Tip!
When you publish the universe, it is actually the business layer that you are publishing with its accompanying data foundation and the secured connection. This is why you only find the publish option on the .blx right-click menu.
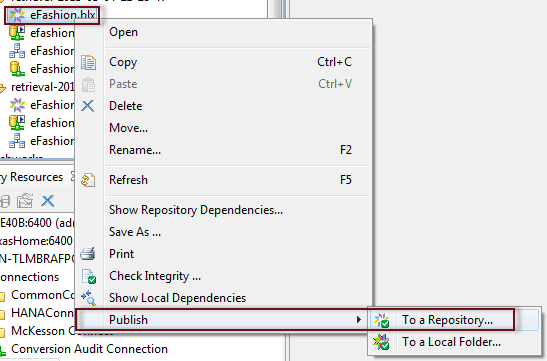
Figure 69
The publish option is only under the .blx context menu
When the converted .blx is published to the same repository as the .UNV universe you will notice that the .UNX extension is displayed in the Repository Resources window so that you can differentiate the two universes (
Figure 70).
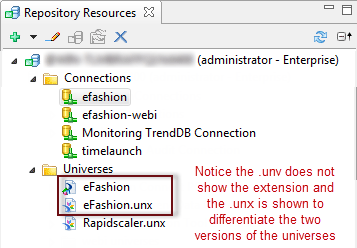
Figure 70
UNV and UNX in the repository
Publishing Universes
Publishing universes to the repository is an essential task for BI developers using the BOE platform. Publishing a universe is of course the method used to make the universe’s data content available to BOE platform users.
The Universe Designer Export function automatically includes all open UNV files in the Export Universe dialog file list (
Figure 71). I can understand the logic of including all open UNV files in the Export Universe dialog but when more than one universe is open the developer should be required to select one or more files from the list for the export to proceed. If you frequently open multiple universes simultaneously, a pretty common occurrence for most developers, you have to be very careful to remove unwanted universes from the Export Universe dialog list or it will be included in the export. If you don’t have good backup procedures in place for your development environment this could become a time consuming problem.
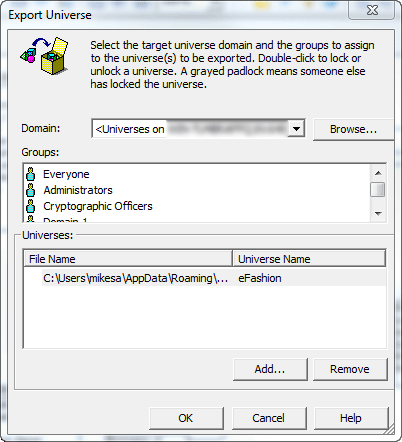
Figure 71
Universe Designer Export dialog file
In the IDT the only way to export a universe is to select the universe’s business layer and right-click to choose Publish from the context menu (
Figure 72). Only the selected universe is exported with this selection. It’s common to inadvertently publish a universe that was open in Universe Designer even if you intend to publish only the universe you’re currently working on. With the IDT this is less likely to happen to developers who work with many different universes during the normal work day.

Figure 72
Publish option only available with .BLX files
Integrity Checks
Before exporting a universe to the repository, a Check Integrity process should be run against the universe to be sure that there are no errors that will negatively affect users. In Universe Designer the Check Integrity is a separate function that is available to the developer to run any time the situation calls for it. However, there is no specific integration of the Check Integrity with the Export functionality. The IDT continues to support the Check Integrity feature as a separate menu item that can also be run at anytime against any universe that is open in the IDT workspace.
The IDT has now incorporated the Check Integrity process into the Export to Repository dialog process. When a universe is to be published the first dialog box to appear has the Check Integrity function built into the dialog.
As you can see in
Figure 73 the Check Integrity button is presented with all the options selected to process on the universe being exported. This makes the Check Integrity only a simple click at the start of the export process. Note that you must click the Check Integrity button to perform the check. Clicking the Next button does not perform the integrity check before selecting the export destination.

Figure 73
IDT export dialog
There are a couple of Integrity Check default settings that I find less useful than the others. The setting Check Cardinality Same as Detected is an option I would only use if I didn’t know the cardinality of the joins in the universe at the time I developed the data foundation. Because joins are such a critical part of the overall performance of any universe I pay special attention to cardinality when building joins. Cardinality checks can be quite time consuming and unnecessary when the cardinalities have been set for your joins. A better practice for universe developers is to detect cardinalities of a new joins when the join is added.
I will add the Check for Undefined Cardinality to that list though this check is not nearly as time consuming as a full cardinality check. In the business layer checks, the Check Business Object OLAP Validity is not a check you need unless your data source is an OLAP cube. Another interesting check is the Check Query option, which checks the validity of any queries you may have built to test objects in the Query area. This could be useful depending on the nature of the queries stored in the business layer. Or, it could be overkill and a productivity inhibitor waiting for those queries to be validated.
By default the IDT starts with all Check Integrity options set to ON with a check mark. There is an option in the IDT Preferences for Check Integrity that allows the developer to customize the Check Integrity options settings.
Figure 74 shows the Preferences screen for Check Integrity with my personal choice of options. These options encourage me to perform Check Integrity every time I export a universe and even when just checking the status of any universe changes. These options should be reviewed to be sure they make sense for the types of universes that you deal with regularly. Take the time to set these options and get in a habit of using the Check Integrity as one of your own personal best practices.
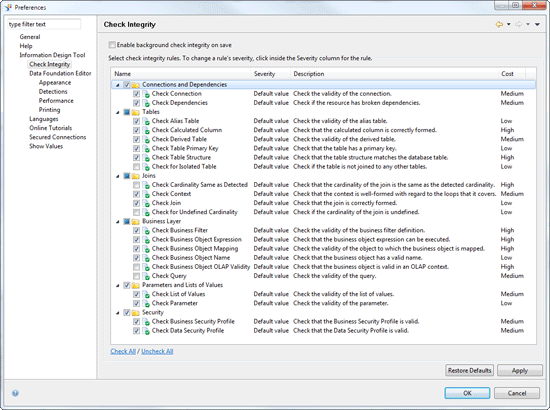
Figure 74
Integrity check options can be customized in IDT Preferences
Another change to the Check Integrity functionality is that the Universe Designer integrity check results were linked to the universe objects to which they pertain, so finding the object to be fixed was as simple as clicking the error message to open the property editor for that object. This extremely useful feature is not available in the IDT. In fact, when the check is completed the open dialog box prevents you from interacting with any other window or feature of the IDT until the results dialog box is closed.
This is not the most convenient method for delivering the check results. Perhaps a future version will incorporate the Integrity Check as a separate Eclipse window which can be run in the background at anytime, not just during the publication process. For now there is an export process that places the results of the check in a file for later viewing. It works but it is awkward at best and does nothing convenient to facilitate the error correction process.
Figure 75 shows the results of an Integrity Check on the eFashions universe. As anyone familiar with the results from the previous version’s check can easily see, there are many more warnings and errors detected than previously tested. That is why there are so many customizing options in the setup and preferences. This should cause most shops to re-evaluate their tolerance for error messages when processing normal life-cycle changes to a universe.

Figure 75
Check Integrity results
Multiple Connection Universes
One of the key new features in UNX universes is the ability to consume more than one connection within a data foundation. That technically means that a universe can source data from more than one type of database and deliver the results in a single query. Initially, this sounds like a great new feature. I’ll wait for feedback from someone using this feature before declaring it a step in the right direction. I’m more concerned that it will lead to massively confusing universes that will continue to be less user friendly as the complexity rises.
Conclusion
IDT has more functionality for developers than Universe Designer and enough strength to be classified as an enterprise development tool. It has added features that make a difference to the productivity of developers responsible for creating and maintaining UNX universes.
It takes a more enterprise approach to the universe life cycle. Using this tool, you can reshape your universe development strategy. What if the data modelers who model your business and build your data warehouse schemas were in charge of building and maintaining the data foundation layers for all universes in your enterprise? Isn’t it much easier to align business layers with corporate master data initiatives?
Will the IDT become your favorite tool in the toolbox? Maybe yes, maybe no, but hopefully this introduction to the IDT will help you get past the “I hate it” stage that we all run into when a tool we have been working with for years is replaced by a totally new interface.
Mike McErlain
Mike McErlain, CBIP, is a senior BI consultant with more than 30 years of getting strategic enterprise information to the right people at the right time. He started specializing in the SAP BOE platform in 1994. Mike is the proud grandparent of seven beautiful children. His leisure time is spent on the golf course with family and friends.
You may contact the author at
mikemcerlain@gmail.com.
If you have comments about this article or publication, or would like to submit an article idea, please contact the
editor.