Learn about Cascading Style Sheets (CSS) and the benefits of using them in combination with Design Studio. Also learn how to use CSS with the different Design Studio installation types and how to edit the CSS styling of the standard Design Studio components.
Key Concept
By using Cascading Style Sheets (CSS), Design Studio developers can fine-tune the looks of their Design Studio applications. A Custom CSS file can support a company-wide styling for a Design Studio application from a single, central place.
Design Studio is a toolset to create dynamic and interactive BI applications and dashboards. With connectivity options to SAP NetWeaver BW, UNX universes, and SAP HANA, Design Studio supports a wide selection of SAP-related data sources. Since Design Studio applications are fully HTML5 compatible, applications can run on almost any mobile device. Design Studio comes with a standard look and feel and has a very basic set of formatting options built in. With the help of Cascading Style Sheets (CSS), however, you have the ability to customize the look of Design Studio applications.
In this article, I give a basic introduction to the language of CSS and explain how it can be used in combination with Design Studio, either on a local installation or with a connection to an SAP BusinessObjects BI4 platform or an SAP NetWeaver BW environment. The contents of this article are based on Design Studio version 1.2.
CSS is a language that describes the look and formatting of a document; for example, an HTML Web site. The styles define how the HTML elements should be displayed. Let’s say a certain paragraph with some text needs to be displayed in red; a CSS class can take care of this. CSS covers the definition of fonts, colors, height, width, margins, and so on.
Originally, the HTML language was only used to add structure to text. For example, you were able to define a piece of text as a headline or a paragraph with specific HTML tags like <h1> and <p>. Soon these initial tags were considered too limited and more HTML tags for layout options were added, such as the <font> tag to define the font that had to be used. This eventually led to a situation that required a lot of HTML coding tricks to achieve the desired layout of a Web page. Often these codes didn’t work exactly the same in different browsers, so a better standard was needed, which is how CSS came about.
With the introduction of CSS, the style of a page could be separated from its content, which has huge advantages when maintaining a Web site, or in some cases, one or even a bunch of Design Studio applications. With CSS you can define a certain style once and use it many times after. If you want a certain text label to appear in red, bold, and with a size of 12 pixels, you can define a so-called CSS class that contains these settings.
From the Text component properties in Design Studio, you only have to refer to this specific CSS class to make the text in the Text component red, bold, and 12 pixels. Furthermore, if you decide to change the color of these labels from red to green, you now only have to change the definition in this single CSS class, once. All the Text components that are referring to this specific CSS class then automatically display their text in the color green. As you can imagine, this is an efficiency gain over having to edit the color setting for each of those Text components in your Design Studio application one by one.
So how are CSS classes defined and how do they work? CSS classes consist of three parts: class name, property, and value. You start with a point, give the class name, and put the CSS properties and their values between brackets ({}). Each property statement must end with a semicolon. This leads to the syntax format shown here:
.classname {
property1: value;
property2: value;
}
In the next example, the CSS class labeltext has a property for the text color with a value of green, a property for the font weight with a value of bold, and a property for the background color with a value of grey.
.labeltext {
color: green;
font-weight: bold;
background-color: grey;
}
Now you are probably wondering how to find the right properties for the formatting styles you want to apply. Luckily you don’t have to invent this yourself because there are a lot of free CSS references and courses available online to help you. W3Schools is a large learning source on Web-related coding and offers a handy CSS reference with all the available CSS property groups, including a try-it-yourself editor to immediately check the result of the code. Click here to visit the site: https://www.w3schools.com/cssref/.
Another tip is to use a specific program to write your CSS code. Notepad++ (open source), is one such editor. This program can recognize the CSS language and it uses multiple colors to highlight certain parts of the code. This greatly improves the readability of the document. You can visit the site here: https://notepad-plus-plus.org/. Even better, there is a plugin available called Notepad++ cssList that offers a built-in list of CSS properties and works with auto-completion and a color picker. Click here to learn more about this plugin: https://sourceforge.net/projects/notepadcsslist/.
You can minimize the code by using shorthand code. With shorthand code you specify all the properties of a CSS group in one declaration. For example, this longer code:
.text_old {
font-style: italic;
font-weight: bold;
font-size: 10px;
font-family: Arial;
}
Becomes this shorter code with shorthand code:
.text_new {
font: italic bold 10px Arial;
}
Check out the W3Schools CSS references for the right order to list the properties.
Furthermore you may group classes with the same property values to minimize the code. For example, this longer code:
.color1 {
color: blue;
}
.color2 {
color: blue;
}
Becomes:
.color1, .color2 {
color: blue;
}
Also, you may use subclasses to reuse the properties values of other CSS classes. For example:
.button {
width: 200px;
background-color: red;
}
.button.buttonbold {
font-weight: bold;
}
In this case, the .button.buttonbold subclass now has a width of 200 pixels, with a red background color, and its text is bold.
Finally, you may add comments to the CSS code using /* and */ . For example:
/*This is a comment.*/
Now that you’ve learned a bit about the basics of CSS, it is time to use it in Design Studio. I start with an easy example to show you how CSS instantly changes the looks of a Design Studio component. Make sure you have Design Studio started up with a clean and empty application loaded. Add a Text component to the application and select it so its properties are shown in the Properties View. The Text component is actually one of the two Design Studio components that let you edit its CSS style from within Design Studio itself. The other component with this feature is the Panel component. All other components only have the option to refer to a custom CSS file; I discuss this later in this article.
In the Properties view of the Text component, select the CSS Style option (Figure 1).
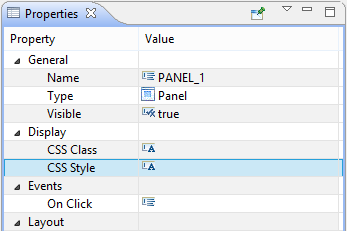
Figure 1
Text component properties
An empty pop-up screen appears: The CSS Style Editor. Here you enter your CSS code for this component. In this example you are going to make the text 14 pixels large, colored white, and aligned to the center of the component (Figure 2). Also make the background of the component green with a solid border of 4 pixels, colored black. Since the code you enter here is only used for this specific component, you don’t have to name the CSS class and use brackets.
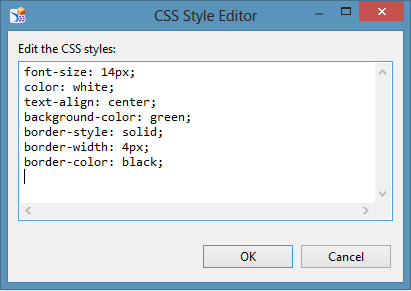
Figure 2
Edit the CSS style
Enter the following code in the CSS Style Editor (Figure 2) and click the OK button:
font-size: 14px;
color: white;
text-align: center;
background-color: green;
border-style: solid;
border-width: 4px;
border-color: black;
The look of the Text component changes as shown in Figures 3 and 4.

Figure 3
The Text component default
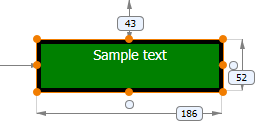
Figure 4
How the Text component looks after applying the new CSS code
As you can see, you can do all kind of things with the Text component and CSS. You can even use CSS to change the shape of the component and create buttons (Figure 5).
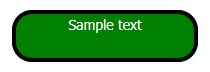
Figure 5
The new Text component with rounded corners
To achieve this new look, add the following line of CSS code to make the corners of the component rounded:
border-radius: 20px;
A big disadvantage of editing CSS code directly into the properties of a component is that it is hard to maintain; there is no way to reuse the code in another component, except for copying the original component. However, if you want to change the style afterwards, you have to make the same change in every component, one-by-one. Therefore, a better strategy is to use a custom CSS file that is separated from the Design Studio application and offers a way to reuse CSS classes over multiple components.
There are several approaches you can take for customizing CSS files. You can reuse the custom CSS file for multiple Design Studio applications within your BI environment. In that case you only have to maintain a single file in which you have defined your company’s presentation style. In case there is a change to this style—say, the company colors switch from yellow to red—you only have to make the changes at a single location: Your single CSS file. You can also choose for a more local scenario in which you create a separate CSS file for each Design Studio application, which probably gives you a lot more development freedom, but may result in applications with different looks.
So how does this exactly work? How can you instruct the components in your application to use the CSS styles as defined in a custom CSS file? Let’s start at the beginning. Start Design Studio in local mode (select Skip when starting up Design Studio) and create a new application. From the Applications menu select the Open Repository Folder option. Windows Explorer opens the local repository folder for your Design Studio applications, where you can open the folder of the application that you just created. Open Notepad++ (or the default Notepad.exe), create a new file, and save it in this folder with the name example.css (Figure 6). Make sure the .css extension is used (and not the extension .txt).
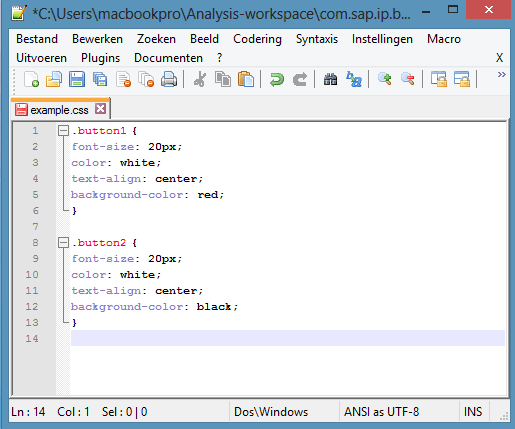
Figure 6
CSS code in Notepad++
Now add the following CSS code to the file and save it:
.button1 {
font-size: 20px;
color: white;
text-align: center;
background-color: red;
}
.button2 {
font-size: 20px;
color: white;
text-align: center;
background-color: black;
}
As you can see in Figure 6, you have defined two CSS classes: button1 and button2. Now switch back to Design Studio and add two new Text components. In the Properties view of the first component, enter button1 for the CSS Class entry and in the second component enter button2.
At this point nothing happens. This is because you have to link the Design Studio application to the CSS file you just created using Notepad++. Go to the Properties view of the application (select the application in the Outline View or click somewhere in the Layout editor). Enter example.css under the Custom CSS option (Figure 7). Press Enter to refresh the application and the new CSS styles are applied to the two components (Figure 8).
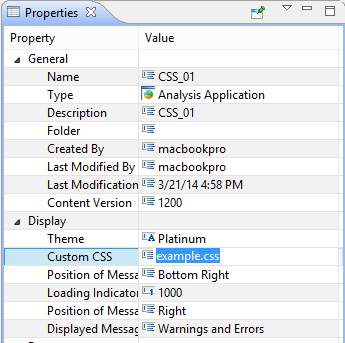
Figure 7
Properties view of application
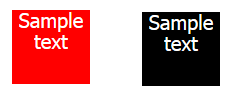
Figure 8
Two Text components after linking the custom CSS files
Two final notes before I move on to the next step. You can change the value of the CSS Class from a script with the .setCSSClass() method. You can, for example, change the CSS Class of a button after clicking it to show that the button has been selected. In addition, to retrieve the CSS Class of a component use the .getCSSClass() method.
Besides running Design Studio applications on your local machine, you can deploy them on either an SAP BusinessObjects BI4 platform environment or an SAP NetWeaver BW installation. This also means that your custom CSS file has to reside on these environments. In this section I show the steps to achieve this.
Uploading to the SAP BusinessObjects BI4 Platform
First, let’s have a look at the BI4 platform scenario. Start Design Studio in the SAP BusinessObjects BI Platform startup mode and open your application from the BI4 platform (or create a new one). In the Properties view of the application, click the Browse button in the Custom CSS entry. A pop-up window opens that lets you browse through the folders of your BI4 environment. Use the Upload Local CSS option to upload your CSS file from your local machine (Figure 9).
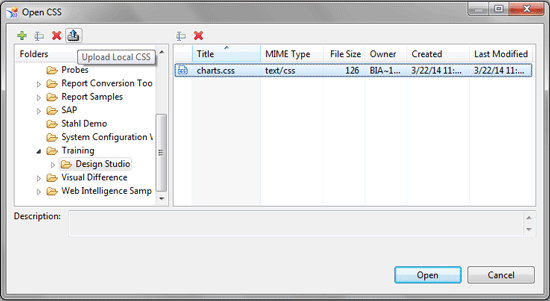
Figure 9
Upload and open the CSS file on the BI4 platform
After uploading it, select it and click the Open button to bind it to the Design Studio application. As you can see, the directories and the name of the CSS file are now filled in (Figure 10). You can also manually change this by double-clicking the entry field (instead of clicking the Browse button). As the CSS file resides on the BI4 platform, you can also use the CMC or BI Launchpad to upload CSS files.
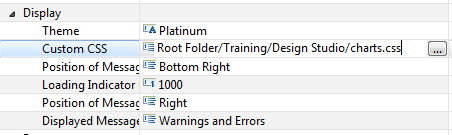
Figure 10
Properties view of the application
A final remark: If you want to update the CSS file by uploading from Design Studio, first delete the original CSS file on the BI4 platform. If you upload a document with the same name into a folder, the original file won’t be overwritten, but the name of the new file will be changed.
Uploading to the SAP NetWeaver BW Environment
Next up is the SAP NetWeaver BW scenario. To host a CSS file on the SAP NetWeaver BW platform, you have to upload it to the MIME Repository. Log into SAP NetWeaver BW with the SAP GUI and execute transaction code SO2_MIME_REPOSITORY. Under the BW folder create your own folders and add files. Use the context menu (right-click) to create one or more folders in the BW folder. To upload a file to a folder, right-click a folder and choose the Import MIME Objects option from the context menu (Figure 11). Now you can navigate through your local machine and select the CSS file. Next you can edit the name of the file and save it by clicking the Save button (Figure 12). Figure 13 shows the uploaded file in the MIME Repository.
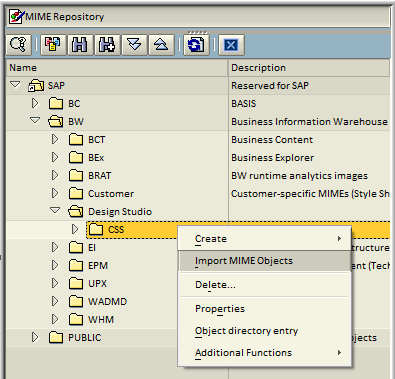
Figure 11
Import MIME Objects (step 1)

Figure 12
Import MIME Objects (step 2)

Figure 13
The CSS file is uploaded to the MIME Repository (step 3)
After the file is uploaded successfully, start Design Studio in SAP NetWeaver startup mode and open your application (or create a new one). Again, in the Properties view of the application, click the Browse button in the Custom CSS entry. This lets you browse through the MIME Repository, where you can select the CSS file (Figure 14). After clicking the Open button, the location of the CSS file is entered in the Custom CSS property (Figure 15).

Figure 14
Select the CSS file from the MIME Repository
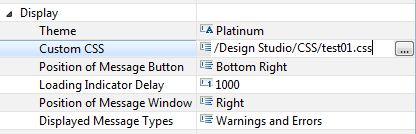
Figure 15
The Properties view of the application
Every Design Studio component uses CSS styles for its formatting. Depending on the theme that is selected, a different style set is used. With your custom CSS file you can adjust the default CSS styles and alter them according to your own preferences. There are two approaches. First you can overwrite the default CSS class of a component type. In this method you don’t have to assign the name of the CSS class in the Properties view anymore when using this component. The adjusted CSS style is applied to all corresponding components. The second approach is to create a CSS subclass, which lets you use parts of the default CSS style. Using this method, this new class has to be assigned to the components.
The big question now is: How do you know which default CSS classes to use? Let’s say you want to adjust the look of the Tabstrip component; you want to move the tabs to the right side of the tabstrip and display the label text in green. First, start Design Studio in local mode, create a new application, and add a new Tabstrip component (Figure 16). Execute the application locally.
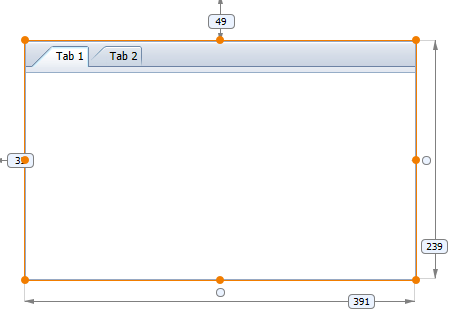
Figure 16
The default Tabstrip component styling
Internet browsers like Google Chrome and Internet Explorer have a developer mode built in that you can use to find the correct CSS classes. In Google Chrome, right-click the element for which you want to change the styling and select the Inspect element option from the context menu. (You can also press F12 to activate the developer mode.) As shown in Figure 17, the CSS classes that are used for this element are shown on the right side of the developer toolset.
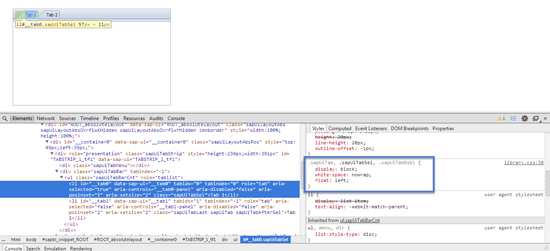
Figure 17
Google Chrome developer tools
In this case you want to change float: left to float: right. This is defined in the classes .sapUiTab, .sapUiTabSel, and .sapUiTabDsbl (Figure 18). You can actually do this in the browser so you can instantly check the effect.
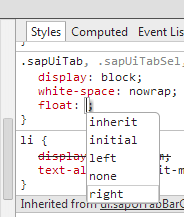
Figure 18
Changing CSS property values in the developer tools
If you scroll down, you can find the class that defines the color of the labels: .sapUiBody (Figure 19).
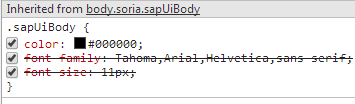
Figure 19
CSS class body.soria.sapUiBody
Now that you know which CSS classes are used (shown below), you may add them to your custom CSS file:
.sapUiTab, .sapUiTabSel, .sapUiTabDsbl {
float: right;
}
.sapUiBody {
color: green;
}
Make sure you refresh the Design Studio application to show the effects of the adjusted custom CSS file. If the Reload Application button doesn’t work, try refreshing the screen: Right click somewhere in the Layout editor (not on a component) and select Refresh from the context menu that appears. This results in the screen shown in Figure 20.
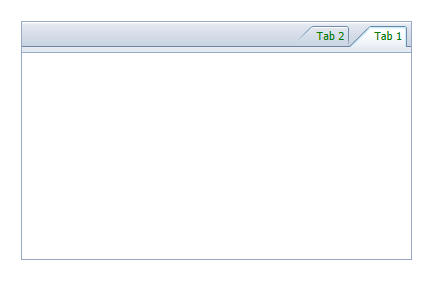
Figure 20
The new Tabstrip component with the modified CSS styles
Xavier Hacking
Xavier Hacking is a SAP BI specialist from Eindhoven, The Netherlands, working as a consultant for Interdobs. He has a Master’s degree in Industrial Engineering and Management Science from the Eindhoven University of Technology. He has worked with a wide range of products from the current SAP BW and SAP BusinessObjects toolset, with a focus on dashboard and application development within SAP environments. Xavier is the co-author of four SAP BI-related books, including SAP BusinessObjects Design Studio – The Comprehensive Guide and SAP BusinessObjects Dashboards 4.1 Cookbook. He blogs on all sorts of BI-related topics at HackingSAP.com and you can follow him on Twitter at @xjhacking.
You may contact the author at post@xavierhacking.nl.
If you have comments about this article or publication, or would like to submit an article idea, please contact the editor.