To realize all the business benefits of SAP BusinessObjects Access Control, it is important that you implement compliant user provisioning and enterprise role management (formerly Access Enforcer and Role Expert). However, if you are not ready to do that, Risk Terminator provides a very good interim solution. You can follow these step-by-step instructions for configuring Risk Terminator.
Key Concept
Risk Terminator is part of risk analysis and remediation. Risk Terminator provides the ability to “stay clean” without having to fully implement compliant user provisioning and enterprise role management. Risk Terminator actually resides on the ABAP back-end systems. It is then connected to the risk analysis and remediation front end. Based on the configuration of Risk Terminator you can prevent, or merely warn, if segregation of duties (SoD) issues occur when trying to change a user or a role.
The SAP BusinessObjects Access Control mantra is “get clean, stay clean.” To achieve this, SAP has created four separate components of SAP BusinessObjects Access Control:
- Risk analysis and remediation – The core product of SAP BusinessObjects Access Control that allows companies to analyze users, roles, and profiles for possible segregation of duties (SoD) problems as well as critical access levels. It allows a user to get clean.
- Compliant user provisioning (CUP) – This is part of the stay clean mantra. This component allows a company to automate provisioning of user access to identify possible SoD issues before the access is actually assigned.
- Enterprise role management (ERM) – This is the second part of the stay clean mantra. This component allows you to review security role changes for possible SoD concerns before the role is actually created or changed in the SAP system.
- Superuser privilege management (SPM) – This is the final piece of the stay clean mantra. The application allows companies to control and review business and IT teams’ use of emergency level access.
A best practice is to implement all four of these components to truly facilitate the get clean, stay clean mentality. However, in today’s economy, sometimes it’s not feasible to implement all four components at once. Implementing CUP and ERM especially take a lot of time, resources, and change control planning to truly realize their benefits.
So what is a company to do if it wants to implement risk analysis and remediation, but is not ready to implement CUP and ERM? The concern is that the company would spend all the time getting clean, but not have the tools to stay clean. A viable option in this situation would be to leverage Risk Terminator.
The first step to implementing Risk Terminator is to activate the necessary BC_SET in the ABAP system where Risk Terminator will be used (Figure 1). To do this, go to transaction code SCPR20. See SAP Note 1357827 for which Business Configuration Set (BC Set) to activate. This should be done with the assistance of the Basis team.
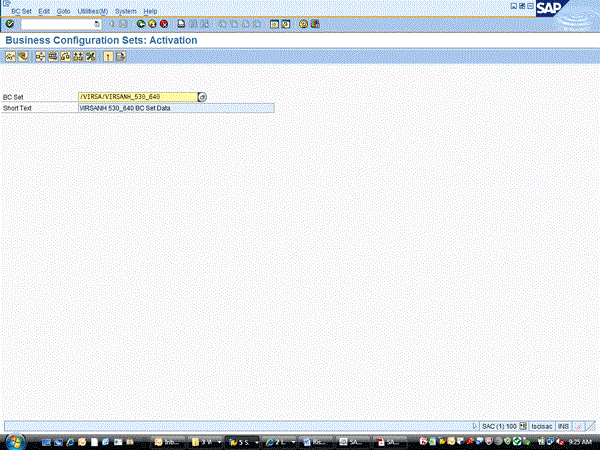
Figure 1
Activate the BC Set
Once it is activated, go to transaction code SE16N and table SSM_CUST. Ensure that the entries below exist in this table (Figure 2):
- SAP_AFTER_PROF_GEN
- SAP_BEFORE_PROF_GEN
- SAP_EXIT_USERS_SAVE
- SAP_SINGLE_USERPROF
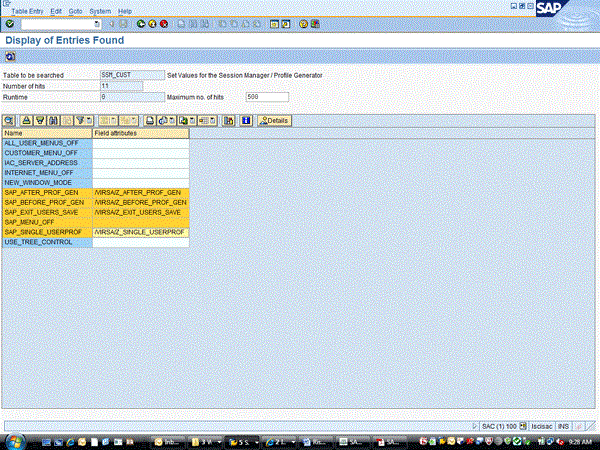
Figure 2
Table SSM_CUST entries necessary for Risk Terminator to work
The next step to implementing Risk Terminator is to create a Remote Function Call (RFC) destination. To do this, go to transaction code SM59 and click the Create button (Figure 3). That takes you to Figure 4.

Figure 3
Display and Maintain RFC Destinations
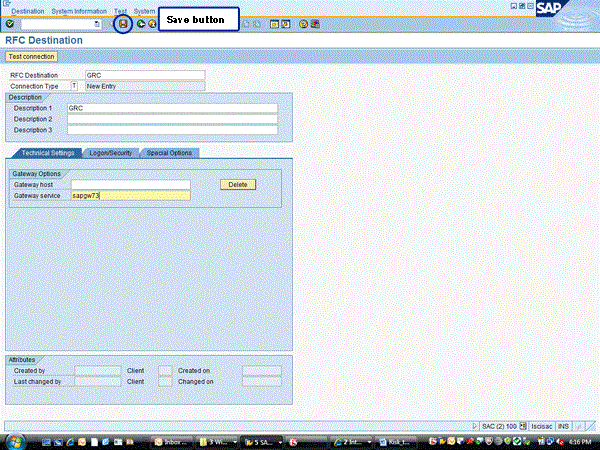
Figure 4
Create an RFC connection
The Connection Type needs to be T – Start an external program via TCP/IP. The Gateway host field should be blank. You can find the Gateway service value by going to transaction RSGWLS. Usually the Gateway service is sapgw + system number. Then click the save button to get to the screen shown in Figure 5.

Figure 5
Set the technical details
In the Technical Settings, Activation Type section, click the Registered Server Program radio button. In the Program ID field, enter any data you want. One caveat is that the Program ID should not contain any of the same data that is included in the RFC Destination name, nor can it be a Program ID used in any other RFC connection. In this example, the name of the RFC Destination is GRC; therefore, do not include GRC in the Program ID field. Once done, click the save icon, which will take you to Figure 6.
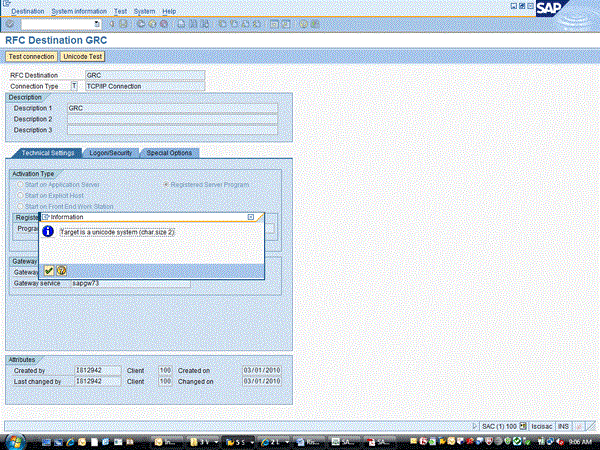
Figure 6
Check to see if this is a Unicode system
Click the Unicode Test button. This information is necessary when the connector is created in risk analysis and remediation. Take note whether this system is a Unicode system. Once done, click the green checkmark, which brings you back to Figure 6. Next, click the Test connection button (Figure 7). The test results show in Figure 8.

Figure 7
Testing the RFC connection
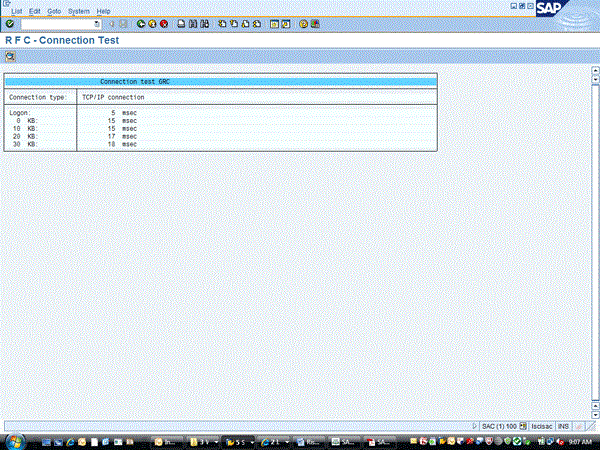
Figure 9
RFC connection test results
This screen shows if the connection works. The screen shown in Figure 8 means the connection is working; however, if there are any connection errors, they are displayed in this screen. If there are any issues or errors, work with your Basis team to correct the RFC connection.
Once the RFC connection is created, the next step is to create the connection in risk analysis and remediation to the back-end SAP ABAP system. In the SAP BusinessObjects Access Control risk analysis and remediation system, go to Configuration tab > Connectors . This brings you to the screen in Figure 9. Once there, click the Create button under Configuration tab >Connectors which will bring you to the screen in Figure 10.
Figure 9
Risk analysis and remediation configuration screen
In the screen in Figure 10, enter the system information. The key fields that need to be filled in for Risk Terminator to work are:
- SAP Gateway – This must match the Gateway service that is also in the SM59 RFC connector
- Report Name – This must match exactly the Registered Server Program ID that was configured in the SM59 RFC connector
- Outbound Connection – This must be checked for Risk Terminator to connect
- Unicode System – This must be checked based on the result of the Unicode Test done in the SM59 RFC connection
Once finished, press the Save button at the bottom of the screen, which takes you to Figure 11.
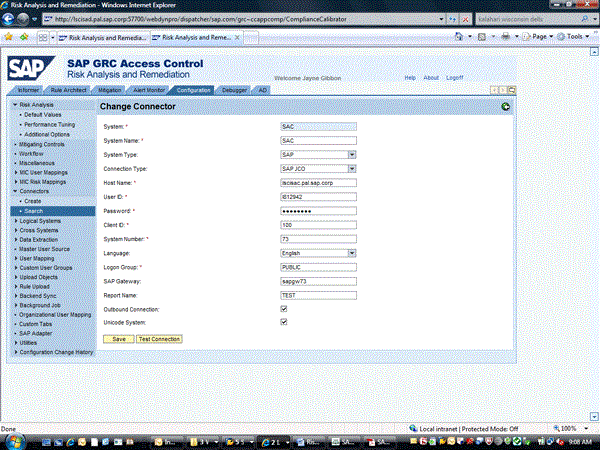
Figure 10
Create risk analysis and remediation connector
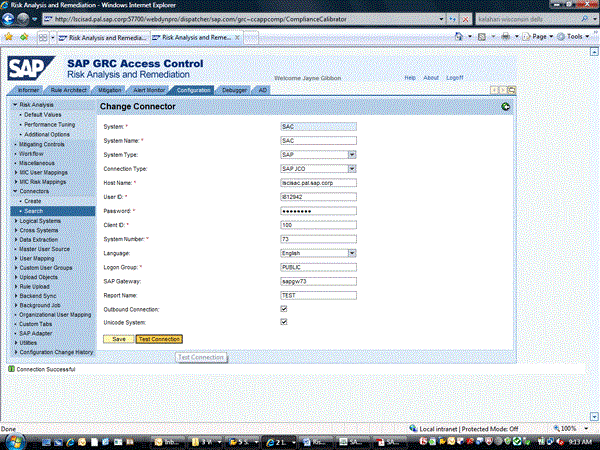
Figure 11
Testing of risk analysis and remediation connector
Once the data is saved, click the Test Connection button and ensure that the connector works. As shown in Figure 11, the message Connection Successful shows if this is configured correctly.
Next, within the risk analysis and remediation application click the Configuration tab and then the SAP Adapter button, which takes you to SAP Adapter Servers screen (Figure 12). The connector created previously should show on this screen with a green button. If the button is gray, click the button to turn it green.

Figure 12
SAP adapter status
Then, you must upload rules against this system ID. To do this, within risk analysis and remediation, click the Configuration tab and go to Rule Upload > Business Process (Figure 13). See SAP Note 1373465 on how to load rules.
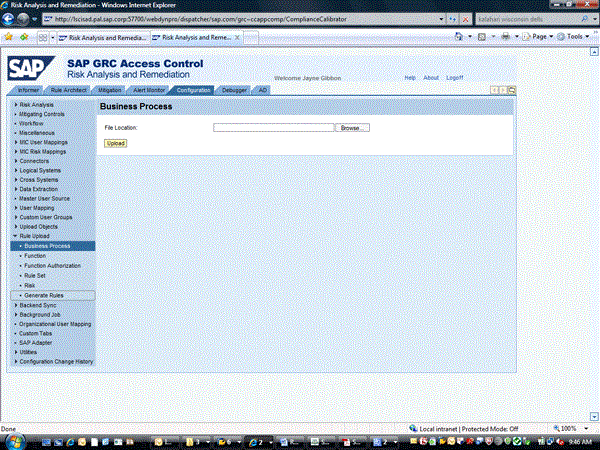
Figure 13
Loading of risk analysis and remediation rules
The final connection step is to take care of the Risk Terminator configuration. You access the configuration in the SAP ABAP system by going to transaction code /n/virsa/zrtcnfg (Figure 14).
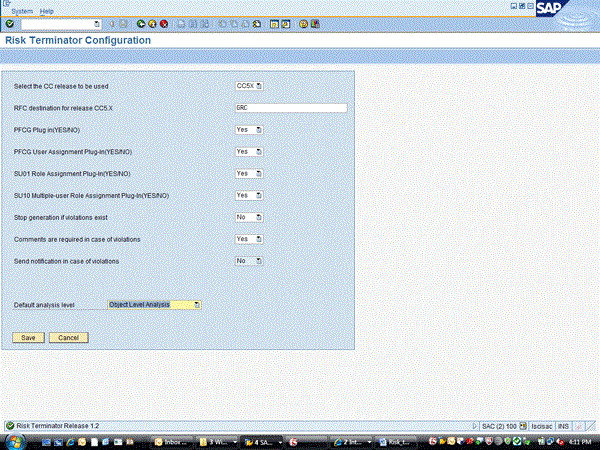
Figure 14
Risk Terminator Configuration
The field Select the CC (Compliance Calibrator) release to be used should be set to CC5X. The RFC destination for release CC5.X should be the name of the RFC destination previously created in transaction SM59 (GRC, in my example). The rest of the configuration should be set based on how you want Risk Terminator to work. Here is an explanation of each option:
- PFCG Plug in(YES/NO) – If this is set to Yes, changes to roles done in PFCG will be checked by Risk Terminator. This does NOT include adding users to roles in PFCG; that is a separate option.
- PFCG User Assignment Plug-In(YES/NO) – If this is set to Yes, adding users to roles in transaction PFCG will be checked by Risk Terminator.
- SU01 Role Assignment plug In(YES/NO) – If this is set to Yes, adding roles to users in transaction SU01 will be checked by Risk Terminator.
- SU10 Multiple-user Role Assignment Plug-In(YES/NO) – If this is set to Yes, adding roles to users in transaction SU10 will be checked by Risk Terminator.
- Stop generation if violations exist – If this is set to Yes, Risk Terminator will not allow the security administrator to save the role or user if any violations exist. This is a hard error and cannot be bypassed until the violation is removed. If set to No, a warning comes up if violations exist, but the administrator can still save (soft warning).
- Comments are required in case of violations – If you want the administrator to put in comments if violations exist, set this as Yes.
- Send notification in case of violations – This option is not available at this time.
- Default analysis level – The best practice is to set this as Object Level Analysis. This corresponds to the permission level analysis in the risk analysis and remediation front end.
Once configured, this system begins triggering Risk Terminator, When a user or role is created or changed, Risk Terminator evaluates the change against the rules that exist in the risk analysis and remediation tool to highlight any possible issues. Here is an example of how Risk Terminator works. In this scenario, a new user is created in transaction SU01 (Figure 15). When you click the Save button in Figure 15, Risk Terminator is triggered to check for possible SoD violations.
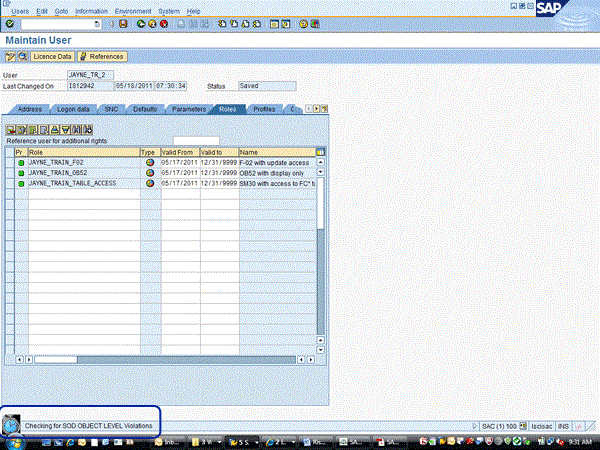
Figure 15
Saving of a user in SU01 triggers Risk Terminator
Once the analysis is done, the system displays the report (Figure 16). This example shows that the user will have the conflicting transactions shown in Figure 16 if this security change is made. Clicking the Detail View button gives you the specifics (Figure 17).
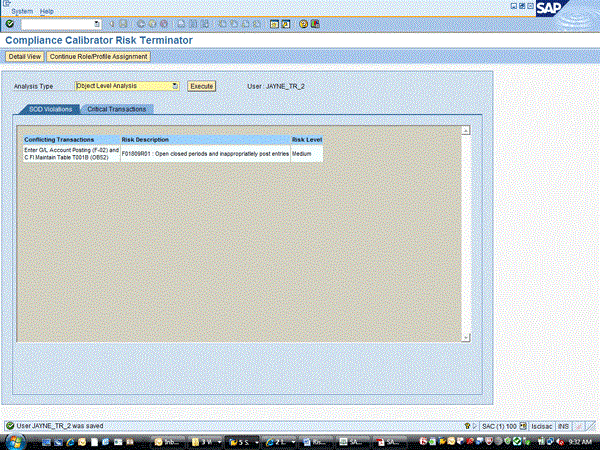
Figure 16
Risk Terminator summary report
This provides the administrator with information about what role is causing this problem. Using this information, the administrator can decide how to proceed (i.e, to Continue Role/Profile Assignment or to remove one of the offending roles).

Figure 17
Risk Terminator detail report
To proceed, the administrator must click the Continue Role/Profile Assignment button, which results in the screen in Figure 18.
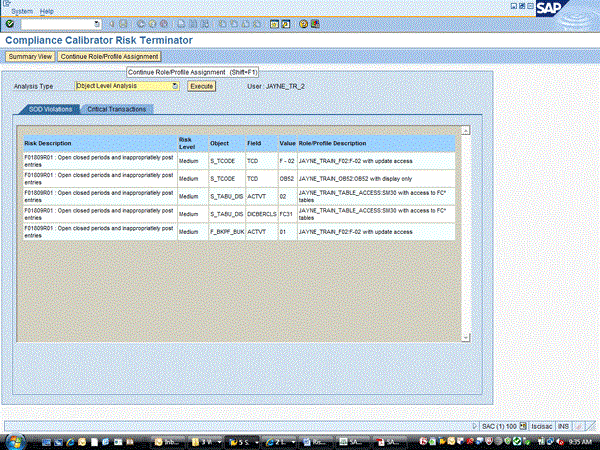
Figure 18
Continue Role/Profile Assignment
If the administrator decides to proceed with the change by[?] adding the security roles to the user, the message in Figure 19 comes up. Because Risk Terminator was configured so that the Stop generation if violations exist option is set to No, the roles can be assigned even though there are SoD conflicts. To do this, simply click the Continue Role/Profile Assignment button in Figure 19. This will then bring up Figure 20.
If the Stop generation if violations exist configuration option is set to Yes, this pop-up box only shows the Discard Changes button and does not allow the administrator to proceed with this change.

Figure 19
Risk Terminator warning of whether the change should proceed
Because the Comments are required in case of violations configuration option is set to Yes, the administrator is prompted to enter comments before the save action completes (Figure 20).
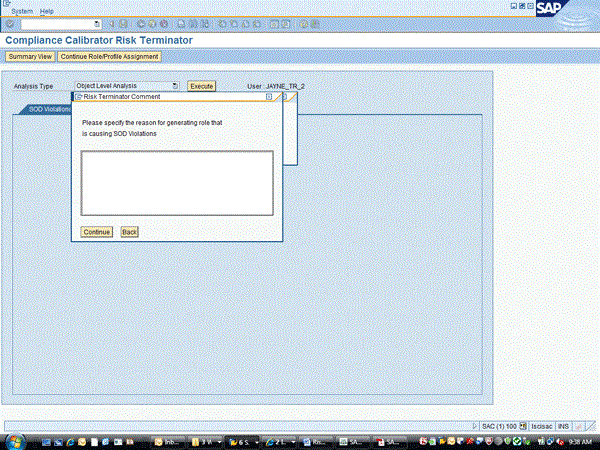
Figure 20
Mandatory comments for SoD violations
The customer can review the comments that have been entered by going to transaction /n/VIRSA/ZRTRGLOG (Figure 21). Reporting variables are entered here, and then the report is executed using the execute icon. This results of the report are shown in Figure 22.
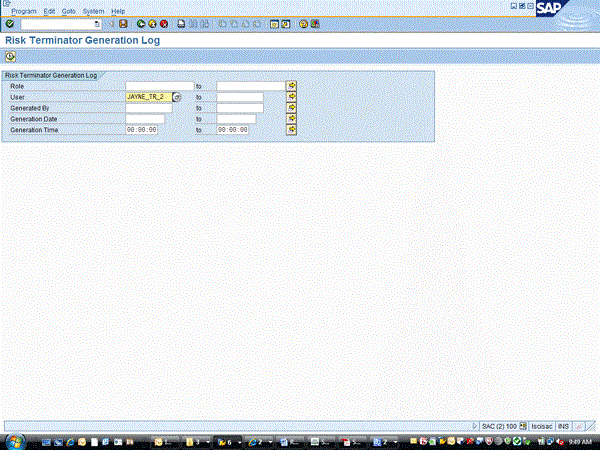
Figure 22
Risk Terminator comment report
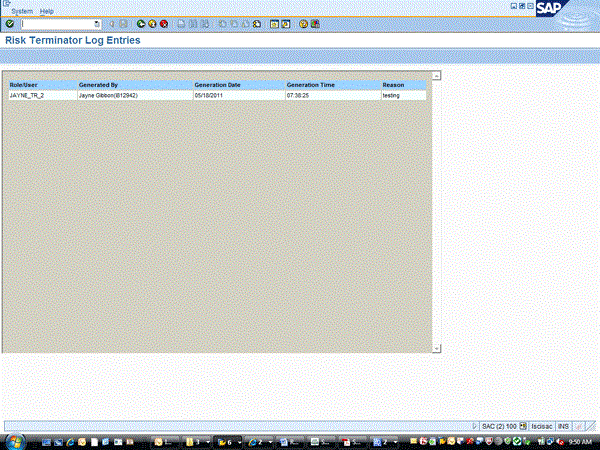
Figure 22
Risk Terminator log entries
Upon running this Risk Terminator comment report, you can view all the comments (Figure 22). Here are some important SAP Notes to review for a Risk Terminator implementation:
- SAP Note 1357827: Risk Terminator is not working though configuration is set
- SAP Note 1581725: Risk Terminator Report Type changes
- SAP Note 1099011: Limitations of using CUA with GRC Access Control
- SAP Note 1110440: Risk Terminator not triggered for composite or single role
- SAP Note 1270413: Risk Terminator times out, analysis not performed
- SAP Note 1270443: Risk Terminator Email Notification is not working
- SAP Note 1225960: /VIRSA/RT_JAVA_RISK_ANALYSIS Error in Risk Terminator
- SAP Note 1016136: Discard changes in Risk Terminator incorrectly assigns Roles
- SAP Note 1504679: Risk Terminator: Risk Analysis Failed exception
- SAP Note 1415292: RT issue at role creation in PFCG
If you implement Risk Terminator, it is hoped that you only need to use it for a limited time. The ultimate goal is to implement compliant user provisioning and enterprise role management to truly realize all the benefits of implementing SAP BusinessObjects Access Control. That said, Risk Terminator is a very good option to use while implementation occurs to allow customers to “Stay Clean.”
Jayne Gibbon
Jayne Gibbon, CPA, has been implementing SAP applications since 1996 and is currently a director in the Chief Customer Office at SAP. Jayne’s focus is making customers successful with their SAP HANA deployments. She has helped more than 100 customers drive business value with SAP HANA. Prior to joining SAP in 2007, Jayne worked for two multinational manufacturing companies based in Wisconsin. While an SAP customer, Jayne led the very first implementation of Virsa’s Compliance Calibrator, which is now part of SAP Access Control. Jayne’s experience includes internal audit; computer security; governance, risk, and compliance; SAP HANA; and SAP analytics.
You may contact the author at jayne.gibbon@sap.com.
If you have comments about this article or publication, or would like to submit an article idea, please contact the editor.