Learn how to add extra columns to the SAP shift planning screen. Some of the benefits of using shift planning are the ability to set up groups of employees (e.g., organizational structures); create plans by work schedule, qualification, or by availability; and evaluate employees’ working hours during the planning process.
Key Concept
Shift planning is a tool for both employees and managers (shift planners). Shift planning provides an easy-to-use graphical user interface that allows managers or shift planners to create a shift plan for a group of employees where employees can record their actual shifts.
SAP shift planning is used to create and maintain shift planning for employees. During the planning, it is crucial that the planner have access to all relevant items of the employee to be able to make a good plan for a certain period. The SAP system offers some columns that can be added to the planning screen, such as employee number, department, and normal working hours. If a planner wants to see other data that is not available in the standard SAP system, such as the work schedule of the employee, this data can be added by adding an extra column to shift planning. You need to create a function module to fill this column with the required data. The function module fetches the data from infotype 0007 in the SAP ERP HCM system.
Note
The functionality discussed in this article is available from SAP version R/3 4.5C onward.
In my example scenario, I show how to add a column that shows the standard work schedule of the employee to shift planners. Shift planning needs to be customized, but this step is not covered this article.
Add Extra Columns to the Shift Planning Screen
There are three steps you need to take to add extra columns to the shift planning screen:
- Create a new function module
- Declare the column
- Test the new shift planning application
I discuss these in detail below.
Step 1. Create a New Function Module
Whenever you add an extra column to shift planning, the data for that column would mostly have to be fetched from an infotype of the employee. To do that, a function module needs to be created. The function module is called by the shift planning program to fill the extra column. To start this process, execute transaction code SE37 (Figure 1).

Figure 1
Create a new function module
Enter ZHR_GET_WS as the Function Module and click the Create button. This opens the screen shown in Figure 2.
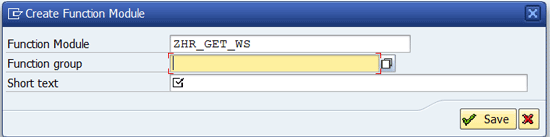
Figure 2
Create the function module
Click the drop-down list icon  to the right of the Function group field and select a custom function group (starting with Z). Enter the Short text and click the Save button. The screen in Figure 3 opens up with the Import tab selected, and all the fields are empty. Add the import parameters as shown in Figure 3. These parameters are provided to the function module by the shift planning program.
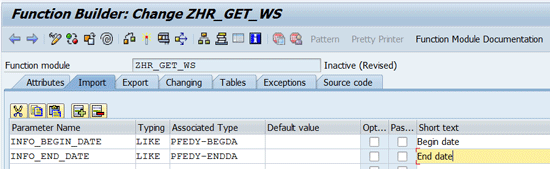
Figure 3
Import parameters
Click the Tables tab and fill in the values, as shown in Figure 4. This table will be transferred from the function module to the shift planning program. The shift planning program adds the values from the table to the extra column.
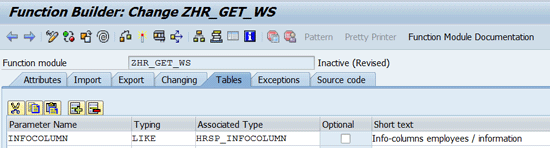
Figure 4
Tables parameters
Next, select the Source code tab. The SAP system creates a piece of source code, which is shown in Figure 5. You need to add some additional code to fetch the work schedule from infotype 0007. Use the code in Figure 6, from lines 11 to 22.
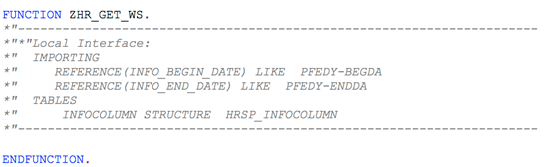
Figure 5
SAP source code

Figure 6
Source code
Fill in the code as in Figure 6. (Click here for a copy and paste version: Source code.)
Note
It is possible to change a person’s work schedule after a change of working hours. In shift planning one can plan shifts in the future, so the work schedule for the future day needs to be fetched.
Next, click the activate icon  . The function module is saved and activated. Click the exit
  icon twice to leave the program.
Step 2. Declaration of the Column
The next step is to declare a new information column in customizing for the shift planning, and attach the newly created function module to it. To do this, follow customizing transaction code SPRO menu path Time management > Shift planning > Info columns and proposal determination > Define information column. The screen shown in Figure 7 appears.
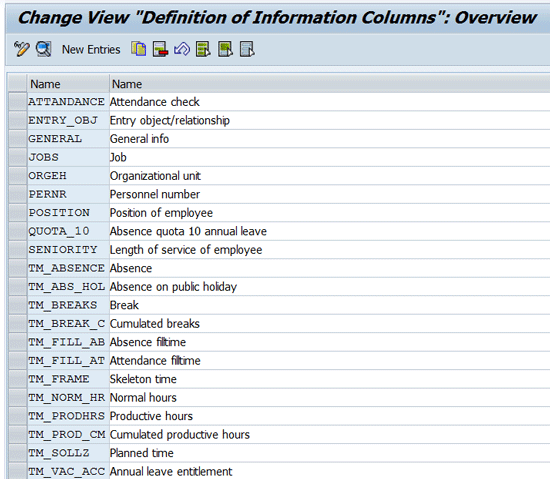
Figure 7
Adding a new column
This shows a list of the SAP standard columns. These information columns can be selected to make them visible in shift planning. To create your own column, click the New Entries button and a new screen appears with empty fields. Fill in the values as shown in Figure 8 and leave the rest blank.
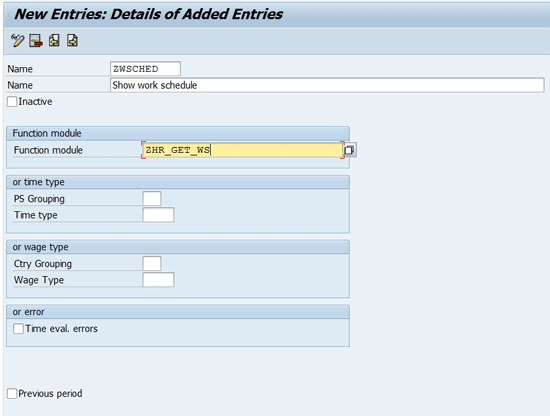
Figure 8
Create a new column
Click the save icon  and then the back icon
  twice to leave the program.
Step 3. Test the New Shift Planning Application
The next step is to test your new shift planning application to make sure it works. Start shift planning by executing transaction code PP61 (Figure 9).
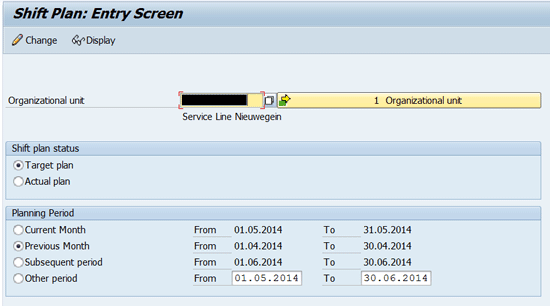
Figure 9
The shift planning entry screen
Note
Shift planning needs to customized, but that is beyond the scope of this article. The functionality described in this article cannot be used without the customizing steps. You can customize shift planning by executing transaction code SPRO, and then follow menu path Time Management > Shift Planning.
Enter the Organizational unit name, select a time frame (Planning Period), select if you want to use the actual or target plan, and click the Change icon (Figure 9). A screen like Figure 10 appears.
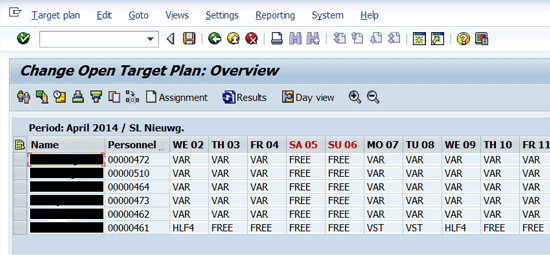
Figure 10
Target plan
Here you see that only the Personnel number column is selected as an extra column. To add other extra columns to the screen, select the menu option Views > Edit information columns from the top toolbar in Figure 10. A pop-up window opens as in Figure 11.
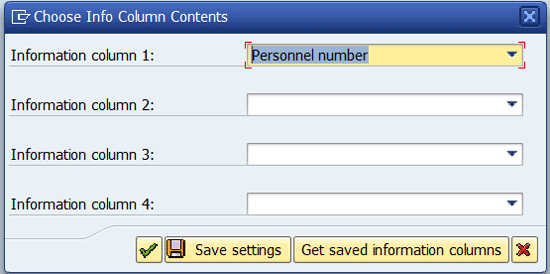
Figure 11
Pop-up screen to add the extra column
Here you see that the Personnel number is already entered in the Information column 1: field. In the Information column 2: field, click the down arrow on the right to expand the list of options. A list appears that looks like Figure 12.
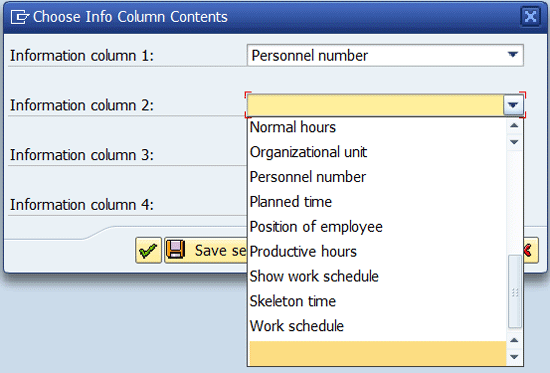
Figure 12
Select a new column name
Select the Work schedule option and then click the Save settings button (Figure 13).
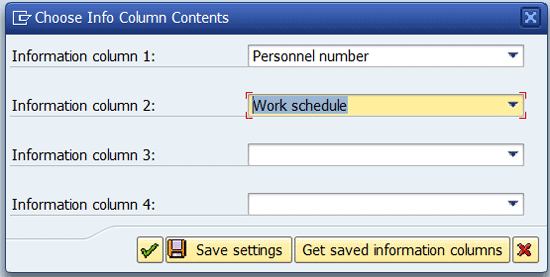
Figure 13
Save the new column name settings
This closes the pop-up window, and the shift planning screen re-appears with the new column (Work schedule) in it (Figure 14).
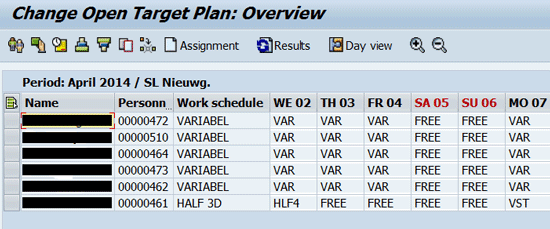
Figure 14
The new shift planning screen with the additional information column
Kees Bond
Kees Bond is a senior HCM consultant and ABAP consultant with 17 years of experience with SAP. He followed an HBO education in Amsterdam and lives in the Netherlands.
He started his SAP career in the first Dutch hospital to implement SAP. He was responsible for the implementation of the HCM module components PA, OM, time, and payroll. Currently, Kees is working as a principal consultant for CIBER Netherlands BV.
You may contact the author at kees.bond@ciber.nl.
If you have comments about this article or publication, or would like to submit an article idea, please contact the editor.