Enhance fixed asset master data in your SAP ERP system by activating a user exit and creating a custom screen. You then can track additional characteristics of a fixed asset to report on and comply with industry- or country-specific requirements.
Key Concept
User exits allow users to add functionality to SAP’s standard program logic without having to modify the original code. SAP delivers more than 2,000 exits that users can later activate. They don’t conflict with standard SAP source code and are upward compatible.
As a way to make their master data more relevant, many users attempt to enhance it with attributes such as classification or reporting designations, while others want to make changes to serve industry-specific functions, such as US Food and Drug Administration (FDA) requirements in the industry solutions (IS)-pharmaceutical solution.
The methods for enhancing master data in different modules vary because each module has unique requirements. I’ll show you a four-step process for addressing Asset Accounting (FI-AA) reporting and compliance-driven requirements. With this better design for your master data, you can add custom fields to the FI-AA master record.
You add the fields by populating the desired fields in table ANLU and writing simple ABAP code to transfer the contents of each custom field. You then add the fields to a master data screen using SAP’s Screen Painter and perform some simple configuration to modify the master data screen layout. This process, which applies to both R/3 and SAP ERP Central Component (ECC) systems, helps solve compliance issues such as the FDA industry requirements I mentioned. Before I go into more detail about implementing this enhancement, I first need to explain a common definition for a user field as it relates to FI-AA.
User Fields in FI-AA
In FI-AA, you can customize five system-delivered fields. SAP refers to these as evaluation groups 1-5, but most users refer to them as user fields. The customization of these fields is quite limited; you can only maintain the field labels and values. The system fixes the data type of these fields at type CHAR (character) and defines their length at either four or eight characters. Users often implement these evaluation groups for basic FI-AA classification, but it is not possible to customize their data type or length. Users also can’t change them into indicators that would satisfy different requirements. Using my process, you won’t face these restrictions. You can add as many fields as you need, all with varying characteristics and data types.
To provide more customization and allow greater definition of custom fields, the SAP system features user exit AIST0002. It doesn’t add any fields; it just creates the framework by which you can add them. It provides a point in the code to add fields, which the SAP system’s core functionality can then interpret. This enhancement allows far greater flexibility around custom master data requirements and can support business process requirements and reporting.
You can add numerous fields of the exact type and length for the business requirement. Without this, users have to work with a delivered field and hope it suits their needs. The system presents the newly added fields in asset reporting, sort versions, and the logical database ADA. The only prominent limitation is that the user fields added cannot be time-dependent fields.
Step 1. Activate the User Exit with Transaction CMOD
As with most user exits, the initial activation of the user exit is quite simple: Go to transaction CMOD, enter a project name, and click on the Create button. After entering a description and clicking on the SAP Enhancements button, enter the SAP enhancement AIST0002 (Figure 1).
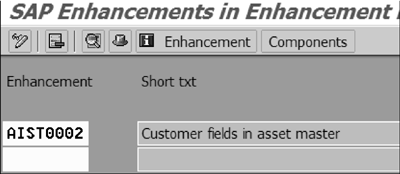
Figure 1
Specify enhancement AIST0002 within a customer project
Click on the Components button to bring up the components that the SAP system defines for this enhancement — two function modules and one include table. The include table ANLU is the asset master data table that stores the customer-defined fields that you need to specify later. The function modules control how the system manages the user field in the asset master data screens and the underlying ANLU table. You need to define the two function modules and the include table.
Step 2. Define the Function Modules and Include Table
Double-click on the CI_ANLU statement and you’ll see the Data Dictionary for this structure. Define the fields that you need. In this example, I’m going to enhance the asset master record with some identification fields to track the state that the asset resides in and a flag that designates the asset as an Asset Retirement Obligation (ARO). Companies use AROs to track the liability to properly dispose of certain fixed assets. For example, a company in the oil and gas industry might build a new pipeline. In the contract with the appropriate government entity, the company agrees to remove the pipeline and restore the environment to its pre- existing condition after the pipeline is shut down and no longer operational. The company needs to add this cost to the asset as the ARO. One small solution is to implement a simple identifier on the asset for ARO purposes, but the full solution is outside the scope of this article.
For this step, add the fields with the appropriate definitions and activate the table. When adding the fields, you may need to create a custom domain and data element in advance if you cannot find a suitable reference field. For the ZZSTATE field, I’m going to reference the SAP domain REGIO so the custom field can take advantage of the domain’s underlying definitions (Table 1). For the ZZARO field, I could have used the standard data element XFELD, but decided to create a custom domain that was mapped to this same domain — either method would have worked. See Table 1 for brief descriptions of these.
|
Field
|
Reference field
|
Description
|
|
ZZSTATE
|
REGIO
|
This is a three-character field mapped to the standard data element (the technical object that defines the field) REGIO that allows you to assign the asset record directly to a state. This is often necessary for US tax reporting purposes.
|
|
ZZARO
|
ZZARO
|
This is a one-character flag field designating the asset as being relevant for ARO. ARO assets track the liability to retire major capital assets.
|
Table 1If you want, you can confirm that the fields have been added correctly by directly accessing table ANLU from the Data Dictionary. Confirming the fields is merely precautionary because if the table is correctly activated, the fields will always appear. You should see the fields listed after the .INCLUDE statement for CI_ANLU (Figure 2).
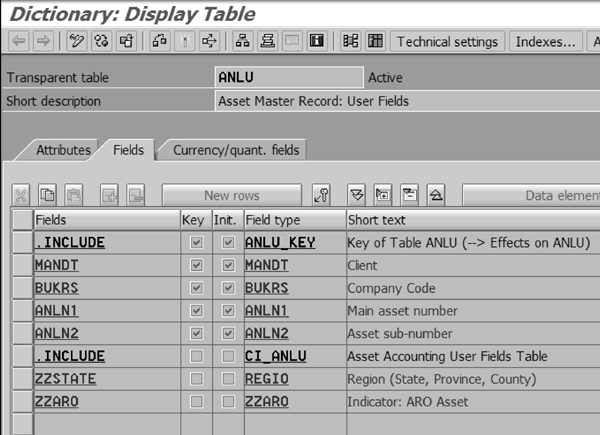
Figure 2
Asset master table for customer-defined fields
Back out of the Data Dictionary, re-access the user exit, and double-click on the first function module listed (EXIT_SAPLAIST_002). This function module references a customer-defined Z-program ZXAISU03. Double-click on this program and the system prompts you to see if you want to create it or not (it does not already exist) (Figure 3). In the small pop-up window that appears, click on the Yes button to create the program. This program controls how the system transfers the data that the user enters so the system can further validate the data.
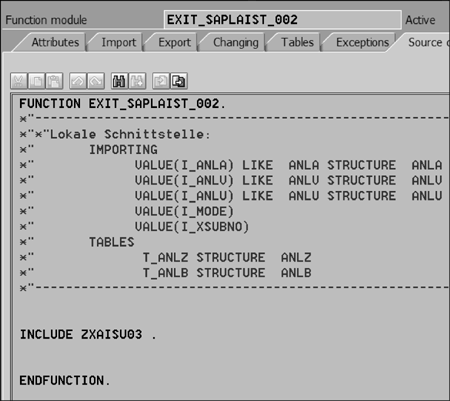
Figure 3
Function module EXIT_SAPLAIST_002
For every field that you want to add, you must at a minimum add a single line of code (Figure 4). You can include additional logic to further validate the data being entered. The purpose of this program is to transfer the values entered during runtime to the global variables used by the enhancement. You can then further validate and control the field values, which I’ll cover in more detail later.
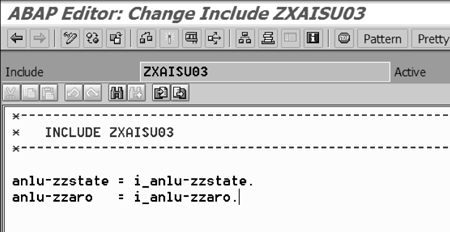
Figure 14
Code for include ZXAISU03 to transfer the field contents to global variables
After activating the program, back out to the user exit and double-click on the next function module (EXIT_SAPLAIST_003). As with the first function module, the system shows a single reference to Z- program ZXAISU04. Create this program by double-clicking on it. As you did to the first function module, you need to enter some simple code (Figure 5). This code transfers the fields entered on the customer-defined screens to the database for updating. The system calls this function module after processing the screens and before saving the records. You can code additional logic based on your requirements.
Back out to the user exit and click on the activate icon to activate the user exit and its underlying components. The final user exit should look the same as what’s shown in Figure 6. At this point, you’ve added the custom fields to the asset user field table and put the code in place to transfer the data from the user screens to the table for storage. Now you need to create a custom screen with which the end user can interface.

Figure 5
A minimum of one line of code is required per asset user field to perform the transfer

Figure 6
Customer project AAUSRFLD has three components active
Step 3. Create a Custom Screen
Next you need to create the subscreen that the system incorporates into the asset master data maintenance screens (e.g., transactions AS01, AS02, and AS92). To do this, you’ll have to use the Screen Painter tool. Screen Painter is an ABAP Workbench tool that allows you to create screens for your transactions. You use it both to create the screen itself, with fields and other graphical elements, as well as to write the flow logic behind the screen.
To create the screen using Screen Painter, you have to use one of two layout editor modes to design the screen: alphanumeric or graphical. Both modes have the same functions but differ in the interface you use. I prefer using the graphical Screen Painter because its interface is similar to other drawing applications such as Microsoft PowerPoint or Visio. It’s a more intuitive way to perform the initial design of the screen. You can switch between the two versions using the menu path Utilities > Settings > Screen Painter.
To access Screen Painter, navigate to transaction SE51 (Figure 7). Enter the screen name saplxais and a screen number. I’ve entered number 9000 in my example, but any available number is acceptable. When you’re done, click on the Create button.
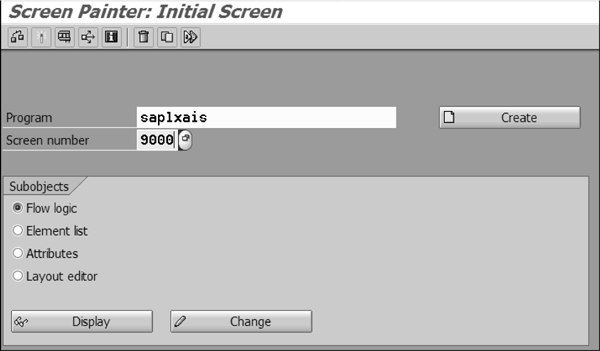
Figure 7
Screen Painter transaction showing the program and screen number
At the next screen, enter an appropriate description for the screen. Be sure to designate the screen as a Subscreen in the Screen Type section. If you don’t, you won’t be able to maintain the screen during configuration of the asset class screen layouts. After you specify these items, click on the Layout button on the toolbar.
This launches the graphical Screen Painter that you’ll use to define and arrange the custom fields. Each of the two custom fields requires two different types of fields: One is an input/output field in which the user enters values and the other is a field label.
In Screen Painter, click on the text icon on the left side and then draw a space in the work area (Figure 8). Its length should be appropriate to the field label that you’re creating.
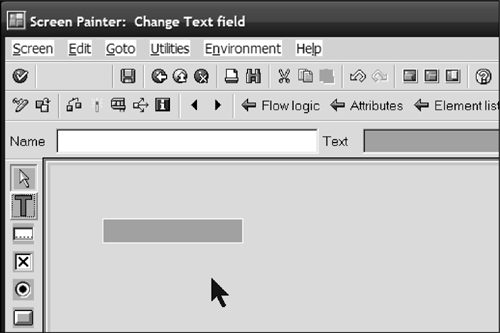
Figure 8
Graphical Screen Painter with a newly drawn text field
Double-click on the new field to see a pop-up window in which you can maintain its attributes (Figure 9). Enter the technical name in the Name field and enter a new field group in the first Groups field. In my example, I’ve entered the technical name ANLU- ZZSTATE and a new three-character field group called USR. You don’t have to define the field group value elsewhere; entering it here for the first time is sufficient. You use the field group value later when processing how the fields are accessed and displayed on the screen during asset configuration. You use field groups, also called field modification groups, to group similar fields together if they should be treated in the same fashion. This makes it easier to control how users can access and configure them in the FI-AA IMG.
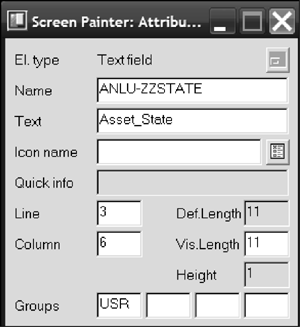
Figure 9
Attributes for the text label for the Asset State field
Press Enter. The system prompts you to see if you want the new screen element to refer to the ABAP Dictionary definition of the field. Accept this proposal and then change the Text field to something more appropriate (I’ve chosen Asset_State).
Now select the input/output field icon and draw a data entry field to the right of the text field that you just defined (Figure 10).
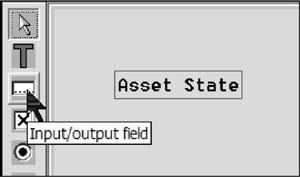
Figure 10
Graphical Screen Painter showing the input/output field icon
As you did with the Text field, reference the technical field name of the underlying field and enter the field group USR.
Figure 11 shows the final design of the subscreen. Both fields are represented by an input field and a field label. Screen Painter also allows you to add other cosmetic elements. The standard SAP system displays all asset fields within a box and with a corresponding label. I’ve adopted the same approach for the sake of consistency and drawn a box around my new fields. I’ve created a field label called Asset User Fields as an example.
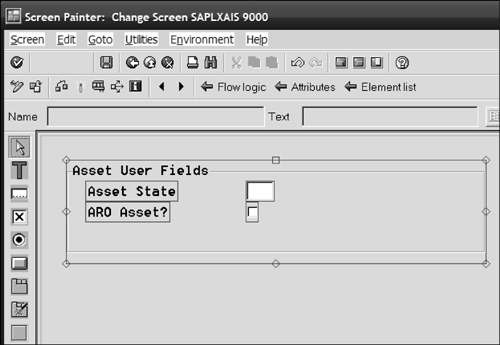
Figure 11
Final design of the two custom asset fields
After activating the screen and exiting the graphical Screen Painter, you navigate to the Flow logic tab as shown in Figure 12. Enter a new line of code: module modify.. This modifies the access controls of the fields. Then double-click on that line.
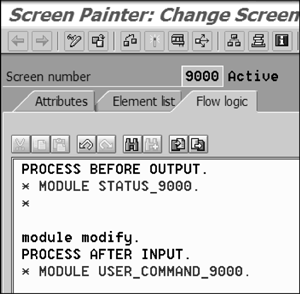
Figure 12
Flow logic section of the custom subscreen with the new command entered
After being prompted to create the new Process Before Output (PBO) module, enter simple ABAP code to control how to access the field. As you can see in Figure 13, I’ve ensured that the field is not maintainable (as controlled by the screen-input = ‘0’. line) if the transaction is a display transaction such as AS03 or AS93.
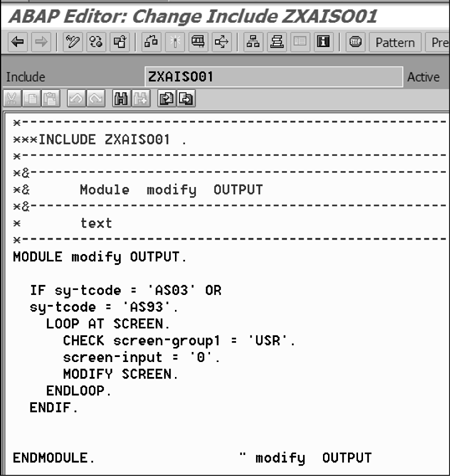
Figure 13
Code to define how to access the field based on the underlying transaction
At this point, you have extended the ANLU table and created the subscreen to capture the data. The last step is to configure the asset master data screen layout to reference the new screen.
Step 4. Configure the Asset Master Data Screen Layout
Navigate through the IMG via menu path Financial Accounting > Asset Accounting > Master Data>Screen Layout > Specify Tab Layout for Asset Master Record > Define Tab Layout for Asset Master Data (Figure 14). Navigate to the appropriate screen layout that you are using and then to the tab in the asset master record where you want to place the new fields. Enter the field group by creating a new entry and choosing it from the drop-down list. The naming convention for standard SAP field groups is S0001 to S0100. For user- defined screens, the system generates the value automatically and has a technical ID of U followed by the screen number that you used. In this example, you have to specify value U9000.
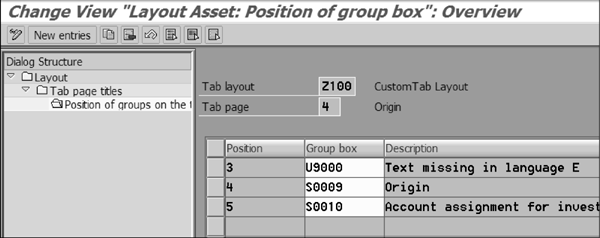
Figure 14
Place the new field group on the Origin tab
Now you can access any of the asset master data maintenance screens to view the new fields. Figure 15 shows the two new fields in transaction AS01. You’ll probably notice that the transaction is regenerating the necessary screens since the enhancement has been put in place.
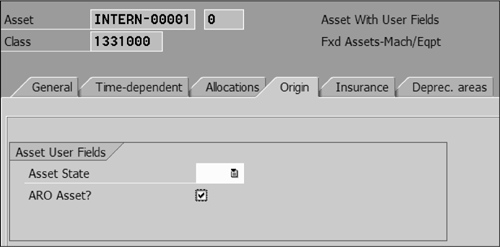
Figure 15
Create asset transaction AS01 with the new custom fields available for entry
Nathan Genez
Nathan Genez is an SAP FI/CO- and SAP BW-certified consultant who has worked with SAP ERP since 1996, with an emphasis on the capital accounting modules: PS, IM, and FI-AA. A former platinum consultant with SAP America, Inc., he has worked with SAP BW since release 1.2B. He is currently a managing partner at Serio Consulting in Houston, Texas.
You may contact the author at nathan.genez@serioconsulting.com.
If you have comments about this article or publication, or would like to submit an article idea, please contact the editor.