Learn how to quickly integrate new or existing SAP Interactive Forms with CRM One Order Framework service objects.
Key Concept
An SAP CRM Web request is a Web-based SAP CRM service object that integrates forms (Business Server Pages [BSP] applications or SAP Interactive Forms) with CRM objects. The Web request object extends the service process object (BUS2000116) to provide Web-based capabilities. Once form data is stored under a Web request, it can be used in various ways as per project requirements.
Businesses use SAP Interactive Forms extensively for outbound correspondence using standard SAP tools such as Smart Forms, but they are often hesitant about using SAP Interactive Forms to capture information. This hesitation results from the custom development required to consume existing SAP Interactive Forms and the higher cost of ownership in developing and integrating new forms. With the Web request functionality in SAP CRM, you can not only easily integrate SAP Interactive Forms with SAP CRM Web request objects but also leverage standard views provided in the SAP CRM Web Client user interface. This feature also streamlines ongoing changes to forms and their integration with SAP CRM, lowering their maintenance cost
As an example, a business receives customer complaints via phone, fax, and mail, but wants to introduce online forms to capture complaints or other information. These online forms, which are exposed via the customer Web site, allow the customer to submit requests or complaints. This action in turn sends an alert or workflow notification to service agents. The business cannot afford full custom development to integrate the form with SAP CRM processes, so it begins looking for a standard solution. The Web request in SAP CRM fits this case perfectly as it provides out-of-the-box functionality that is faster and easier to implement.
SAP Interactive Forms are the most critical piece of this functionality for a number of reasons. First, it is a customer-facing view of the business on the Internet; thus, form security is important. SAP Interactive Forms benefit from a robust set of security features that Adobe provides. Second, many organizations (especially those in the public sector) have strict regulations for user forms, making design an important factor. Third, SAP Interactive Forms can be developed independently in Adobe LiveCycle Designer, and therefore, form development can happen in parallel with back-end development.
Detailed in the next section are the main steps required to create new SAP Interactive Forms and consume them in SAP CRM. For the sake of simplicity, the form captures only a customer’s first name, last name, email, and issue description.
Step 1. Develop an SAP Interactive Form
You need Adobe LiveCycle Designer to develop the SAP Interactive Form. You can add user validations (via JavaScript), mandatory field checks, and other features to the form. You generally should not put any business validations at the form level, as they are meant to be maintained in a more flexible way in the back end. You do not need to perform this step if you already have an existing SAP Interactive Form.
Open Adobe LiveCycle Designer and click File, then New to create a new form. From the Object Library toolbar, drag and drop a Text Field object into the form. Select the Text Field. In the Object toolbar, follow the series of tabs Object and then Field. Delete the phrase blank value from the Caption field as shown in Figure 1. Under the Binding tab, rename the Name field First_Name.
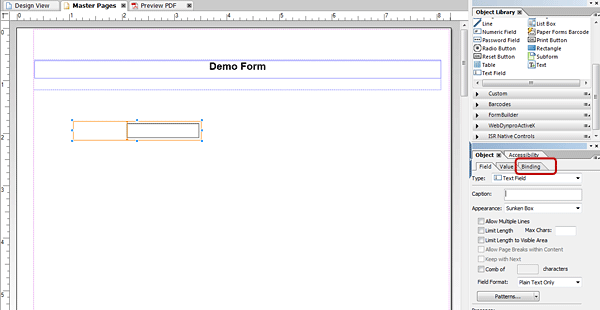
Figure 1
Create a Text Field in Adobe LiveCycle Designer
Now drag and drop a Text object (from the Object Library toolbar) on top of the Text Field First_Name. Repeat the same process for the other three form fields (Last Name, Email, and Issue Description) to create the form shown in Figure 2. Save the form on the local machine by clicking File, then Save from the resulting drop-down menu. A particular file name is not needed for the process to work.
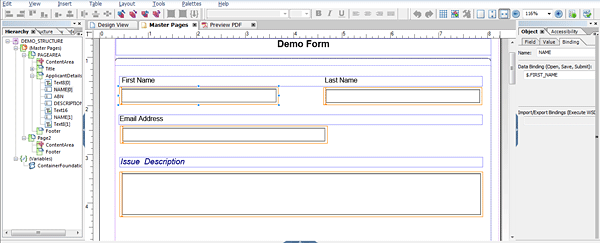
Figure 2
The completed SAP Interactive Form
Step 2. Create a New Transaction Type
Use transaction code SPRO and follow IMG menu path SAP Implementation Guide > Customer Relationship Management > Transactions > Basic Settings > Define Transaction Types. Create a new transaction type with a service process object (BUS2000116) as the Leading Transaction Category. The easiest way to accomplish this task is to copy the existing Web request transaction type SWRA, as shown in Figure 3. This step ensures that business-specific processes can be captured without changing the standard transaction type.

Figure 3
Custom transaction type for Web request
Step 3. Define New Web Request Category Groups
Use transaction code SPRO and follow IMG menu path SAP Implementation Guide > Customer Relationship Management > Web Channel > E-Service > Web Requests > Define request Category Groups. Click the New button to create a new Web request category group. Enter the Group and Description (Figure 4). You use this setting to group request categories in a logical manner. You can search Web requests using this request category in CRM UI.

Figure 4
Custom Web request category grouping
Step 4. Define New Web Request Category
Use transaction code SPRO and follow IMG menu path SAP Implementation Guide > Customer Relationship Management > Web Channel > E-Service > Web Requests > Define Request Categories. Click New to define a new request category for your demo form. This step is the most important one in the whole setup. The Web request category holds everything together. Enter the Req.Category, description, Request Ctgry Group (select the group created in Step 3), and Transaction Typ (select the custom transaction type created in Step 2) as shown in Figure 5.
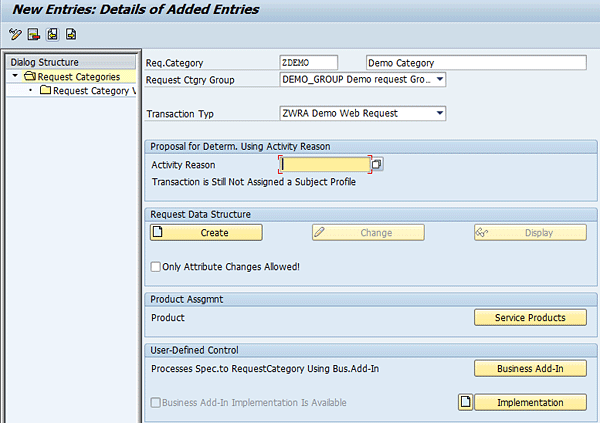
Figure 5
Define request categories
Click the Create button in the Request Data Structure section to create a new request data structure (Figure 6). In this structure define all the form fields that need to be captured from the Web. The form interface is generated based on fields in the request data structure. If any field is not in this structure, it is not captured in the back end.
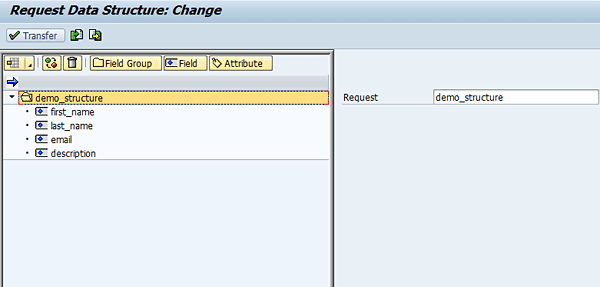
Figure 6
Request data structure
As shown in the example in Figure 6, click the Field button and add four fields: First Name, Last Name, Email, and Description. After adding these fields, click the Transfer button to go back to the Define Request Categories view (Figure 5).
From the Dialog Structure section in the left side of the screen shown in Figure 5, click Request Categories, double-click Request Category View, and click the New button to create a new request category view of type ADOBE Forms. You can also create a Business Server Pages (BSP) application, but in this example, I concentrate on the Adobe form option. Populate the View and Usage fields (Figure 7). You can use any name for the fields Form and Interface. Just make sure that you start the names with Z (or your customer namespace). Note that the framework has now assigned standard Web Dynpro application CRM_WEBREQ_INF to your form.
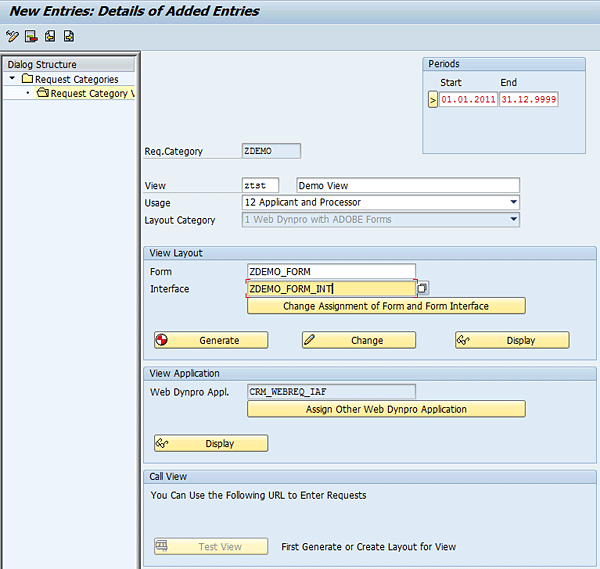
Figure 7
Request category view
Click Table View, click Save in the resulting drop-down menu, and then click the Generate button in the View Layout section. During generation the system asks you to assign a package and a transport request. You can obtain this information from one of your developers. This step generates an empty SAP Interactive Form and form interface. The form interfaces contain all the fields from the request data structure. Now select the Request Category is Active check box (Figure 8) and then click the save icon.
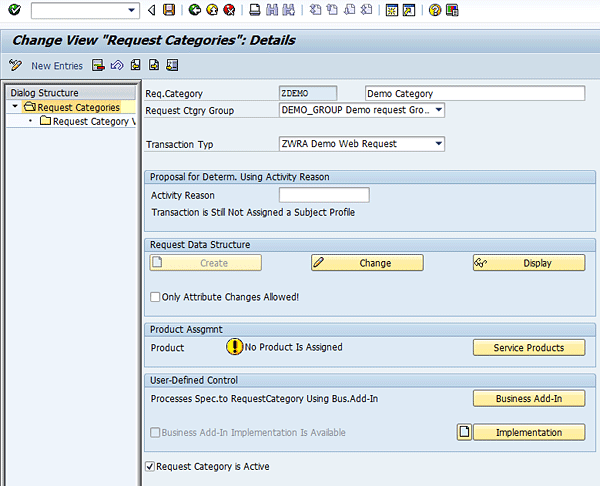
Figure 8
Request category
In this configuration you ensure that SAP Interactive Form ZDEMO_FORM is linked with transaction type ZWRA.
Step 5. Import the SAP Interactive Form
In this last step, you import the form designed in Step 1 into the SAP environment and bind form fields with form interface fields (which were generated automatically using request data structure fields in Step 4).
Using transaction code SFP, open in edit mode the form that was mentioned in the request category definition in Figure 7. Select the Layout tab to open the form layout in the SAP environment. This action launches Adobe LiveCycle Designer internally, so you need to make sure that your local machine has Designer installed.
From the Designer’s menu (remember that there is an SAP menu at the top as well), select Tools and Import (Figure 9). In the pop-up screen select the form you designed in Step 1 to open the custom form in the SAP environment.

Figure 9
Form designer inside the SAP environment
To bind form fields with structure fields, select the Master Pages tab and then select the First Name field. In the Object toolbar, navigate to the Object tab and then the Binding tab Select the Data Binding field to bind it to the form interface field (Figure 10). Perform the same steps for the Last Name, Email Address, and Issue Description fields.
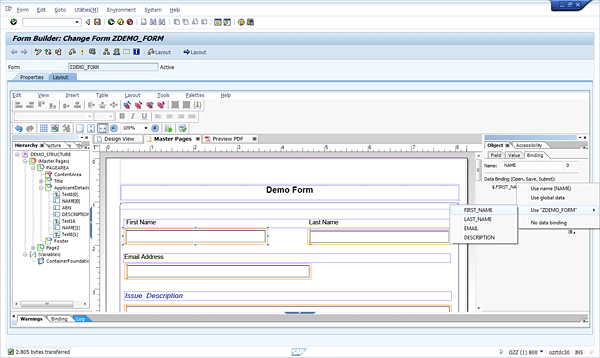
Figure 10
Binding the Form field with the Form interface field
Click the save icon and then click the activate icon  .
.
Let’s Test It
To test the functionality, use transaction code SPRO and follow IMG menu path SAP Implementation Guide > Customer Relationship Management > Web Channel > E-Service > Web Requests > Define Request Categories. Open the request category defined in Step 4. Navigate to the Request Category View subnode and then click the Test View button seen in Figure 7. This action launches the SAP Interactive Form URL (Figure 11). Populate the fields for First Name, Last Name, Email Address, and Issue Description. Click the Send button.
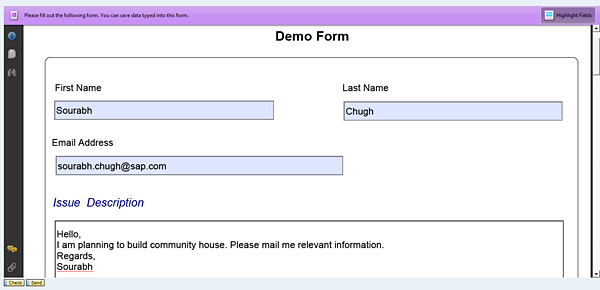
Figure 11
A Custom SAP Interactive Form
The framework creates a Web request transaction and stores the SAP Interactive Form along with all four fields under this transaction. You then see a confirmation page with a Web request transaction number for reference (Figure 12).
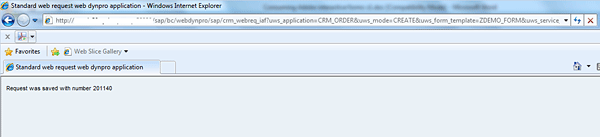
Figure 12
The form confirmation page
Now check how it looks in the SAP CRM WebClient UI. Log on to the CRM WebUI with the standard role SERVICEPRO and navigate to Home > Search > Web Requests. Open the Web request transaction that was created by submitting the SAP Interactive Form (Figure 12). The CRM WebUI has an additional assignment block called Request, which displays SAP Interactive Form details submitted by the user (Figure 13). The framework has also generated version 1 of the submitted form. You can modify form content, and it generates a new version with the changes.
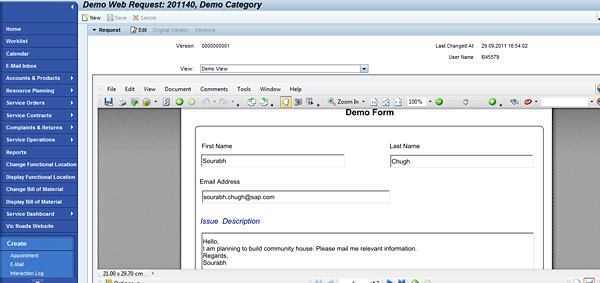
Figure 13
Viewing SAP Interactive Forms with the CRM WebUI
You can see it’s fairly straightforward to integrate the form with the SAP CRM object. You not only keep your system close to standard SAP but also present a reliable interface to end users.
Where Can You Go from Here?
You can use the Business Add-In (BAdI) CRM_SERVICE_WEBREQ to initialize content (for example, you can pre-populate user details), perform runtime checks, and perform post submission steps.
Now that you have managed to capture form information inside an SAP CRM object, a whole host of options is available to you. You can perform any post-processing function, such as actions, workflow, or events, to suit business requirements. Standard APIs (e.g., CRM_WEBREQ_GET_XML_INSIDE) are available to read form data to make the task easier.
Forms, of course, are not so simple in real business scenarios and do need business validations. SAP has therefore extended Web request visibility to the Business Rule Framework (BRF). You can use the BRF to execute business rules runtimes alongside the Web request, as well as after request submission, but both are beyond the scope of this article.
Notes
Here are a few notes to keep in mind when you are integrating SAP Interactive Forms with CRM One Order Framework service objects:
- You can use BAdI CRM_SERVICE_WEBREQ and the BRF to perform business validations in the form, but these validations do not work once you download the form.
- You should design the SAP Interactive Form in the Adobe LiveCycle Designer version supported by SAP. Check out SAP Notes 1522483 and 1359778 for more information.
- You should have the relevant Adobe LiveCycle Designer licenses. Check out SAP Notes 7009556, 7009557, 7010531, and 7010532 for more information.
Sourabh Chugh
Sourabh Chugh is a senior consultant at SAP Australia. He has seven years of experience in SAP CRM across various industries. During this time he has gained an in-depth knowledge of technical and functional aspects of SAP CRM and has worked in different roles ranging from functional lead to technical architect and developer. His last few projects have been in the public sector, involving grantor management and SAP Interactive Form integration.
If you have comments about this article or SAPexperts, or would like to submit an article idea, please contact the CRM Hub editor.
You may contact the author at Sourabh.chugh@sap.com.
If you have comments about this article or publication, or would like to submit an article idea, please contact the editor.