Examining the Features of Business Role Versioning in SAP Access Control 10.1
Business role versioning in SAP Access Control 10.1 enables you to have two versions of a business role—active and draft. The active version can be provisioned to a user and at the same time a role designer can modify (add or remove roles) business roles without affecting the active version. This feature prevents an unapproved version of a business role from being assigned to a user.
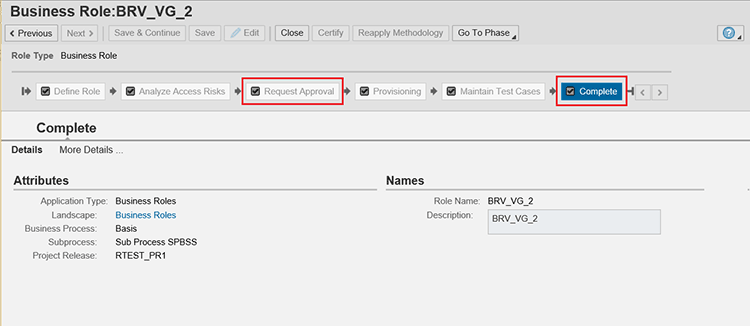
Figure 1 shows an active business role. If a business role is approved or completed by the role owner, it is considered as an active version of the business role. In Figure 1, the highlighted rectangles show that the Request Approval and Complete steps are completed.
If there is no approval step in the business role, then the completed business role is considered an approved version. In business role versioning, two new buttons have been added in the Roles tab of the business role (Figure 2). They are the Revert to Active Version and Show Active Version buttons.

The Revert to Active Version Button
When a role is approved by the role owner, the business role becomes active. If there are changes in the business role (i.e., adding or removing roles from the Roles subtab in the Define Role tab), the Revert to Active Version button is enabled, as shown in Figure 3. When a new version of the role appears on the user’s screen, the user can click that button and revert back to the previous active version if he or she is not satisfied with the changes.
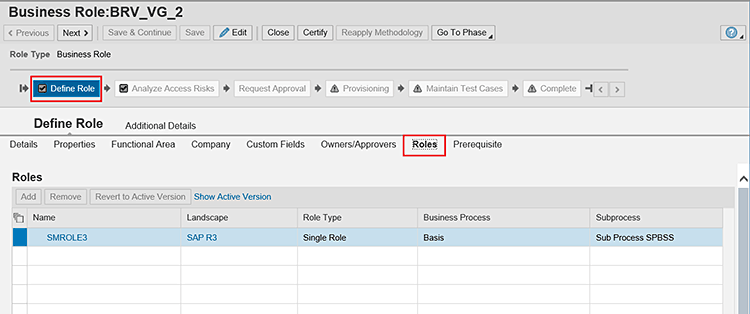
Figure 3 shows the approved active version of the business role. Now add one new single role to the business role. To add a role to the business role, click the Define Role button shown in Figure 4 and then click the Edit button.
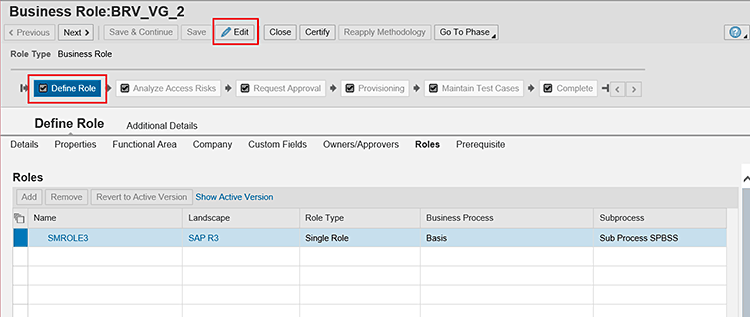
When you click the Edit button, the Add and Remove buttons in the Roles subtab become active as shown in Figure 5.
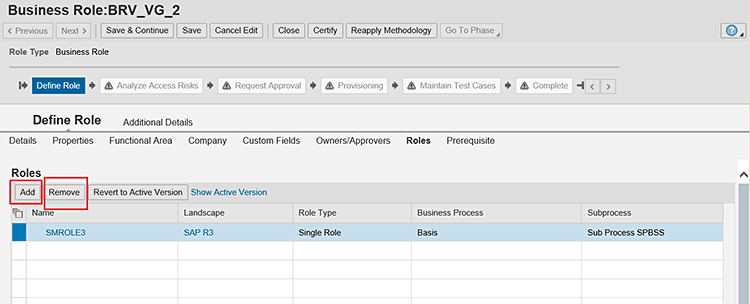
Click the Add Role button and add one role to it. In my example I have added SMROLE4 to the business role as shown in Figure 6. This business role now has two single roles, but still the role is not approved. If the role is not approved, it becomes the inactive, or draft, version of the role. For details on how to approve a business role refer to the sidebar “Steps to Approve a Business Role” at the end of this article.
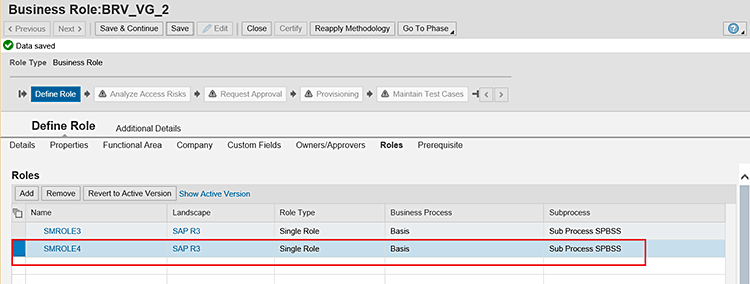
In Figure 7 the Request Approval button is not green, which means the approval step is still not complete and thus is inactive.

If the role designer wants to take back the approved version or role and wants to remove all newly added roles that are still not approved, the role designer can click the Revert to Active Version button as shown in Figure 8. The role designer then can remove the newly added single role SMROLE4 from the business role and revert to the active version of the role as shown in Figure 9.
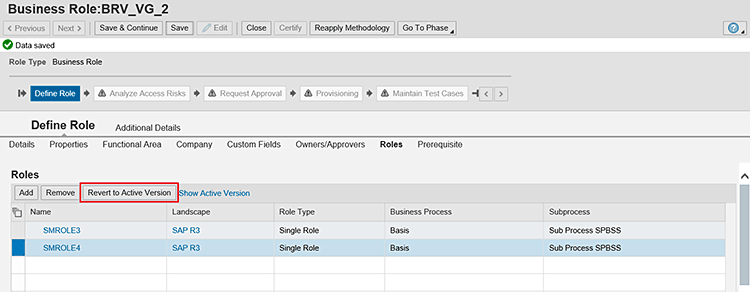

In Figure 9, in the Roles tab, there is only one role (SMROLE3).
By clicking the Show Active Version button, the user can see the active version or approved version of the role. Now to show the use of this link, again add a single role to the business role as shown in Figure 10. Role SMROLE4 is added following the same steps mentioned above.
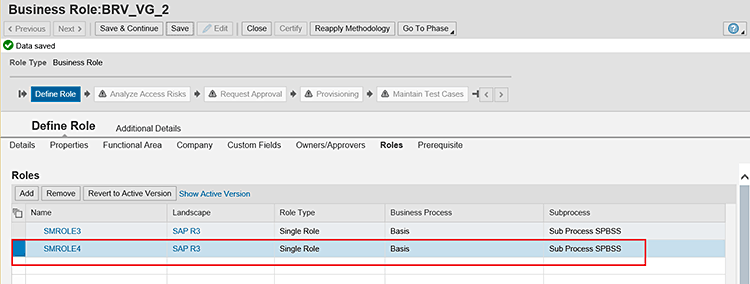
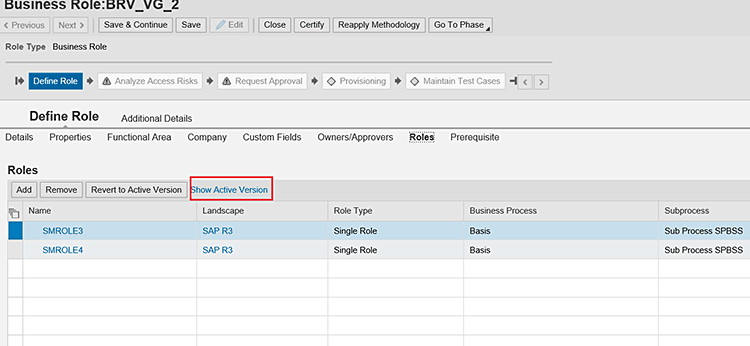
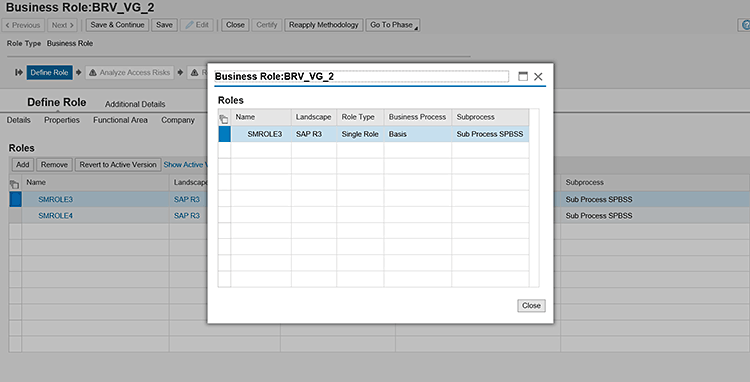
If you click the Show Active Version Link in Figure 11, the system shows the approved or active version of the role in a pop-up screen (Figure 12).
Access Request (Provisioning) of the Business Role
Business role versioning allows the user to provision only an approved version of a business role. This provides flexibility to the role designer to change roles without affecting the approved version of the business role. Now I have added one more role to the business role as shown in Figure 13.
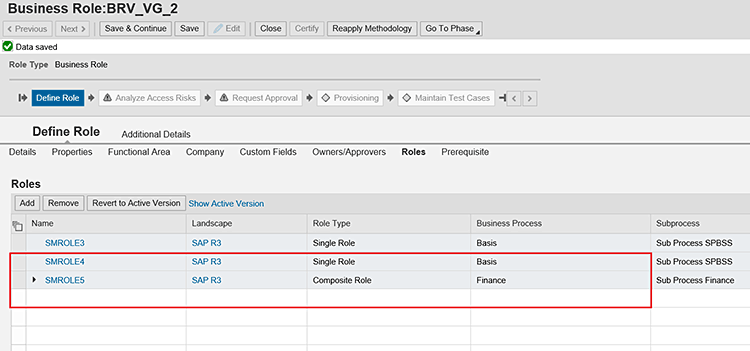
As shown in Figure 13, two new roles have been added in the business role and these roles are inactive versions of the business role. The inactive version of the business role has three roles in it (Figure 13), while the active version has only one role as shown in Figure 14.
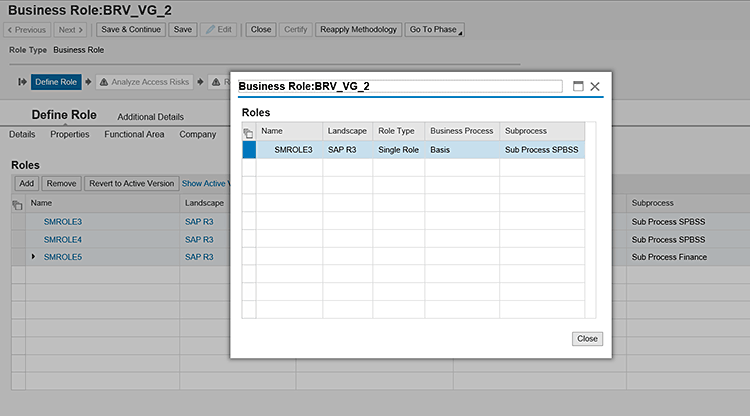
Now go to the access request to provision the role to the user. Provisioning means to assign a role to a user. You can go to the Access Request screen by clicking Access Management > Access Request Creation > Access Request. This screen (Figure 15) is used to create the request to assign a role to a user.
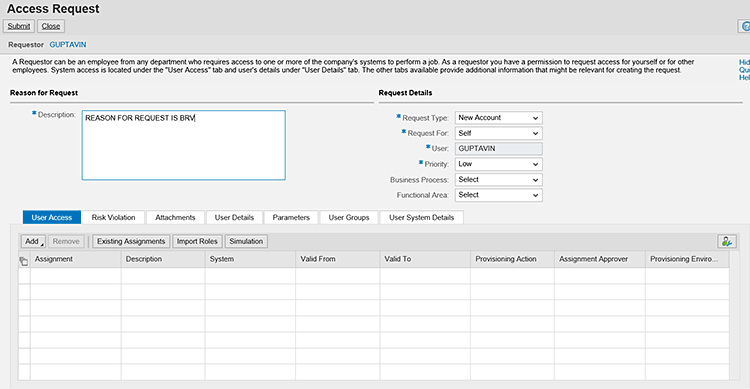
Click the Add button and then click the Role button shown in Figure 16 to search for a business role. In this step you select a business role to provision to a user.
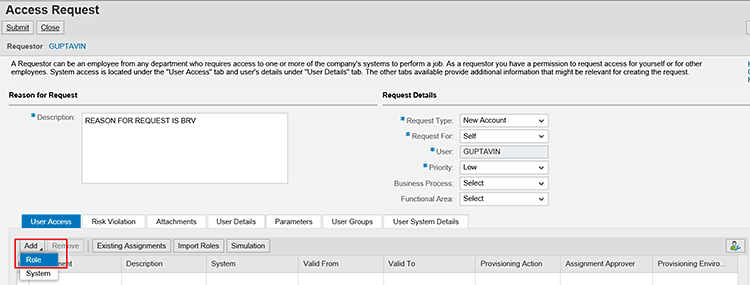
This action opens the screen in Figure 17. In the Role/Profile Name field enter a business role name and click the Search button to search for a role.
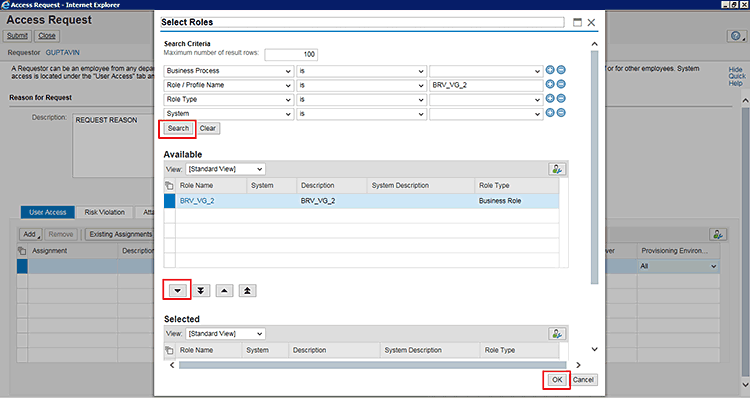
After you search for the role, select the business role and click the down arrow icon ![]() to move the role into the selected role. Click the OK button to add this role to the request you are creating to provision the business role to a user (Figure 18).
to move the role into the selected role. Click the OK button to add this role to the request you are creating to provision the business role to a user (Figure 18).

Now click the business role name link to see the role details, as shown in the highlighted field in Figure 18. This action opens the details of the business role shown in Figure 19.
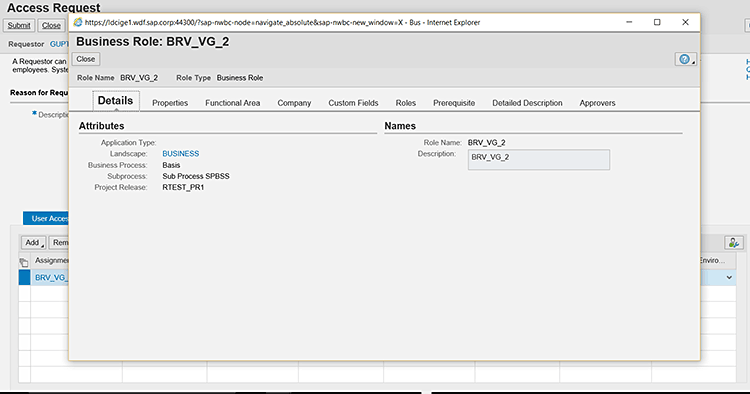
Go to the Roles tab to check the roles in the business role (Figure 20). This shows the roles that are part of the business role.
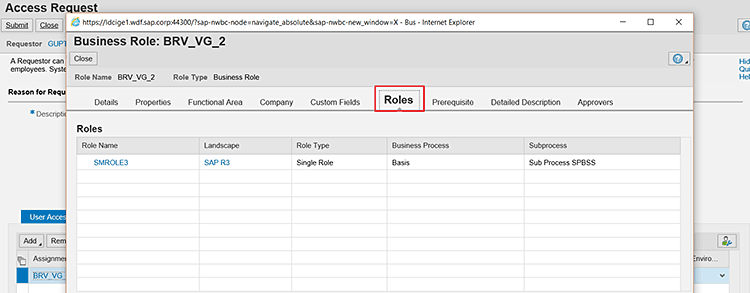
This is the active version of the role. In Figure 13, you saw three roles added to the business role, but this access request business role shows only one role in the Roles tab. The reason is that business role versioning allows you to provision only one active version of the role. In this active version of the business role only one role is approved as part of business role as shown in Figure 14. As this role is provisioned to a user, the user gets only the active version of the business role. It means the user will be assigned only the single role SMROLE3 in the back-end system.
A New Program for Business Role Versioning
To use the business role versioning functionality, you need to implement business role versioning SAP Notes or upgrade the system to SAP Access Control 10.1 Support Package 13. The SAP Notes are 2290974, 2290993, 2291023, and 2291631.
You can get this functionality by implementing these notes. However, because of the amount of changes, SAP recommends that you upgrade to SAP Access Control 10.1, Support Package 13 instead of implementing the SAP Notes.
After you implement SAP Notes, a new program, GRAC_SETUP_BRM_ACT_VERSN_TABLE, is added to the system. To set up business role versioning, follow these steps. These steps apply both to implementing the notes and to upgrading the system.
Enter transaction code SE38 in the command line of the main screen (Figure 21).
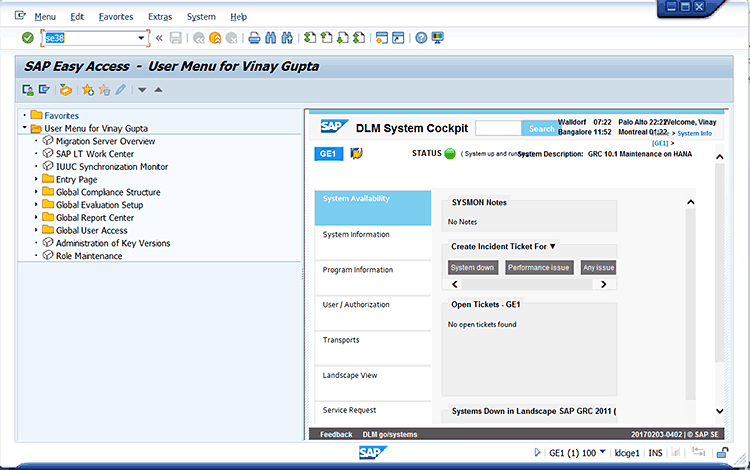
Now execute program GRAC_SETUP_BRM_ACT_VERSN_TABLE. Enter Program GRAC_SETUP_BRM_ACT_VERSN_TABLE and click the execute icon ![]() as shown in Figure 22.
as shown in Figure 22.

The system then displays the screen shown in Figure 23.
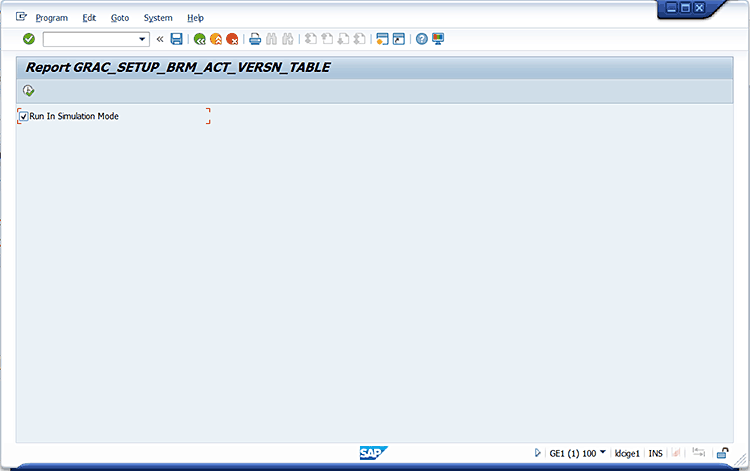
The screen in Figure 23 gives you two options: run in simulation mode and execute. To run in simulation mode, select the Run in Simulation Mode check box and then click the execute icon. To run without simulation you can just uncheck the simulation check box and then click the execute icon. If you check the Run In Simulation Mode check box, it only shows the records that will be updated in the table. Simulation mode does not update the database (GRC tables). If you want to update the tables and use business role functionality, you should use the execute method.
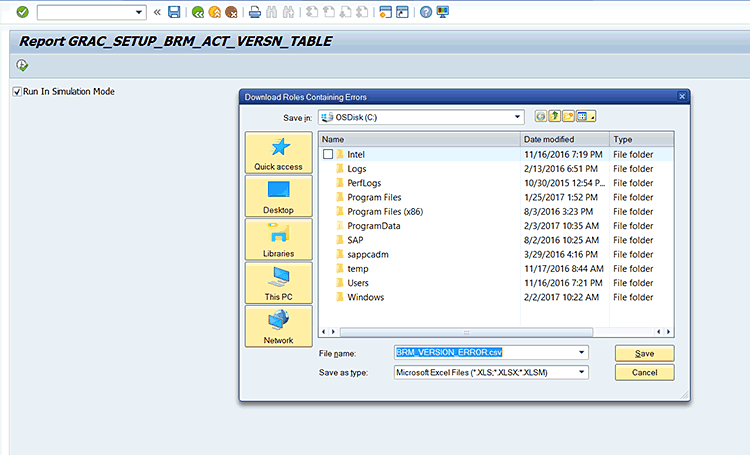
As you run the program, the system asks for a file path to save any errors with the execution of the program. An Excel file named BRM_VERSION_ERROR.csv will be saved at a given path. The system automatically saves the errors as shown in Figure 24.
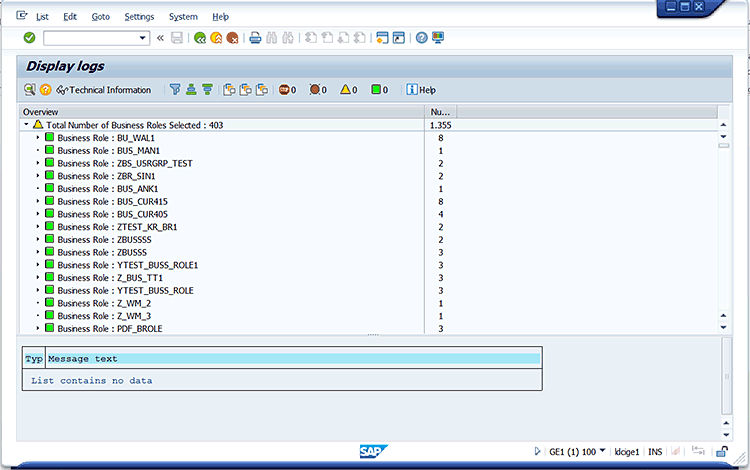
When the job is completed, the system shows the logs (Figure 25). Business roles, which do not have associated roles (i.e., no roles added in the roles tab of business roles) in it, are not considered and all this information is saved in a log file.
If you want to run the job and update the table, uncheck the Run In Simulation Mode check box and run the job. This is a mandatory step to use business role versioning. As you execute this program, it reads all the approved and completed business roles from the system and updates them in the corresponding tables.
Activate Business Role Versioning for Existing Roles
To activate the business role versioning for existing roles, run the background job as mentioned in the last step. Users who do not want to use business role versioning do not need to run the job and it will not affect them. (Some users are not using business roles and use only technical roles, so they would not want this feature.) This feature of business role versioning activates only after execution of the background job GRAC_SETUP_BRM_ACT_VERSN_TABLE.
Risk Analysis of the Business Role After Business Role Versioning
You can perform Risk Analysis (i.e., Risk Analysis is the process by which you can identify the risks for a business role) from the Business Role Management (BRM) screen and from the Access Risk and Analysis (ARA) screen. If you perform Risk Analysis for a business role in BRM, then it considers the current version of the role, which means the inactive or draft version. If you perform Risk Analysis from the ARA screen, it considers the active version of role.
Risk Analysis of a Business Role from BRM
Figure 26 shows the business role with three associated roles. These are the draft, or inactive, versions of the business role as the active version has only one associated role.
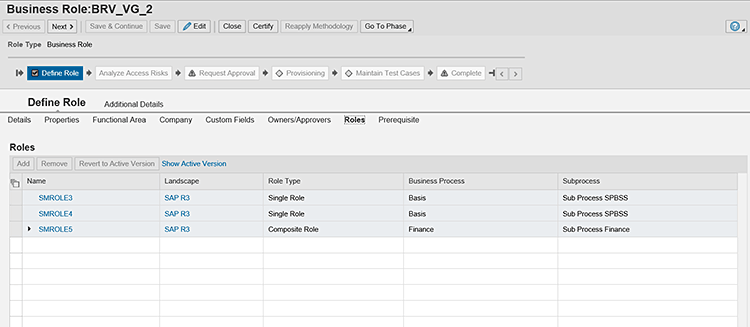
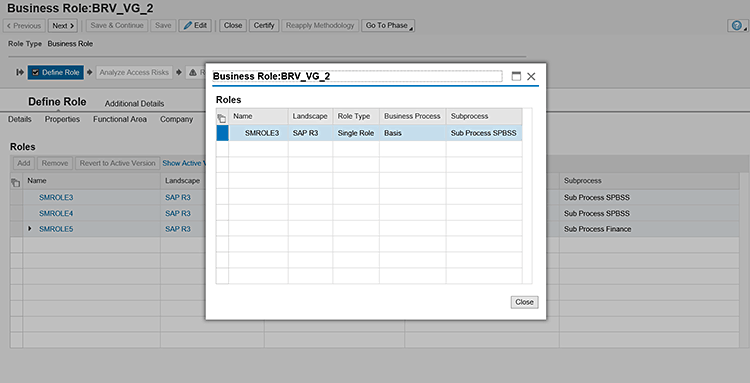
Figure 27 Shows the active version, with a single role.
As you perform Risk Analysis, Risk Analysis considers the inactive versions of a business role. In Role Management, it considers the latest version of the business role as users want to check the risks if they add new roles in the business role. Figure 28 shows the Analyze Access Risks phase in the role. You can go to this phase by clicking the Save & Continue button in the Define Role phase.
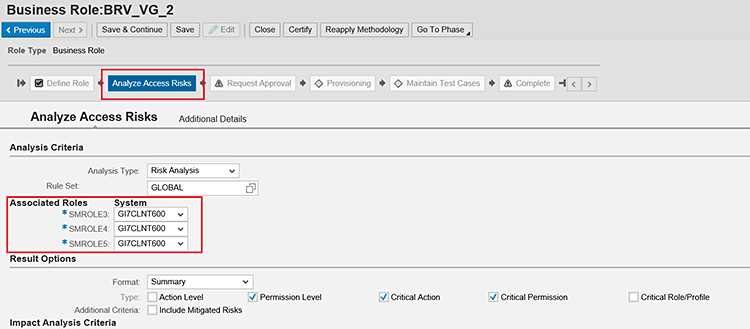
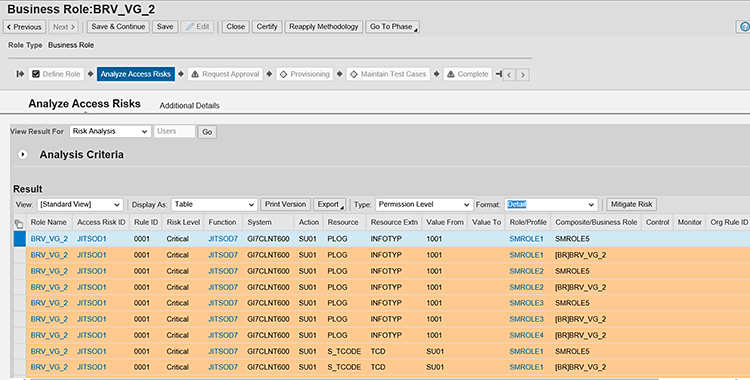
Figure 29 shows all the risks for this business role considering all three roles: SMROLE3, SMROLE4, and SMROLE5. It shows all permission level risks for them.
Risk Analysis of Business Role from ARA
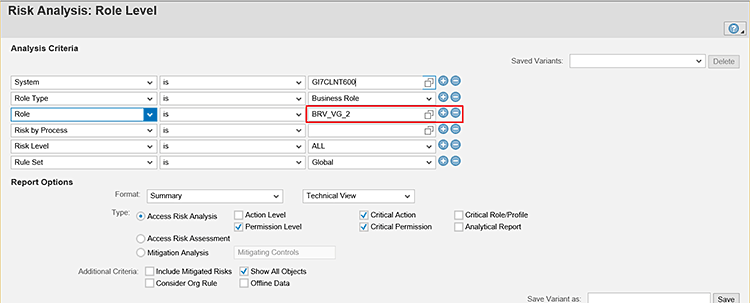
Risk analysis in ARA considers the active version of the business role. You can go to Risk Analysis by clicking Access Management > Access Risk Analysis > Role Level (Figure 30). Enter the System, Role Type, Role Name, Risk Level, and Rule Set.
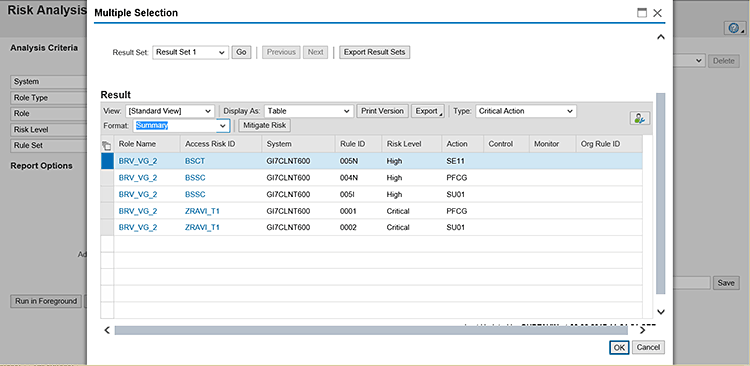
After performing Risk Analysis, you get the risks for business role SMROLE3. Figure 31 shows the risks for the active version of the business role.
Affected Reports After Business Role Versioning
After business role versioning enablement, only one report is affected (i.e., List Action in Roles). There are no other reports in which the results are changing, so only this report is affected. This report considers only the active version of the business role.
To access the report, go to the Report and Analytics tab in SAP NetWeaver Business Client (NWBC). Search for the List Action in Roles report in the Role Management Reports subheading in Figure 32.
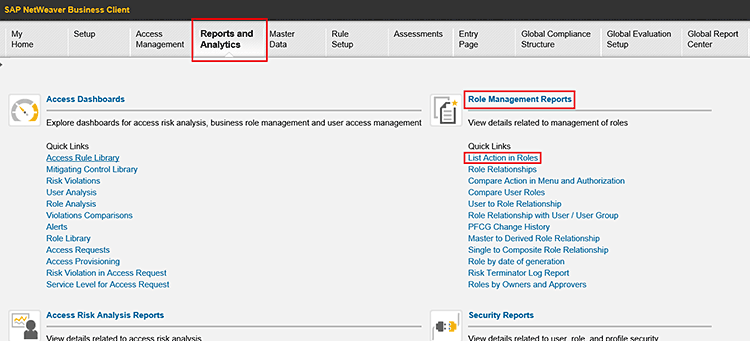
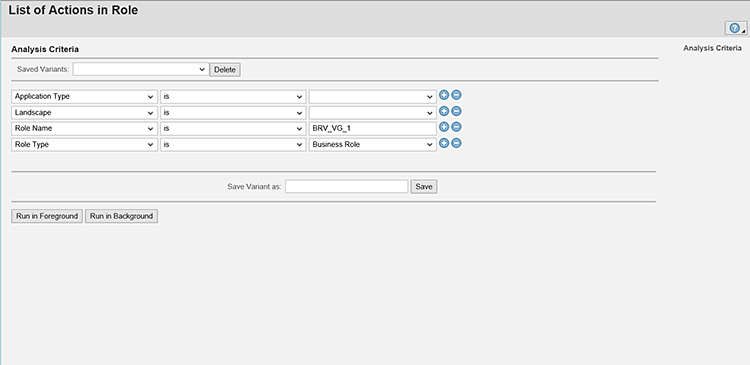
Click the List Action in Roles option to open the report. Enter the Role Name and Role Type as shown in Figure 33 and click the Run in Foreground or Run in Background button.
After you execute the report, the system shows the results in Figure 34.
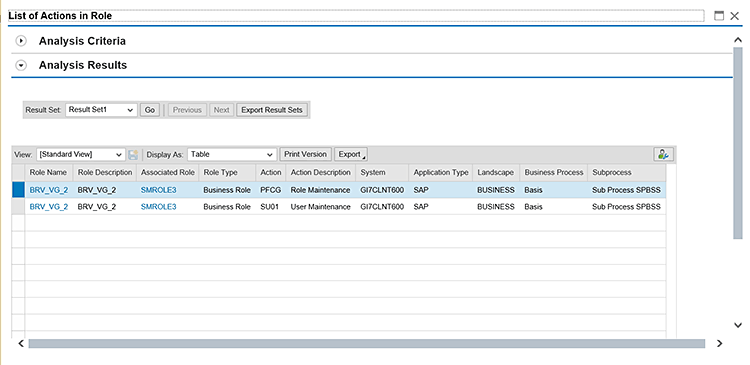
You see that the report lists only the active version of the business role. In this business role, only SMROLE3 is active. The purpose of this report is to check transactions the user gets after the provisioning of this business role.
Steps to Approve a Business Role
To approve a business role, follow these steps. In the Define Role screen, add roles in the Roles tab as shown in Figure A.
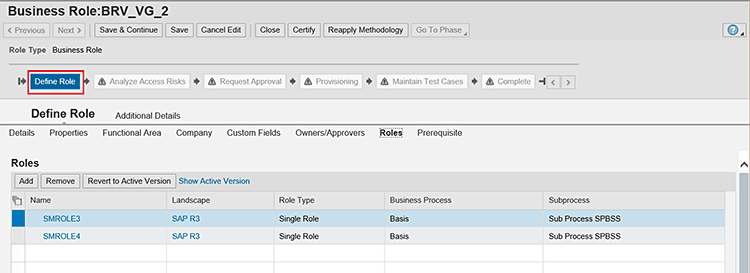
Click the Save & Continue button to go to next step, which is Analyze Access Risks. Click the Save & Continue button again to go to the Request Approval screen shown in Figure B.

Click the Initiate Approval Request button and the role is sent for approval to the role owner as shown in Figure C.

Now the role owner can go to his or her work inbox by following menu path My Home > Work Inbox. A work inbox opens as shown in Figure D.
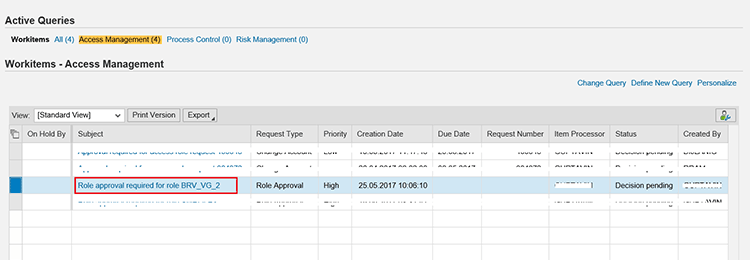
Click the link Role approval required for role BRV_VG_2 and the role opens as shown in Figure E.
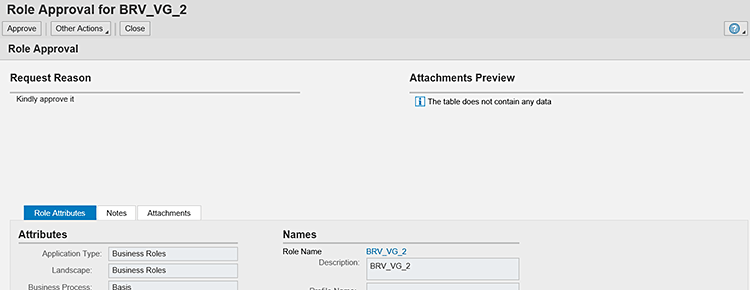
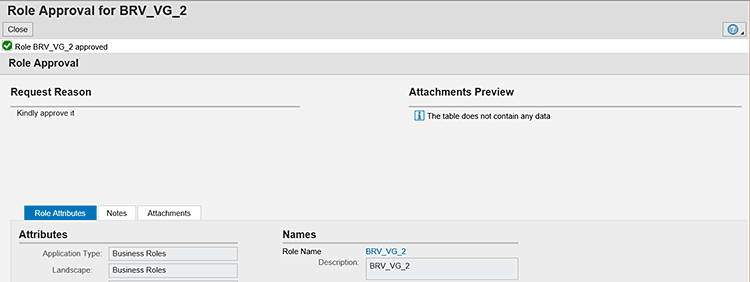
Click the Approve button and the role is approved as shown in Figure F.
