SAP NetWeaver BI 7.0 has increased formatting options over SAP BW 3.5. Learn how to create custom workbooks in SAP NetWeaver BI 7.0. Also, find out about other enhancements, including creating company default workbooks for logos and corporate formatting.
Key Concept
New in SAP NetWeaver BI 7.0, are improvements to the concept of a customized default workbook in BEx Analyzer. In addition to the logos and formatting controls available in SAP BW 3.5, you can also add buttons and other graphical user interface features to carry out specific tasks, such as to toggle the status of an exception or a condition.
SAP NetWeaver BI provides expanded options for formatting queries and reports in both the Web and Excel (BEx Analyzer) worlds. In this three-part series, I will discuss the choices you have for formatting. In this first part, I focus on BEx Analyzer and the formatting control available in queries. This includes discussion of enhanced key figures and cells in BEx Query Designer as well as default workbooks (logos, formatting control, and default properties for items).
The second article focuses on workbook themes, Excel controlled formatting, and the Formula mode and its formatting possibilities. The third article covers the Web, including portal themes, style commands, enhanced key figures, display options for exceptions, and an overview of the new format-intensive BEx reports.
Highlighted Display Setting
Before I go into the options you have for customizing the default workbooks, I want to bring your attention to a setting that’s changed with SAP NetWeaver BI 7.0. In previous versions of SAP BW, if you wanted to make a particular cell show up in bold font, you set the display to Emphasis in the key figure properties for the cell. In SAP NetWeaver BI 7.0, the Emphasis setting is now referred to as Highlighted Display, as shown in Figure 1.

Figure 1
Highlighted Display setting
The query designer uses the Highlighted Display setting to control how the key figure cells appear in the report output. In the next section, I’ll show you how to get more creative with your workbook design to alter how your finished query looks.
Designing Default Workbooks
For BW 3.x users, designing a workbook is a new concept because only SAP NetWeaver BI 7.0 BEx Analyzer has a design toolbar in which you can include design elements similar to, but less numerous than, those of the BEx Web Application Designer. You could start from a blank sheet and design a new workbook using the BEx Analyzer toolbar. However, I recommend using an existing default workbook and customizing it to meet your needs. This process involves these five steps:
Step 1. Open a query in BEx Analyzer
Step 2. Clear out the data provider that feeds the default workbook
Step 3. Customize the workbook
Step 4. Set the global settings
Step 5. Test your work
In my example, I am working with an exceptions and conditions report in which the user must be able to quickly spot which incoming orders have problems. Although the default workbook shows orders falling under exception in shaded boxes, it can be difficult to pick these out in the standard template. In my custom version, the highlighted fields have an identifiable border around them, plus larger text.
Step 1. Open a query in BEx Analyzer. Figure 2 shows some of the important icons in BEx Analyzer. To open a query, click on the open icon  and then select a query. In my example, I selected an exceptions and conditions query, which I use to monitor incoming orders. Opening an existing query allows you to use a default workbook as a backdrop for your new query. To see the technical details of the workbook, you need to access the Visual Basic (VB) code and BEx design items. Although you do not necessarily need to change the existing SAP workbook features, it is good to know how to change them.

Figure 2
Important BEx Analyzer icons
Figure 3 shows the default workbook that you see when you open a query. Although it’s easy to spot the Status of Data field, it is more difficult to find the key date for the time-dependent master data. In this case, you need to know to click on the Information button, but this is not readily apparent to the user.

Figure 3
Default workbook that appears when you open a query. The shaded orders are technically bolded, but the bolding is faint.
Let’s take a quick look at the VB code for this SAP default workbook to understand how it works (Figure 4). VB, like many languages, uses reusable modules of code. You activate the code when you click on or hover over the buttons. To view this code, add the VB toolbar to the workbook by going to View>Tool Bars>VB Tool Bar and use it to view the code. In the code, you can see the reused code where the code calls Module 1, 2, or 3 at various times.

Figure 4
VB code for the query showing code for Module1
Step 2. Clear out the data provider that feeds the default workbook. In BEx Analyzer, click on the workbook settings icon  to bring up the screen shown in Figure 5. Click on the Data Provider tab to view all the data providers available in the workbook.
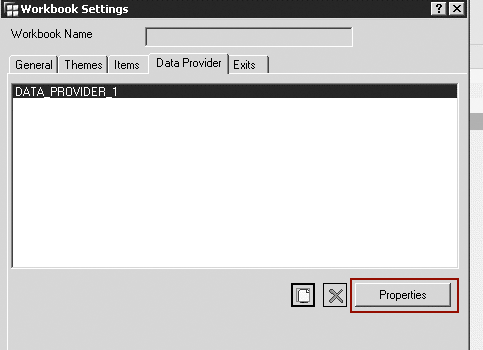
Figure 5
Workbook settings — Data Provider tab
Next, you need to clear all the data out of this data provider because a background workbook should not have data. Select the data provider that appears in this tab (in my example, DATA_PROVDER_1) and click on the Properties button on the bottom right corner of the screen.
This brings you to the data provider properties settings. Here you must eliminate the underlying source from DATA_PROVIDER_1 so you are left with just a shell workbook for logos and formatting. Click on the delete icon  to delete the initial query from your default workbook. Save this workbook with the name CORPORATE_DEFAULT in a custom BI role called ZGUI_ADMIN.
Step 3. Customize the workbook. For my example, I want to change the colors of exceptions and the style of enhanced key figures in Excel. To help with the latter, SAP provides a workbook with an example of all the provided custom styles. This workbook is installed on your PC when you install the Excel BEx Add-In for BI. The name of the workbook is SAPBEXS.XLA. On my PC, this file is located at C:Program FilesCommon FilesSAP SharedBW. Open this workbook, shown in Figure 6.

Figure 6
When you click on a cell, the name of the style appears in the top right corner
Adjust the Style
In my example, the SAPBEXexcGOOD1 style shows up as dark green, whereas the SAPBEXexcBAD9 style shows up as dark red. This could be troublesome for people who are red-green colorblind. To provide another way to tell the styles apart, you can add a border around the SAPBEXexcBAD9 style to make these cells stand out more.
Go to Format>Style in Excel to change the styles. Then select SAPBEXexcBad9 for the Style name and click on the Modify button (Figure 7). In the Format Cells screen that appears, click on the Border tab, and select a border for the cell. In the Font tab, I customized the font appearance for styles ending in Emph (emphasized/bold, such as SAPBEXaggDataEmph) so that they are bolder and in a larger font.
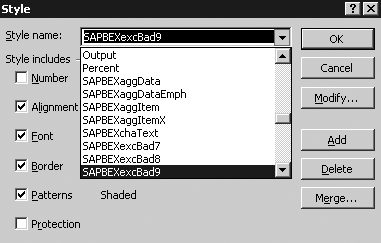
Figure 7
Select the style
After you customize the SAPBEXS.XLA workbook, save it as a new workbook called CORPORATE_STYLES_WB.XLA. You can place it on the server in the the ZGUI_ADMIN role.
Next, merge the customized styles from this workbook with the styles on the workbook called CORPORATE_DEFAULT. Make sure to click on the Merge button from the CORPORATE_DEFAULT workbook in Figure 7, not the CORPORATE_STYLES workbook. This merges the styles you changed on your version of SAPBEXS.XLA and overwrites the SAP defaults.
Tip!
Web template designers could also reuse the ZGUI_ADMIN role to store reusable Web items. Although storing templates and storing Web items are separate uses for the role, the users involved in these tasks might be the same and they both involve corporate defaults.
Add Material to the Query
Now you can insert a logo in your workbook. This can be useful for BI teams that create workbooks for different divisions of the same company. The logo makes it easy to see whose workbook you’re running. SAP uses picture files for some of the backgrounds, so you might have to adjust their sizes to make room for the logo. I also recommend adding a feature that allows users to toggle between the exceptions and conditions set by the query designer.
Finally, I would add the key date (the data of the time-dependent master data used on the query) to the upper right corner of the screen. This key date shows the master data effective date that was used with the transaction data. For example, if you used a key date of 01/01/1986 for a 2006 country sales report, you might get sales for East Germany. The same report for 2006 with a key date of today would show Germany, as East German master data is no longer valid.
To add the new Key Date field, click on the design icon  in BEx Query Designer. Next, locate a position on the workbook and click on the cell to select the area on the workbook where you want the Key Date field to appear. Then, click on the access the text design item icon
  . In Figure 8, click on the Constants tab, select Display Key date, and click on OK. Your workbook should now show a Key Date field in the area you selected.

Figure 8
Add a text element for the Key Date field
Add a Button
The next improvement is to add a button to your own worksheet that contains a list of all the exceptions and conditions contained in the query. To accomplish this task, you add an Excel button. Then you connect the button to a macro that takes the user to the new sheet.
First create the new sheet by going to Insert>Worksheet in Excel. Right-click on the new worksheet and rename it Exceptions And Conditions. Next, in Excel’s forms toolbar, click on the create-a-button icon  to create button called Exceptions and Conditions. Inserting this button automatically prompts Excel to record a macro (Figure 9). Click on the Record button, navigate to the Exceptions And Conditions worksheet, and then stop the recording of the macro by clicking on the stop icon.
Note
Adding the Exceptions And Conditions worksheet is one example. If you know VB, you can add other options, such as hiding rows dynamically.
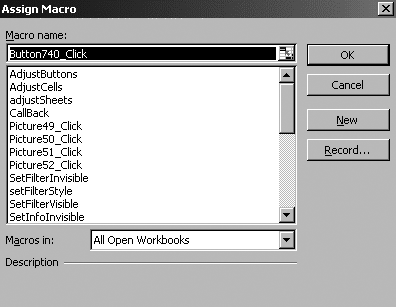
Figure 9
Record a macro connected to the Exceptions and Conditions button
Now let’s add the exception and condition items to the macro. Select a cell, click on the design icon, and select the exceptions and conditions item icons. In this part you add buttons to the Exceptions And Conditions worksheet that can take the user to the table or chart views of the workbook. To do this, copy and paste the appropriate buttons from the SAP default workbook. Your resulting sheet should look like the one shown in Figure 10. Make sure you save your workbook to avoid losing your work.
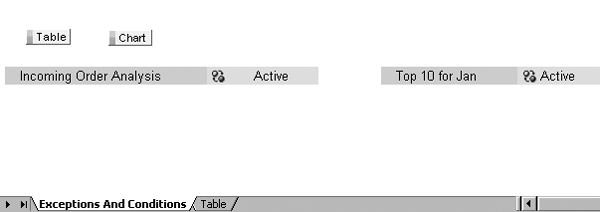
Figure 10
The Exceptions And Conditions worksheet
Step 4. Set the global settings. Click on the global settings icon  and select the appropriate options under the Select Default Workbook tab (Figure 11). If you are the responsible administrator, you can also select the check box for Global Default Workbook to enable all users to see this workbook as the default if they elected to use the default in their systems.
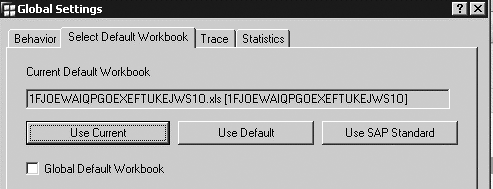
Figure 11
Global settings
The selections you make in the Global Settings screen are stored in table RSRWB- TEMPLATE (Figure 12). In this example, I set a global default template, which is the one with the blank user ID. Only one is possible for your whole system. Some users are using different templates as their default. For example, FalkN has a default different from the one set as the global default. Users can override the default by opening a different workbook and setting it as the default by clicking on the Use Current button in Figure 11.
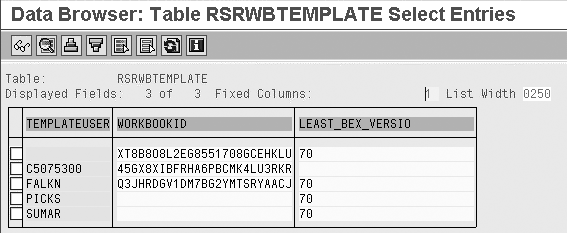
Figure 12
Table RSRWBTEMPLATE
It might be necessary to pre-assign a specific default workbook to a specific user (not just the global default). In some cases, power users may need more than one global default, such as in a large company with many divisions, each with a different logo. Direct entry into the RSRWBTEMPLATE table is not allowed by most users, so you need an ABAP program. I suggest the one available on SDN at https://www.sdn.sap.com/irj/sdn/thread?forumID=134&threadID=96854&messageID=1069494#1069494.
Step 5. Test your work. Log in to the system and open a query, which should reflect the improvements you made, such as adding a logo and buttons. Figure 13 shows an example of a customized workbook. Compare this to the standard workbook in Figure 3 to see the new customizations.
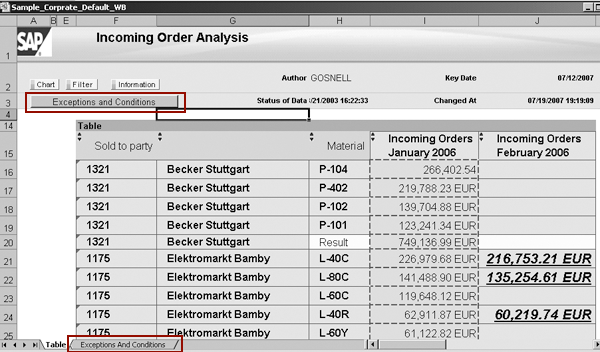
Figure 13
The query shows the improvements added to the workbook
Note
To learn more about workbook design consider taking SAP Education class BW306 (BI — Enterprise Reporting, Query and Analysis: Part II).
Ned Falk
Ned Falk is a senior education consultant at SAP. In prior positions, he implemented many ERP solutions, including SAP R/3. While at SAP, he initially focused on logistics. Now he focuses on SAP HANA, SAP BW (formerly SAP NetWeaver BW), SAP CRM, and the integration of SAP BW and SAP BusinessObjects tools. You can meet him in person when he teaches SAP HANA, SAP BW, or SAP CRM classes from the Atlanta SAP office, or in a virtual training class over the web. If you need an SAP education plan for SAP HANA, SAP BW, BusinessObjects, or SAP CRM, you may contact Ned via email.
You may contact the author at ned.falk@sap.com.
If you have comments about this article or publication, or would like to submit an article idea, please contact the editor.