See how to reward a regular vendor who has been supplying a good quality product for a long time by providing reduced inspection requirements. That means not every delivery goes through a stringent quality control test. If a problem is identified in the supplied goods, you can change to normal or tightened inspection. You can achieve both with the Dynamic Modification Rule (DMR) in the quality management (QM) module. DMR can also help in the production process by reducing the data entry efforts needed to maintain results when several goods receipts are undertaken in different shifts. The benefit is improved business process efficiency.
Key Concept
The Dynamic Modification Rule (DMR) in the quality management (QM) module reduces data entry in results recording because all inspection lots with SKIP status no longer require data entry efforts. It can also help to improve organizational efficiencies if procurement or production yields a satisfactory output on a consistent basis. In procurement, DMR helps to quickly bring the raw material or packing material on the production line if the vendor adheres to the stringent quality control of the company. DMR provides for inspections at periodic intervals. As soon as any problem in quality is observed, it reverts back to regular or tightened inspection until the vendor again meets the quality standards.
Dynamic Modification Rule (DMR) functionality in quality management (QM) with its integration in procurement and production processes promises to bring about significant value addition and efficiency to business processes. It eliminates the need to routinely record all inspection results of every incoming raw material of a vendor or a continuous manufacturing finished good.
It skips a predefined number of inspection lots for results recording purposes and only requires a user to enter a usage decision of the inspection lots. However, any rejected inspection lot automatically triggers a normal or even tightened inspection. This ensures that necessary checks and balances are in place, despite moving toward automating some of the processes by means of implementing DMR for reduced inspection efforts.
The company benefits from reduced data entry effort as well as being able to reduce the lead time it take to clear (which is goods receipt processing time in the SAP system) these procured goods and make them available to the production process. It also helps to reduce inventory carrying costs. It enables vendors to negotiate better payment terms and a better selling price for their product, given that reliability with the company has been established. Eventually all these factors add up to a process called annual or periodic vendor evaluation in the SAP system (for which quality plays a very important role, in addition to price and timely deliveries).
My example of multiple goods receipts shows how DMR works. It starts with a reduced inspection. Then the inspection lot is rejected so you can see how the next inspection lots undergo regular or tightened inspection. Although the focus of this article is on DMR integration with the procurement process, the information is applicable to production processes.
To use DMR, you need to have QM master data set up correctly, including the sampling scheme, sampling procedure, Acceptable Quality Limit (AQL), and task list.
Quick Checks in Master Data
You need to make two quick checks of your master data to ensure that DMR is effectively implemented when conducting transactions. The checks are in:
- Material master
- Master inspection characteristic (MIC)
Material Master
While the material is already created previously, its quality management view needs to be activated at the organizational level (Plant). Follow SAP menu path Logistics > Materials Management > Material Master > Material > Create (General) > Immediately or use transaction code MM01. Enter the material number and click the Select view(s) button. In my example, I use material 3000000080. Select the Quality Management view and then click the Organizational levels button. Enter the Plant as 1000. Press Enter or click the continue icon  . This leads to the QM view of the material master (Figure 1).
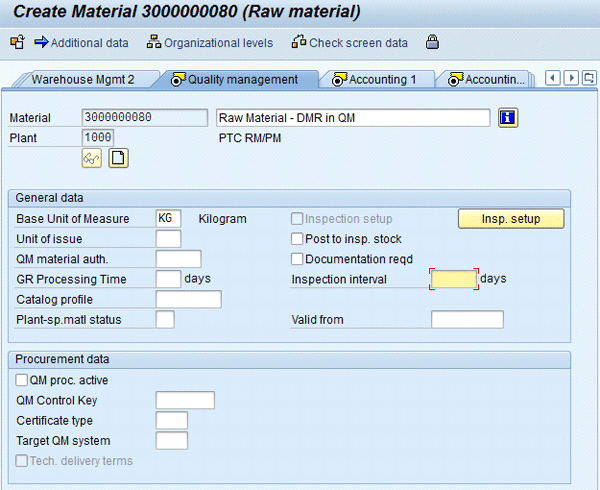
Figure 1
QM view of material master
Click the Insp. setup button to go to the screen in Figure 2. Click the inspection type detail icon  for inspection type 01. Select the check box Skips allowed. This ensures that when DMR is working for the inspection type 01, it allows skipping of inspection results recording. Inspection type 01 is used to activate QM for goods receipts against a purchase order from vendors. Click the continue icon and save the material master by pressing Ctrl-S or clicking the save icon
  .
.
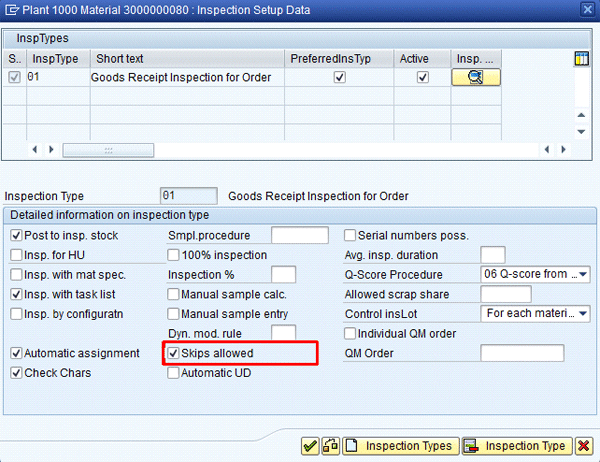
Figure 2
Inspection type setup for material
Note
If you intend to use DMR for goods receipt against in-house production,
then you need to make the same Skips allowed check in the material
master for inspection type 04. Inspection type 04 is the QM activation
for goods receipt for in-house production.
Check the Sampling Procedure in MIC
Another check you need to make for DMR activation is in MIC to ensure that the sampling procedure is checked on in MIC. MIC is the quantitative or qualitative attribute of a material. It has its own set of specifications that you define as important QM master data. Sampling procedure is also QM master data. You use it to define the sample size of an inspection lot and how to calculate it.
To change MIC, follow menu path Logistics > Quality Management > Quality Planning > Inspection Characteristic > Change or use transaction code QS23 (Figure 3). Figure 3 is the initial screen for MIC. Enter QM01 as the Master insp.charac. value and 1000 as the Plant value. Press Enter to go to the screen in Figure 4.
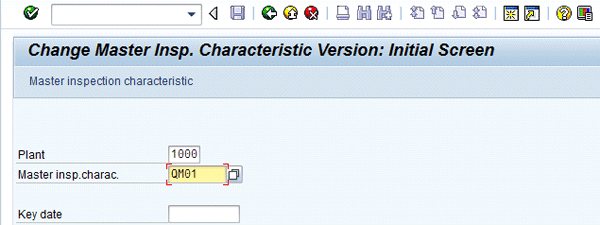
Figure 3
Initial screen of MIC
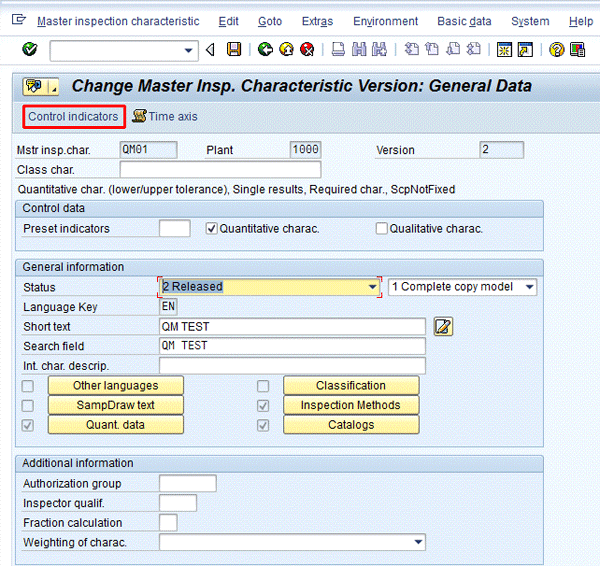
Figure 4
General data screen of MIC
Figure 4 is the general data of MIC. Click the Control indicators button to go to the screen in Figure 5.
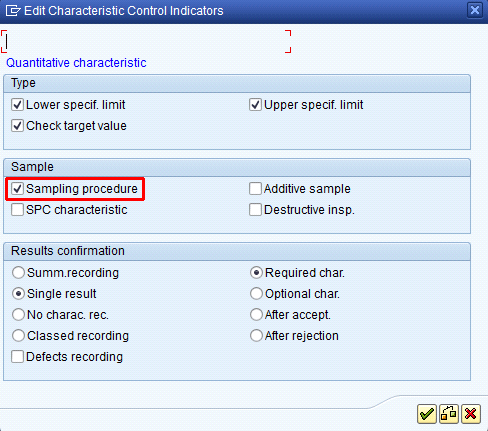
Figure 5
Control indicators of MIC
In the screen in Figure 5, check the Sampling procedure check box to turn it on. Click the continue icon and save the MIC by pressing Ctrl-S or clicking the save icon.
QM Master Data Maintenance for DMR
To effectively implement DMR in the procurement process, maintain the following QM master data in the specified sequence.
- Define a sampling scheme
- Set up a sampling procedure
- Create the DMR
- Maintain a DMR relationship with the sampling procedure
-
Create an inspection plan
1. Define a Sampling Scheme
In a sampling scheme, sample size is defined based on the total quantity of the goods receipt. In addition to sample size calculation, the sampling scheme also incorporates the information related to the number of samples that can be accepted or rejected in a sample size to help decide if the inspection lot must be accepted or rejected. To create a sampling scheme, follow SAP menu path Logistics > Quality Management > Quality Planning > Basic Data > Sample > Sampling Scheme > Create or use transaction code QDP1 (Figure 6). Enter the sampling scheme (ZQM in my example) and press Enter to go to the screen in Figure 7.

Figure 6
Initial screen of the sampling scheme
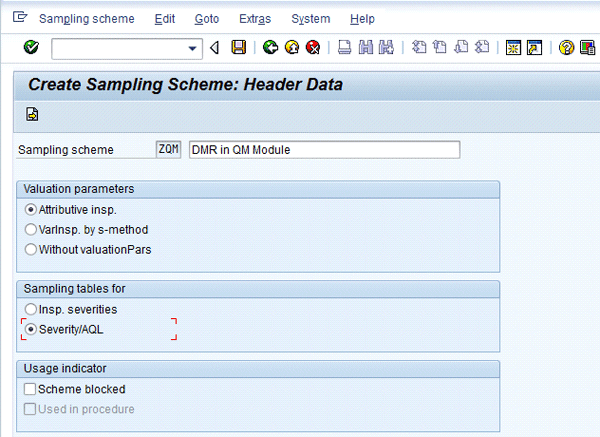
Figure 7
Header data of sampling scheme
Figure 7 is the header data for the sampling scheme. Select the Valuation parameters as Attributive insp. to ensure that all MICs within the tolerance limits are automatically valuated as accepted and the non-conforming MICs have the rejected valuation. Select the Sampling tables for as Severity/AQL (AQL stands for Acceptable Quality Limit). Click the continue icon (Figure 8).
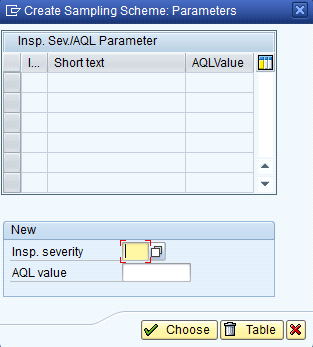
Figure 8
Sampling scheme parameters for inspection severity/AQL parameters
AQL is the international industry standard to define the total percentage of samples that are either accepted or rejected from an overall sample calculation. Hence, an AQL level of 2.5 percent allows defects of 2.5 percent of the overall sample size calculation. If the sample size of an inspection lot is calculated to be 100 and its AQL is 2.5 percent, then no more than 2.5 percent of the samples must be rejected for the entire inspection lot to be considered as acceptable.
Although various international AQL standards are available in an SAP system as standard offerings and can be immediately used, I cover the creation of AQLs in detail in this article, just in case there is a business need to define them for a company-specific scenario.
Figure 8 is the initial screen to define inspection severity and AQL value. After you define them, click the Insp. severity dropdown, which leads to the screen in Figure 9.The drop-down options of inspection severity are defined in customizing, which is not in the scope of this article.

Figure 9
Drop-down list of inspection severity
In my example, I selected an inspection severity of 002, which is for reduced inspection. This took me to Figure 10, where I entered an AQL value of 2.0. Press Enter or click the Choose button to go to Figure 11.
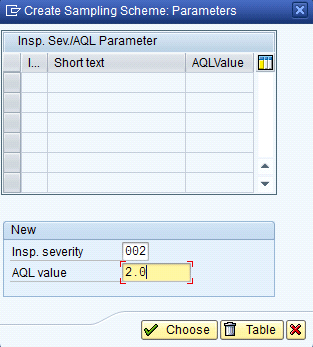
Figure 10
Inspection severity and AQL value input screen
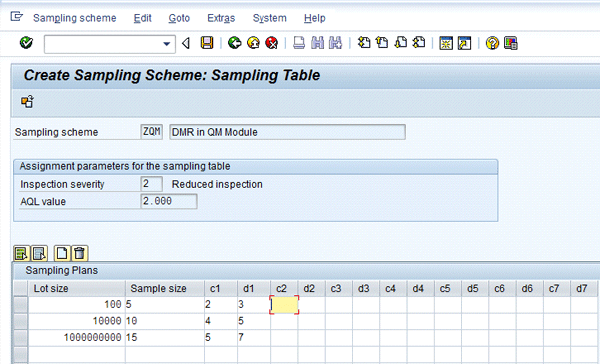
Figure 11
Sampling table for inspection severity 2 (reduced inspection) and AQL value of 2.000
Figure 11 is the sampling table for sampling scheme ZQM with inspection severity of 002 and an AQL value of 2.000. Note that it is standard SAP system behavior that all leading zeros are eliminated, but up to three decimal places are shown. Therefore in Figure 11, the Inspection severity of 002 has been changed to 2. Although the AQL value is defined as 2.0 in Figure 10, the system shows up to three decimal places.
Figure 11 defines that for an inspection lot quantity of 100 units, the sample size is 5 units. Of that a minimum of 2 (column c1) units has to be accepted while a maximum of 3 (column d1) units is allowed for rejection. This is applicable for all the inspection lots for which there is a reduced inspection. For an inspection lot of 10,000 units or greater, the sample size is 10 units and the number of acceptable samples is 4. A maximum of 5 rejections is acceptable.
The same process for creating another set for inspection severity and AQL is repeated for an inspection severity of normal, which is denoted by 004 and with an AQL level of 3.000, as shown in Figure 12. Note that I clicked the other table icon in Figure 11 to go to Figure 12, where I am creating another table. After the changes are made, click the save icon or press Ctrl+S.
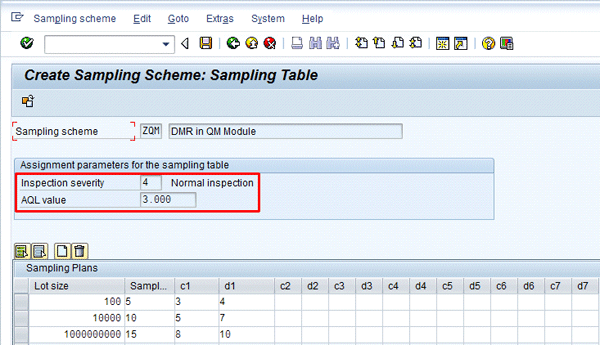
Figure 12
Sampling table for inspection severity 4 (normal inspection) and AQL value of 2.000
Figure 12 defines that for a inspection lot quantity of 100 units, there will be a sample size of 5 units out of which a minimum of 3 (column c1) units has to be accepted while a maximum of 4 (column d1) units are allowed for rejection. For an inspection lot of 10,000 or greater, the sample size is 10 and number of acceptable samples is 5. A maximum of 7 rejections is acceptable.
Click the save icon or press Ctrl+S to save the sampling scheme. Depending on business requirements, there can be several variations for defining reduced, normal, and tightened inspections in an SAP system. For example, with reduced inspection, there can be fewer sample sizes to inspect while keeping the acceptance and rejection samples the same. Alternatively, sample size can remain the same while the acceptance and rejection ratio can be adjusted.
In my example, I have kept the sample size for reduced and normal inspection the same, which is 5 units for an inspection lot of 100 units, but have defined that for reduced inspection the acceptable samples should be at least 2 units and maximum rejected samples should be 3 units. For a normal inspection at least 3 units must be acceptable and a maximum of 4 units can be rejected.
Note
You can use the same process to define tightened inspection. This is a
more stringent form of quality checks that is used by companies when a
vendor has repeatedly failed to supply acceptable quality products. The
vendor is then monitored more frequently for quality checks until it is
able to maintain and sustain the acceptable quality products’ deliveries
over a longer period of time. Once achieved, the tightened inspection
can be brought back to normal inspection or even reduced inspection. The
option to define a tightened inspection with an inspection severity
code of 006 is defined in Figure 9. All subsequent steps remain the same as for reduced or normal inspections in this article.
2. Set Up a Sampling Procedure
As explained previously, a sampling procedure is the QM master data that is used to define the sample size of an inspection lot how it is calculated. To create a sampling procedure, follow SAP menu path Logistics > Quality Management > Quality Planning > Basic Data > Sample > Sampling Procedure > Create or use transaction code QDV1 (Figure 13). Figure 13 is the initial screen of sampling procedure. Define the sampling procedure (e.g., ZQMSP) and press Enter to bring up the screen in Figure 14.

Figure 13
Initial screen of sampling procedure
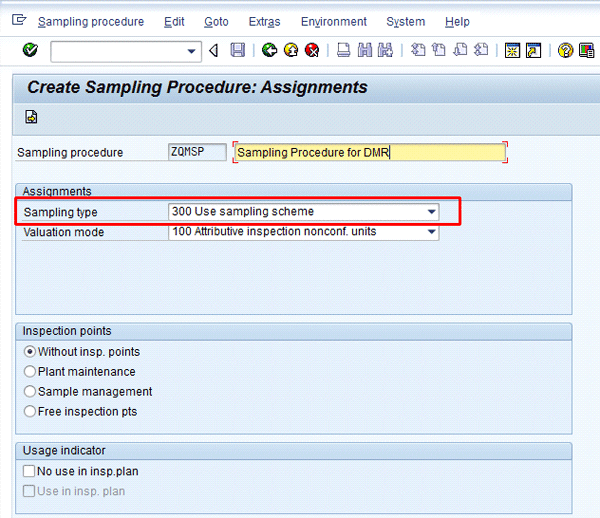
Figure 14
Sampling procedure with sampling type and valuation mode
Figure 14 is the assignments screen of the sampling procedure. Here I assign the sampling type 300 Use sampling scheme, which was previously created. Other sampling types available are Fixed Sample, which entails that regardless of the inspection lot size, the sample size is fixed, and Percentage, which entails that the sample size is calculated based on a defined percentage of the inspection lot.
For Valuation mode, select 100 Attributive inspection nonconf. units to ensure that all MICs are valuated if the results are within the specified tolerance limits. If any result is not, then the MIC is valuated as rejected.
Click the continue  icon to bring up the screen in Figure 15. Since the sampling type selected in Figure 14 was Use sampling scheme, you now need to assign the relevant sampling scheme that you previously created. I assigned sampling scheme ZQM.
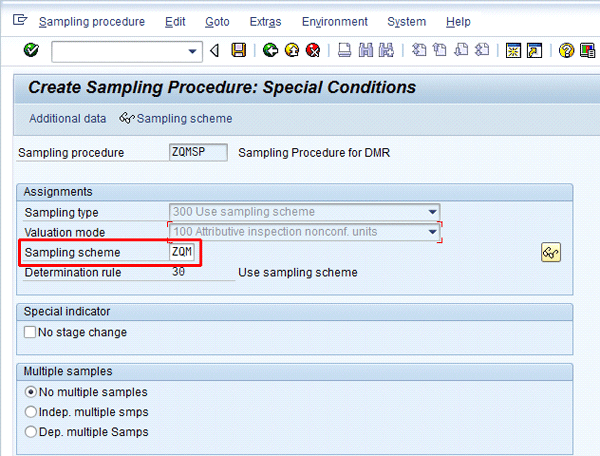
Figure 15
Sampling procedure with sampling scheme
Click the Additional data button to go to the screen in Figure 16. Figure 16 is required to assign inspection severity and the AQL value for the previously created sampling scheme ZQM. Press F4 or click the drop-down box while keeping the mouse on the Inspection severity field to bring up the screen in Figure 17.
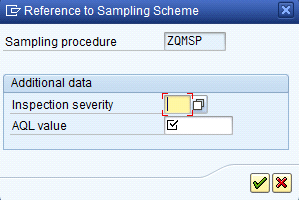
Figure 16
Sampling scheme with inspection severity and AQL value

Figure 17
Drop-down options to select inspection severity for sampling procedure
Figure 17 shows two options of sampling scheme ZQM from which to choose, namely, reduced inspection with AQL of 2.000 and normal inspection with AQL 3.000.
I chose Reduced inspection with an AQL value of 2.000 from the screen in Figure 17. Click the continue icon to go to the screen in Figure 18.

Figure 18
Sampling procedure ZQMSP with inspection severity of 002 and AQL value of 2.000
Click the continue icon in Figure 18 and then save either by pressing Ctrl-S or clicking the save icon to save the sampling procedure.
3. Create the DMR
The DMR is used to comprehensively define the details about the factors that trigger normal inspection to reduced inspections. The DMR is used to define the number of inspection lots that have the accepted or rejected statuses before it switches inspection stages from normal to reduced to tightened or vice versa.
To create a DMR, follow menu path Logistics > Quality Management > Quality Planning > Basic Data > Sample > Dynamic Modification Rule > Create or use transaction code QDR1 (Figure 19). Figure 19 is the initial screen for creating a DMR. In my example, I created a DMR as ZQM. Press Enter to go to the screen in Figure 20.
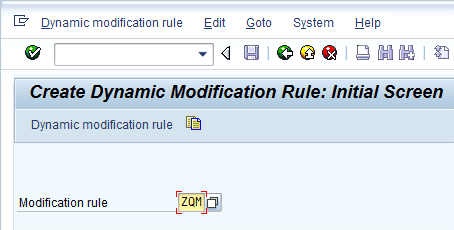
Figure 19
Initial screen for DMR creation
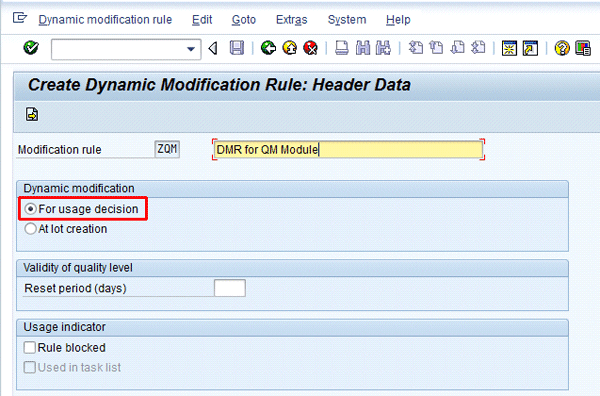
Figure 20
DMR header data
Figure 20 is the header data screen for DMR. Enter the short description and select the DMR rule as For usage decision. This option ensures that the basis for DMR triggering is a usage decision of an inspection lot – that is, if an inspection lot has been accepted during the usage decision (the decision to use a material or not). Then DMR decides if any inspection stage change is needed or not.
Click the continue icon to bring up the screen in Figure 21. This is the detailed screen for defining inspection stages of a DMR. An inspection stage is used to define the number of accepted or rejected inspection lots that lead to an inspection stage change. Inspection stages are also referred as stages. In my example in Figure 21, I defined two stages: stages 1 and 2.
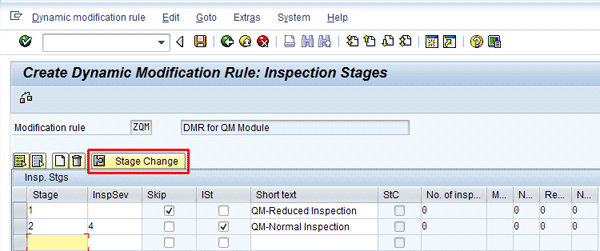
Figure 21
DMR with details about the inspection stages
In stage 1, I activated the check box for Skip inspection, which means skips in results recording are allowed for the inspection stage 1. For stage 2, I defined an inspection severity of 4, which is the normal inspection. I also activated the check box ISt (which is for initial stage) to ensure that DMR should always start out with normal inspection (stage 2) before the stage changes to reduced inspection (stage 1). Next, select the row of inspection stage 1 in Figure 21 and click the Stage change button. This leads to the screen in Figure 22.

Figure 22
Details of inspection stage change 1 for DMR
Figure 22 is the detailed screen for inspection stage change for inspection stage 1. Here, I defined that at least 3 inspection lots must have the usage decision OK or Accepted so that inspection stage 1 can continue. If there is a single rejection (as shown in Figure 22) with Not OK or a rejection in the Rejections field, then the next inspection stage is 2, which is the normal inspection that requires results to be recorded. Click the continue icon and this leads back to Figure 21.
Repeat the same process in Figure 21 by selecting Stage 2 and selecting the Stage Change button to go to the screen in Figure 23. Figure 23 stipulates that just one OK or accepted inspection lot again changes the new stage change to 1, which is for reduced inspection. Similarly if there is one rejection (not OK), then the next stage remains 2, which is a normal inspection. Click the continue icon to go to Figure 24.
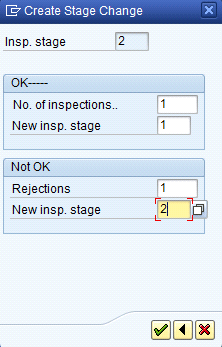
Figure 23
Details of inspection stage change 2 for DMR

Figure 24
Overview of inspection stages’ change of DMR
Figure 24 shows that after you incorporate all the necessary details for individual stage changes, they are reflected in the various columns. Click the consistency check icon  to go to the screen in Figure 25.
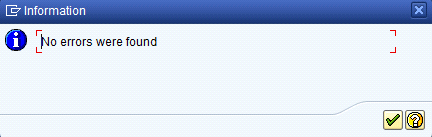
Figure 25
Consistency check of DMR
Figure 25 gives an information message that the DMR creation found no error. Click the continue icon and save the DMR by pressing Ctrl-S or clicking the save icon. This leads to the screen in Figure 26.
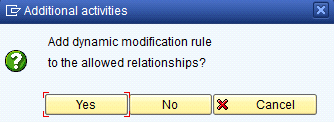
Figure 26
Pop-up screen to allow creation of a DMR relationship with the sampling procedure
Figure 26 brings up an option to allow the user to create a relationship between DMR and the sampling procedure. Click the Yes button in Figure 26 and this leads to Figure 27.
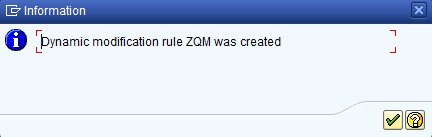
Figure 27
Information message of DMR creation
Figure 27 is the information message that DMR ZQM has been created. Click the continue icon.
4. Maintain a DMR Relationship with the Sampling Procedure
One of the requirements for DMR use is that a relationship be maintained between DMR and the sampling procedure. Although in my example, the option to maintain this relationship was made available while creating the DMR (as shown in Figure 26), this relationship can also be created independently. Follow SAP menu path Logistics > Quality Management > Quality Planning > Basic Data > Sample > Sampling Procedure > Assign Dynamic Modification Rule or use transaction code QDB1 (Figure 28). Figure 28 is the initial screen to maintain the relationship of DMR with the sampling procedure. Click the New Entries button and this leads to Figure 29.
Figure 28
Initial screen for DMR relationship creation with sampling procedure

Figure 29
DMR ZQM relationship with sampling procedure ZQMSP
Create a new relationship between sampling procedure ZQMSP and DMR ZQM and save it by pressing Ctrl-S or clicking the save icon.
5. Create an Inspection Plan
An inspection plan is the task list referred to whenever an inspection lot against a purchase order is created. An inspection plan consists of previously created MICs. To create an inspection plan follow SAP menu path Logistics > Quality Management > Quality Planning > Inspection Planning > Inspection Plan > Create or use transaction code QP01 (Figure 30). Figure 30 is the initial screen for the inspection plan in which I have defined the Material as 3000000080 and the Plant as 1000 for the creation of an inspection plan. Press Enter or click the continue icon.
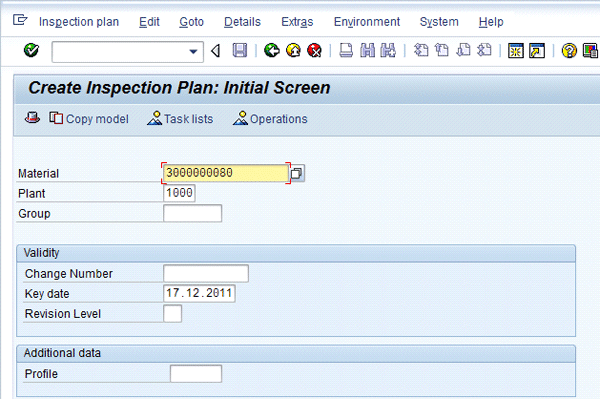
Figure 30
Initial screen for inspection plan
In Figure 31, the header information given is that the usage is 5, which is for goods receipt and the status of the inspection plan is set to 4, which is released. A usage specifies the purpose for using a specific inspection plan. A material can have a different inspection plan for different uses – for example, for goods receipt-specific usage or a universal usage that can be for all the different inspections or a goods issuance usage that is used in a sales order-related quality check before goods are sent to the customer against a sales order.
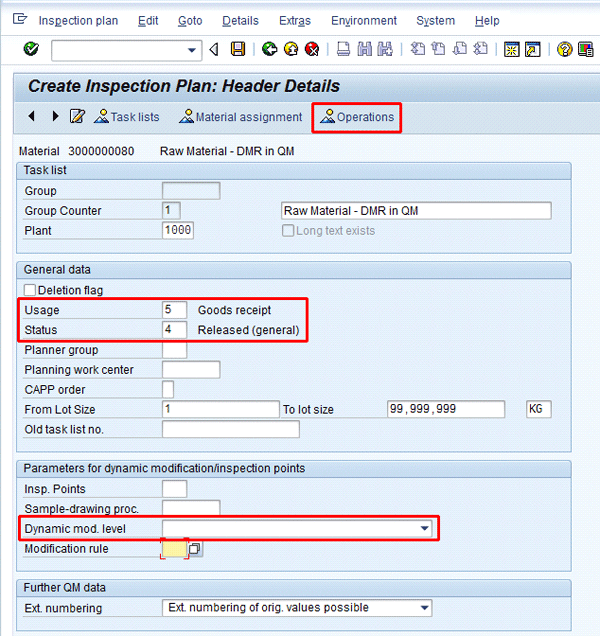
Figure 31
Header data of inspection plan
In Figure 31, notice the option Dynamic mod. Level, which allows you to define the DMR in the inspection plan. The dropdown of the DMR field reveals three options, as shown in Figure 32. Figure 32 shows that DMR can be activated on the entire inspection type, which means, for example, all the incoming inspection lots against purchase order (inspection type 01) have DMR activated. The second option for DMR is at the inspection lot level, which entails that each and every individual inspection lot is evaluated to see if it qualifies for DMR. Finally, the third option is to have DMR triggered at the individual MIC level (characteristics level).

Figure 32
Drop-down list of DMR level
In my example, I chose the option to have DMR at the inspection lot level, as shown in Figure 33 and also defined in the previously created DMR ZQM.
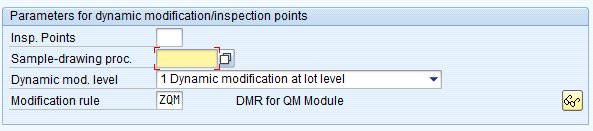
Figure 33
DMR level at inspection lot selected with DMR rule of ZQM
Next, click the Operations button in Figure 31 to bring up the screen in Figure 34. Assign the work center MACH90 on which the inspection is going to be carried out. Select the line item 0010 and click the Inspection characteristics button to bring up the screen in Figure 35.
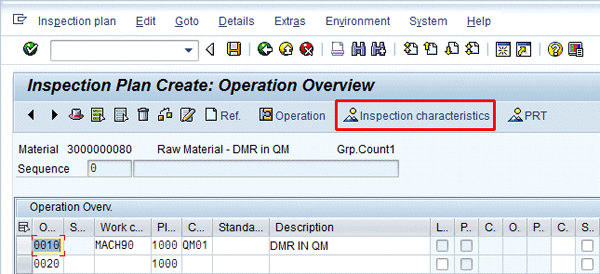
Figure 34
Overview screen of inspection plan

Figure 35
Two MICs, QM01 and QM10, with sampling procedure ZQMSP
Assigned the previously created MICs, namely QM01 and QM10. All other details are automatically copied from the MIC, including upper and lower limits and target value. Notice that the sampling procedure is assigned as ZQMSP for both characteristics.
You can now save the inspection plan. Press Ctrl-S or click the save icon.
DMR at Work
Now that all the required QM master data needed to successfully trigger DMR is complete, I demonstrate the end-to-end process flow to show how DMR actually works.
A purchase order was created for the above material for which DMR has been activated and a goods receipt was performed. As soon as the goods receipt was done, it created an inspection lot.
To go to the worklist for a QM inspection lot, follow menu path Logistics > Quality Management > Quality Inspection > Worklist > Inspection > Change Data or use transaction code QA32 (Figure 36). Enter the material number 3000000080, plant 1000, and inspection type 01. Press F8 or click the execute icon. This leads to Figure 37.
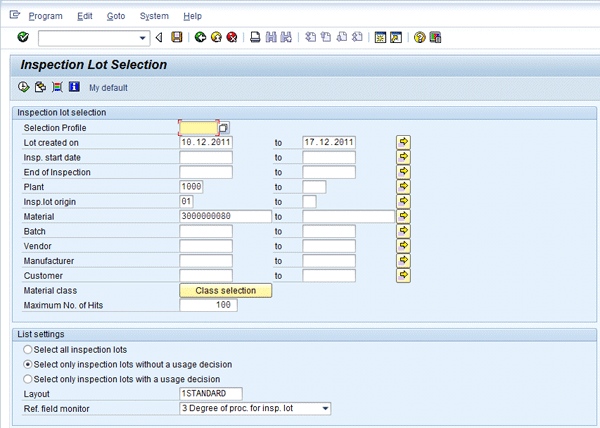
Figure 36
Worklist of inspection lots

Figure 37
Inspection lot 3462 with calculated sample size and DMR rule of ZQM
Figure 37 is the worklist of all the inspection lot for which the results recording or usage decision has not been taken. Notice that modification rule ZQM was successfully applied to inspection lot 3462. Also, the sample size has been correctly calculated to 5 kg based on the goods receipt quantity of 50 kg (refer to Figure 11). This confirms that the sampling scheme and sampling procedure are correctly defined.
Select the inspection lot 3462 and click the results icon to bring up the screen in Figure 38. Figure 38 is the results recording screen in which the individual specifications of material and the corresponding MICs are available for reference.
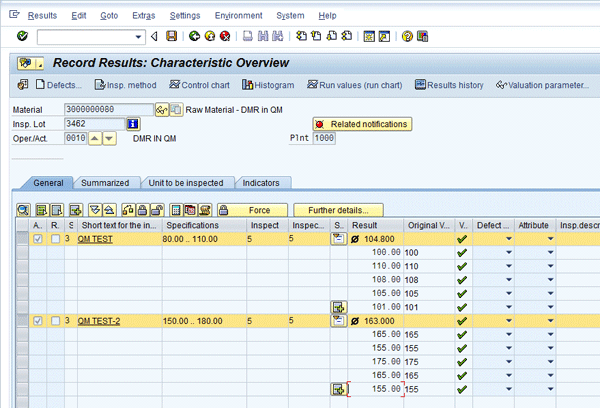
Figure 38
Results recording of inspection lot 3462
Enter the results of each sample and the system automatically performs its valuation (denoted by the green check mark in the V column in Figure 39). Save the results by pressing Ctrl+S or clicking the save icon. This leads to Figure 37 again. Select inspection lot 3462 and click the usage decision icon, which leads to the screen in Figure 39. The usage decision (UD) is made by providing the UD code A for acceptance.
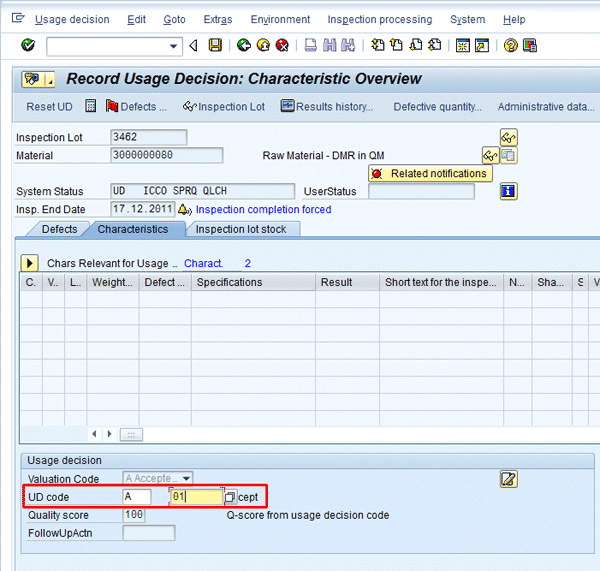
Figure 39
UD of inspection lot 3462
Click the inspection lot stock tab in Figure 39. This leads to the screen in Figure 40.
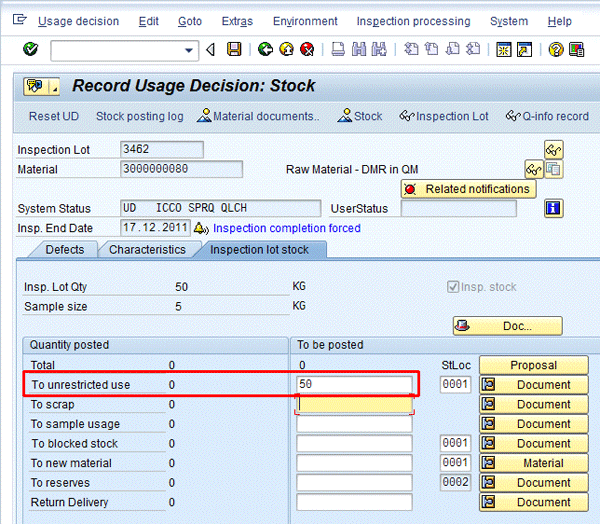
Figure 40
Stock posting of inspection lot 3462
Figure 40 is the inspection stock posting screen in which the quality inspection stock is transferred or moved to unrestricted use stock when saved. The unrestricted stock is the quality cleared and quality approved stock. Save the UD by pressing Ctrl-S or clicking the save icon.
As soon as the UD has been undertaken with an Accepted decision, further goods receipts against the same purchase order have inspection lots with SKIP status as shown in Figure 41. This means no results recording is necessary and only the UD is sufficient.
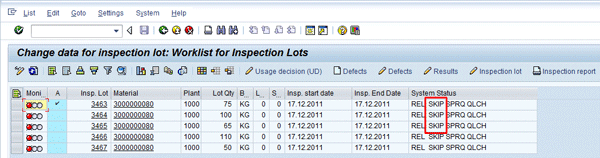
Figure 41
Inspection lots with SKIP status
If you still have a business need to record the results of an inspection lot with SKIP status, you can still do it. The standard process of results recording prevails, although the system issues an information message that this specific inspection lot has SKIP status.
To further check if the DMR is properly configured, I selected a SKIP inspection lot, entered results, and then rejected an inspection lot 3468 (not shown) by giving a UD code as rejected. When the subsequent goods receipt against the purchase order was undertaken, the DMR with SKIP was not triggered and normal results recording had to be performed. This is shown in Figure 42 for inspection lots 3469 and 3470.
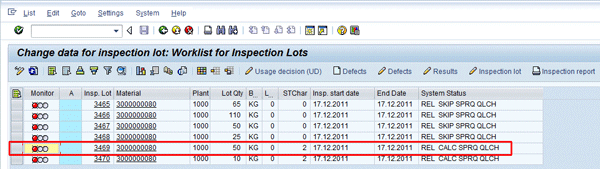
Figure 42
Inspection lots requiring results recording
As soon as the inspection lot 3469 was accepted during results recording and the UD, the goods receipt against subsequent inspection lots were again given SKIP status as shown in inspection lot 3471 in Figure 43, thereby confirming that DMR is successfully configured.
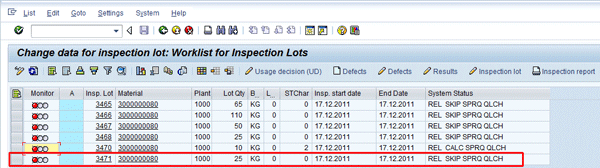
Figure 43
Inspection lot 3471 again with SKIP status

Jawad Akhtar
Jawad Akhtar earned his chemical engineering degree from Missouri University of Science and Technology. He has 17 years of professional experience, of which nine years are in SAP. He has completed eight end-to-end SAP project implementation lifecycles in the areas of PP, QM, MM, PM, and DMS in the steel, automobile, chemical, fertilizer, FMCG, and building products industries. He also has worked as an SAP integration manager and an SAP project manager. He has been proactively involved in a business development and solution architect role for seven years. He is the author of Production Planning and Control with SAP ERP, it's filled with in-depth infomation on discrete, process, and repetitive manufacturing types. His profile on LinkedIn is at https://pk.linkedin.com/in/jawadakhtar. You may follow Jawad on Twitter @jawadahl. Currently, he is associated with AbacusConsulting as Head of SAP Delivery.
You may contact the author at jawad.akhtar@live.com.
If you have comments about this article or publication, or would like to submit an article idea, please contact the editor.