Creating an SAP BusinessObjects Multi-Source Universe: A Step-by-Step Guide
Big Data technologies combined with Internet of Things complement business functions by providing insights into processes through data. As these sources of data increase, so do reporting needs. Varied reporting needs require the merging of data sets to comprehend relationships and insights into the data. As the demand for shorter turnaround times to answer specific business queries grows, the requirement to build solutions quickly has been increasing. SAP BusinessObjects provides this functionality to quickly merge multiple data sources to present a single version of truth to answer the business queries through Multi-Source Universes.
Multi-Source Universes extract data from multiple sources and present it in a single semantic layer. Prior to the release of the SAP BusinessObjects 4.0, Multi-Source Universes had to be developed using the Data Federator application, a separately licensed product. With Business Objects 4.0, Data Federator is integrated in the Information Design Tool (IDT) and therefore doesn’t require an additional license.
Built on underlying data sources, the Universe, also known as a semantic layer, enables the business user to understand data in familiar business terms. Accessible across a variety of SAP BusinessObjects tools, such as Web Intelligence, Design Studio, and SAP Lumira, a Universe builds a common platform that provides relevant business information to users across hierarchies and functions.
Explore related questions
Multi-Source Universes
Multi-Source Universes enable you to combine data gleaned from data sources in SAP systems and non-SAP systems into a single Universe, providing a unified view of data from multiple data sources to business users. Using the built-in Data Federator engine, the target Universe enables the querying of data from multiple underlying data sources. Figure 1 shows the high-level architecture of building the Multi-Source Universe.

Multi-Source Universes provide multiple advantages, the most significant being:
- Flexibility: This feature enables developers to avoid long waiting cycles to load data from multiple data sources into a central enterprise data warehouse and then make it available for reporting. It offers a quick turnaround while answering demanding queries from business users. We are referring here to the time that is required to load the data from the new data source (i.e., Microsoft Excel in our example) into SAP BW to make it available for reporting. Multi-Source Universes remove the need for loading the data from the new data source in SAP BW and make it available for reporting immediately.
- Reduced total cost of ownership (TCO): Multi-Source Universes help in maintaining a lower TCO by reducing the number of Universes and Extract, Transform, and Load (ETL) jobs.
Multi-Source Universes come with certain drawbacks that need to be weighed against the benefits. They include:
- Performance: With the Data Federator engine, data from multiple data sources is fetched onto the SAP BusinessObjects BI platform to combine and calculate the required measures, if any. This puts a lot of pressure on resources, thus affecting reporting performance.
- Specific SQL functions: The underlying Data Federator engine does not support database-specific functions. All the functions in business layer objects must be SQL-92 compliant.
Steps for Creating a Multi-Source Universe
Now we walk you through a step-by-step guide to create, deploy, and use a Multi-Source Universe. For this specific example, we use the data sources from SAP BW and Microsoft Excel to demonstrate the combining of data sources from SAP systems and non-SAP systems.
In the following example, data for sales orders is available in a DataStore object (DSO) in an SAP BW system, whereas the billing information is available in Excel. A Multi-Source Universe created by following the steps below creates a common semantic layer for business users to get sales order information along with billing details.
Environment details are as follows:
- SAP BusinessObjects BI Platform 4.1 Support Package 5 (Windows)
- SAP BW 7.3
- SAP BusinessObjects BI Client Tools 4.1 Support Package 5 (the IDT)
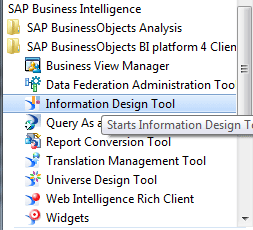
1. Start the IDT from the SAP BusinessObjects BI platform 4 Client Tools installation in the Windows start menu (Figure 2).
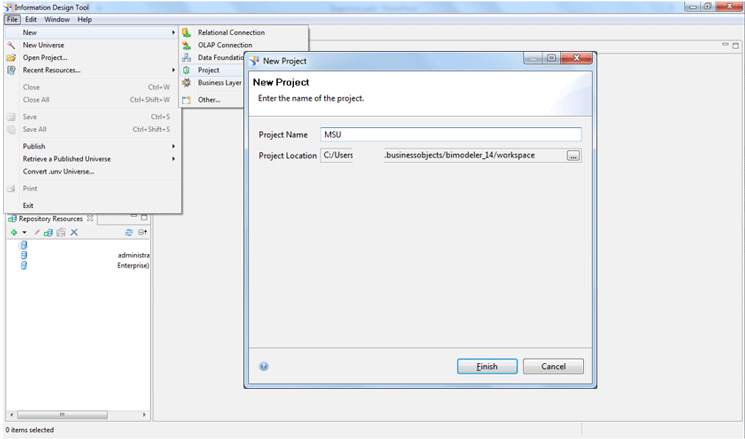
2. In the IDT, the development is done locally in folders for specific projects. Once finalized, the artifacts from local projects need to be published to the SAP BusinessObjects repository to make them available across the enterprise (subject to authorizations). Create a new project called MSU to store all the local artifacts for the Multi-Source Universe. In the IDT, navigate to File > New > Project. Provide the name of the project and click the Finish button (Figure 3).
3. Create a secured relational connection to SAP BW in the SAP BusinessObjects repository. Multi-Source Universes can be created only with secured connections to data sources from the SAP BusinessObjects repository.
To create a secured connection, open a session with the SAP BusinessObjects repository. In the Repository Resources Section of the IDT, insert a new session if no SAP BusinessObjects repository already exists, or open a session by logging in to the existing SAP BusinessObjects repository.
To insert a new repository and open a session, go to the Repository Resources section and navigate to the + sign. Click the Insert Session option and provide SAP BusinessObjects Repository details and credentials.
To open a session within an existing repository, right-click an existing repository. Select the Open Session option and provide SAP BusinessObjects Repository details and credentials (Figure 4).

(Note: Multi-Source Universes can be created only by using a relational connection to SAP BW. Business Intelligence Consumer Services [BICS] connections cannot be used to create Universes on SAP BW in SAP BusinessObjects.)
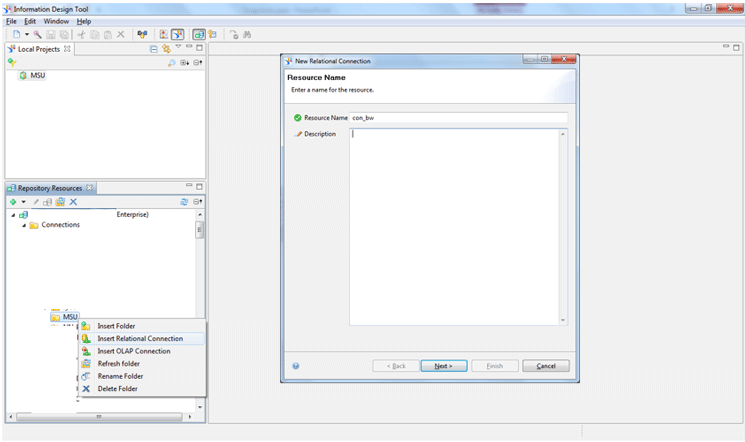
4. To create a new relational connection to SAP BW, expand the Connections folder under the opened session with SAP BusinessObjects repository as shown in Figure 5. Navigate to the particular folder in which the new relational connection to SAP BW would be stored in the repository. In the example folder, the name in the repository is MSU. Right-click the folder and select the Insert Relational Connection option. In the pop-up window, enter the name for the new relational connection to SAP BW. Click the Next button shown in Figure 5 to go to Figure 6.
5. In Figure 6, select the appropriate middleware that is required to communicate with the underlying data source. For a relational connection to SAP BW, select SAP Java Connector (JCO) middleware under SAP > SAP BW. Click the Next button to go to Figure 7.

6. In Figure 7, enter the SAP BW connection details and credentials required to log in to the SAP BW system. Click the Test Connection button to test the connectivity to the SAP BW system using the supplied credentials. When you connect, click the icon next to the InfoProvider option to select an InfoProvider, which opens the screen shown in Figure 8.

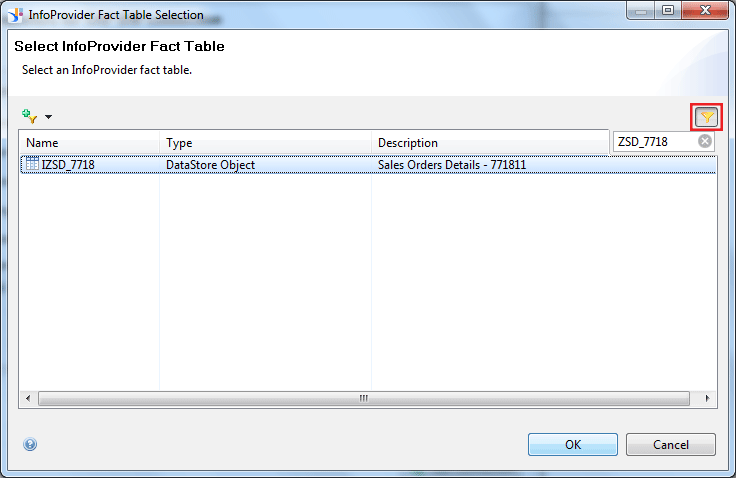
7. In Figure 8, click the filter icon on the right as highlighted. Input the name of the InfoProvider. Press Enter on your keyboard. The InfoProvider with the specified name is listed. Select the row. Click the OK button to finalize the selection. In this example, the InfoProvider is a DSO with the name Sales Order Details – 771811.
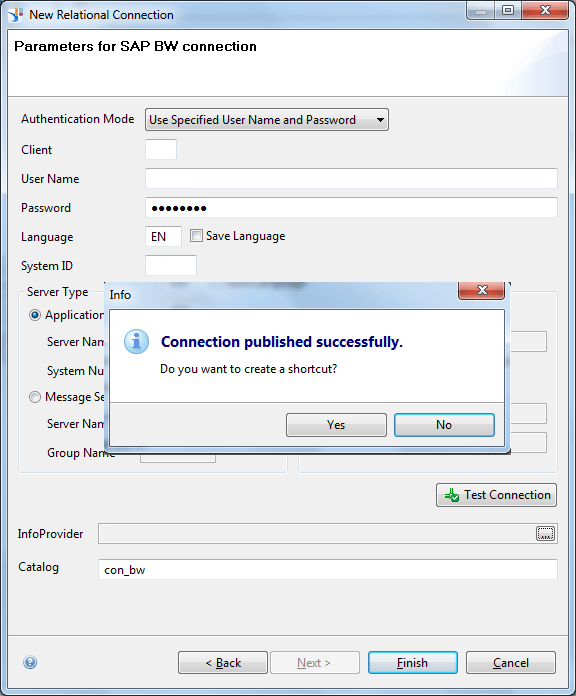
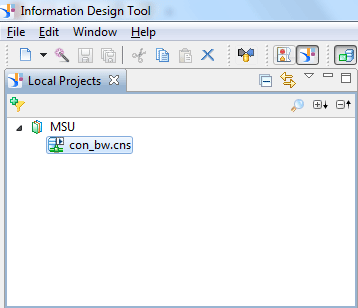
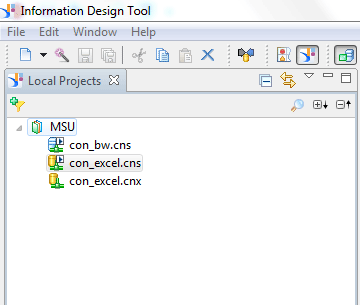
8. Click the Finish button to complete the SAP BW relational connection configuration. The system then displays a pop-up window (Figure 9) giving you an option to create a shortcut to this repository connection in the project that was created earlier. Click the Yes button in the pop-up window. The shortcut of the connection can be seen in the project in the IDT as shown in Figure 10.
9. A Multi-Source Universe can be created only on secured connections in an SAP BusinessObjects repository. Therefore, after creating a secured connection, you need to create a shortcut under the project in the IDT to proceed with data foundation creation.
You can create a connection shortcut in the following ways:
- In the last step while creating the secured connection in BusinessObjects Repository, as shown in Figure 9.
- From the Repository Resources section open the Connections folder. Navigate to the secured connection whose shortcut needs to be created. Right-click the connection and select the create shortcut option.
Figure 10 shows the relational connection shortcut with the name con_bw.cns under the project MSU in the IDT.
You now have created a secured relational connection to SAP BW in the IDT.
Create a Connection to Excel
The following section describes how to create a secured relational connection to Excel that stores the billing details and acts as a second data source to a Multi-Source Universe. The process involves creating a local connection to Excel using an Open Database Connectivity (ODBC) client under the project in the IDT and publishing it to the SAP BusinessObjects repository. Then you create the ODBC Data Source Name (henceforth referred as DSN) on the SAP BusinessObjects server to support the execution of queries at run time.
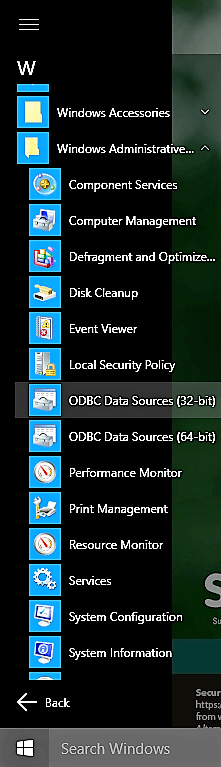
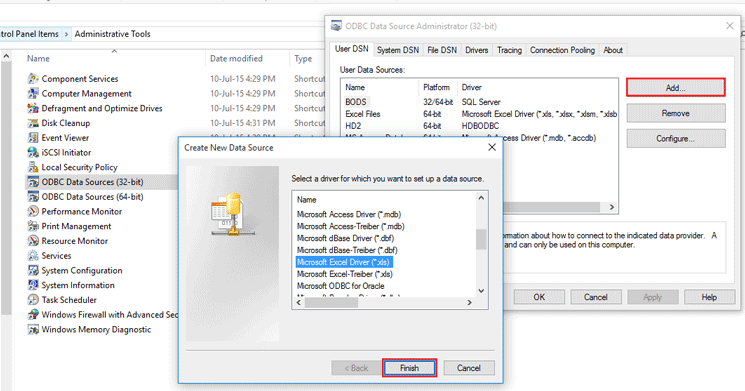
10. This process starts with creating a local ODBC DSN to Excel that stores billing details on the machine that runs the IDT. Here local refers to the artifacts created on the machine that runs the IDT. For that, follow Windows menu path Windows Administrative Tools > ODBC Data Sources (32 bit) as shown in Figure 11. Since this is a local DSN, a 32-bit ODBC client is used as shown in Figure 11.
(Note: SAP BusinessObjects client tools architecture is 32-bit. Therefore, while you create the ODBC connection locally using the IDT [one of the SAP BusinessObjects client tools], you need to use a 32-bit ODBC client to define the DSN, whereas an SAP BusinessObjects server architecture is 64-bit. Hence, the secured connection on SAP BusinessObjects server refers to a 64-bit ODBC DSN, requiring the use of a 64-bit ODBC client to define a DSN on an SAP BusinessObjects server. The DSN name should be kept the same on the machine that runs the IDT as the one on the SAP BusinessObjects server.)
Select the Excel client (Figure 12). Click the Finish button.
Provide the required details such as Data Source Name and the location of the Excel file on the machine that runs the IDT or accessible network path using the Select Workbook button shown in Figure 13. Click the OK button to complete the ODBC DSN configuration for Excel.
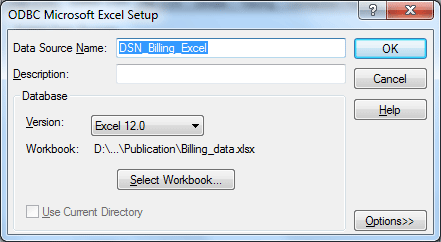
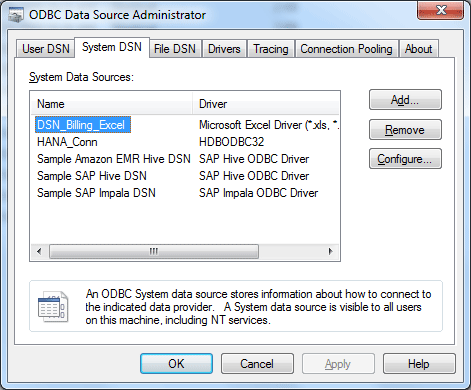
Figure 14 shows the completed ODBC DSN configuration on the local machine (i.e., the machine that runs the IDT).
11. Now the created ODBC DSN needs to be consumed in an SAP BusinessObjects relational connection. In this case, first a local relational connection to Excel using ODBC DSN needs to be created under the local project in the IDT. Here, local refers to the artifacts created in the IDT and not published to the SAP BusinessObjects server. The local connection is then published to the SAP BusinessObjects repository to make it a secured connection. Then the shortcut of this secured connection must be created in the local project before the data foundation can be created.
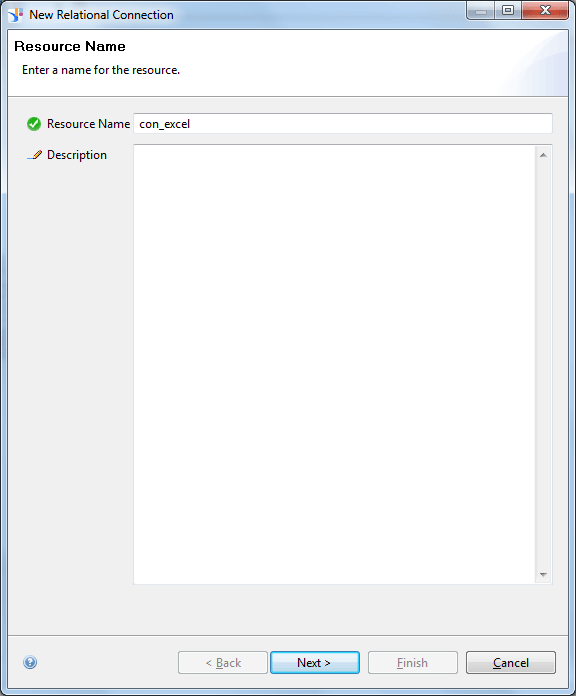
Start with creating a new relational connection to Excel in the local project and providing a suitable name for the connection. Click the Next button.
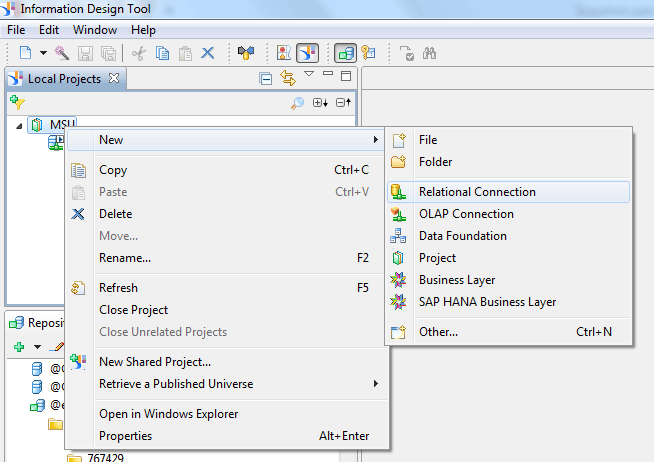
Right-click the project in the IDT. Select the New button and then click the Relational Connection link (Figure 15). It leads to the screen shown in Figure 16.
In Figure 16, enter the name of the connection and click the Next button to go to the screen shown in Figure 17.
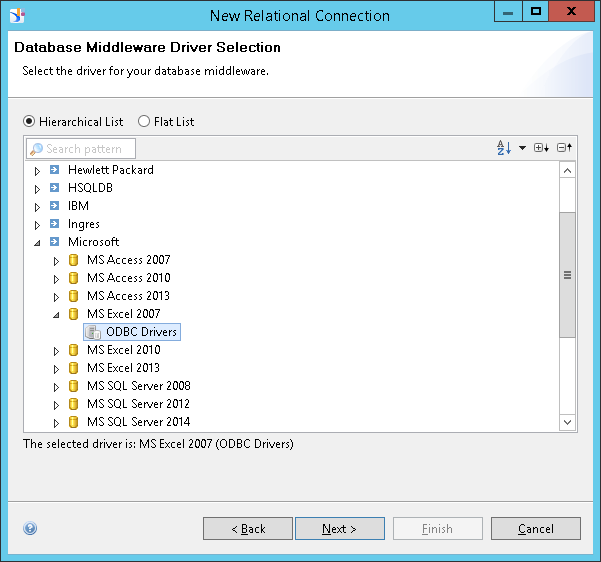
12. In Figure 17, select the appropriate middleware driver for the Excel connection. Click the Next button to go to the screen shown in Figure 18.
13. In Figure 18, provide the required details such as user name and password, if any, and the DSN name from the local machine. Click the Test Connection button to test the connectivity. If the connection is successful, a pop-up window displays the message Test Successful. Click the Close button to close the pop-up window. Click the Finish button to complete the process of creating a local relational connection to Excel.

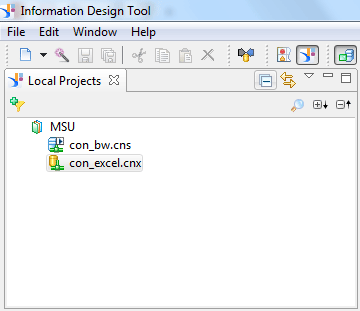
Figure 19 shows a new local connection to Excel (con_excel.cnx) under the project in the IDT. Note that the local connection has a .cnx extension indicating that it is a local connection and not a shortcut to the secured connection from SAP BusinessObjects repository. The extension of the shortcut to the secured connection from SAP BusinessObjects repository is .cns.
14. This local connection needs to be published to the SAP BusinessObjects repository to convert it to a secured one. For that, right-click the local connection under the project in the IDT. Select the Publish Connection to a Repository option (Figure 20). It leads to screen shown in Figure 21.

15. In Figure 21, provide the SAP BusinessObjects repository credentials to log in so that the connection can be published to it. After supplying the credentials, click the Next button to go to Figure 22.

In Figure 22, select a folder on the SAP BusinessObjects server to which you want to publish the connection. Click the Finish button to complete the process (Figure 22).

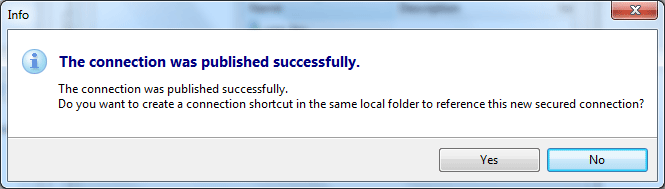
If the connection is successfully published to the SAP BusinessObjects repository, the system displays a pop-up window as shown in Figure 23.
16. A shortcut of this secured connection from BusinessObjects repository should be created in the local project in the IDT. To complete this step, go to the Repository Resources section in the IDT. Expand the session with SAP BusinessObjects repository and then expand the Connection folder. Navigate to the connection for which you want to create a shortcut. Right-click it. Select the Create shortcut option and then select the project in the IDT under which the shortcut needs to be created. This creates a shortcut to the repository connection in the local project as shown in Figure 24. Note its extension is .cns.
This step completes the process of creating secured connections to the data sources to be used in the Multi-Source Universe.
Create a Data Foundation and Business Layer
The following steps illustrate the process of creating a Multi-Source and business layer. A data foundation is a framework for the database wherein tables, joins, and views are defined and relationships are created between them. This layer forms the core for building the business layer.
A business layer is built on top of the data foundation layer. The objects from the data foundation are presented in terms that are more business-user friendly, using metadata objects such as dimensions, hierarchies, measures, attributes, and predefined conditions. The business layer is finally published as a Universe and exposed to users. The data foundation layer is not exposed to end users.
17. To create the data foundation, right-click the local project in the IDT. Select the New option and then Data Foundation (Figure 25).

18. Enter the appropriate name for the data foundation (Figure 26). Click the Next button to go to Figure 27.

In Figure 27, select the type of data foundation as Multisource-Enabled. Click the Next button to go to Figure 28.

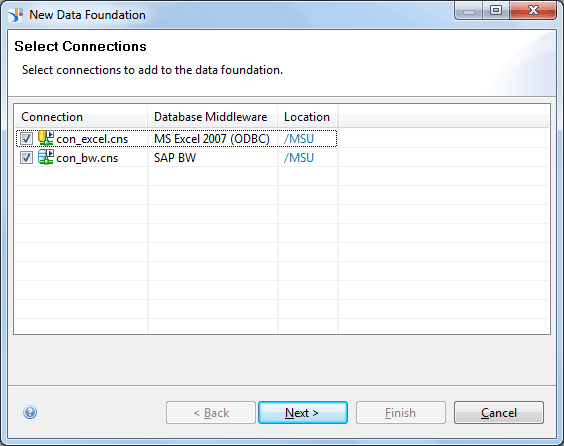
19. Figure 28 shows the connection shortcuts from the project in the IDT. Select the connection shortcuts as participating connections in the Multi-Source data foundation by checking the check box beside them. Click the Next button.
20. The IDT then creates a Multi-Source data foundation showing a relational structure for an SAP BW InfoProvider as shown in Figure 29.
(Note: Tables from each data source are highlighted in different colors. The corresponding color for the data source can be seen against the data source name in the Data Foundation connection section as highlighted in Figure 29.)
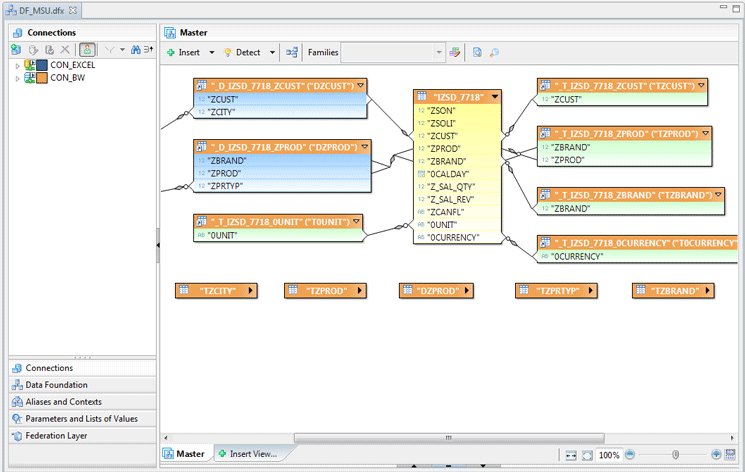
21. Add the table from the Excel connection to the data foundation by dragging and dropping it in the design area as shown in Figure 30. Join the Excel table to the central fact table for SAP BW DSO (IZSD_7718 in our example) on SALESORDER_NO and SALESORDER_LINE_NO. This join defines the relationship between the tables from disparate sources. Click the save icon on the toolbar to save the data foundation as shown in Figure 30.

22. Once the data foundation is complete, the next step is to create a business layer on it. A business layer is a Universe that is presented to business users for their reporting needs. Right-click the local project, click the New button, and then click the Business Layer option (Figure 31) to go to Figure 32.

23. Enter a suitable name as shown in Figure 32. Click the Finish button.

24. Select the data foundation saved as DF_MSU as shown in Figure 33. Click the Finish button.

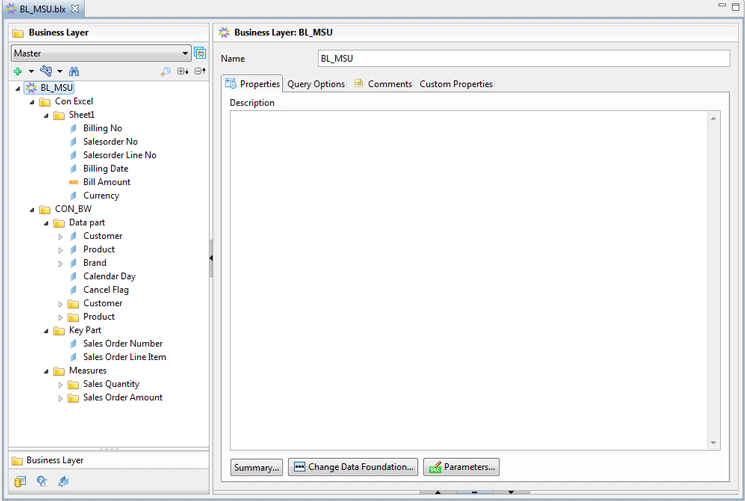
25. The IDT automatically creates the folder structure and the required objects as shown in Figure 34. The folder structure can be manually customized based on specific needs later.
26. The business layer should be published to the SAP BusinessObjects platform to make it available across the enterprise to address any reporting needs. Right-click the business layer from the local project in the IDT. Select the Publish To a Repository… option as shown in Figure 35.

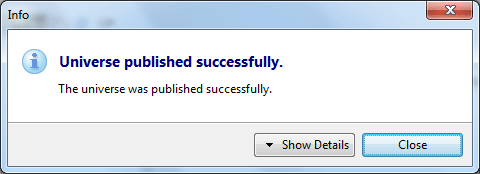
27. The business layer is published to the BusinessObjects repository as a Universe. Select the folder on the BusinessObjects platform where the business layer needs to be published. After successful publishing as shown in Figure 36, the Universe is available for business users to query, subject to authorization.
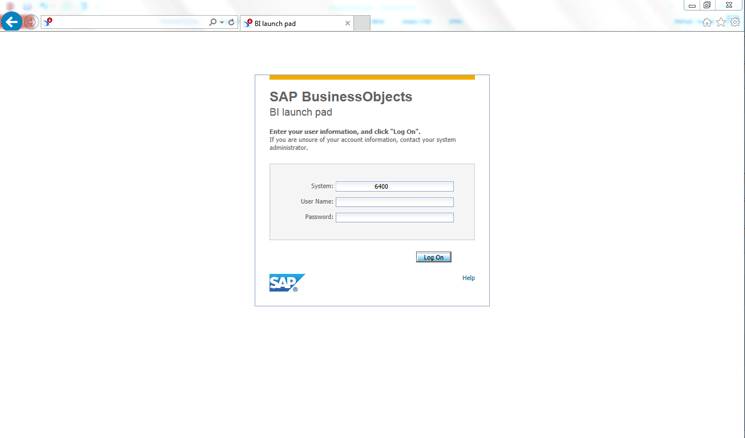
28. The published Universe can be accessed from Web Intelligence through the SAP BusinessObjects BI launch pad. Go to the SAP BusinessObjects BI launch pad, enter your log-in credentials, and click the Log On button as shown in Figure 37.
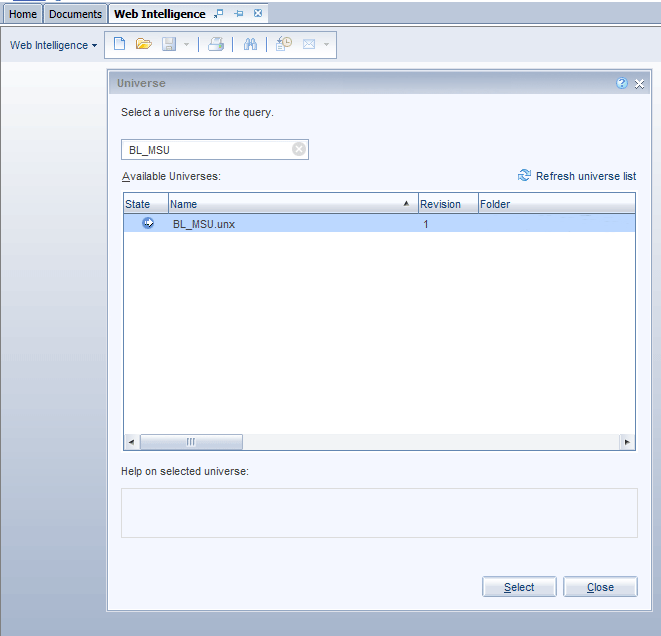
29. Select the Web Intelligence application from the list of applications and create a new document with Universe as the data source as shown in Figure 38. Filter from the list of available Universes using the name of the business layer.
(Note: Users need to have appropriate authorization to access and run queries on a Universe. SAP BusinessObjects Web Intelligence and Design Studio can use Multi-Source Universes as a data source.)
30. Select the dimensions and key figures from the Universe in the Query Panel of Web Intelligence. These fields can be from a single source or from both sources. They have been marked by a blue arrow in Figure 39. Click the highlighted Run Query button.

31. Web Intelligence runs the query on the respective data sources involved through the Multi-Source Universe. It generates the output having combined data from both the data sources, if the selected fields are from both the data sources. The output is shown in Figure 40.

Multi-Source Universes enable disparate data sources to be integrated into a single consumable semantic layer. This approach is particularly useful for rapid development wherein the data can be combined into a front-end tool without any development from the ETL technologies. As explained above, the Universe can be used across multiple SAP BusinessObjects tools for querying data and building reports.