In the standard payment transaction F110, outgoing payments are all based on financial documents. By using online payments, you can create payments without any underlying financial document. Instead of a financial document, the basis for the online payment is a payment request. You create the payment requests with transaction FIBLAPOP and the outgoing payment with transaction F111.
Key Concept
Transaction FIBLAPOP allows you to make payments without relying on a financial document. It deals with online payments that are based on payment requests.
A customer once asked me how to make a partial payment on a blocked vendor invoice in the SAP system. My answer was that the payment should be sent to the bank using an electronic bank file. The reason behind this was a purchase invoice that contained hundreds of line items but was blocked because of a dispute over a single item. To maintain the good relationship with its vendor, my customer wanted to pay the complete invoice — except the amount for the disputed item. At that time, I wasn’t aware of any good solution for this in the SAP system. However, after a search, I found transaction FIBLAPOP.
This transaction can make payments to vendors without requiring an underlying financial document. The SAP term for this kind of payment is online payment. After seeing this transaction, my customer became so enthusiastic that he decided to use this transaction for vendor down payments because the process is much simpler than the down payment process.
Depending on your settings in the IMG, you follow different procedures to complete the payment process. However, all these procedures have one thing in common: they aren’t based on financial documents. Instead, they are based on online payments that are based on payment requests. The procedures reflect your requirements regarding authorization and segregation of duties, but the procedure you use also depends on the need to combine several payments in one payment file. The SAP system allows four procedures. I’ll explain the simplest and the most elaborate of these in more detail. The other two procedures are only discussed briefly because they resemble the most elaborate one except that some activities are combined.
The Simplest Procedure
The simplest procedure combines all activities in two steps. Basically, all necessary activities are done in the first step. The second step is simply downloading the payment file. This procedure doesn’t allow you to combine several payments in one payment file; you can only make one payment at a time.
Step 1. Create the Payment Request
A payment request is a document you can use to generate payments. You create a payment request and use it within the payment program to generate the payment file that you send to the bank. Use transaction FIBLAPOP and follow menu path Accounting > Financial Accounting > Banks > Outgoings > Online Payments (Figure 1).
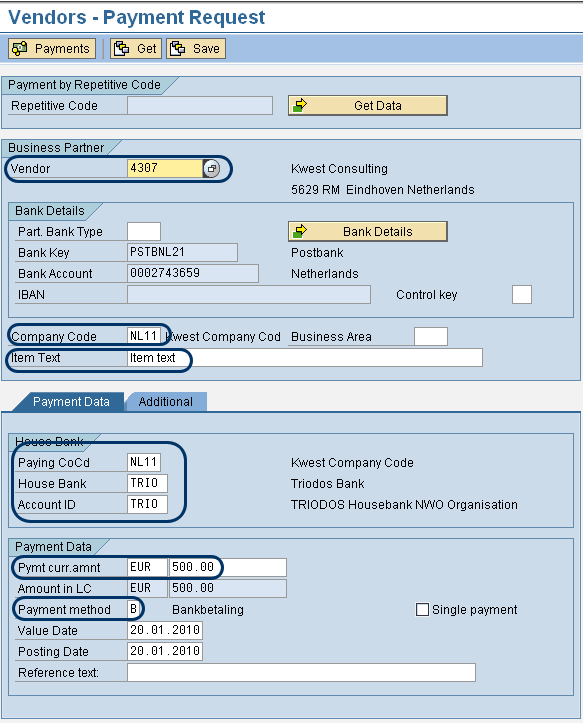
Figure 1
Create a payment request in transaction FIBLAPOP
On the selection screen, enter the Vendor number and the Company Code of the vendor. You can find these fields in the Business Partner section. On the Payment Data tab, enter the paying company code, the bank account from which you want to make the payment, the amount to be paid, and the payment method. The paying company code may differ from the company code to which the vendor belongs.
Note
On the Additional tab in Figure 1, you can enter the instruction key, instructions, and the state central bank indicator. The relevancy of these fields is country dependent and therefore is not further discussed.
Besides the mandatory fields I’ve mentioned, you can enter an item text and a reference text. The item text is copied into the vendor document and reference text is copied into the bank file.
The bank details are copied automatically to the screen. If a vendor has more than one bank account, you can select the bank you want to use by entering a partner bank type or by clicking the Bank Details button. The partner bank type is a field of the vendor master bank details.
Once you have entered all the data, you can create the payment run. To do so, click the Payments button to create a payment request. The program automatically processes the payment request and creates the payment file that is sent to the bank. A pop-up window appears to indicate that the process has been completed (Figure 2). On the pop-up you also see the identification of the payment run.
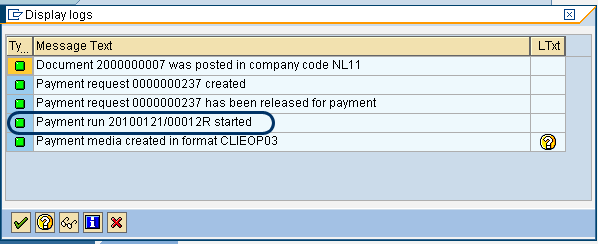
Figure 2
Confirmation the payment file has been created
Step 2. Download the Payment File
You can go to payment program F111 in two ways. The first is directly from transaction FIBLAPOP. On the menu in transaction FIBLAPOP, select Environment > Payment Program or press Shift+F1 (Figure 3). You can also follow menu path Accounting > Financial Accounting > Banks > Outgoings > Automatic Payment > Payment Requests.
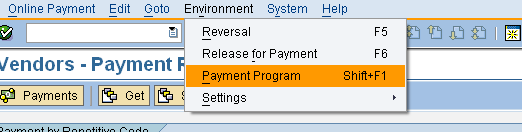
Figure 3
Jump to the payment program from transaction FIBLAPOP
Transaction F111 is similar to transaction F110 and therefore the functionality of this transaction is not further explained in this article. Transaction F111 shows the same information as shown in Figure 2 on the marked line. Figure 4 shows the main screen of transaction F111 with the run date and the identification. The main difference between transactions F110 and F111 is that transaction F110 uses financial documents as inputs for the creation of the payment file, whereas transaction F111 uses payment requests as inputs.
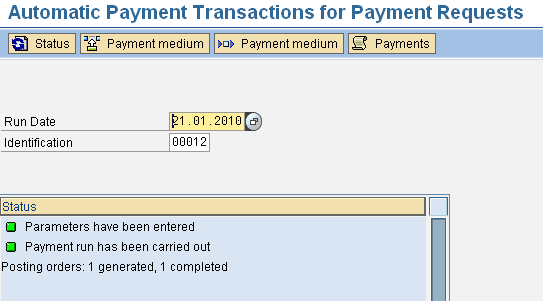
Figure 4
Main screen of transaction F111
The parameters for the payment run with transaction F111 show how it is different from transaction F110. Display them by selecting menu Edit > Parameters > Display (Figure 5). These parameters are the paying company code, the payment method, and the payment request number. Transaction FIBLAPOP generated these parameters automatically. The parameters also show that you can select general ledger accounts and payment requests as the dynamic selection, both of which are not possible in transaction F110. You can see that the number of the payment request that was generated in step 1 of the process was automatically generated. The download of the payment file is done the same way as with transaction F110.
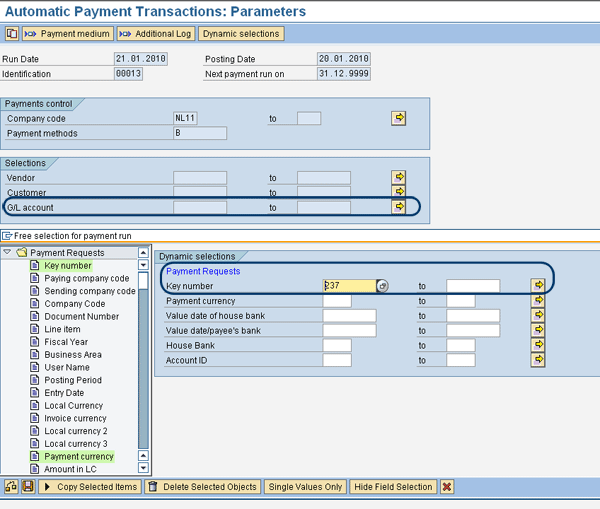
Figure 5
Payment run transaction F111 and its parameters
The Most Elaborate Procedure
From an internal control point of view, you might prefer that one user create the payment request and another release it. The most elaborate procedure has the best possibilities for segregation of duties because it uses SAP authorization. It also allows you to combine several payments in one payment file. I’ll describe the steps in this procedure next.
Step 1. Create the Payment Request
The payment request is created in the same way I described in the simplest procedure. The only difference is that after you click the Payments button, you see a pop-up window indicating that the payment request has been created, but not released (Figure 6). When you compare Figure 6 with Figure 2 you can see that the next step is to release the payment request. Before you release the payment request you can create additional payment requests. Then, in the next step, you can release all payment requests simultaneously.
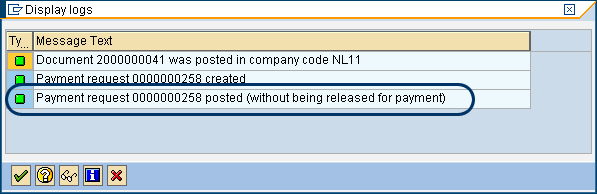
Figure 6
Creation of payment request without release
Step 2. Release the Payment Request
The payment request created in the previous step must be released by a different user than the one who created it. This is standard functionality. Use transaction F8REL or follow menu path Accounting > Financial Accounting > Banks > Outgoings > Release Payment Requests (Figure 7). On the selection screen, enter the company code and the entry date as selection criteria.
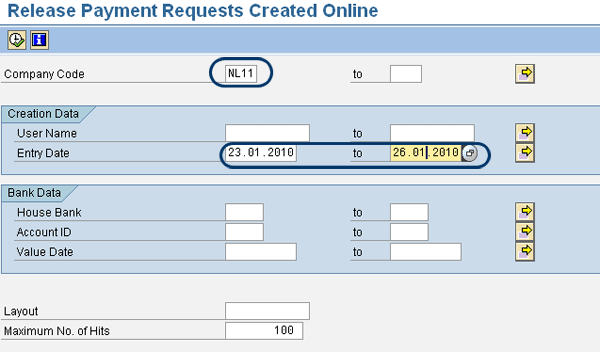
Figure 7
Transaction F8REL to release payment requests
On the overview screen, you see the unreleased payment request marked with a red traffic light (Figure 8). To select the payment request you want to release, place a check mark in the box in front of the traffic light and click the Prebook button with the green check mark. This selects the payment request. The traffic light changes to green. Now you can release the payment request by clicking the Payments button with the green flag. A message confirms the release of the payment request.

Figure 8
Overview of unreleased payment requests
The release of the payment request results in a posting. Use transaction FB03 to display the document (Figure 9). It is a debit posting on the vendor account and a credit posting on the clearing account that was defined in customizing.
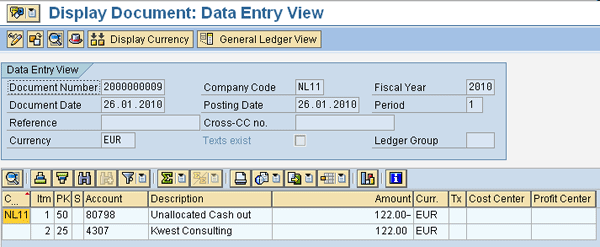
Figure 9
Posting as result of releasing the payment request
Step 3. Run the Payment Program F111
In the next step of the procedure you must set up the payment run manually. Use transaction F111 and fill the parameters as shown in Figure 5. It is not necessary to enter the payment request number. The result of transaction F111 is also a posting (Figure 10). It is a debit posting on the clearing account that is also used for the released payment request, and a credit posting on the bank clearing account. The account to be used is defined in the settings for the payment run.
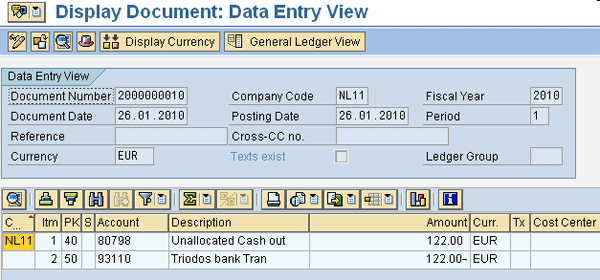
Figure 10
Posting as result of the payment run
Note
The two postings resulting from this scenario are also made when you use the simplest procedure. You always generate two postings.
Step 4. Download the Payment File
This is already discussed in step 2 of the previous procedure and is the same here.
Other Possible Procedures
There are two other possible procedures. Which procedure you use depends on the customizing settings.
In the third procedure, you can automatically release the payment request and start the payment run as a separate step. This combines step 1 and step 2 of the previous procedure, and step 3 is still separate. This procedure allows separate users for the payment requests and for the payment run. It also allows you to combine several payment requests in one payment run.
In the fourth procedure, the payment request is released automatically and the payment run is started automatically, but the payment file still has to be created manually. This procedure combines step 1, step 2, and part of step 3 of the previous procedure. This allows separate users for the payment requests and for the creation of the payment file.
Note
The most elaborate procedure and the third one mentioned in this section allow better control over the payment run because you activate the additional logging in the payment run. The additional log shows more information on errors.
Payment Requests vs. Invoices
Two important differences exist between payments based on payment requests and payments based on open items (e.g., invoices). The first difference is that payments based on payment requests do not clear the open item. They only create new financial documents, which have to be cleared manually with an open item.
The second difference is that for payments based on payment requests a reference text is used, and for payments based on open items a reference document number (e.g., an invoice number) is used. This means that you must check whether the payment medium format, which defines the format of your payment file, picks up the reference text. If not, you may have to create a new payment medium format and payment method, especially for the online payments. You need to set up the new payment method with transaction FBZP and allocate the new payment medium format to this payment method.
Customizing
To use transaction FIBLAPOP, you need to make a few customizing settings. Most of these settings concern the settings for the payment program. However, if you have already made the customizing settings for the transaction F110, you don’t need to do this. As it only makes sense to use transaction FIBLAPOP if you also use payment transaction F110, the settings for the payment program aren’t discussed. You can use transaction FBZP to make the settings for the payment program. The customizing settings are part of bank accounting.
Step 1. Define Number Ranges for Payment Requests
You need to define a number range for the payment requests that are created with transaction FIBLAPOP. With transaction F8BM, you can maintain the number range. You can also start this transaction by following IMG menu path Financial Accounting (New) > Bank Accounting > Business Transactions > Payment transactions > Payment request > Define Number Ranges for Payment Requests. You must define number range 01 and make the numbering internal.
Step 2. Define Clearing Accounts for Cross-Country Bank Account Transfers
When you create a payment using the payment request, two accounting documents are created (Figures 9 and 10). These postings use a clearing account. In my example, it is account 80798. With these customizing settings you define which account is to be used. You can start this customizing transaction by following IMG menu path Financial Accounting (New) > Bank Accounting > Business Transactions > Payment transactions > Online Payments > Define Clearing Accounts for Cross-Country Bank Account Transfers (Figure 11). You need to define one general ledger account per company code.

Figure 11
Settings for the clearing accounts used in payment requests
Step 3. Define Global Settings
These settings determine which parameters are defaulted in transaction F111, such as those shown in Figure 5. In this example the parameters are vendor, customer, and general ledger accounts. In principle, these settings are not required but sometimes it is easier to select them on a vendor or general ledger account than to select with dynamic selections. You can start this customizing transaction by following IMG menu path Financial Accounting (New) > Bank Accounting > Business Transactions > Payment transactions > Payment Handling > Define Global Settings (Figure 12).
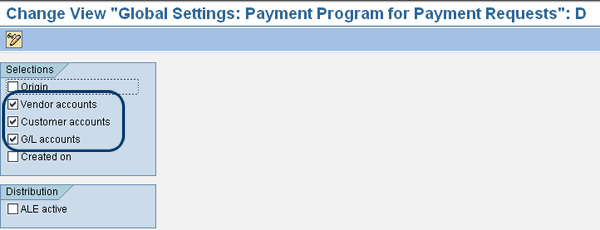
Figure 12
Global settings payment program for payment requests
Step 4. Define Account Determination
These settings determine which bank clearing account is used by transaction F111. It is the same account as the second account shown in Figure 10 (93110). You can start this customizing transaction by following IMG menu path Financial Accounting (New) > Bank Accounting > Business Transactions > Payment transactions > Payment Handling > Bank Clearing Account Determination > Define Account Determination.
You can also maintain the settings with transaction F11CU. In this transaction, you see a number of menu options and then you have to click the Bank determination button. You then define the clearing account for your bank and payment method. You can only use a payment already defined either in the settings for transaction F110 or F111. The settings for the two payment programs are almost identical, but the account determination is not. Therefore, you must be very careful when making the settings for the bank clearing account — you must use the same account you defined in the settings for transaction F110.
In Figure 13 you can see the settings I used. The top of this figure shows the settings for the payment request (i.e., for transaction F111) and the lower part for the standard payment program (i.e., transaction F110). Figure 13 confirms that my settings are consistent. There is a special transaction to check the consistencies of the settings. Use transaction F8BH or follow IMG menu path Financial Accounting (New) > Bank Accounting > Business Transactions > Payment transactions > Payment Handling > Bank Clearing Account Determination > Check Account Determination.
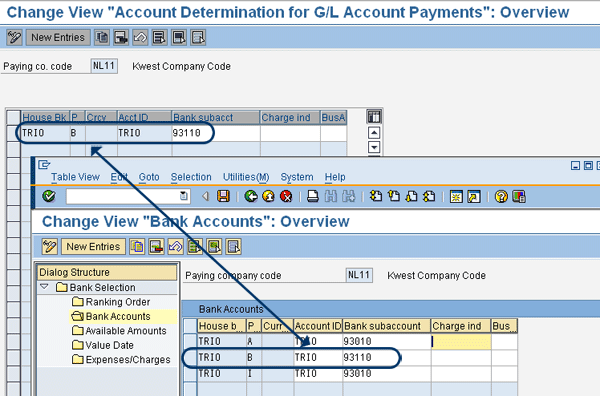
Figure 13
Consistent settings for payment method
Step 5. Define Process Steps
With these settings, you define which procedure you want to use for transaction FIBLAPOP. You can start this customizing transaction by following IMG menu path Financial Accounting (New) > Bank Accounting > Business Transactions > Payment transactions > Online Payments > Define Process Steps.
When you start this transaction, you arrive at a screen in which you must select the origin for which you want to make the settings. The origin stands for the SAP R/3 or SAP ERP component for which the payment request is to be created. Three origins are standard in the SAP system: one for vendors, one for customers, and one for a free-form payment. For transaction FIBLAPOP, you must select the vendors (FI-AP-PR). When you double-click the selected line, you see the detail screen shown in Figure 14.
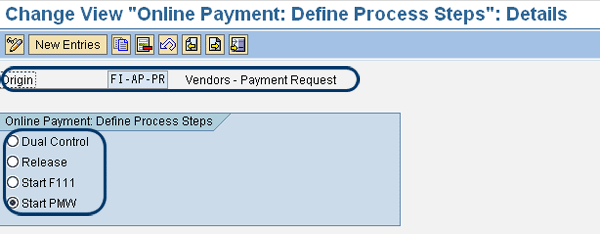
Figure 14
Define the process steps for transaction FIBLAPOP
At the top of the screen you see the origin, and below that you see the four options from which you can choose. The meaning of the four selections is:
- Dual Control: When chosen, only the payment request is created. Another user still has to release it and the payment run has to be started manually. I described it in this article as the most elaborate process.
- Release: When chosen, the payment request is created and automatically released. The payment run must be set up manually.
- Start F111: When chosen, the payment request is created and automatically released. The payment program is also started automatically, but the payment file has to be created manually.
- Start PMW: When chosen, the payment request is created and automatically released. The payment program is also started automatically, including the creation of the payment file. I described the process in this article as the simplest procedure. (PMW stands for Payment Medium Workbench.)
In principle, these are all the settings required. You can use some optional settings to deviate from the standard settings for the payment run. For example, you can choose a different document type.
Note
Besides transaction FIBLAPOP, there is also a transaction called FIBLAROP. This transaction works the same as FIBLAPOP, but it is used for customer payments.
Kees van Westerop
Kees van Westerop has been working as an SAP consultant for more than 25 years. He has an MBA degree in mathematics and a degree in finance. Kees has been concentrating on the financial modules, especially in general ledger accounting, cost center accounting, and consolidation. He also has a great deal of experience with rollouts of kernel systems and integrating finance and logistics.
You may contact the author at keesvanwesterop@hotmail.com.
If you have comments about this article or publication, or would like to submit an article idea, please contact the editor.


