SAP ERP Central Component (ECC) includes more robust functionality for intercompany reconciliation during period-end closing. The reconciliation ledger helps to reconcile balances between companies and tags disputed or follow-up items. See how the intercompany reconciliation process works and how to handle the differences.
Key Concept
An intercompany process can be any of following:
- Intercompany posting within the G/L using transaction OBYA (cross-company code postings)
- Intercompany posting through FI/CO posting during allocations
- Intercompany posting through sales order intercompany billing to the G/L for drop shipment (e.g., an intercompany sales order where the selling company drops shipment)
- Intercompany posting through stock transport purchase order for material transfer
The system reconciles all of these transactions between companies during month-end.
During month-end closing, one of the most challenging tasks for any company is reconciling intercompany balances to zero. Accountants need to find the documents that cause intercompany differences, follow up, and make adjustments. I’ll show you how to use SAP functionality to reconcile the intercompany balance automatically and find those documents causing the difference. I’ll also explain how to handle unreconciled documents, mark those documents with actions taken, and post an adjustment entry. These actions should speed your month-end account closing.
The intercompany reconciliation process in SAP ERP Central Component (ECC) enables faster reconciliation of balances between companies. The configuration and program that I’ll talk about are entirely new to ECC 6.0. ECC includes some major changes from previous releases, including:
- Data collection. You can collect open items posted between partners of a corporate group from SAP and from non-SAP systems. ECC features reconciliation between the G/L, G/L with open item, and customer/vendor as separate processes.
- Rule-based assignment. You can set up rules that automatically assign intercompany documents based on certain fields.
- Data presentation. ECC includes a user interface geared toward finding the reasons for intercompany differences and supporting communication between accountants involved in the reconciliation process. It also automatically displays documents whose relationships could not be automatically determined or documents that contain posting errors.
I’ll explain the transaction and associated configuration for setting up an intercompany reconciliation process. My example uses an intercompany transaction between company codes 1002 and 1004. Figure 1 shows the three basic steps required for intercompany reconciliation.
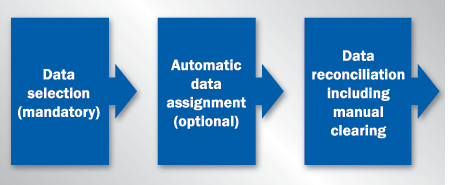
Figure 1
Figure 1 Three-step intercompany reconciliation process
Before I go in depth on these three steps of the intercompany reconciliation process, I’ll discuss the required basic configuration and master data setup.
You can perform intercompany reconciliation in three different manners. You can use G/L accounts that are managed on an open- item basis (001 in the system), use G/L accounts managed on a non-open item basis (002), or use customers and vendors as intercompany accounts (003).
I’ll explain this third intercompany process using customer and vendor as intercompany accounts. I’ve chosen this one because I’ve found that most companies prefer to use process 003 rather than the other two. In my example, process 003 is active and uses table FBICR003A, which is also set to active.
Use transaction FBIC031 or follow menu path SPRO > Financial Accounting (NEW)>Accounts Receivable and Accounts Payable > Business Transactions > Closing > Count > Cross System Inter Company Reconciliation > Preparations in the Reconciliation System > General Settings > Activate Processes (Figure 2).
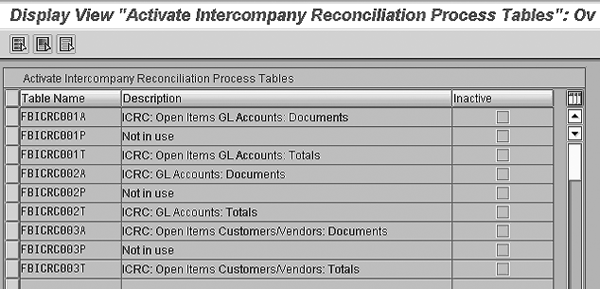
Figure 2
Activate intercompany reconciliation process
In the standard SAP system, the FBICRC003A indicator is active. This is necessary if you want to post to the reconciliation ledger. The system clears receivables from one company exclusively against payables of the other company.
As a result, you can see that by default the Inactive indicator for FBICRC003A in Figure 2 is not checked. If it is checked, the system does not select the original document because the table is inactive. Check the indicator.
You then need to assign the company code to a company, which the system treats as a trading partner. While creating the intercompany customer and vendor, the user assigns the trading partner in the master data. Then the transactions posted to these intercompany customers/vendors flow into the trading partners. The system uses the trading partner to reconcile the balances between companies. Use transaction OX16 or follow menu path SPRO > Enterprise Structure > Assignment > Financial Accounting > Assign Company Code to Company (Figure 3).
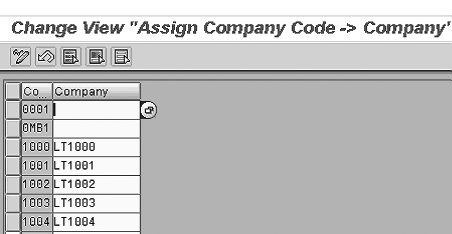
Figure 3
Assign company code to company
I recommend setting up a naming convention for the vendor and customer as APINT/ARINT**** where APINT or ARINT stands for accounts payable intercompany or accounts receivable intercompany, respectively, and **** is your four- character company code.
The user creates the vendor and customer assigning trading partner of the company code by following menu path Accounting > Financial Accounting > Vendor > Master Records > Create and assigning it during master data setup between company codes 1002 and 1004 (Figure 4). In my example, the user created APINT1004 under company code 1002.

Figure 4
Assign vendor master (transaction FK01)
While Figure 4 shows the vendor master created by the user, transaction FK01 shows the vendor master for the customer. Creating vendor and customer master data is a series of steps, but you need to pay attention only to the customer/vendor and trading partner field. You need to select ARINT**** and trading partner LT****, where **** again denotes company code.
The system posts every original intercompany transaction (which includes my example between transactions LT1002 and LT1004) to ARINT1002 and APINT1004. If there is any intercompany transaction between 1002 and 1004, the original document posting posts to ARINT1002 and APINT1004. You can configure this via transaction OBYA and Sales and Distribution (SD)/Materials Management (MM) intercompany postings. Based on this master data setup, the system assigns trading partners to the original documents posted. Based on the trading partner, the system selects documents and posts them in the reconciliation ledger to reconcile.
Now that I’ve covered the high-level requirement of the intercompany reconciliation process configuration and customer/vendor master setup, I’ll look at the three intercompany reconciliation process steps. I’ll start with step 1, which is data selection.
Step 1. Data Selection
Data selection is a preparatory step. The system selects the data to be reconciled from the customer/vendor accounts from the operational systems of the companies that you need to reconcile and transfers it to the reconciliation ledger, not the leading ledger.
In the data selection process, the program pulls the documents from the trading partner’s respective company codes into the reconciliation ledger, which was assigned in ECC when configuring transaction FBIC010.
To perform data selection, use transaction code FBISC3 or FBICR3 or follow menu path Accounting > Financial Accounting > Vendors > Periodical processing > Closing > Check/Count > Cross System Inter Company Reconciliation > Reconcile Document Manually (Figure 5). Then go to the auxiliary program by clicking on the Auxiliary Programs button. This brings up the screen shown in Figure 6, which presents the process steps that I outlined in Figure 1.
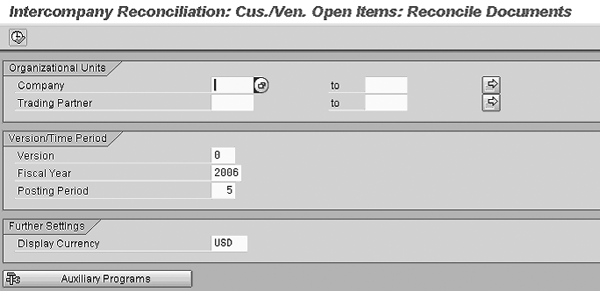
Figure 5
Intercompany reconciliation report for customer/vendor
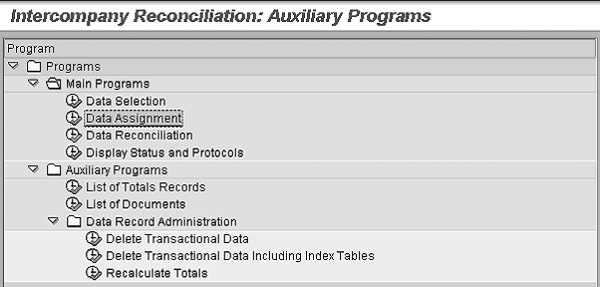
Figure 6
Auxiliary program steps
Execute the transaction to select the data that the intercompany customers and vendors need to reconcile. The system selects open items posted between customers and vendors in the group using trading partners. Based on the trading partners assigned to customers/vendors, the system selects documents posted to these customers/vendors for reconciliation. Data selection is based on a trading partner that brings all customers/vendors assigned to it.
A trading partner is the base for data selection in customer and vendor master records’ respective company codes. The user assigns trading partners to those master records. Then the system assigns trading partners as companies to the company code. It then uses these trading partners to pull the data into a reconciliation database and checks that the entries are posted to both company codes. If the entries are posted to both sides for the same amount with different signs (+ and – signs), then the balance is reconciled (assigned). If not, then the balances are unreconciled (unassigned).
Use transaction FBICS3 or follow menu path Accounting > Financial Accounting > Vendors > Periodical Processing > Closing > Check/Count > Cross System Inter Company Reconciliation > Select Documents to obtain the output that states how many documents the system selected (Figure 7).

Figure 7
Transactions selected to transfer to reconciliation database
In the example in Figure 7, you can see that the number of selected items is 3.
Step 2. Data Assignment
After you select the transaction and update it into the reconciliation ledger, you need to start the automatic assignment of data — in other words, assign the documents that match between group companies. The system assigns the documents that have the same reference number across company codes, and those that have matching amounts. The system completes this automatically so that you see only those unassigned documents that need manual reconciliation. The total of the unreconciled document is the exact amount of intercompany difference.
The end user needs to use transaction FBICA3 or follow menu path Accounting > Financial Accounting > Vendors > Periodical Processing > Closing > Check/Count > Cross System Inter Company Reconciliation > Assign Document Automatically. This transaction takes the user to the screen to run data assignment. Here, the end user assigns the documents that match between company codes in the reconciliation ledger. Based on the configuration that I’ll show you next, when you execute FBICA3 the system assigns only transaction data.
Configuration for Data Assignment
One important part of the configuration for data assignment is setting the key field for matching the documents between company codes. Use transaction FBIC032 or follow menu path SPRO > Financial Accounting (NEW) > Accounts Receivable and Accounts Payable > Business Transactions > Closing > Count > Cross System Inter Company Reconciliation > Preparations in the Reconciliation System > Data Selection and Storage > Companies to be Reconciled (Figure 8).
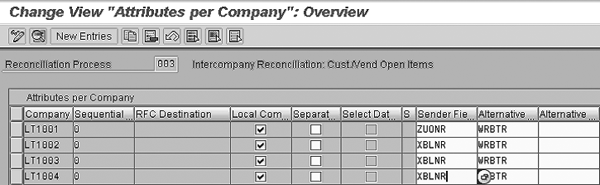
Figure 8
Assign company code to sender field between company documents (transaction FBIC032)
Assign the companies to be reconciled and select the field that you’ll use as a reference number to clear. For example, company 1002 posts the reference number to field XBLNR during posting. You use the same number in the reference field for company 1004. In this example, you enter XBLNR in the Sender Fie… (sender field) column.
In many situations, the system fills the reference number automatically. For example, if you create an intercompany billing document for a drop shipment scenario, XBLNR generates a billing document number as a reference. This billing document creates output type RD04 to post an intercompany entry in the cross- company code. This document also has the same billing number as a reference. This way the system can reconcile intercompany documents automatically. In the case of FI postings only, using a regular cross- company code posting, you can have a reference number that is at the header of the document as a reference for both cross-company code postings. An issue arises only when you post a posting between two companies to independent documents. If the reference number is a mismatch, then the system does not automatically reconcile these documents. You can also configure the system to clear when the amount matches without any reference to XBLNR by using a different field under a different rule, which I’ll discuss next.
Another important piece of configuration to set is rule definition. You need to set this to help form rules to clear a document. Use transaction FBRC005 or follow menu path SPRO > Financial Accounting (NEW) > Accounts Receivable and Accounts Payable > Business Transactions > Closing > Count > Cross System Inter Company Reconciliation > Preparations in the Reconciliation System > Data Reconciliation > Define Rules for Document Assignments (Figure 9).
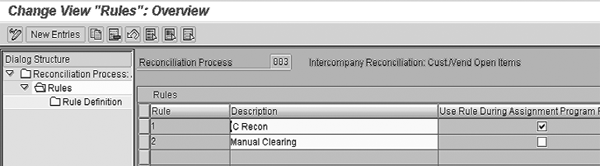
Figure 9
Rules and definition
In Figure 9, you can see a defining rule that is assigned to the reconciliation process — rule 1, described as IC Recon, which is checked off in the Use Rule During Assignment Program Run column. If the indicator is set during data assignment, the system assigns the document automatically. You need to manually assign the documents that the system leaves unassigned.
You can see that there is also a rule for Manual Clearing that is not checked. Documents that do not fit under this rule are unassigned and appear in the Unassigned Data Records box of the reconciliation screen, which I’ll explain later.
You can base the rule definition on many different combinations depending on the design. I’d recommend basing it on the reference document numbers that match between intercompany posting with Dr (debit) and Cr (credit) indicators that net to zero. You can do this in the Rule Definition screen by selecting Not Equal under the Compare column (Figure 10).

Figure 10
Further drilling down into rules and definition
Clearing can be either automatic or manual. I’m not referring to clearing from the customer/vendor account between companies — assignment is only for the purpose of reporting in the reconciliation ledger. FI has a different open item clearing process from other modules. This reconciliation process clears the balances from the FI leading ledger table.
Intercompany reconciliation data assignment does not clear the FI leading ledger table — it just assigns the document in the intercompany reconciliation ledger I3.
Automatic clearing is based on a predefined rule. If the rule is met, the system automatically assigns the entries on both sides — for example, if the document is posted in two different cross- company codes. If the cross-company code document posting has the same reference number and the amount of debit and credit nets to zero, the system assigns these documents, meaning they do not show up in the report as the system cleared the transaction.
In some cases, an intercompany reconciliation report may show unreconciled balances. Let’s say the system posted a cross-company code transaction, but one company did not agree to the transaction and reversed it. The document was reversed in one company code but not in the other, causing an intercompany balance difference. The system would not assign these sets of documents unassigned. You can clear this difference manually or you can set up rules for the system to do it automatically. Check off the check box in the Use Rule During Assignment Program Run column in Figure 9 for the rule you want to set (in my example, IC Recon) so the system automatically clears the balances. If you do not select it, you’ll need to clear the balances manually.
Now that I’ve selected data and assigned documents to the data that they match, I’ll show you the last step in the reconciliation process.
Step 3. Interactive Data Reconciliation
Figure 11 shows a report that is the ultimate output for reconciliation and the unassigned documents between group companies. You can reach this screen by using transaction FBICR3 or following menu path Accounting > Financial Accounting > Vendors > Periodical Processing > Closing > Check/Count > Cross System Inter Company Reconciliation > Reconcile Manually.

Figure 11
Intercompany reconciliation (transaction FBICR3)
When you work on these unassigned documents, you can assess why they are not reconciled between companies. If there are any issues, you can put a follow-up status on the document. In the transaction, choose the document that needs further attention.
The screen in Figure 11 consists of four sections. The left pane is the structure tree and includes the company, partner, and object groups. The top-middle pane contains unassigned open items of the company and the top-right pane shows unassigned open items of the partner. The bottom-right pane shows assigned open items that do not balance to zero.
In the example report in Figure 11, on the left side you can see that the difference between company codes 1002 and 1004 is $750.04. The amount the system cleared is shown at the bottom of the screen: $162,507.79. This means that the entry is posted in both company codes 1002 and 1004 because documents at both company codes are cleared/assigned.
In the top-right section of the screen, you can see the unassigned transaction between the company and partner entries. An accountant will follow up during the closing process with an adjustment posting to reconcile the intercompany balance.
Transaction 530001300 for $200 is posted and cleared in the partner company code but still shows up as unassigned. Let’s say an accountant follows with the other company to find the document number.
The other company code gives the document number, which is open in the partner company code. You know the functionality cleared, but the system does not recognize it because the reference number is incorrect. You can clear this manually, which clears the item from the unassigned data records and puts it in the assigned values in the bottom pane.
Select the unreconciled item (transaction 530001300 in this case) and assign this document manually. Based on the follow-up, the accountant knows functionally that document 530001300 should be assigned against 7000000000 but technically it is not. Both of these documents appear in Figure 11 as unassigned.
The accountant receives a confirmation screen in which the two documents appear in one line item (Figure 12).
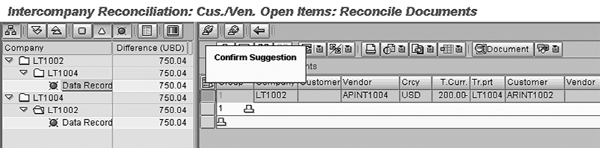
Figure 12
Intercompany reconciliation to confirm suggestion to clear the balance
He can choose both documents and click on the assign data records icon in Figure 11. If the assigned documents do not balance to zero, they appear as a document group in the lower part of the screen. If the assigned documents balance to zero, they are no longer displayed in the lower part of the screen unless you click on the Without Differences button. Click on the Without Differences button to see documents that you need to clear or assign.
After you select a data record and one of the rules defined in Customizing, the system proposes suitable data records of the partner in a list for assignment. In this list, click on the confirm assignments icon. When you confirm an assignment, the system assigns the concerned data records to a new document group. When you reject an assignment, the data records remain in the worklist. You can return to the main display at any time via the back icon. All proposals not confirmed up to this time remain in the worklist. For example, you have to check the proposals for a rule in which the two documents have different reference numbers, but the same document date, transaction currency, and transaction currency amount.
When companies have intercompany reconciliation disputes or issues, they need to reconcile these disputes after follow-up with the affected departments. You can do this using two icons.
With the set status icon, you can indicate the different statuses of processing open items in the list according to Customizing. Click on the set status icon and follow menu path Processing Status > Requested Correction Posting.
You can contact the clerk if there are any discrepancies that you need to resolve. To do this, you can use templates that you can adjust to meet your requirements. Select the appropriate recipient from the contact person database. This enables you to prepare possible adjustment postings. You can then send email to end users with the attachment of the open unassigned item or correspondence about a document which is under dispute. Click on the send email icon and, in the resulting pop-up screen, select Send Mail Using Template.
Configuration for Status
Figure 13 shows status icons and values that you can configure. This helps clarify what actions resolve a dispute regarding unassigned documents. Use transaction FBRC006 and follow menu path SPRO > Financial Accounting (NEW) > Accounts Receivable and Accounts Payable > Business Transactions > Closing > Count > Cross System Inter Company Reconciliation > Preparations in the Reconciliation System > Data Reconciliation > Define Possible Status for Documents. You add the status field for field name CSTAT and choose a different status and related icon. For unassigned documents, you can flag one of these icons to show the current status on this document.

Figure 13
Status icons and values that you can configure
Srihari Subramaniam
Srihari Subramaniam is an SAP manager at Capgemini US LLC, with 14 years of experience in SAP consulting. He has thorough knowledge in the integration of SD, MM, FI/CO, POS DM and PP. Srihari has worked in projects for industries such as high-tech manufacturing, telecommunications, chemical, retail (IS-R), and apparel.
You may contact the author at srihari.subramaniam@capgemini.com.
If you have comments about this article or publication, or would like to submit an article idea, please contact the editor.