SAP Fiori Application Development in the Cloud
Building, Deploying, and Mobilizing Applications for Today’s Enterprises
The cloud is not only changing the way organizations deploy their applications — it is changing the way those very applications are built. The cloud opens the door to a low-cost, high-return approach to development that enables anytime, anywhere access to the latest tools, features, and functionality with no need for additional infrastructure investment.
With SAP HANA Cloud Platform, SAP brings these same benefits to its customers, along with access to innovations such as the real-time processing capabilities of SAP HANA and the sophisticated user experience enabled by SAP Fiori and SAPUI5, SAP’s adaptation of the HTML5 standard. And with the addition of intuitive browser-based tools, such as SAP Web IDE, to the SAP development tool portfolio (see the sidebar “SAP Development Platform Overview”),1 and access to the cloud-based SAP Mobile Secure portfolio for managing mobile applications, customers can quickly and easily build, deploy, and create mobile versions of full featured, high-performing, elegantly designed applications — all from within a browser. And not just developers — business users can now create prototypes without the assistance of developers, freeing developers to focus on core projects and allowing business users to see their ideas in action.
To demonstrate how simple this is, this article walks through the development of an SAP Fiori application using SAP Web IDE in SAP HANA Cloud Platform, and how to use SAP Mobile Secure to create a mobile version that can leverage device capabilities, such as camera features. Figure 1 shows the example application displayed in a web browser.2 As you can see, it is a simple master/detail application for reviewing damage reports and managing claims, with a set of claims listed on the left and details for a selected claim displayed on the right, including a section for a diagram or photo and fields for comments, amounts, and approvals.

Let’s see how easy it is to get this application up and running.
Accessing SAP HANA Cloud Platform
The trial edition of SAP HANA Cloud Platform is available free of charge at https://account.hanatrial.ondemand.com. All you need to register is a valid SAP Community Network (SCN) user account. Logging in with your SCN credentials automatically generates a trial SAP HANA Cloud Platform developer account, and takes you to your account dashboard in the SAP HANA Cloud Platform cockpit (see Figure 2), where you can view the status of applications and services in use with your account. The cockpit also displays a list of categories that provides access to more detailed information about your account, your applications, and the functionality you need to develop, run, deploy, and manage your cloud-based applications. There are three categories in particular that are important for application development: Services, Destinations, and Subscriptions.

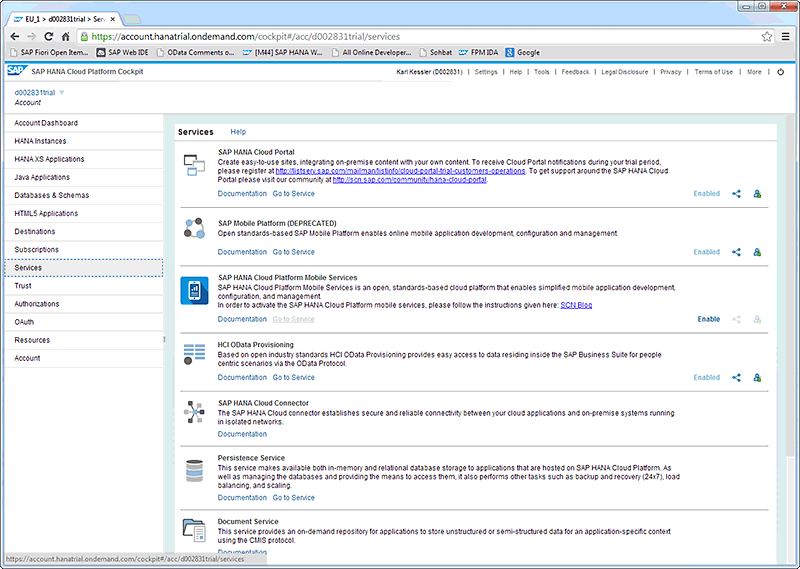
The Services category lists the services available for development use, along with links to related documentation (see Figure 3). There are a wide variety of services available for various needs, including an SAP HANA Cloud Portal service for on-premise and on-demand content mashups, an SAP HANA Cloud Integration OData provisioning service for providing on-premise content to on-demand applications, an SAP HANA cloud connector service for secure on-demand and on-premise connectivity, a persistence service for accessing SAP HANA or traditional relational databases, and a document service based on the CMIS standard3 that stores structured and unstructured data for use in applications in an on-demand repository. For simplicity, we will use basic SAP Web IDE capabilities to create the example, rather than the more comprehensive functionality included in these services.
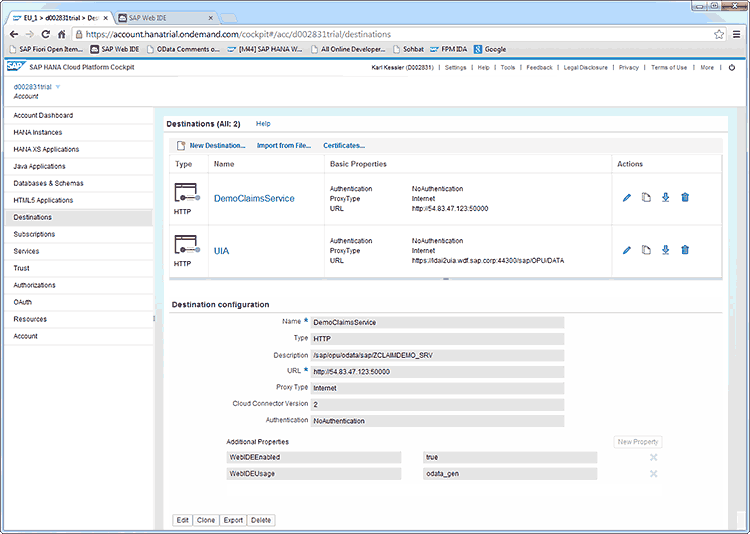
The Destinations category lists the connectivity destinations for your applications — so you can connect your application to an on-premise system or internet service, for example. Here, you can view the details of existing destinations as well as create, edit, delete, import, and export additional destinations. For the example application, we create a DemoClaimsService destination (see Figure 4) based on a demo OData service that is publicly available to SAP customers from https://demo.abap.ondemand.com (which resolves to https://54.83.47.123). We specify the type (HTTP); a description (the name of the OData service to be used); the URL of the publicly available demo OData service plus the HTTP 50000 port; a proxy type; a cloud connector version; rules for authentication; and two additional properties to enable its use with SAP Web IDE.
The Subscriptions category lists all of the built-in tools and services to which you are subscribed, such as SAP Web IDE, along with the application’s state and version information (see Figure 5). You can access the applications directly from this page by simply clicking on its hyperlinked name, which is how we launch SAP Web IDE to create our example application.

Building the SAP Fiori Application in SAP Web IDE
SAP Web IDE is a web-based development environment that is included with SAP HANA Cloud Platform. It simplifies and streamlines development with anytime, anywhere accessibility and user-friendly features and tools, including automated code generation and completion functionality as well as a rich set of templates that automate many development tasks.
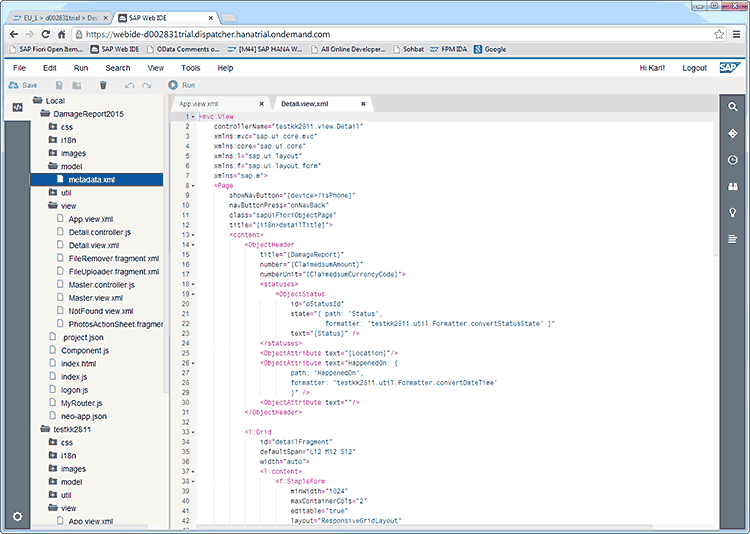
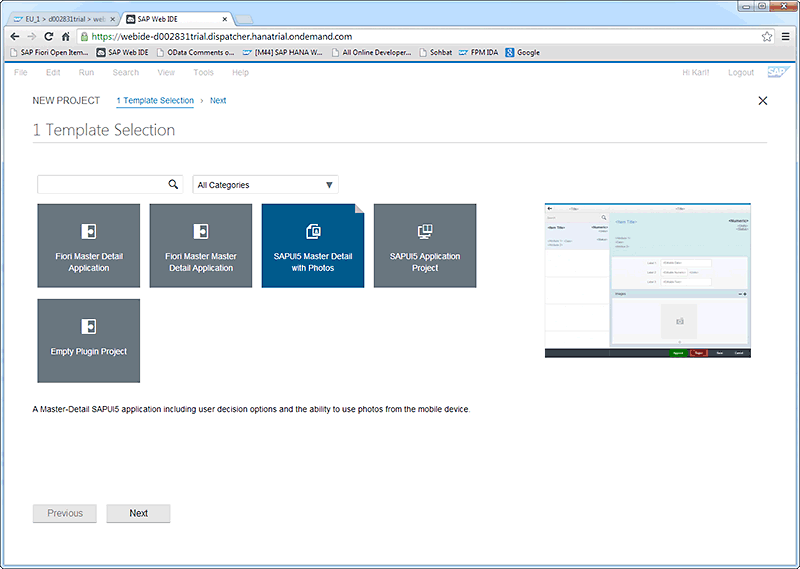
To create the example application, start at the SAP Web IDE main screen (see Figure 6). On the left is the artifact tree, where you can see the applications you’ve created and their associated project outlines, which contain all the artifacts that make up an application. On the right is the source code editor, where you can edit the artifacts of your applications. To create a new application using a template, select File > New > Project From Template from the main menu, which launches the New Project wizard (see Figure 7). Since we are creating a master/detail application with the ability to include an image, we choose the SAPUI5 Master Detail with Photos template.4
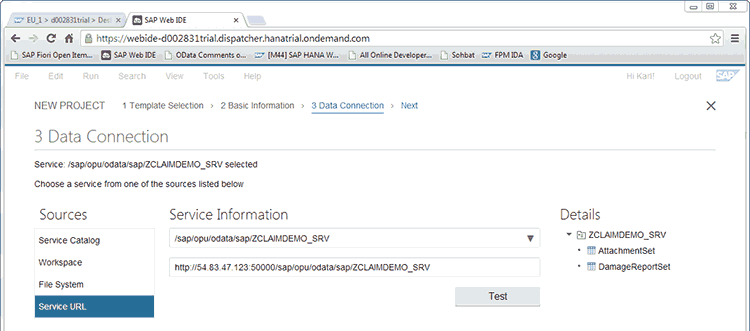
On the next screen, specify the project name (DamageReport2015), and on the following screen (see Figure 8), specify the data connection — for the example, the OData service we created previously under Destinations in the SAP HANA Cloud Platform cockpit. Under Sources, select Service URL and under Service Information, specify the system and URL we defined for the service earlier in the Destinations configuration. You can easily test the availability of the service and check its metadata, which is displayed under Details. The OData service ZCLAIMDEMO_SRV consists of the entityset DamageReportSet and an associated AttachmentSet (for attaching diagrams or photos describing the damages being claimed).
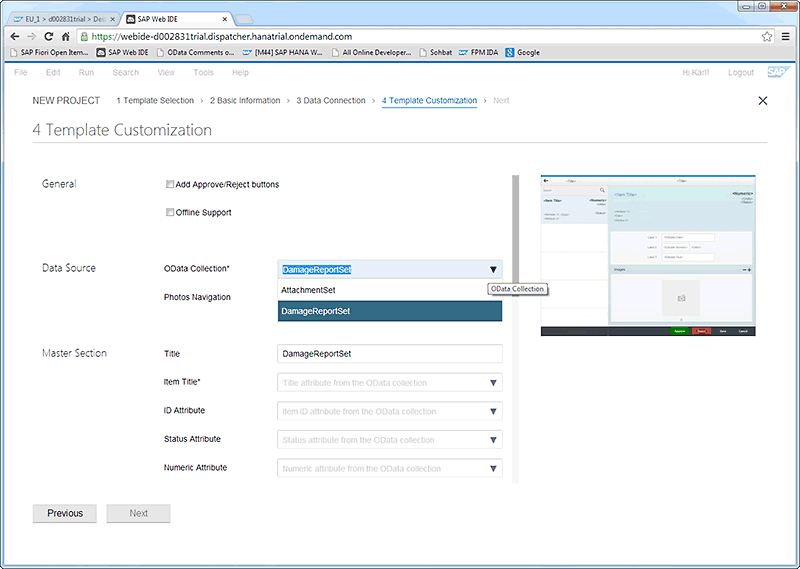
On the next screen, bind the entityset and attributes from the OData service to the resulting SAP Fiori user interface. Specify the entityset (DamageReportSet) for the data source (see Figure 9), which populates field selections for the entire template (see Figure 10 and Figure 11), enabling you to select the appropriate value for each field without having to refer to the full specifications of the underlying service. Mapping the corresponding OData fields is very intuitive, and some input fields — such as ID, status, and numerical and date attributes — are equipped with context-sensitive help. An image of how the template will look in the SAP Fiori user interface is also displayed — you can view the exact position of the various attributes by clicking on this image to enlarge it.


Our work is essentially complete — on the following screen, click on Finish, which takes you to the main SAP Web IDE screen, where the finished application is now included in the artifact tree. From there, you can add fields and manipulate the layout of the detail view, for instance, using a WYSIWYG layout editor (see Figure 12) by right-clicking on detail.view.xml in the artifact tree and selecting Open With > Layout Editor. You can also run the application in preview mode by selecting the start page (index.html) in the artifact tree and clicking on Run in the menu bar. The resulting application (DamageReportSet) is then displayed in your browser with an item selected ready for claims review (see Figure 13).


Deploying the Application to SAP HANA Cloud Platform
We can now deploy the application to SAP HANA Cloud Platform to enable other users to use our service from the cloud.5
Deployment is simple — right-click on the project folder for the application (DamageReport2015) in the SAP Web IDE artifact tree, and from the context menu select Deploy > Deploy to SAP HANA Cloud Platform.
At the prompt, provide your SAP HANA Cloud Platform account details and the version information for the application (for the example, create a version 1.0), and click on Deploy. After successful deployment, return to the SAP HANA Cloud Platform cockpit to activate the application. Go to the HTML5 Applications category, click on the application name (damagereport2015), and select Version Management (see Figure 14). Activate the application, which generates a public URL that you can share, allowing the SAPUI5 application to be launched in any web browser. Figure 15 shows the deployed application displayed in a Safari browser.


Taking the Application Mobile with SAP Mobile Secure
While the application can be viewed in any browser, including browsers on a mobile device, it cannot integrate with mobile device hardware, such as camera functionality, from within a browser. To fully leverage mobile device capabilities, the application must be deployed as a true mobile app.
To turn our example application into a true mobile app, we use SAP Mobile Secure, which provides a mobile app configuration service for wrapping and deploying SAP Fiori and SAPUI5 applications to Mobile Place — a customizable, secure, cloud-based enterprise app store, included with SAP Mobile Secure, that organizations can use to provision Android or iOS-based apps. With this approach, the mobile app acts as a container — the original SAPUI5 application runs inside this container, only now with full access to the device environment. This approach also allows the same SAPUI5 application to run on different device types, such as Android and iOS, with local device context provided by the particular mobile container app.
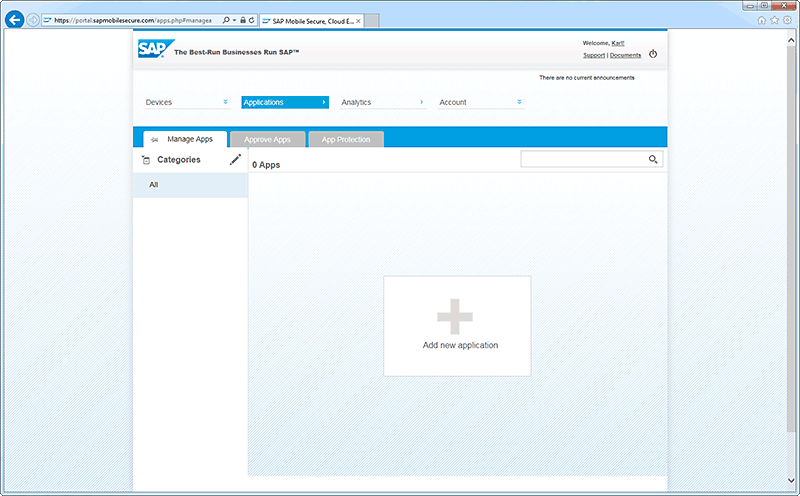
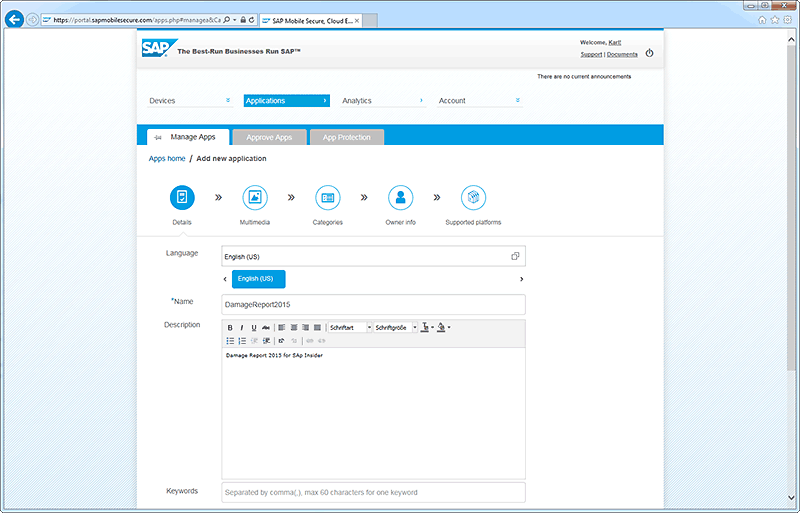
A free trial edition of SAP Mobile Secure is available at https://portal.sapmobilesecure.com/free_trial.php. After logging into the SAP Mobile Secure portal, go to the Applications console (see Figure 16), where you can manage your mobile apps and later publish them to Mobile Place. To wrap our example application as a mobile app, click on Add new application. Specify an application type (Fiori Application) and provide basic details for the app, such as a language, a name, a description, and any keywords (see Figure 17). Next, provide any multimedia files, such as an icon image or a banner image (see Figure 18). Then assign the application to any relevant Mobile Place categories and specify any additional owners for the application, who will appear as contacts for the application in Mobile Place.

Next, specify the supported platform (iOS or Android) for the app. Click on Get Started and select the OS platform (iOS for this example); the base URL of the SAP Fiori application (the public URL generated during deployment in SAP Web IDE); and any additional images, such as a splash screen, for the app (see Figure 19). For authentication and security reasons, you next need to sign your app and add a provisioning profile. For iOS, you obtain these certificates from the Apple Developer Program (either from the Apple web page or from the XCode development environment). For Android, you need to generate a keystore file with the command line utility “keytool” (found in your local JDK binary directory). Next, add any necessary multimedia, such as videos and screenshots, any required documentation for the app, and any trial users who can test the app before it is published. Once the app is approved and deployed by the Mobile Place app catalog administrator, it is available in your organization’s Mobile Place (see Figure 20).


Installation is easy — simply click on Install on the app’s detail page in Mobile Place (see Figure 21). The system immediately deploys the app and installs it on your device (see Figure 22), where it can be launched right away from your home screen (see Figure 23). Figure 24 shows the resulting app opened on an iPad.


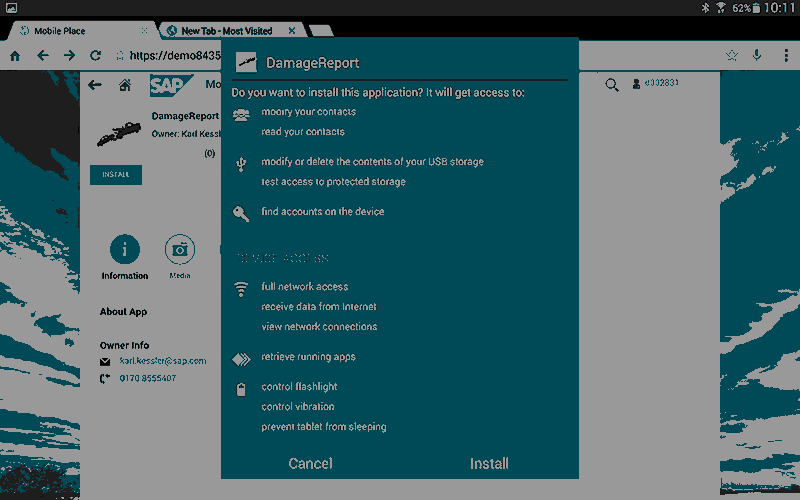
Figure 25, Figure 26, and Figure 27 show the app available in an Android Mobile Place, selected for installation, and installed on an Android device.


Summary
Building and deploying an SAP Fiori application with SAP HANA Cloud Platform is fast, simple, and secure. SAP HANA Cloud Platform comes with many pre-integrated services to streamline development tasks, and gives you access to web-based tools such as SAP Web IDE to enable anytime, anywhere access to an intuitive development environment. And thanks to the templates and wizards offered by SAP Web IDE, you can generate full-featured prototypes without a lot of coding work. From there, using the infrastructure offered by SAP Mobile Secure and Mobile Place, you can quickly and easily deploy your SAP Fiori application as a true mobile app that can leverage the functionality of the device environment.
No need to take our word for it. There are free trials available for each of these platforms and tools. Take a test drive and see for yourself what they — and you — can do.
1 Learn more about SAP’s development tool portfolio in the article “A Guide to SAP’s Development Environments for SAP HANA and the Cloud” in the January-March 2015 issue of SAPinsider. [back]
2 While SAP Web IDE works best in a Chrome browser, it also works with Firefox as well as Internet Explorer (minimum version 10). [back]
3 The Content Management Interoperability Services standard defines how content management systems interoperate using web protocols. [back]
4 While some of the template names reference SAPUI5 instead of SAP Fiori, each SAP Web IDE template generates an SAP Fiori application. [back]
5 Since the application is pure SAPUI5, you could, in principle, also deploy it to an ABAP stack if you would prefer an on-premise deployment with the convenience of cloud-based development. [back]


