/GRC
Analyze and properly maintain your exposures in SAP Exposure Management before transferring them to SAP Hedge Management.
Key Concept
Buying and selling goods or services in foreign currencies can expose an organization to foreign exchange rate risk. The risk arises due to unfavorable movements of exchange rates between the foreign currency and the local currency. A foreign exchange exposure refers to the currency risk in a transaction due to exchange rate fluctuations. Placing a foreign exchange hedge can help to manage foreign exchange rate risks.
SAP Exposure Management, a part of the SAP Hedge Management solution, manages foreign currency risk based on up-to-date financial facts from business transactions in the system. It tracks foreign currency exposures and enables the transfer of the exposure to Hedge Management. Hedge Management controls all hedging activities in line with International Accounting Standard (IAS) 39 and Financial Accounting Standings Board Statement (FAS) 133, which require hedging transactions to be linked to exposures. Hedge Management, without Exposure Management, is standard with all SAP releases since R/3 4.7. Exposure Management is available in SAP ERP Central Component (SAP ECC) 6.0 systems.
We show you how to create, edit, analyze, and release exposures. You then transfer the exposures to Hedge Management, where you can link the exposure to the derivative (hedging) transaction to comply with accounting regulations and apply standard hedge accounting rules.
Create Raw Exposures
Exposures are values of transactions such as purchases, sales, investments, borrowings, and forecasts of sales and purchases denominated in foreign currency. These exposures may or may not originate in your SAP system. They are called raw when they are initially processed in Exposure Management. You can use SAP Cash Management to view a report on foreign exchange exposures by currency. However, SAP does not currently have a standard upload program to upload exposures from Cash Management.
Besides uploading exposures through ABAP programs into Exposure Management, you can also enter raw exposures into Exposure Management manually using transaction TEM10 (
Figure 1). You can also follow menu path SAP menu > Accounting > Financial Supply Chain Management > Treasury and Risk Management > Transaction Manager > Hedge Management > Exposure Management > TEM10 – Maintain Raw Exposures.
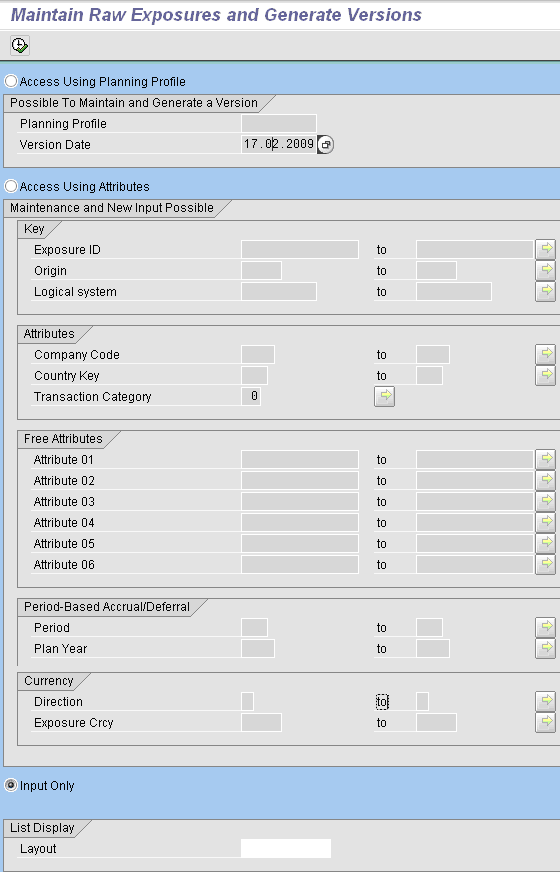
Figure 1
Enter raw exposures
Enter new exposures by checking the Input Only radio button and clicking the execute icon (
Figure 2). Alternatively, you can check the Access Using Attributes radio button, but with new exposures it is best to use the Input Only option because it enables entry of all raw exposures regardless of the planning profile and attributes for the exposure.

Figure 2
Enter new exposures
Add a line to enter the exposure by clicking the insert icon. You can add more lines by the same process. You can enter the Period and Year fields here, or they can be automatically filled when you release or version-generate the exposures. Version generation refers to finalizing (or versioning) exposures so that they can be analyzed and compared (with other versions) before a transfer to Hedge Management. The period depends on the type of planning year variant. For example, if the planning year variant is K4 (calendar year) with the exposure date of March 15, 2007, the period is 3 and the year is 2007. If the planning year variant is based on calendar-year quarters, then the period for this exposure is 1. Save the raw exposure by clicking the save icon and the system produces a confirmation message that says the changes saved successfully.
Analyze and Edit Exposures
After you have entered the exposures, the user can analyze the raw exposures and make any changes if needed. The user can also do this through the radio buttons mentioned earlier in transaction TEM10. Note that if you use the Access Using Planning Profile radio button, the system only produces the raw exposures of that planning profile and you cannot make any changes to most attribute fields. The only changes you can make are to the Exp.Amount, Reference, and Text fields (
Figure 3). The display also does not list any of the attributes that are not checked for the planning profile. If you have checked Attribute 1 but not other attributes in the planning profile, then only Attribute 1 shows up in the display.

Figure 3
Analyze and edit exposures by planning profile
Ideally, you can use this option to change the amount fields to reflect any reduction or increase in exposures that have already been versioned and transferred to Hedge Management. On the other hand, if you are using the Access Using Attributes radio button, you can filter the raw exposures using the various attributes to display only those exposures meeting the specific requirement. The display thenlists all the attributes, whether they are checked in the planning profile or not. You can make changes to not only the amount fields but also to all the attribute fields. The only exception is that the system does not allow any change to be saved for an attribute that has been checked in the planning profile if the raw exposure has already been versioned. The screen with other attribute fields ready for input is shown in
Figure 4.

Figure 4
The screen with attribute fields
You can use the copy, paste, or insert icons to add exposures or copy and paste from exposures entered, and then change the exposures and save. You can use this screen if you need to change or add attribute values to exposures subsequent to the exposures being uploaded into Exposure Management from an external source. The system doesn’t create change documents for changes to raw exposures and does not keep a history. Save the changes by clicking the save icon.
Release Exposures
You need to release the raw exposures in the system before you can generate a version.
You can release an exposure manually or set it up as an automated process. The setting is done as part of IMG configuration. If it is set to automatic, the system considers all created raw exposures as released. However, if this setting is not activated, the user has to manually select the exposures and release them. If there is a change made to an already versioned exposure (e.g., changing the amount field to reflect a reduction or increase in an already versioned exposure), then this also needs to be released.
The release in this case also depends on whether it is automatic or manual. If the organization decides to hedge only some of the exposures, then the release setting should not be automatic because it allows the user to select the exposures that need to be processed further. You can perform the process of manual release by using transaction TEM10 or the same menu path that we listed earlier (
Figure 5).
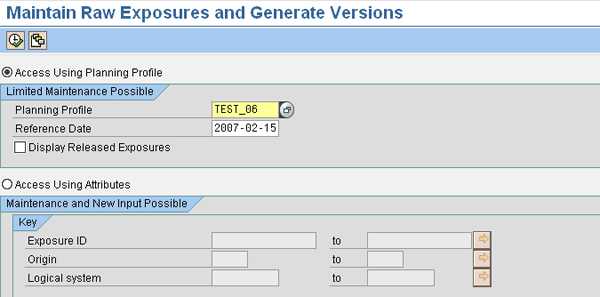
Figure 5
Perform manual release
For release, you access the raw exposures using the Access Using Planning Profile radio button. The user has to select the planning profile and the reference date. Execute by clicking the execute icon and the system produces the message “Exposures selected according to maximum age in planning profile from 2006-02-15” with the date depending on your circumstances. Click the check mark icon to produce the screen shown in
Figure 6.

Figure 6
Maintain raw exposures (with Period and Year fields blank)
You can have the Period and Year fields filled automatically by clicking the Fill Period button (
Figure 7). The system fills in the information based on the planning year variant of the planning profile and the date of the exposure. You also have the same option in the Version Generation screen later — the version cannot be saved without the period and year fields correctly filled in.

Figure 7
The system fills in the Period and Year fields
You need to save the exposure before you can release it. To release exposures, you have to select them and then click the Release Exposure button. You select either individual exposures by clicking the Release Exposure button or all the exposures by clicking the select all icon

. After you click the Release Exposure button, the system tells you that the “Changes saved successfully.” Then click the green check mark icon and the screen in
Figure 8 appears. It shows that the system has duplicated the exposure, marking one copy as Released. Only released exposures can be versioned, which is what we’ll go over next.

Figure 8
Released exposure
Generate Versions
You need to create versions for the released exposures before you can transfer them to Hedge Management. Versions are created per the requirement of the user. The requirement for creating a version depends on the reason for the Exposure Analysis. For example, a user might need to make a comparison of the exposure with the hedged amount, or make a comparison with an existing version to recognize changes over time and possibly explain the variances between target and actual hedge units.
Typically, a version is created on the date the user analyzes the exposures for hedging decisions. The system keeps track of the different versions and can compare the current version with any of the previous versions in exposure analysis. By default, it compares with the immediately preceding version.
To generate versions, either use transaction TEM15 or follow menu path SAP menu > Accounting > Financial Supply Chain Management > Treasury and Risk Management > Transaction Manager > Hedge Management > Exposure Management > TEM15 – Generate Versions (
Figure 9).

Figure 9
Generate versions
You generate versions per planning profile. Enter the relevant planning profile and version date and click the execute icon to produce transaction TEM15 (
Figure 10). You cannot make any changes to the exposure here. Fill in the Period and Year fields if they are empty and click the Fill Period button. Then click the Generate Version button. The earlier transaction referred to the release of exposures. In the resulting pop-up screen, click the Yes button, and the system produces a message that tells you the version was generated.

Figure 10
Generated version
If you need to delete a version, you can use transaction TEM30 provided that none of the exposures in that version have been transferred to Hedge Management. If a planning profile has many versions, the deletion of versions can be performed one at a time, starting from the latest version. The condition that no exposure in that version has been transferred to Hedge Management applies to every version that is being deleted.
For example, a planning profile has version 1 dated January 15, 2007 with exposures that have already been transferred to Hedge Management. On February 15, 2007, version 2 was created, the change being that in the version from February 15, a new exposure has been added and an exposure amount that was in the first version was reduced. You can delete version 2 because no transfer to Hedge Management has been done on the exposures from version 2 (though one of the exposure is already there in version 1, but with a different amount). Also note that the system does not duplicate the transfer of exposure to Hedge Management. Only new exposures or changes in exposures are transferred to Hedge Management.
Analyze Versioned Exposures and Transfer to Hedge Management
Next you need to perform exposure analysis. Exposure analysis helps the user analyze the exposures and take appropriate hedging decisions. Use transaction TEM20 or follow menu path SAP menu > Accounting > Financial Supply Chain Management > Treasury and Risk Management > Transaction Manager > Hedge Management > Exposure Management > TEM20 – Execute Exposure Analysis.
In the Exposure Analysis transaction, you can compare the current version with the previous version. You can see an increase or decrease in exposures in Exposure Analysis, which helps in making the hedging decision. If there is a reduction in exposures for which valuation has already been done forming part of a cash flow hedge, you need to reclassify them. The system identifies such exposures and marks the exposure for reclassification.
You need to be careful when designing the layout to minimize the burden of decision-making due to the number of hedging decisions the user needs to make. The layout in
Figure 11 shows the Hedge Plan and Hedge Management Exposure ID fields are not in the analysis. You can change layouts using the change layout icon.

Figure 11
Exposure Analysis layout
You use the add icon to indicate that the hedging transaction is necessary as the Hedged Amt is 0. The yellow row is the totals row. You can transfer exposures by the total row or individually. If you have transferred individual exposures, then totals cannot be transferred. Total rows are formed for exposures grouped with the same attribute values. Normally the totals rows are transferred to Hedge Management. The system puts the Exposure date field of the totals row as the last day of the period. In the above case, the system has put March 31, 2007, though the exposure date is March 15, 2007. You can change the date in the totals row while transferring. This date is the exposure date in Hedge Management. Ideally, the period end date is defaulted if totals are transferred. You can change this date to an earlier one (e.g., March 15 in our example). Then, when a later version comes with an exposure with the same attributes but dated March 20, 2007, the system groups it together and the totals date remains March 15, 2007 — and in Hedge Management, the exposure has an end date of March 15. You can change the exposure end date in Hedge Management, but it requires unnecessary extra work.
Now you need to transfer the exposure to Hedge Management. You need to select either the exposure or the total rows depending on the situation. In this example, we’re transferring the totals, so we select the totals row by clicking the Totals button. Then click the transfer icon to transfer to Hedge Management (
Figure 12).
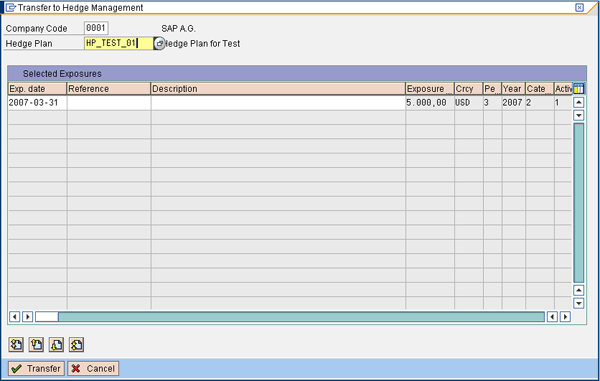
Figure 12
Transfer exposures to Hedge Management
Here you select the company code from a drop-down menu and enter the Hedge Plan to which you need to transfer the exposures as well as the reference and description of the exposures according to the user’s requirements. The reference and description fields are not mandatory. However, users can enter the reference and description fields to identify and describe the exposure. You can change the exposure date that the system enters, as we just explained.
After you have entered the information, click the Transfer button to transfer the exposures to Hedge Management. This produces a message. Click the green check mark icon to close the window. This updates the Hedge Plan and Hedge Management Exposure ID fields in the Exposure Analysis screen, which appears as shown in
Figure 13. The 1 represents the exposure ID in the hedge plan in Hedge Management. You can look at the Exposure tab of the hedge plan in Hedge Management to check whether the exposure transfer to Hedge Management is reflected in the hedge plan (
Figure 14).

Figure 13
Exposure Analysis report after transfer to Hedge Management
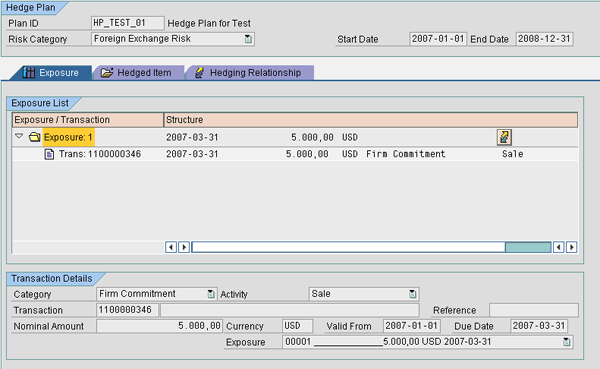
Figure 14
Hedge plan
You can also look at the exposure analysis after creating the Hedge ID and Hedge Relationship. Running exposure analysis after creating the hedge ID results in a screen that is similar to
Figure 13. The Hedged Amt field would be updated to show that the totals have transferred. Using various layouts with different fields, you can create different reports to use for effective hedge analysis.
Now we’ll check the changes to exposures against a second version to help make hedging decisions. The second version on February 15, 2007, reflects a new exposure with value date April 15, 2007, and the earlier exposure reducing in value to US$4,000. It is also assumed that a valuation was done on the earlier hedge relationship on January 31, 2007. Hence, the reduction of the exposure to $4,000 as reflected in version 2 triggers reclassification, as the hedge relationship is a cash flow hedge (a relationship in which cash flows offset the variability of what is being hedged).
Execute exposure analysis by using transaction TEM20 for the same planning profile, but for version 2 this time (
Figure 15). The Exposure Analysis screen looks like the screen shown in
Figure 16. You can see that the version is February 15, 2007, and the comparison version is January 15, 2007.
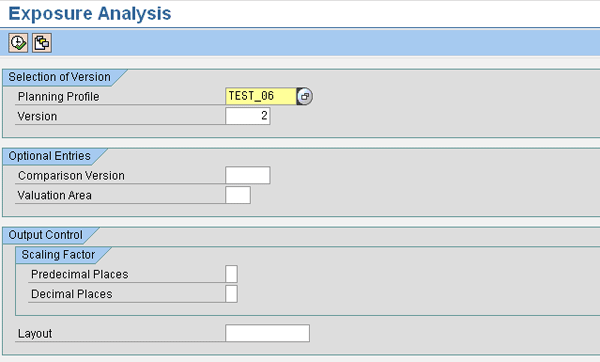
Figure 15
Exposure Analysis for version 2

Figure 16
Compare version 2 to version 1
In the case of an exposure already present in version 1, the system shows a downward arrow signifying that there has been a reduction in the exposure from 5,000 to 4,000. Because that exposure was in a cash flow hedge relationship and a valuation was done on January 31, 2007, the reduction in version 2 requires a reclassification that is signified by the warning icon in the totals row.
If the new exposure with the date April 15, 2007 is in a separate group due to different periods, the upward arrow appears and signifies that, when compared to the previous version, it has gone up. The add icon on the totals line signifies that hedging is necessary.
Now, you can transfer the totals to the hedge plan (
Figure 17).
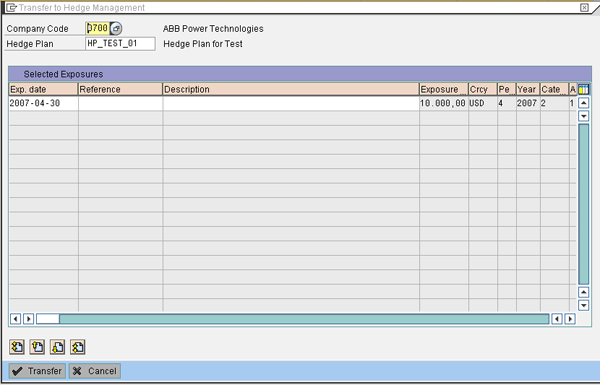
Figure 17
Transfer exposures to Hedge Management
You can see from the Exposure amount (US$10,000 in
Figure 17) that the system only asks about the total row that was not there in the earlier version and not the total row that was transferred in the earlier version. The system automatically transfers the previous total row to the correct hedge plan and you do not need to select it again. In other words, after you transfer an exposure to a hedge plan, any subsequent changes and transfers always go to the same hedge plan and hedge plan exposure ID — thereby ensuring that different versions of the same exposure do not lie in different hedge plans or different IDs in the same hedge plan, creating duplicates.
Click the Transfer button to produce the information screen shown in
Figure 18. This tells you that an exposure has reduced and reclassification is required.
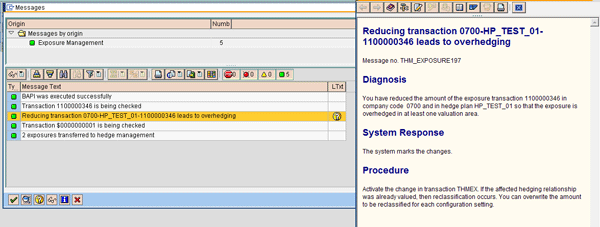
Figure 18
Message log after transfer to hedge accounting
Then you can check in Hedge Management to see that the changes occurred (
Figure 19). Exposure 1 shows a reduction from 5,000 to 4,000 with the Stop icon and a message below it stating Reclassification Marked. The system only allows further processing of this exposure after you perform post processing in Hedge Management. In post processing, an accounting entry is passed for reclassification. You need to do this for exposures that are overhedged.

Figure 19
Hedge plan after transfer of exposures
Customizing Settings Specific to Exposure Management
Now we’ll look at each of the configuration settings required for Exposure Management. To get to each of them, follow menu path SAP Customizing Implementation Guide > Financial Supply Chain Management > Treasury and Risk Management > Transaction Manager > General Settings > Hedge Management > Settings for Exposure Management and then navigate to each of the following:
- Maintain Types for Exposure Planning Profile
- Maintain Period for Exposure Management
- Maintain Headings, Values and Texts for Attributes
- Maintain Release Setting for Raw Exposures
Maintain Types for Exposure Planning Profile
As explained earlier, you use the planning profile type to control the user authorization for the process. You make the required entries in this screen, shown in
Figure 20. Using different planning profile types, you can control which user has access to which profile. For example, if planning profiles are created in an organization based on profit centers, then users can create different planning profile types so they can process only those profit centers for which they are responsible.
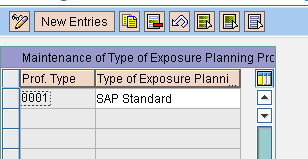
Figure 20
Maintain the planning profile type
Maintain Period for Exposure Management
As explained earlier, you use the period in the planning profile to determine how the exposures are grouped. Making the period requires two steps. First, you define the fiscal year variant in FI — provided you are using a non-standard fiscal year variant, such as a Quarter period variant, that is not already defined in FI. Second, you define the periods for this fiscal year variant in the Exposure Management settings. For example, for the K4 variant, define the 12 periods. For a Quarter period variant, define four periods (
Figure 21).
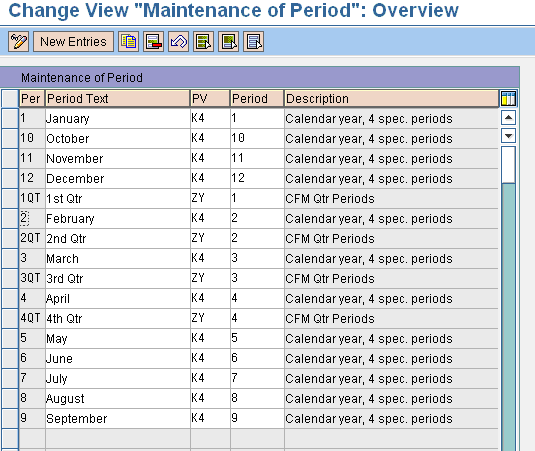
Figure 21
Maintain period for Exposure Management
In the Per field, enter an alphanumeric character (maximum size of three characters) to distinguish a period in Exposure Management. In the Period Text field, enter a description of the period. In the PV field, select the fiscal year variant already defined in FI. In the Period field, select the period defined in the fiscal year variant in FI that corresponds to the period in Exposure Management defined in the Per field.
Maintain Headings, Values, and Texts for Attributes
You define all required attributes and their values that need to be used in Exposure Management in the screen shown in
Figure 22. You can define only six user-defined attributes.

Figure 22
Maintain attribute heading
In this example, we have defined only two attributes: profit center and cost center. Click on one of the rows and enter the individual values of each of these attributes (e.g., the individual profit center values and cost center values). Then double-click the Attributes Values and Texts folder and enter the values for that attribute (
Figure 23).

Figure 23
Maintain attribute values and texts
Maintain Release Setting for Raw Exposures
This setting is simple: just select With Release or Without Release to maintain the setting (
Figure 24). The process of release of exposures can be manual or automated. If the setting is set to automatic, the system considers all created raw exposures as released. However, if this setting is not done, then the user has to manually select the exposures and release them. If all the exposures that come into Exposure Management from external systems do not need to be considered for Hedge Management — in other words, if the process is that the Treasury views the exposures uploaded into the system and then decides on which exposures to hedge — then the release setting should not be automatic because it allows the user to select the exposures that need to be processed further.

Figure 24
Settings for release of exposures
Ajay Furtado
Ajay Furtado is a principal consultant with Fourth Signal and has worked with customers worldwide in the areas of SAP Treasury and Risk Management. He is a certified SAP solution consultant and has more than eight years of experience in business and technology consulting.
You may contact the author at
ajay@fourthsignal.com.
If you have comments about this article or publication, or would like to submit an article idea, please contact the
editor.

Gopa Kumar
Gopa Kumar is a senior consultant with Fourth Signal (I) Pvt. Ltd., a company specializing in SAP Financials with a focus on SAP Treasury. He is a chartered accountant with more than 16 years of financial management experience and a certified SAP solution consultant with SAP finance and treasury consulting experience in multinational organizations.
You may contact the author at
gopakumar@fourthsignal.com.
If you have comments about this article or publication, or would like to submit an article idea, please contact the
editor.


