An Overview of SAP EWM Shipping Cockpit Planning and Execution
With the ever-changing demands of a supply chain and the software it uses, plus functionality that must be robust, user friendly, adaptive and efficient, it became necessary for a one-stop cockpit in which the outbound processes of your warehouse could be planned, executed, and monitored in an effective and easy-to-use manner.
We are sharing information about this functionality, for we believe it adds value in the outbound logistics area of a warehouse that uses SAP Extended Warehouse Management (SAP EWM). If you browse the Internet, you will find some documentation mentioning the Shipping Cockpit at a high level of detail, but through this article we hope that you will see the simplicity and business benefit from a functionality perspective when you include it in your business processes.
Shipping Cockpit Planning (SCOP) and Shipping Cockpit Execution (SCOE) form part of the Shipping and Receiving area of SAP EWM. The Shipping Cockpit was introduced to fill a gap in the outbound planning and execution processes of the SAP EWM system. This functionality was developed in earlier SAP EWM releases by users as custom development in their existing SAP EWM landscapes. These custom developments added extra cost and risk to their SAP EWM implementations.
Explore related questions
The Shipping Cockpit consists of two main transactions: The first is the planning side of the transportation functions (SCOP), and the other is the execution side (SCOE) of the plan. These are native SAP EWM functions and executable inside the SAP NetWeaver Business Client (NWBC) as two separate transactions. This functionality is available from SAP EWM 9.1 and requires other component releases equal to or higher including:
- SAP NetWeaver 7.40
- NWBC 4.0
- SAP GUI 7.30
The main advantage of the SCOP and SCOE is that they are developed and maintained by SAP, and hence are tightly integrated with the rest of the SAP EWM outbound functionality — for example, delivery statuses, wave management, the picking and packing progress, transportation unit management, loading, and goods issue status. All these integration points are connected to one area in which you can manage the shipping processes.
Some Setup Tips and Tricks of the Shipping Cockpit
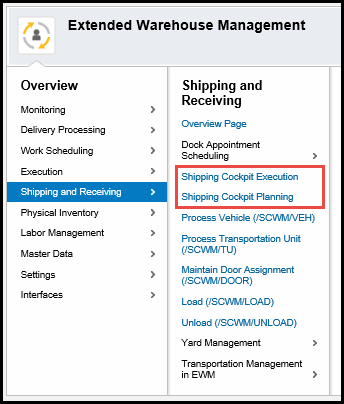
The transactions for the SCOP and SCOE are based on the NWBC platform and can be seen under the Shipping and Receiving node from a NWBC logon session (Figure 1).
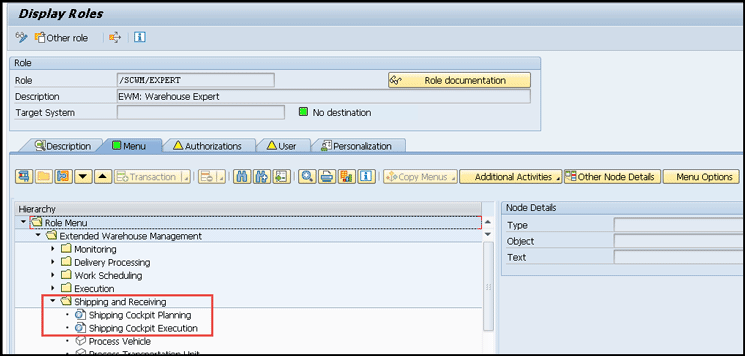
The transactions are delivered in authorization role /SCWM/EXPERT. To view this role, execute transaction code PFCG or follow menu path Tools > Administration > User Maintenance > Role Administration > Roles. Figure 2 displays the /SCM/EXPERT role.
You must activate the NWBC Internet communication services specific to the Shipping Cockpit functionality. To do this, execute transaction code SICF or follow menu path Tools > Administration > Administration > Network > HTTP Service Hierarchy Maintenance. The following services are necessary to allow the different NWBC functionality areas to be active in the SCOP and SCOE. These services are:
- Sap/public/bc/icons
- Sap/public/bc/icons_rtl
- Sap/public/bc/pictograms
- Sap/public/bc/webdynpro/*
- Sap/public/bc/webicons
- Sap/bc/nwbc/*
- Sap/bc/webdynpro/scwm/sco & sco_EXEC & shp_assign_door_lp & shp_assign_tu_door
Select each service and activate it by either right-clicking the service and selecting Activate Service or selecting Service/Host from the menu and then selecting Activate.
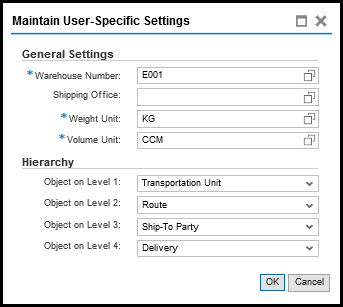
User-specific settings can be set for the SCOP and SCOE, as shown in Figure 3.
Function buttons can be removed or custom ones can be added. The standard buttons delivered for the SCOE are displayed in Figure 4.

For our example, we reduced the menu shown in Figure 4 to show only the necessary buttons for this implementation (Figure 5).
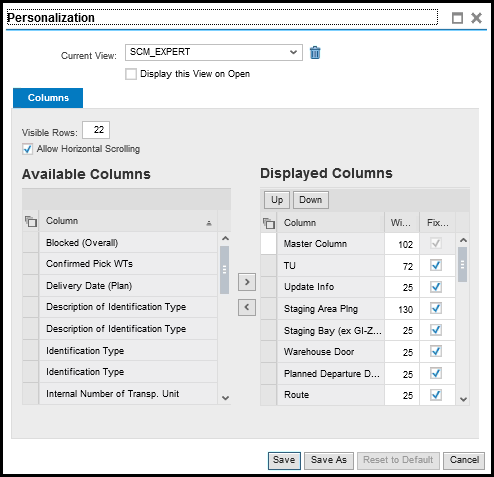
Different layout views can be created and used as default or selected during the process as needed. Click the personalization icon to achieve this (Figure 6).

After you click the personalization icon, the screen shown in Figure 7 appears.
SAP provides standard Business Add-Ins (BAdIs) to enhance the Shipping Cockpit if required. The BAdI used in this example implementation was /PLMB/EX_SPI_TRANSACTION. It was implemented to add the delivery status as a visual status light, showing status by color indicating if the delivery was blocked due to incomplete data.
The following actual challenges were faced with a Shipping Cockpit implementation:
- NWBC4, Support Package 12 caused some transactions to stop. The solution was to revert back to Support Package 11.
- The antivirus software running on the server had a huge impact on performance when processing through the Shipping Cockpit. The antivirus was scanning the NWBC HTTP each time NWBC was started. The solution was to add NWBC.exe as part of the exclusions for the antivirus software.
- The session time-out settings for Internet communication (ICM) must be set on the ABAP server to prevent the Shipping Cockpit HTTP session from timeout.
An Example of an End-to-End Outbound Process with the Shipping Cockpit Functionality
As an example of SCOP, we explain how an SAP EWM outbound delivery order (ODO) is created from a distributed outbound delivery transmitted by SAP ERP Central Component (SAP ECC) to SAP EWM. We also describe where the outbound delivery order is visible in the standard SAP EWM warehouse management monitor as shown in Figure 8.
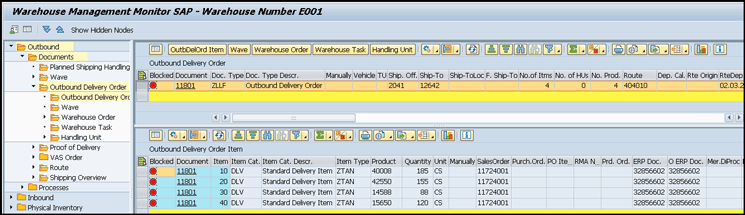
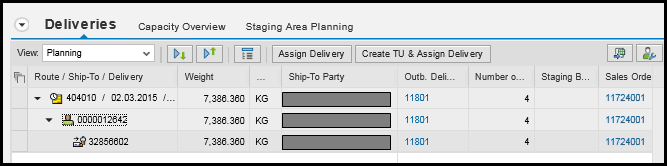
The same delivery also reflects in the SCOP as seen in Figure 9.
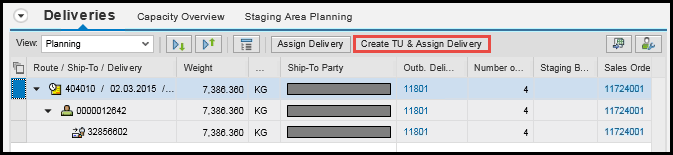
Now you need to create a transportation unit (TU) and assign the delivery document to it. To complete this step, select the delivery and click the Create TU & Assign Delivery button (Figure 10).
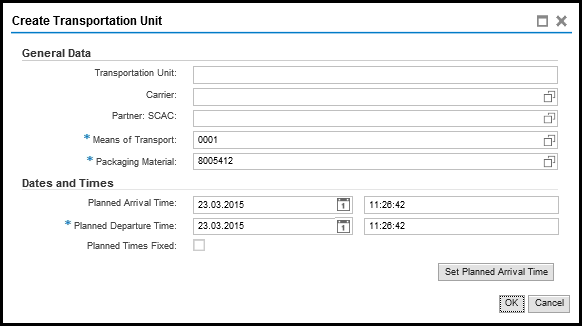
This action opens the screen shown in Figure 11 in which you populate the Means of Transport and Packaging Material fields in order to select the type of TU to be created.
This action creates a TU with the delivery assigned and the result is shown in the planned delivery (Transportation Unit) area (Figure 12).
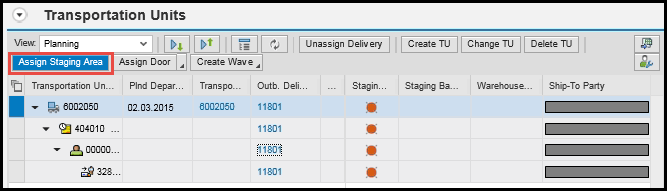
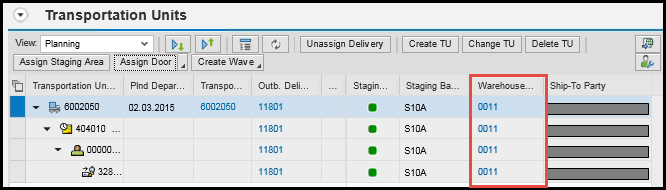
Now you assign staging area details and assign a door. For this implementation, we had multiple staging areas per door, so we assigned the staging area first so that picking could commence before the truck was actually docked at the door. Select the TU by clicking the number listed in the Transportation Un… (transportation unit) column and then clicking the Assign Staging Area button (Figure 12). This action opens a screen in which you enter the staging details as shown in Figure 13. Click the OK button.

The selection adds the staging details to all the assigned delivery line items and activates the deliveries as shown in Figure 14.

The delivery in the warehouse management monitor is now updated with the TU as well. See Figure 15.

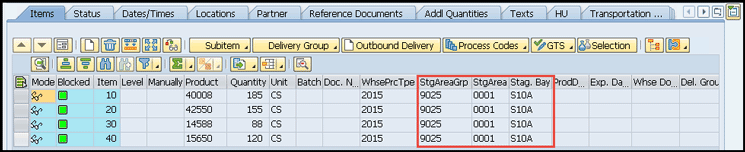
The delivery line items show the staging details as shown in Figure 16.
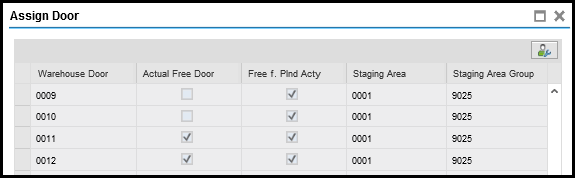
When the door is known and is where the truck must dock, select the TU and then click the Assign Door button (Figure 17).

This action opens the screen shown in Figure 18 in which you select the desired door by clicking the line.
The door assignment is reflected against the TU as shown in Figure 19 and is consistent inside the warehouse management monitor as well.
The updated delivery can also be seen from the warehouse management monitor. To access the warehouse management monitor, execute transaction code /SCWM/MON. Browse to the item level of the Outbound Delivery Order as seen in Figure 20 in which you can view the updated delivery.

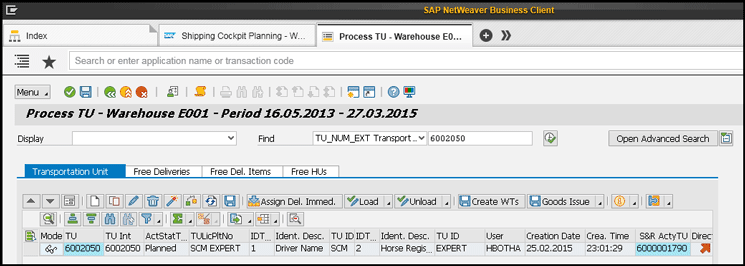
Note that you can execute transaction code /SCWM/TU by clicking the TU number. This action displays the results of executing transaction code /SCWM/TU (Process Transportation Unit) in the NWBC platform (Figure 21).
For this scenario the SCOP processes are completed.
SCOE
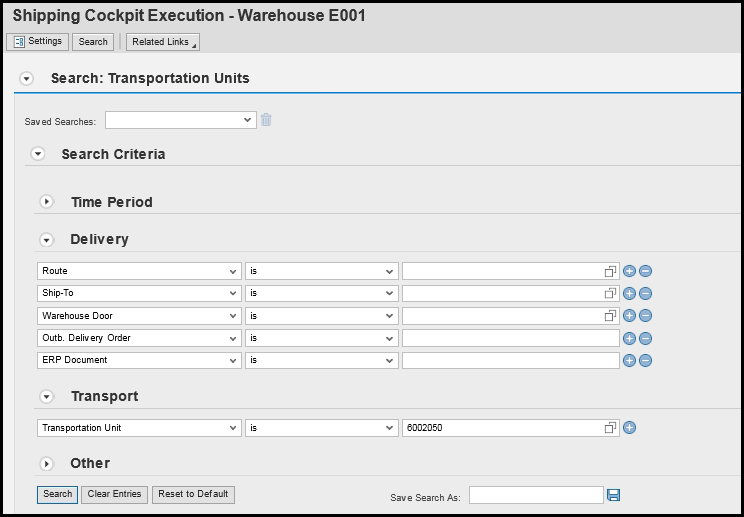
Once the TU is planned, it is visible in the SCOE. Start the SCOE transaction from the user menu. Search for your TU either by delivery number, TU number, or any of the other available search criteria (Figure 22). Click the Search button to execute your search.
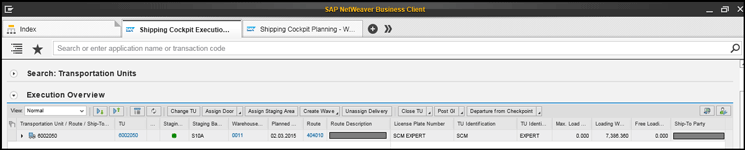
The results of your search are displayed in the screen shown in Figure 23.
Create a wave for the TU. We use the wave functionality to group deliveries so that they can be picked together. Picking is done per TU, so a wave would typically contain all deliveries assigned to a TU. Select the TU and click the Create Wave button. From the list of options, select the wave create option with which you work. In our example, we used the automated creation per TU (Automatically Determination/TU) option as shown in Figure 24.

After you select a wave creation option, the wave log is displayed in the top left corner of the NWBC screen and shows the number created (Figure 25).

The wave creation caused the TU status to be updated with the wave planning indicator. This icon now appears as a green status light as shown in Figure 26.

Picking can now commence after the wave has been released. The wave release can be performed by executing transaction code /SCWM/WAVE per standard functionality. The warehouse tasks created are reflected in the SCOE as open tasks (Figure 27).

The yellow status light under the Pick column shows that the picking process is in progress. The remaining open warehouse tasks are also updated (Figure 28).

After the picking is completed, the pick status light is green as shown in Figure 29.

All handling units are now staged. The stage step is now complete (Figure 30).

Once the TU has arrived in the yard, the Arrival and At Door statuses must be set. The activation of the TU and the move to the door must be performed from outside the SCOE. For example, you could execute transaction code /SCWM/TU. The SCOE does not support yard management movements. The SCOE status for Arrival and At Door will be completed (green status light). These statuses will be set from the yard movement tasks created when you execute transaction code /SCWM/TU (Figure 31).

This status is also reflected in the Process Transportation Unit transaction (/SCWM/TU).
Loading may now commence. The progress can be seen in that the Loading Started status light is green. The Load status light will be yellow during the process as shown in Figure 32 and green once completed as shown in Figure 33.

After all loading is completed, the TU can be closed to set the Loading Completed status to green by clicking the Close TU button (Figure 33).
After the loading is completed, the goods issue posting can be performed by clicking the Post GI button (Figure 34). This action sets the Goods Issue status and also the Goods Issue (TU) status as shown in Figure 34.

The TU can now be moved away from the door to a checkpoint or parking area. This must be done through the TU transaction (transaction code /SCWM/TU). This updates the At Door status again.
The TU can now be checked out from the SCOE by selecting the Departure from Checkpoint button. Clicking this button sets the Departure status to green (Figure 35).

Once the TU and all relevant activities are completed, all the statuses are green as shown in Figure 36.

The warehouse management monitor for the TU/delivery is updated to completed statuses. This is automatically set. See Figure 37.

The TU is completed. This can be seen by the GI/GR Pstd (goods issue/goods receipt posted) status that is set to a green status light and the activity status (ActStatTxt) that displays as Completed (Figure 38).