When you use SAP CRM Marketing to send an email marketing campaign, you should provide recipients with a way to view the content from a Web page. This allows your contacts to read the content of your campaign if their mail reader was unable to open the HMTL content they received.
Key Concept
Some of your contacts’ mail clients may not render your emails in a format that is easy for them to read and navigate, even though you need to provide them with the information about your company’s products and services. You can work around this issue by creating a Web-based version of your email that your contacts can access from your original email.
You’re ready to execute your first mass email campaign. Your message is clear, your content is exciting, the target group includes a huge number of recipients who are sure to have an interest in your company’s products and services, and your marketing and sales employees are ready to follow up with contacts who respond favorably to the campaign. However, what happens if some of the recipients cannot see the graphics in your email because their email reader blocks them? What if some of the recipients cannot read all of the content because your HTML includes a font that is not compatible with a common Web-based email provider in their country? What if security settings or default preferences at the recipients’ companies prevent your message from getting through as you intended?
To address these questions, you can include in each outbound email a link that takes the user to a Web page with the same information as the email message. When users click the link, their browsers open the page, and the users bypass their mail readers to view your content.
I’ll show you how to save your email message as a Web-hosted HTML page. I will also explain how you can keep tracking enabled in the Web-hosted version of the form so you know how many contacts clicked on each link within the page.
Note
The screenprints in this article are from SAP CRM 7.0. However, I implemented this when my organization was on SAP CRM 5.0. In fact, in any version of SAP CRM, you follow the same steps I present here. The process isn’t any different — you just see screens that look a little different in each version.
Finalizing the Mail Form
Before you use the approach outlined here, be sure your mail form is in its final version. You should complete this procedure as the last step before executing your campaign. Start by adding a hyperlink to the mail form for your email campaign. Somewhere in the <BODY> section of the HTML, typically toward the top of the form, insert a line that says, “If you are having difficulty viewing or using this email, please click here” or something similar. The words "click here" should be inserted as a hyperlink that points to the URL of the Web-based version of the form. In this example, the Web-hosted version is published at https://www.yourcompany.com/product_announcement_2010_10_01.htm. Note that tracking is enabled for this link so you can see how many recipients click on it after they receive the campaign (Figure 1).

Figure 1
Insert the hyperlink for the Web-hosted form
Send the Campaign to Yourself
Next, you need to create a contact record that represents all contacts who access the Web-hosted version of your campaign. Specify a first and last name that are meaningful, such as Web-Hosted Access, because the name will ultimately appear on click-through reports when you do your post-campaign analysis (Figure 2). Be sure to specify your own email address on this contact record. This is important because you will send the campaign to this email address in a subsequent step. After you have created the contact record, make a note of the contact’s business partner number.
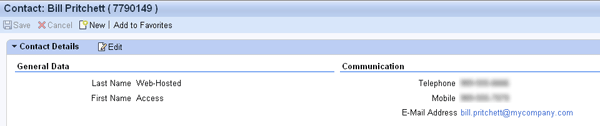
Figure 2
Create a business partner that has your email address
Now go into transaction CRMD_MKTDS and create a custom filter you can use to create a target group containing your contact record. You can use the standard Attribute List named Contact Address to build your filter (Figure 3). The InfoSet named BP Address contains the Business Partner ID field, in which you can create a filter that includes the number of your contact record.
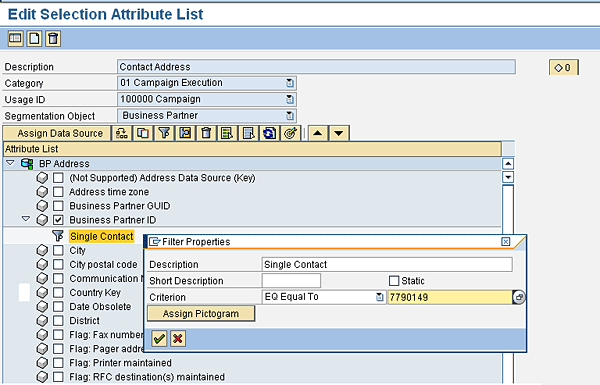
Figure 3
Create a custom filter for the new business partner
Next you need to create a target group based on the filter you just created. This is done in the Segment Builder. Simply drag the new filter into the profile set and you should see a record count of one, which corresponds to the business partner you created. Build the target group to generate a distribution list for your campaign (Figure 4). Note that when you launch subsequent campaigns, you will not be required to repeat the steps you have completed so far. You can reuse the business partner record and its target group for future campaigns that require a Web-hosted form.

Figure 4
Target group with one business partner
The next step is to go into your campaign and attach the target group to it. Execute the campaign and it will be sent to the one recipient in your target group. Since you placed your own email address on the recipient’s business partner record, you will receive a copy of the email campaign in your inbox. The email you receive becomes the basis for the Web-based version of the email campaign.
Finalizing the Web-Hosted Content
To create the Web-hosted version of the mail form, save the email you received as an HTML file. Your email program should have a menu command that allows you to do a Save As… specifying HTML as the file format. After you have saved the message as an HTML file, you need to make a few changes using Microsoft FrontPage or a similar HTML editor:
- Delete the text at the top that says, “If you are having difficulty viewing or using this email, please click here.” If the contact is accessing this form, they already clicked that link in the email.
- Remove any attributes that personalize the form (e.g., “Dear [Person: First Name]”).
- Remove any other attributes that are related to any specific recipient, such as customer name, email address, or any other identifier your company might use.
- Delete any links that allow recipients to unsubscribe from future emails.
While you are editing your HTML, be sure to look at the source code for the Web page. If you look closely at any of the hyperlinks in the code, you can see that the parameters MIG and URLGUID have been appended to each link, e.g.: &MIG=4C8DFC85EC9C44EAE100000097A35159&URLGUID=4C87C0C962170BEBE100000097A35159
When a campaign is launched, these parameters are automatically added to any link for which tracking is enabled. The MIG identifies the contact who received the campaign and the URLGUID identifies the hyperlink. When a contact clicks links in a received email message, these click-throughs are tracked. This allows you to analyze the campaign after it has been executed. Because the Web-hosted version of the form has MIG and URLGUID parameters on each link, these click-throughs are also tracked. When you do the campaign analysis, all click activity from the Web-hosted form is consolidated under the recipient named Access Web Hosted, because that is the name of the business partner you created in the first step.
After the Web-hosted version of the HTML has been finalized, view it in your browser to verify that it is correct. Once the content has been checked, you should publish it on your company's Web site at the URL specified in the first step (https://www.yourcompany.com/product_announcement_2010_10_01.htm in this example). Since the Web-based version of the form has been published at the address you referenced in your email campaign, recipients will be taken to the hosted form if they select the click here link.
Execute the Campaign
Now that a version of your content is available online and your mail form contains a hyperlink to access the Web-hosted form, you are ready to launch your campaign. Attach your full target group to the campaign and execute it. When you send your outbound emails, you can be certain that everyone will be able to access your content, even if their email client does not display it correctly.
William R. Pritchett
William (Bill) Pritchett has more than 25 years of IT industry experience and has worked at Dow Corning Corporation for the past 16 years. Over the past eight years he has focused on the company’s CRM systems and processes. His current responsibilities include expanding the capabilities of Dow Corning’s SAP CRM 7.0 system.
You may contact the author at bill.pritchett@dowcorning.com.
If you have comments about this article or publication, or would like to submit an article idea, please contact the editor.