Learn how to implement message handling in Web Dynpro for ABAP. Discover three techniques for how to do this, and step through a demo scenario to see which technique is best for your situation.
Key Concept
In an ABAP custom report, you can give a message command to display a message to the end user, but the same command cannot work in Web Dynpro for ABAP. Object-oriented ABAP knowledge is required to understand the message handling implementation technique.
Messages are important in Web Dynpro applications to show the exact status of a user action. With the help of messages, users can then take the appropriate action. For example, a warning or error message can be raised to validate user input. If the screen has a text input field for the customer or vendor number and the user should input a value, but the value doesn’t exist in the master table of the SAP system, the Web Dynpro application can raise an error to alert the user to the issue.
There are four types of messages that can be raised in Web Dynpro applications: success, error, warning, and fatal errors. I’ll describe three detailed approaches to implement message handling in Web Dynpro applications: Text (which uses a place holder at run time), T100 (which also uses a place holder at run time), and Exception (which can be used when standard exceptions are raised within the hook method and can be caught). There can be a dedicated message area user interface (UI) element to display messages. You can place the message area in the screen per your own requirements; otherwise the default location of the message area is the top of the page. The target audience of this article is ABAP developers who would like to understand and implement message handling in Web Dynpro for ABAP.
Message Area UI Element
Use transaction SE80 and give the Web Dynpro component name. Then select the Web Dynpro application and click the Properties tab. You can choose between two radio buttons for message handling: Show Message Component on Demand and Always Display Message Component (Figure 1).

Figure 1
Select the radio button to show the message area
If you select Always Display Message Component, the message area is always displayed regardless of whether a message has been triggered from the Web Dynpro application. If you select Show Message Component on Demand, the message area is only displayed if the Web Dynpro application triggers a message.
The default location of the message area is the top of the page, but you can move the message area to another location if you’d prefer. In such a case, you need to create a dedicated message area UI element in Web Dynpro view. On the Layout view, right-click Transparent Container and select Insert Element (Figure 2). Give meaningful text for the ID and select the type (Typ) from the drop-down menu. The type should always be the MessageArea and the ID should be meaningful text.

Figure 2
Dedicated message area to display the message
Assistance Class
An assistance class is required to supply text information to the message. This text can also have placeholders that can be replaced by a value at run time. A custom assistance class is a child class, meaning it is inherited from the standard class CL_WD_COMPONENT_ASSISTANCE, and has implemented the standard interface IF_WD_COMPONENT_ASSISTANCE. The Get_text() method returns text by passing a text symbol. WD_ASSIT is the controller’s attribute holding a reference to the assistance object.
You can create a custom assistance class by using transaction SE24 and following this procedure.
Step 1. Give an Object type name as ZMESS_ASST_CLASS (Figure 3). Click the Create button.
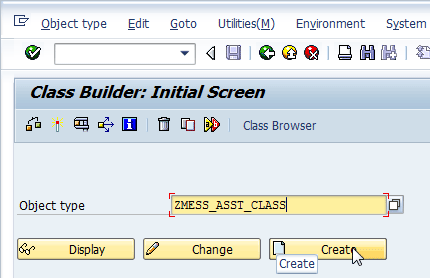
Figure 3
Enter an Object type name
Step 2. Select the object type as Class and click the green check mark icon.

Figure 4
Select Class
Step 3. Give a meaningful description in the Description field (Figure 5). Click the Save button and enter the package $tmp.

Figure 5
Add a description
Step 4. Go to the Properties tab and click the Superclass button (Figure 6). Enter the superclass (i.e., parent class) name as CL_WD_COMPONENT_ASSISTANCE and activate the custom class.

Figure 6
Provide superclass information
Step 5. Create a text element and type in the following phrase: Text First Name: &PARA1& entered and last name is initial (Figure 7).

Figure 7
Create a text symbol in the assistance class
Here &PARA1& is a placeholder, which is replaced with the appropriate value at run time. A maximum of four placeholders can be used in a message. The placeholder name should always be in capital letters.
Step 6. In the Web Dynpro component, assign a custom Assistance Class name as shown in Figure 8. Use transaction SE80 and give the Web Dynpro component name. Only the Description and Assistance Class are editable here; the rest of the information is automatically filled.

Figure 8
Provide the Assistance Class name as ZMESS_ASST_CLASS
This demo application accepts input from the user. There are two text fields for the user’s name when you execute the Web Dynpro application from transaction SE80 (Figure 9). Click the Show button and the output view appears with non-editable information (Figure 10).

Figure 9
Enter user information

Figure 10
Output view
Set a validation on the input screen so if the user does not enter a last name, an error message appears. If the error message is triggered, the UI element is highlighted as shown in Figure 11.
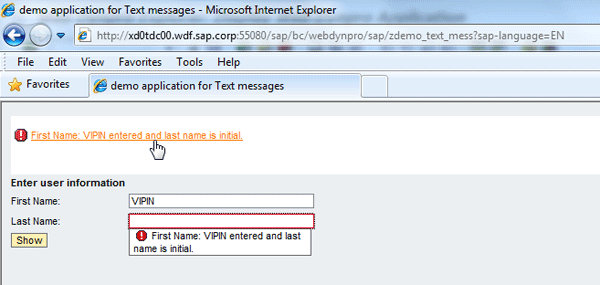
Figure 11
An error message is triggered
Text Approach
In the text technique, you can use an assistance class reference. In the assistance class, define a text symbol with a placeholder. Use the code wizard to read the context attribute value. If the last name is blank, create a message manager reference and call method to display the error message. Write validation statements in hook method WDDOBEFOREACTION of the main view. Perform the following steps:
Step 1. On the application toolbar, click the Web Dynpro code wizard icon  (Figure 12). Select the Read Context radio button. The code in Figure 13 is generated automatically from the code wizard.

Figure 12
Use the code wizard to read node values

Figure 13
Hook method coding to read the context node value
Step 2. Read the text symbol using the code wizard as shown in Figures 14 and 15. Pass a placeholder parameter value in the get text method.

Figure 14
Use the code wizard to read the text symbol value

Figure 15
Statement to read text symbol values generated from the code wizard
Step 3. Get the message manager reference and call REPORT_ATTRIBUTE_MESSAGE method. The corresponding UI element is highlighted when you enter the attribute name as LAST_NAME. The LV_TEXT variable is storing the actual message with a placeholder value. The message type can be error, warning, success, and fatal. Navigation is cancelled if an error message is raised in hook method WDDOBEFOREACTION. Click the Web Dynpro code wizard icon to bring up the screen in Figure 16. Figure 17 shows the code statements that are generated from the code wizard.

Figure 16
Use the code wizard to call the message manager method

Figure 17
Method call the hook method
T100 Approach
In the T100 technique, you create a message in the custom message class using transaction SE91 (Figure 18). All messages created in transaction SE91 are stored in the T100 database table.

Figure 18
Create a message in the message class
In this approach, use the read context attribute values and text symbols as shown in the previous approach. Click the Web Dynpro code wizard on the application toolbar and call method REPORT_ATTRIBUTE_T100_MESSAGE (Figure 19).

Figure 19
Use the code wizard to call method
Give a message class and message number and type in the ls_msg variable. Pass the attribute name to highlight the UI element. Figure 20 shows the code from the code wizard in the hook method.

Figure 20
Method call in the hook method
Exception Approach
Message text is always defined in exception class. In the standard exception class, you cannot use a placeholder but you can create a custom exception class to pass along the appropriate text message.
The demo application in this example accepts dividend and divisor values from the user. If the divisor is not zero, it calculates a quotient; otherwise it triggers a message that the divisor is zero (Figure 21).
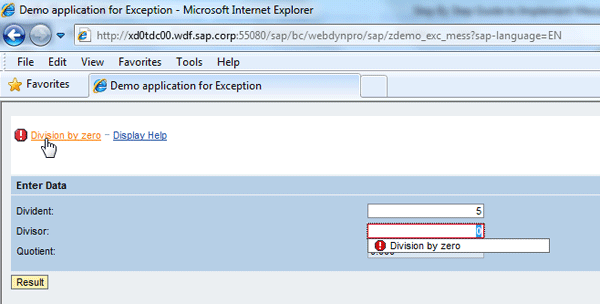
Figure 21
An error message is triggered
Now you need to write logic in the event handler method to be executed when the user clicks a button. Follow this sequence:
Step 1. Set up read context attribute values using the code wizard via the Web Dynpro code wizard icon (Figure 22).

Figure 22
Code wizard to read the node value
Figure 23 is visible when you click the Result button in the screen in Figure 21.

Figure 23
Statement generated in the hook method by code wizard
Step 2. Use the code wizard to call method report_attribute_exception (Figure 24). Pass attribute name INTEGER2 to highlight the UI element (Figure 25). lo_msg is the exception class object reference.

Figure 24
Call the message manager’s method
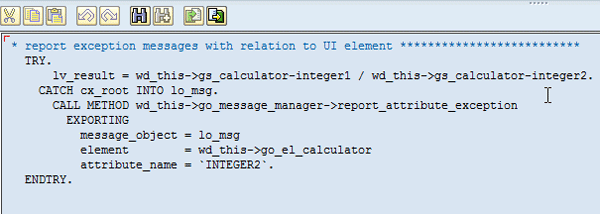
Figure 25
Statement generated from code wizard to call message manager’s method
Vipin Nagpal
Vipin Nagpal is an SAP ERP technical consultant specializing in ABAP. He is a certified ABAP professional consultant. He has a master’s degree in engineering from BITS Pilani University, specializing in software systems. He has more than 10 years of experience in design, development, and production support in SAP ERP. He has worked with SAP ERP implementations for industries such as chip manufacturing, healthcare, aviation, and computer hardware equipment. He has worked with SAP ERP modules in sales and distribution, material management, plant maintenance, finance, and project system. He has been part of challenging assignments including SAP implementations for Japan Airlines and General Motors.
To contact the editor, click here.
You may contact the author at v.nagpal@sap.com.
If you have comments about this article or publication, or would like to submit an article idea, please contact the editor.