Learn the year-end process for Canadian SAP payroll systems, and what year-end forms are required. This step-by-step process shows how to configure the year-end mapping process and how to test the configuration.
Key Concept
The year-end process in SAP payroll is necessary because the system needs to have a required configuration for running payroll and creating payroll forms for the coming year in place. SAP recommends that new HR Support packages and up-to-date SAP Notes be installed at the beginning of each year, thus creating the ability to move on to the next configuration steps for the process of year-end mapping.
One of the most important SAP payroll activities for Canadian payroll is year-end mapping. Year-end mapping is a process in which the wage types are mapped to the year-end form wage type buckets (e.g., a set of wage types cumulated for year-end reporting purposes) or cumulation wage types. I discuss the relevant Canadian payroll year-end forms, and how to configure and complete this activity successfully.
Note
This article is geared toward Canadian SAP ERP HCM users who have some
familiarity with the SAP payroll system, but still have some
configuration questions.
First, here is a brief description of four Canadian payroll year-end forms and their usage:
- Form T4: This is a form that Canadian employers are required to provide to employees; it summarizes the total earnings and deductions for taxation for the year for the employee. This form is for all Canadian employees except those who live in Quebec.
- Form T4A: This is the form for pensioners. Also called a statement of pension or retirement, it lists any earned income paid by the employer and the amount of tax deducted. This form is for all Canadian employees except those who live in Quebec.
- Form Releve 1 (RL-1): Form RL1 is similar to Form T4, but it is only for employees who are Quebec residents.
- Form Releve 2 (RL-2): Form RL-2 is similar to Form T4A, but it is only for employees who are Quebec residents.
Year-end mapping is a task that needs to be completed each year before the start of the new year and before the configuration is created for the next year. The tax year for Canadian payroll runs from January to December. As a result, the year-end mapping for 2014 has to be completed before the end of 2014, and before the year-end forms (such as T4, T4A, RL1 and RL2) are generated for 2014. Very often SAP releases new wage types for the coming year; therefore, the old wage types of the previous year need to be updated for the coming year’s forms’ buckets.
For the year 2014, SAP released the following new technical wage types for Canadian payroll:
/130 – CPP Actual Earnings
/131 – QPP Actual Earnings
/132 – EI Actual Earnings
Before going into detail about the configuration steps, I want to review the concept of the wage type application. This is something readers need to be familiar with when completing the configuration steps (discussed later in this article).
What is a Wage Type Application?
Wage type applications are simply the year-end forms used. For example, wage type application T414 corresponds to the T4 form for tax year 2014. Wage type applications are used for many countries’ payrolls, such as in the US and Canadian payroll configurations.
They are made up of four-characters, in which the first two characters denote the form name and last two characters denote the year. Here are some examples to illustrate this concept:
R114 – This denotes Form Releve1 for the year 2014
R214 – This denotes Form Releve2 for the year 2014
T414 – This signifies Form T4 for the year 2014
TA14– This means Form T4A for the year 2014
Now let’s learn the steps required to configure the year-end mapping.
Required Steps in the Year-End Mapping Process
The following configuration steps are required as this process is not very easy to implement and very often you run into problems with finding the details of wage type applications, corresponding wage type buckets, and wage types, and how to connect and map them during the year-end process. These are the four required steps in the year-end mapping process:
- Identify and analyze the new technical wage types released by SAP
- Identify the wage type buckets and wage types to be created
- Complete the wage type configuration
- Create year-end forms and test the configuration when done
Now let’s get to the meat of this article—the actual configuration of the year-end process.
Step1. Identify and Analyze the New SAP Wage Types
One of the prerequisites for this step is to ensure that all the SAP Notes are implemented and updated. The latest SAP Notes can be found here (log-in required): www.service.sap.com.
Once the notes and Support Packages are applied, you need to check the year-end tables to see if there are any new wage types or wage type buckets. You then compare the current year’s technical wage types with the previous year’s wage types to find any differences. The next step is to analyze the new wage types to ensure that their impact on the year-end forms is per the business scenario of the company, and to decide if you want to keep them. For example, this year SAP introduced new wage types /130, /131, and /132. These should be analyzed as follows:
- Analysis 1: You need to analyze these wage types and ascertain if they affect gross pay or net pay. If the answer is yes, they affect gross or net pay, then you need to keep them.
- Analysis 2: You need to analyze these wage types and find out if they are used for any business scenarios which are used by your company. If the answer to this question is yes, then you need to keep them.
- Analysis 3: You need to analyze these wage types and find out if they are used for any business scenarios which are used by your company. If the answer is no, then you don’t have a need for this wage type for the current year, and you can get rid of it.
Step 2. Identify the New Wage Types and Wage Type Buckets that Need to be Created
The next step is identifying the wage type buckets and wage types to be copied to the next year. This is based on the analysis and business process of the user company. Generally the list is the same as that of the previous year. In the next step, I show how to copy the wage types and wage type buckets.
Step 3. Configure the Wage Type Mapping
To configure the year-end wage types, wage type buckets, and wage type application, follow IMG menu path SAP Customizing Implementation Guide > Payroll > Payroll: Canada > Reporting and Statistics > Year End Reporting > Configure wage types for Year End Reporting,. This opens the screen shown in Figure 1.
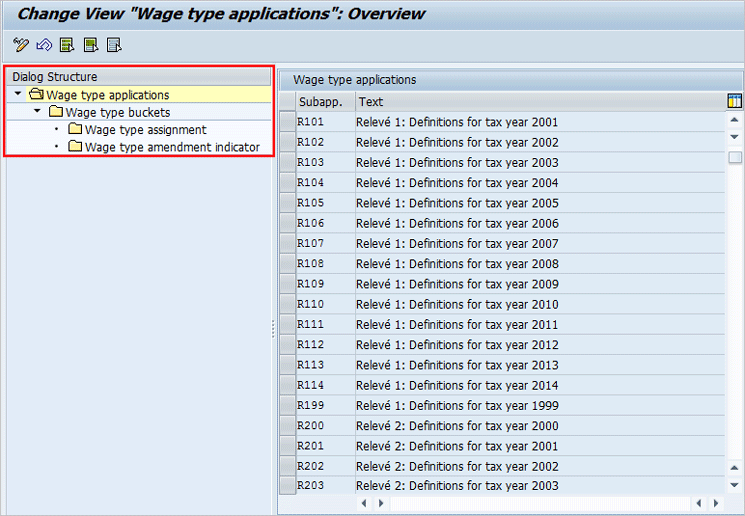
Figure 1
Wage type application
There are three levels for this configuration (highlighted in Figure 1):
- Wage type applications (the year-end forms)
- Wage type buckets (the cumulation wage types or wage type buckets)
- Wage type assignment or Wage type amendment indicator
To check the wage type buckets for a wage type application (e.g., level 1), follow these steps. First, select the wage type application, and in the screen that opens (Figure 2) select the appropriate wage type bucket (on the left) and double-click.
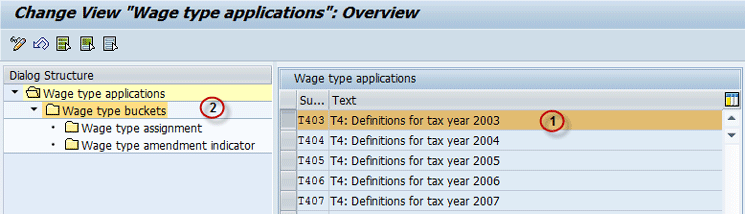
Figure 2
Finding wage type buckets for wage type applications
The screen in Figure 3 opens, where you can see the different wage type buckets listed with their cumulation wage type descriptions (e.g., level 2).
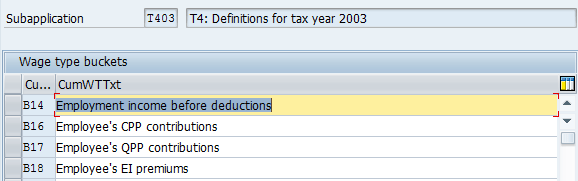
Figure 3
List of wage type buckets
The cumulation wage types are in the format X999 (in Figure 3, shown as B14, B16, B17, and B18).
The X (B) character can be any letter from B to N.
The 999 digits can be any number between 1 and 999.
So, in this example, B14 denotes box 14 of the T4 form and lists the employee’s Employment income before deductions.
Bnnn corresponds to the box number nnn of the selected year-end form.
In Figure 4, the cumulation wage types are shown in the following format: Fnnn (e.g., F30, F31, F32, and so on). In this screen, F corresponds to the footnote number of the selected year-end form. So, for example, F30 denotes footnote number 30 of the form and it lists the employee’s housing, board, and lodging expenses.
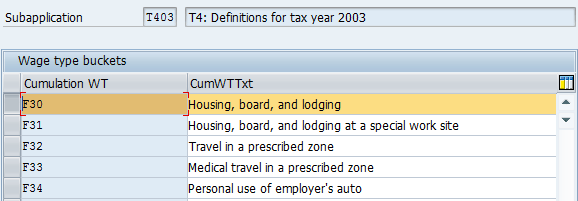
Figure 4
Wage type bucket with example footnotes
The next step is level 3. It’s at this level of configuration that wage type buckets are assigned to the wage types. This level is important because this is where the wage type values are added up and stored in the wage type buckets. Any errors in the wage types at this stage result in errors in the wage type calculations later on, and also produces errors in the year-end form calculations.
I discuss these and other important points in more detail in the following sections.
Assign Wage Types to Wage Type Buckets
Follow IMG menu path SAP Customizing Implementation Guide > Payroll > Payroll: Canada > Reporting and Statistics > Year End Reporting > Configure wage types for Year End Reporting, and the screen in Figure 5 opens. Click the sub-application number (T403, in this example) on the right and then select the Wage type buckets folder on the left.
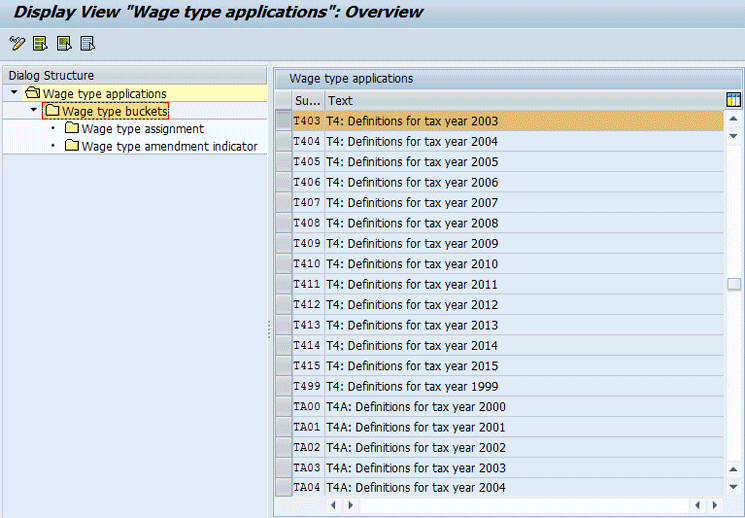
Figure 5
Open the wage type bucket
In the screen that opens (Figure 6), select the wage type bucket—in this case, B16 – Employee’s CPP contributions—and click the Wage type assignment folder on the left.

Figure 6
List of cumulation wage types
This opens the screen shown in Figure 7, which lists the wage type assignments. Conversely, you can also navigate directly to this screen from table V_T596I (Figure 8) by executing transaction code SE12. The latter method is the quickest way to check wage type assignment details.
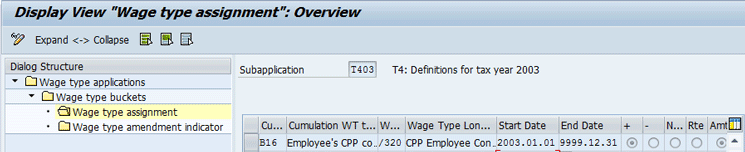
Figure 7
List of wage type assignments

Figure 8
Table V_T596I
Assign Wage Types
The wage types can be assigned to the cumulation wage type. The fields listed in Table 1 are the fields to be updated in the screen in Figure 8.
| Field |
Technical name |
What is updated in the field |
Example value |
What it represents |
Cumulation wage type
|
SUMLG
|
Cumulation wage type
|
B16
|
Box 16 of the T4 form
|
Cumulation WT Text
|
SUMTX
|
Text on cumulation wage types
|
Employee’s CPP contributions
|
Wage type text
|
Wage type
|
LGART
|
Wage type
|
/320
|
Wage type
|
Wage type Long Text
|
LGTXT
|
Long text for the wage type
|
Employee’s CPP Contribution
|
Long text for the wage type
|
Start Date
|
BEGDA
|
Start date for the wage type
|
2003.01.01
|
The date from which the wage type is valid
|
End Date
|
ENDDA
|
End date for the wage type
|
9999.12.31
|
The date until the wage type is valid
|
+
|
RECHZ
|
Select radio button
|
Select radio button |
Select this option if the wage type is to be added to the cumulation wage type |
–
|
RECHZ
|
Select radio button
|
Select radio button |
Select this option if the wage type is to be subtracted from the cumulation wage type |
Number
|
CLCFD
|
Select radio button
|
Select radio button |
Select this option if the wage type number value is to be considered |
Rate
|
CLCFD
|
Select radio button
|
Select radio button |
Select this option if the wage type rate value is to be considered |
Amount
|
CLCFD
|
Select radio button
|
Select radio button |
Select this field if the wage type amount value is to be considered |
Table 1
The field details for table V_T596I
In table V_T596I, the start date is the date from which the assignment is effective—usually the beginning of the year. For example, in Figure 9, for the year 2014, the year field has values 2014.01.01 and the end date is shown as 9999.12.31. Here you also need to determine if the wage type is added or deducted from the wage type bucket and if the wage type is a rate, a number, or a specific amount.

Figure 9
New entry screen
Save the wage type after all the details are entered. Then click the save icon to save your changes and initiate the cumulation. Once done, the wage types are cumulated to the cumulating wage types (e.g., in this case wage type /320 is added to the cumulating wage type B16, as shown in Figure 7). As a result, wage type /320 now appears in box 16 of the T4 year-end form.
Step 4. Test the Year-End Form Output
The correctness and success of the wage type configuration can be established only after testing the year-end mapping. This is achieved by running the year-end forms for employees (Figure 10). To run the year-end forms, execute program RPCYERK0. Once the forms are generated, the amounts in the form boxes should be compared with the Output Log of program RPCYERK0 to make sure they’re correct. Program RPCYERK0 is used to generate year-end forms like T4 (an example of which is shown in Figure 10), T4A, Releve 1 and Releve 2.
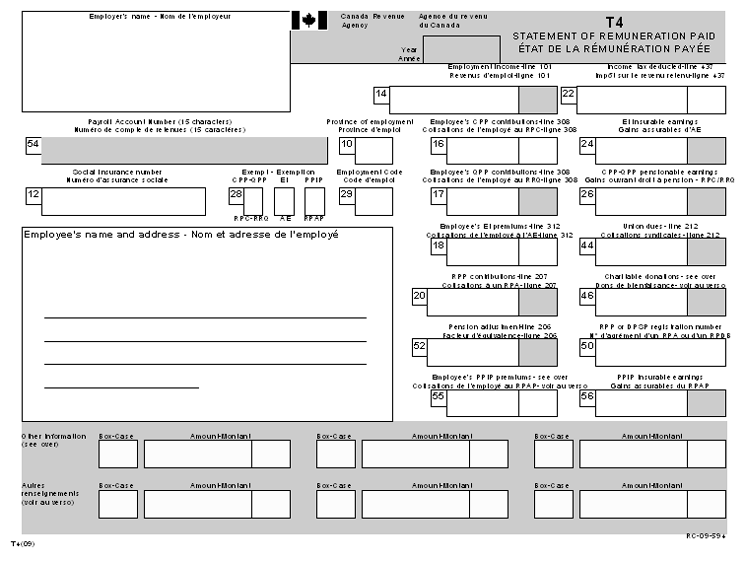
Figure 10
An example of the Canadian T4 form
Once the testing is complete and you have the correct result, the changes can be moved to the production system, the details of which are outside the scope of this article.
Srikant Nayak
Srikant Nayak is an SAP-certified senior HCM consultant with 20 years of IT-industry experience and nine years of SAP experience. In addition to Payroll, Srikant has experience in Organizational Management, Time Management, and Personnel Administration. He has also been a part of multiple end-to-end Payroll implementations, including roll-out, up-gradation, and support. Srikant works for a large management and systems integration consulting firm and handles global payroll for clients.
You may contact the author at srikanta.k.nayak@cgi.com.
If you have comments about this article or publication, or would like to submit an article idea, please contact the editor.