Learn how you can improve the quality of your customer data in three simple steps without using third-party services.
Key Concept
After you identify duplicate customer master records, SAP CRM provides functionality for data cleansing. This process enables a customer data administrator or sales representative to transfer business transactions from one customer to another and, if required, delete or archive the duplicate customer master records.
When an organization has duplicate customers in its database, transactions for the same customer could be assigned to two different customer numbers. Inaccurate customer information leads to inefficiency and unprofessional customer contacts. It causes irritation with customers and increases the costs of direct mail, marketing campaigns, delivery, and invoicing. The quality of data determines the quality of the interaction with the customer.
The data cleansing functionality in SAP CRM 2005 helps you consolidate the duplicate records to avoid these problems. You can achieve a higher data quality and improve customer satisfaction with three simple steps to cleanse your customer data:
Step 1. Create the data cleansing case
Step 2. Process the cleansing case
Step 3. Delete the duplicate business partners (optional)
The Process
Step 1. Create the data cleansing case. In this step you identify duplicates and create a case to use for data cleansing. Start with the selection of the business partners that you know have duplicates. Use transaction /nBP to search for the duplicate business partners. You can identify duplicate business partners in several ways. The most well known are: by an external search engine, by user-defined programs, by manual analyses, and by a customer’s request. Select the duplicate business partners and right-click on them. Then choose Create data cleansing case from the context menu.
Figure 1 shows the screen that appears. In this screen, enter the Processor and Note for Processor and select the Priority. Click on the enter icon to confirm your changes. A message appears that the clearing case was created.
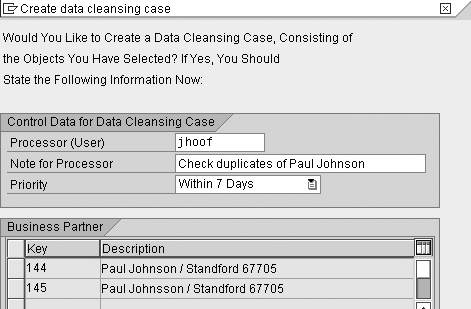
Figure 1
Enter the additional information to create the cleansing case
Tip!
You can customize the options for the Priority field by following IMG menu path Cross-Application Components>SAP Business Partner>Data Cleansing>Define Priorities. The change view Data Cleansing: Permitted Priorities: Overview appears. Click on the New Entries or Delete button to change the options.
Step 2. Process the cleansing case. In this step you move all transactions from the duplicate customer (source) to the correct customer (target). Use transaction /nBUPA_CLEAR. Here you can search for the cleansing case you just created either by using the Find tab on the left or by entering the case number in the field on the right (Figure 2).
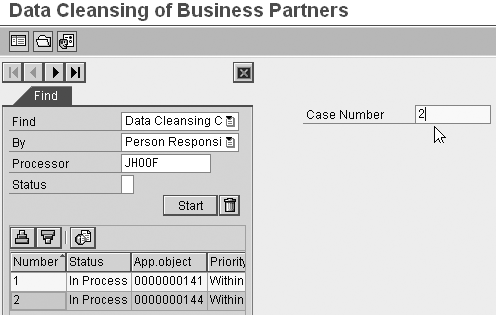
Figure 2
Searching for the cleansing case
Double-click on the relevant case (2, in my example) in the locator at the bottom of Figure 2. A screen appears that asks if the system should start the determination of referencing objects, which are the business transactions for the customer. You must ensure that no transactions of any kind (e.g., activities, appointments, or orders) are linked to the customer record you want to remove. As long as business transactions are linked to a business partner it is not possible to delete the business partner.
Click on Yes to determine all the related business transactions. The system displays the transactions on the BUPA_CLEAR screen in the case overview (Figure 3). Both partners are now opened side by side. In the Status field enter I for In Process (Figure 4).
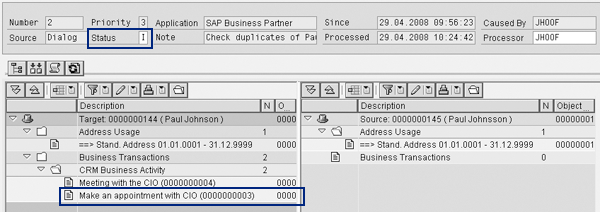
Figure 3
Make an appointment with CIO moved from Source 145 to Target 144
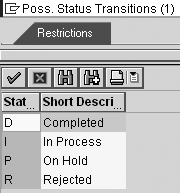
Figure 4
Set the status of the case
Now you can drag and drop transactions from the source customer to the target customer. Figure 3 shows that I moved the Make an appointment with CIO transaction from the source on the right side of the screen to the target on the left side of the screen.
When you finish dragging and dropping transactions, click on the save icon to save the cleansing case. Indicate which customer is the source and which is the target by entering T for target and S for source on the left site of the Object List (Figure 5). In my example, the Paul Johnson record 144 is the record I want to keep, so I label it as the target customer.
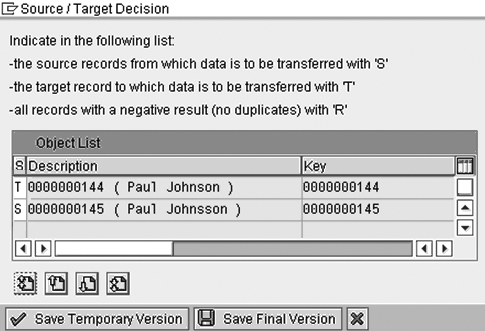
Figure 5
Enter how you want to save the cleansing case
After you have labeled the customer records, you have two save options — you can either save a temporary version or a final version. Use the temporary version when the cleansing process may require an approval step, such as from the customer data owner. In my example, I don’t need an approval, so I click on the Save Final Version button. This brings up the screen in Figure 6 in which I determine what to do with the record I don’t want to keep, record 145.
Note
Standard SAP CRM 2005 gives you an error when you exit transaction BUPA_CLEAR. To avoid this error, execute the steps described in the second solution of SAP Note 1090391.
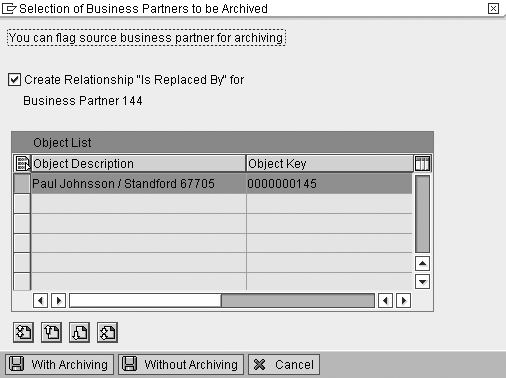
Figure 6
Archiving selection
In Figure 6 you indicate if the source customer should be related to the target customer. If you select the Create Relationship “Is Replaced By” for check box, the system creates the relationship Is Replaced By in the source’s master record. The system also creates a Replaces relationship in the target’s master record.
Next, decide whether or not you want to archive the source record by clicking on either the With Archiving or Without Archiving button. If you opt to archive the record, the system sets the archive flag in the source’s master record.
After saving, the system automatically sets the cleansing case status to Completed. When you open this source customer via transaction BP, you receive a notification that tells you that the customer has archiving status.
Step 3. Delete the duplicate business partners (optional). For this part of the process, you mark source customers and delete them from your system.
After you set the duplicate customer’s archive status, you don’t have to execute any additional actions if an archiving process is in place. When you initiate this process, the system automatically archives all the customer records that have the archive status.
Be aware that other processes can also set the archive status. However, sometimes you want to delete the duplicate records to keep the operational and archive database as clean as possible. In this case, use the following technique.
Go to transaction /nbupa_pre_da to access the Business Partner: Set Deletion/Archiving Flag screen in Figure 7. You can use this transaction to either set a deletion or an archiving flag on a single customer record or on a range of customer records. Note that in this example I describe the deletion option, although the process works the same for the To Be Archived option.
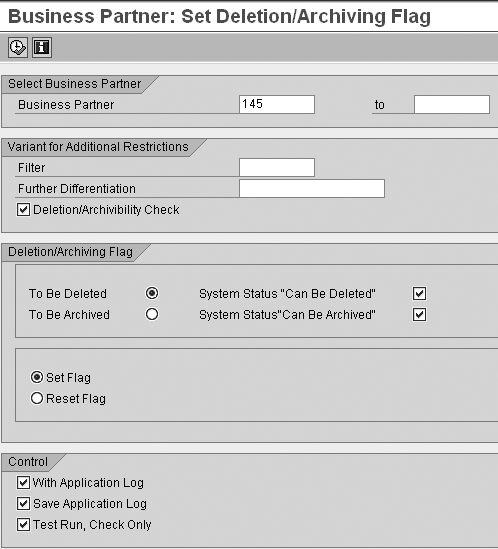
Figure 7
Set the deletion/archiving flag
Enter a business partner number or a range and select To Be Deleted. All other settings are standard, so change them only if your situation is different. Pay attention to the check box Test Run, Check Only to make sure that it is selected so nothing happens to your data. Always set the flag for a test case first, and then do it for the live case. Press F8 to view the result (Figure 8).
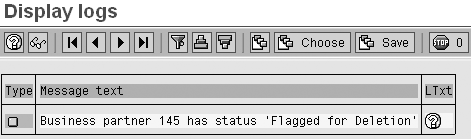
Figure 8
Display log
In this test case, the deletion flag is set successfully. If, for example, transactions are still linked to the customer master, the screen in Figure 8 will show the business partner’s number followed by the message text still used in business transactions.
If you want to delete a record in a live system, go back to Figure 7 by pressing F3. Uncheck the Test Run, Check Only check box and press F8. Answer Yes to the next dialog box for changing the selected business partners. The display log in Figure 8 shows a successful result. Keep in mind you can remove the deletion flag by selecting Reset Flag in Figure 7 and pressing F8.
Tip!
This deletion flag is stored in table CRM_JEST and not in table BUT000 as you would expect. You can find the correct record in this table by going to transaction SE16 and entering the globally unique identifier (GUID) in the search screen of the corresponding business partner.
Now the customer record in this example is flagged for deletion. The only thing you have to do is just delete the record. Go to transaction /nbupa_del and you see the screen in Figure 9.
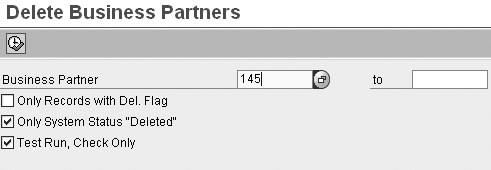
Figure 9
Delete business partner 145
This transaction works somewhat the same as the previous transaction (bupa_pre_da). Enter the number of the customer record or a range of customer records, first with the Test Run, Check Only check box enabled. After you press F8, you see a list of deleted business partners. This list indicates that you can deleted the customer records.
To physically delete the customer records, press F3 to go back to the previous screen. Uncheck the Test Run, Check Only check box, and press F8. Answer Yes to the next dialog box for deleting the selected business partners. The next list you see is the result of the deletion (Figure 10). Be careful not to enable the Only Records with Del. Flag check box in transaction bupa_del. If you do, the records that have an archive flag are listed for deletion.
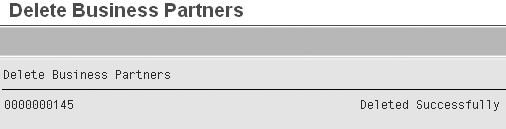
Figure 10
Result of the deletion
Finally, you should replicate all changes to your customer data as a result of the cleansing process to your business warehouse system. Say you have revenue generated by the “to-be-replaced” customer that you transfer to the correct customer by moving the relevant business transactions in SAP CRM. The relevant reports that SAP NetWeaver Business Intelligence creates should reflect the correct customer’s new situation.
Jan van Hoof
Jan van Hoof is an SAP CRM business consultant. He has a proven record in many different CRM environments and supports organizations on their journeys to successful CRM implementations. He applies his extensive experience in several industries, focusing on customer contact strategies, call centers, customer support, telesales, and telemarketing processes.
If you have comments about this article or publication, or would like to submit an article idea, please contact the editor.