Securing business partner data in SAP CRM 2007 has changed with the introduction of business roles and configuration keys. Find out the four ways you can secure business partner data.
Key Concept
You can use a configuration key to vary the appearance of a screen depending on the user. You assign the configuration key to a business role, and then you can use it when defining new screen configurations. Any user assigned to a given business role then sees a screen view that matches the configuration key in the business role to the configuration key in the screen setup.
As a vital part of your SAP CRM 2007 implementation, the locking down of functionality and data requires a dedicated team to design and implement security profiles for your user base. With a complex business partner design, the security can also be rather detailed. You may need to prevent some users from viewing sensitive customer data.
This is especially the case if you have added your own new data structures to the business partner where a standard security object has not been provided. For example, your business may need to record a customer’s insurance claims or driving history, which is important for some departments, but should not be made available to the wider user base.
In this article, I will take you through the various methods that you can use to secure the data, specifically the business partner data. Security of business partner data can be achieved at four levels:
- Authorization groups
- Business partner roles
- Business partner views
- Fields within views
Authorization Groups
You may already be familiar with the use of an authorization group, as this is a concept that has been used in previous SAP CRM releases. Authorization groups allow you to restrict access to groups of business partners.
The first step is to configure the various authorization groups. Go to the configuration view via transaction SPRO and follow menu path Cross Application Components>SAP Business Partner>Business Partner>Basic Settings>Authorization Management>Maintain Authorization Groups.
A good example of how you can apply this is when dealing with an international implementation. You may wish to restrict each country’s business partners to be visible only to users in that country. For this you configure an authorization group for each country or region you wish to restrict. This allows or restricts access to business partner maintenance, depending on the assigned authorization group.
Figure 1 shows an authorization group for Australia and a group for New Zealand. Each time users create business partners, they manually assign an authorization group to the business partner.

Figure 1
Authorization groups for business partners
Note
You should make the authorization group a mandatory field for the create and change activities in a business partner record to ensure that this security is effective. If no authorization group is assigned to a business partner, all users can view and edit that record.
From a security profile perspective, you should then assign authorization object B_BUPA_GRP to the user’s security profile and assign the field value Authorization Group to reflect the region or country to which he or she should have access. You can also define the activities available: 01 (create), 02 (change), and 03 (display). Figure 2 shows a security profile that contains the B_BUPA_GRP authorization object.

Figure 2
Security profile that contains the authorization object B_BUPA_GRP
The overall effect is that when users search for a business partner to view or change, they only see the business partners permitted by the authorization group specified in their security profiles.
Business Partner Roles
Now that you have secured groups of business partners, I’ll show you how to restrict business partner roles for users. For example, you may want some of your users to have access to customer records (sold-to party role), but not to have access to supplier records (vendor role).
In the past, it was possible to use the security object B_BUPA_RLT to lock down business partners based on their roles. This security check is no longer active in SAP CRM 2007. However, it is still possible to activate this security check. The details of how to activate the security check on roles can be found in SAP Note 1129682 (“Authorization for BP roles in CRM 5.2 WebClient UI”).
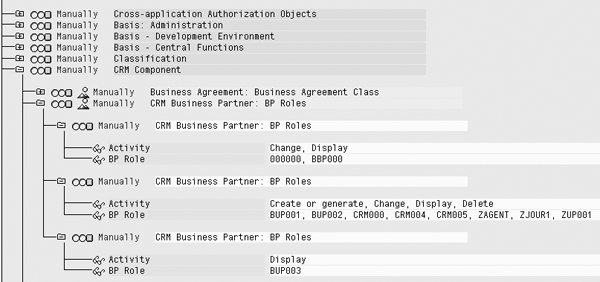
In short, you simply need to activate Business Add-In (BAdI) BADI_CRM_ BUPA_FILTER_ BPROLE. The code already exists in this BAdI — it just needs to be activated to take effect. After you activate this BAdI you can use the new authorization object CRM_BPROLE. In the user’s security profile you can assign the technical names of the roles to this authorization object (Figure 3).

Figure 3
Authorization object CRM_BPROLE for locking down business partner role access to users
When activated, this BAdI checks the authorization object CRM_BPROLE in a user’s security profile. If the user does not have access to a given role, for example vendor role BBP000, the user cannot search for business partners that have the vendor role. They also cannot assign that role to any business partner.
It is important to note that if business partners have multiple roles, users can still view and change these business partners even if they don’t have access to one of the many roles to which they have been granted access. For example, a business partner may be a customer (sold-to) as well as a supplier (vendor role). A user who has been granted access to the sold-to party role still can view and modify the general and sold-to data as well as any custom views that you may have added to the business partner. This may be an issue if you have not locked down views specific to the vendor. The next section details how you can associate views with roles and restrict user access where appropriate.
Business Partner Views
Each view in business partner maintenance contains a set of related data. As a part of your security definition, you might need some users to have edit access to an entire view and some users to only have display access to a view. Also, you might want to prevent a user from seeing the entire view if the data is deemed sensitive.
Some views delivered as standard already come with security checks to restrict edit and display. However, if you find a view that does not provide security checks, or if you have added your own views, here are some methods you can use to secure the data.
Influence Display or Edit Access
If you want users to have edit access, then give them the Edit button on a view. If you do not want users to have access to change the data within a view, make sure that the Edit button does not appear for them. You can do this with coding in the Business Server Page (BSP) Component Workbench.
Step 1. Create a new authorization object. To be able to check access to a given view in a user’s security profile, you should create a new authorization object. In this example, I created a new authorization object ZS_BPFIELD with two parameters: view name and activity. These allow me to use this authorization object as a generic check for any view to see who has the authorization to perform the 02 (change) and 03 (display) activities.
To create a new authorization object, you first need to create a new object class. Go to transaction SU21. Click on the Create button and select Object Class. Enter the name of your object class and class description and save. You can use this new class for all your new authorization objects.
Highlight your new authorization object class and click on the Create button to create your new authorization object. This time, select authorization object. Enter the name of your new authorization object (Figure 4). In this example, my new authorization object is ZS_BPFIELD. The field names specify what you need to check. In this example, I want to check the view names and the permitted activities.

Figure 4
Create a new authorization object
When completed, save the new authorization object. You can now add this object to your user security profiles, providing them with access to views where you are planning to apply security checking.
Step 2. Edit the view in the BSP Component Workbench. Use transaction SPRO and follow menu path Customer Relationship Management>UI Framework>UI Framework Definition>Configure user interface or use transaction BSP_WD_CMPWB.
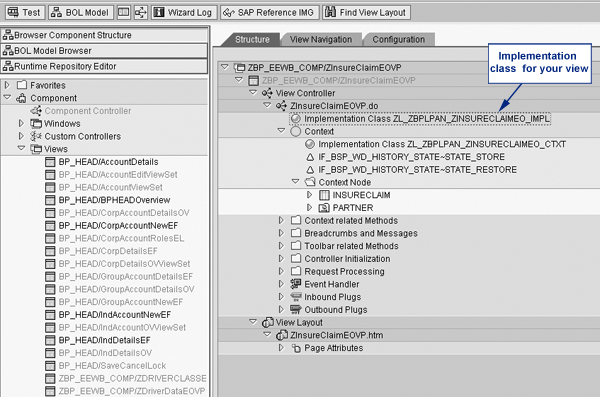
Enter the name of the component and click on the Edit button. Navigate to the view to which you want to apply security. On the right side of the screen, double-click on the implementation class (ends in _IMP). This takes you to the class that contains the code for screen display and navigation. Figure 5 shows where you can find the implementation class in the BSP Component Workbench.

Figure 5
Implementation class location showing the business partner maintenance component BP_HEAD and a new customized view ZInsuranceClaimEOVP
In the Methods tab, scroll down until you locate the method DO_PREPARE_OUTPUT. The system uses this method to determine where to display the buttons on the view. You need to redefine this method by selecting the method and clicking on the Redefine button.
Within this method, you can see the table GT_BUTTONS. This table contains a list of the buttons that appear on the top of the view. Here you can perform a security check on your new authorization object. If the result is that the user has change access to the Edit button, insert this button into the GT_BUTTONS table. If the authorization check determines that access should be display only, do not add this button. Click here for a download of this code: Code download.
Influence Display or No Display
If you don’t want a user to have access to a view, you can remove the view prior to presentation on the screen. To do this, implement the enhancement spot CRM_UIU_BP_ENHANCMENT using transaction SE19. This enhancement influences which views are displayed on the screen. Within this enhancement spot, use interface IF_UIU_BP_VIEWS.
Once again, perform a security check on your new authorization object. If the authorization check determines that the user does not have any access to the specified view, you can remove it by adding it to an exclusion table CT_DETACH_STATIC_VIEWS within the coding of the enhancement. Click here for a download of this code: Download code.
Fields with Views
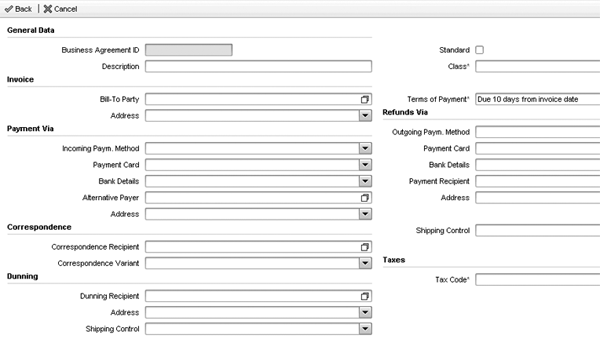
As a part of the design process for setting up security profiles, you might come across a requirement to provide different access to a single view within the business partner. A good example of this is the Business Agreement view on the business partner, which specifies how a customer makes and receives payments, dunning procedures, and payment terms. Figure 6 shows the full set of fields available in a business agreement.

Figure 6
Business agreement screen available for sold-to business partners
A sales account manager may have negotiated the payment terms and therefore needs to modify the business agreement to enter these payment terms. In addition, the finance department needs to view and select bank details for a customer’s business agreement to specify inbound and outbound payments. Bank details often need to be restricted to a specific section of the business. In this example, the finance department needs to see all the business agreement fields, but the account managers should only see a subset of those fields.
How do you provide display and edit access at a field level within a single view? In SAP CRM 2007, the solution is a configuration key.
You assign a configuration key to a business role. Each time a component, such as the business agreement create component BP_BuAG/BUAgEF, is displayed, the screen configuration is checked to assess if there is a screen configuration set up for the configuration key specified in the user’s business role. If this configuration exists, the specified screen configuration is displayed on the screen. If configuration with the specified configuration key does not exist, the system displays the default view.
Figure 7 shows the existing configuration for the business agreement screen. It contains the default configuration and two screen configurations with a specified configuration key. In this example, I have set up configurations for configuration keys ZFINANCE and ZCOMMERCL, as shown in the bottom two rows.

Figure 7
Business agreement component BP_BUAG/BuAgEF screen configurations
To achieve this method of data lockdown, restricting the fields a user can see, follow these steps:
Step 1. Create a new configuration key. Use transaction SPRO and follow menu path Customer Relationship Management>UI Framework>UI Framework Definition>Define Role Configuration Key. The system presents a table of existing configuration keys as shown in Figure 8.

Figure 8
Create a new configuration key
To create a new configuration key, click on the New Entries button and then enter the name of the configuration key and a short description. In Figure 7, I created two new configuration keys, ZCOMMERCL and ZFINANCE. Click the save icon.
Step 2. Assign the configuration key to the appropriate business role. Use transaction SPRO and follow menu path Customer Relationship Management>Business Roles>Define Business Roles. Alternatively, you could use transaction CRMC_UI_PROFILE.
Double-click on the business role to which you want to assign your new configuration key. Enter the name of your new configuration key in the Role Config. Ke (role configuration key) field. In the example shown in Figure 9, I assigned my new configuration key, ZCOMMERCL, to the business role SALESPRO in the Role Config. Ke field. SALESPRO is the role that the account managers use.

Figure 9
Specify the role configuration key for your business role
Step 3. Set up screen configuration using the new configuration key. In this example, I want to configure the business agreement screen so that account managers with the SALESPRO business role have a different view of the screen when compared to the finance department users.
Use transaction SPRO and follow menu path Customer Relationship Management>UI Framework>UI Framework Definition>Configure user interface. Or, you can use transaction BSP_WD_CMPWB. Enter the component name you need to configure (BP_BUAG for a business agreement) and click on the Display button.
Once in the component, double-click on the view that you want to configure. In this example, I want to change the business agreement create/change view BuAgEF. Navigate to the Configuration tab and click on the Select Configuration button. A pop-up screen appears that contains a list of the entire existing configuration. Select the configuration that matches the configuration called up in the UI.
Copy this configuration by clicking on the Copy Configuration button. You should use the identical values for component usage, object type, and object subtype — you only need to specify your new role configuration key. In Figure 10 I assigned the role configuration key created in step 1, ZCOMMERCL, when copying the BuAgEF view configuration.

Figure 10
Copy the view configuration for BP_BUAG/BuAgEF
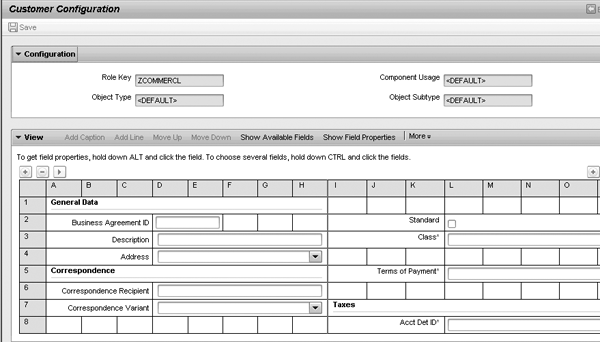
Step 4. Complete the screen configuration for this version of the screen. You can now remove fields, make fields mandatory, make fields display only, or even change the titles of fields to match a given business role from both a security and usability perspective. In Figure 11, many of the fields have been removed from the standard configuration of this view. (The original view appears in Figure 6.)

Figure 11
Business agreement screen using configuration key ZCOMMERCL
As a result of this configuration, when account managers log in under the business role SALESPRO they now see a different version of the business agreement. In this example, they cannot see the incoming and outgoing payment method, which in effect prevents them from seeing a customer’s banking details. Figure 12 displays the business agreement now visible by users logging in using the SALESPRO business role. Users logging in using other business roles continue to see the default configuration for this screen.

Figure 12
Business agreement as viewed by users logging on under the SALESPRO role after assigning a configuration key to the business role
You have many options for locking down data in the business partner. You can apply the use of a configuration key to all transactional and data views so it becomes a very useful tool for changing the view of data depending upon the user group. The important thing is that you spend time up front putting together the design of your security and defining different user groups and what data they will require access to. Once this is determined, it is a matter of selecting the correct security methods to achieve the final product.
Katrina Burke
Is a senior CRM consultant at SAP Australia. Working as an SAP consultant for 13 years, initially Katrina was entrenched in ABAP and SAPScript. In later projects in both Asia and Europe, Katrina worked as a development manager and HR Payroll consultant. Most recently Katrina has been working at SAP as a CRM consultant specializing in business partner, marketing, and opportunity management. In her current CRM consulting role, she has been working with SAP CRM 2006s.
You may contact the author at katrina.burke@sap.com.
If you have comments about this article or publication, or would like to submit an article idea, please contact the editor.


