Learn how to set up and configure the SuccessFactors leave of absence (LOA) functionality with—or without—integrating with the Time Off module in Employee Central. Learn about the LOA functionality’s design considerations, how to record the leave of absence and return from a leave of absence, and how the change of status changes the behavior of the job information of the employee.
Key Concept
SuccessFactors Employee Central is leveraging and adding new features to the Time Off module to cover the need for global time management in Employee Central. Leave of Absence is one such time type that can be recorded in different ways in Employee Central based on the integration of the Time Off functionality with Employee Central.
Leaves of absence are a benefit that is often very sensitive—who gets leave, how much leave is awarded, and so on—and it is an important tool for rewarding and retaining key employees. Therefore, the leave of absence (LOA) functionality is one of the most important Time Off types and benefits offered to employees. With LOA, employees can use their time off for personal reasons (for example, caring for a sick relative, maternity or paternity leave, or educational leave) without terminating their current job.
Based on a country’s legal requirements and the employee’s benefits offered by the business, LOAs are offered with pay for a certain set period and can be extended with or without pay based on the employee’s condition. For example, employees can apply for maternity or paternity leave, which are paid leaves, or take what is called an education break to get an additional degree, which is usually an unpaid leave.
SuccessFactors LOA can be implemented with or without the Time Off functionality based on the implementation requirements. In this article I cover the design of the business process, the configuration requirements, and the end-user functionality of the SuccessFactors LOA process with or without the Time Off integration. I also discuss the basic configuration steps required for setting up the time types for LOA, recording LOAs, the return from LOA from the end-user’s perspective, and its impact on the employee’s status in the system.
Overview of LOA
LOA is the time allowed away from the work. When any of the other time types such as sick leave or paid time off (PTO) do not cover the time off from work, a LOA can be used to fill this gap. Depending on the reason for the employee’s absence from work, the LOA can be either paid or unpaid based on the company’s policy. Also, the employee’s status in the company changes depending on how the employee’s payroll is processed in the system, based on whether the LOA is paid or unpaid.
In the first scenario, SuccessFactors Employee Central has a functionality that records employees’ time off based on the implementation requirements. Some companies may not use the Time Off functionality in Employee Central, but instead record the LOA as a part of an event, under the Take Action tab. In this scenario, none of the time types such as paid time off (PTO), sick leave, or any other kind of leave are stored in Employee Central, and Time Management is not a part of the Employee Central system.
In the second scenario, some companies may use the Time Off functionality to record only the LOA time type, which also overrules the recording and managing of Time Management in Employee Central.
In the third scenario, Employee Central is used to manage the employee’s time off and record all kinds of time types. Time Management functionality is managed and recorded in Employee Central.
I explain the process of managing the LOA in all three of the scenarios discussed above. I also show the end user experience in recording the LOA in these scenarios.
Before beginning, you first must configure the reasons for the LOA and the return from LOA, as well as the change of employee status based on the LOA reasons the employee attains during these transactions in the system. As part of the standard Employee Central design, employees are in paid leave or unpaid leave status for payroll during the LOA period and then revert to active status in the payroll system after they return from leave. I use the paid maternity/paternity leave reason as my example for the LOA functionality.
Configure the LOA Reason
Event reasons can be configured from OneAdmin by following menu path Employee Files > Manage Organization, Pay and Job Structure > Create New > Event Reason (Figure 1).
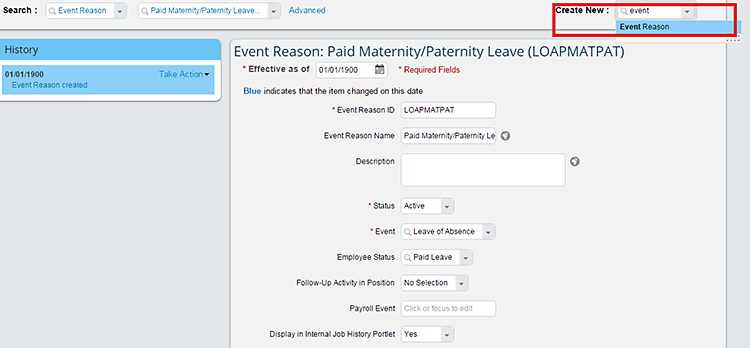
Figure 1
Create a new event reason
On this screen, enter the start date from which the event reason should be active in the Effective as of field. In the Event Reason ID field enter the event reason code (which is a unique identifier). In this example, I am using LOAPMATPAT as the ID, and the Event Reason Name is Paid Maternity/Paternity Leave.
The Description field is optional; here you would enter the descriptive text (explanation) for the event reason being created. The Status field has two options: Active or Inactive. If the event reason is created with the status as Inactive, this reason will not be visible (available) for selection on the LOA reason field when recording the LOA for the employee.
The Event field assigns the event to the reason being created—in this case, select the event as Leave of Absence. The Employee Status field assigns the status of the employee in the organization when the selected event and event reason are recorded for the employee. In this example, when the Leave of Absence event with the reason LOAPMATPAT is selected, the employee’s status is Paid Leave. For unpaid LOAs, select Unpaid Leave as the Employee Status and the rest of the attributes are maintained as per the requirements. In this same way, create a Return from Leave event reason with the Employee Status set as Active.
Now that I have shown how to configure the LOA reasons, in the next sections I discuss each of the three example scenarios in detail.
Scenario 1: Using the LOA Functionality Without Integrating with the Time Off Functionality
Time Off is a sub-module in SuccessFactors Employee Central that can be activated based on the implementation requirements. If you are not using the Time Off functionality, then the HR administrator or supervisor (based on the authorization provided) can record the LOA for employees using the Manage Leave of Absence event in Employee Central.
Recording LOAs
Click the Manage Leave of Absence link from the Take Action options as shown in Figure 2. This opens the screen in Figure 3 where you complete the remaining entries for the LOA.
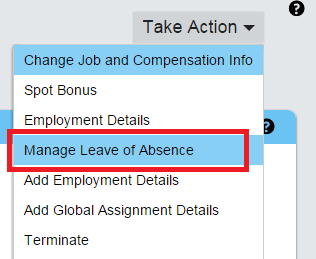
Figure 2
Click the Manage Leave of Absence link to record a LOA
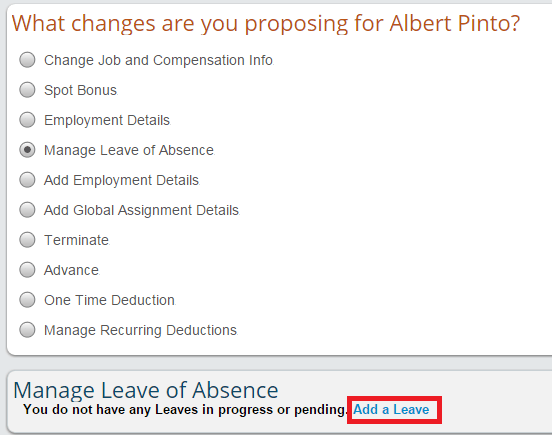
Figure 3
Add a LOA
The screen in the figure shows a variety of radio-button options. In this case, tick the Manage Leave of Absence radio button and then click the Add a Leave link that appears at the bottom of the screen.
This expands the screen (Figure 4) so you can record the LOA. Enter the Leave Start Date, Expected Return Date, and Leave Reason using the drop-down options. In this example, select the event reason you created earlier—Paid Maternity/Paternity Leave. Once you’ve made your selections, click the Submit button.

Figure 4
Record the LOA
Once the request is submitted and approved, the Job Information portlet is updated with the Leave of Absence event and event reason along with the change of employee status (Figure 5).

Figure 5
The employee’s status before and after the LOA event
This shows the change in employee status once the LOA is recorded for the employee as per the configuration done in Figure 1.
Recording Returns from Leave
Once the employee decides to return to work, the user needs to record the return from leave event. For an employee who is on LOA, once the user selects the Manage Leave of Absence link (Figure 2), the screen in Figure 6 appears. Tick the Manage Leave of Absence radio button and then the link to record the Return from Leave event.

Figure 6
Add a return from leave event
This expands the screen as shown in Figure 7. Enter the Actual Return Date, select the Return Reason, and click the Submit button to complete the transaction.
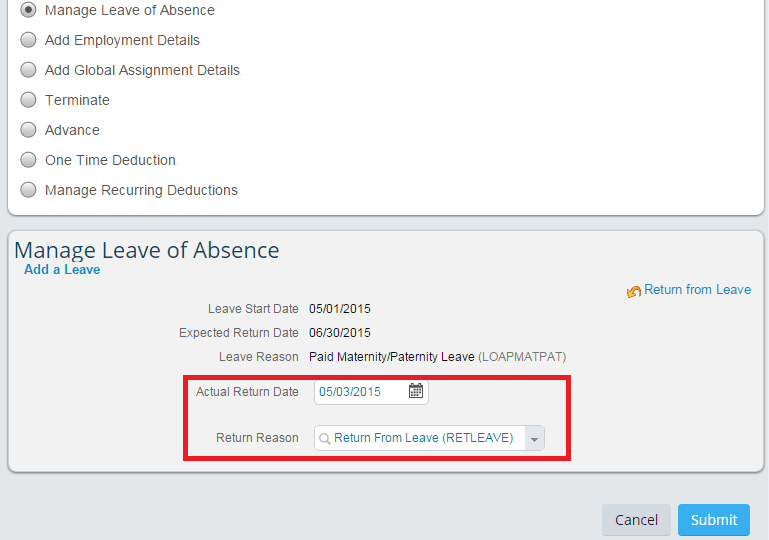
Figure 7
Record the return from leave event
Once the transaction is approved and completed, the employee’s status is returned to Active. Figure 8 shows the different statuses of the employee before, during, and after the LOA event recording is completed.
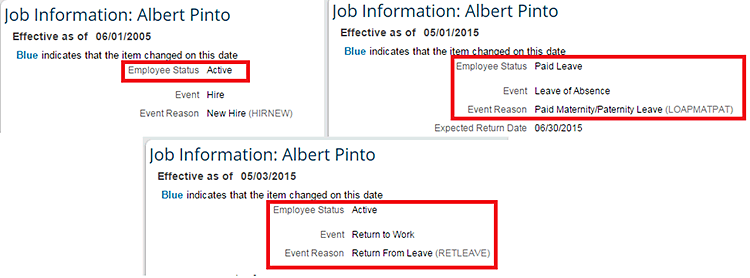
Figure 8
Status of the employee before, during, and after the LOA
Scenario 2: Using the Time Off Functionality Only for LOA Time Types
If a company wants to implement the Time Off functionality only to record LOAs, follow these steps.
Activate Time Off in Provisioning
As a first step, you need to activate the Time Off functionality in PROVISIONING. PROVISIONING is the web-enabled tool that allows trained users who have access to activate or deactivate such functionalities in SuccessFactors. PROVISIONING is provided to Partner users to implement the SuccessFactors product.
Log on to PROVISIONING with the user name and password provided by SuccessFactors (this is unique per partner user). Once logged on to PROVISIONING, on the main screen you can see the number of instances or systems attached to the logon ID, as shown in Figure 9. In my example, there are six instances aligned with the logged-in user ID. Select the system or instance for which Time Off needs to be enabled. In this example, I am enabling the Time Off functionalities to activate the Time Off module to the Article Demo system. To achieve this, follow these steps.

Figure 9
The initial PROVISIONING screen showing the instance details
Note
In this article, the terms instance and system are used interchangeably.
First, select the instance Article Demo (boxed in red in the figure) to change the company settings to enable the Time Off module. Once you click the Article Demo system link, the screen in Figure 10 opens, where you are able to access all the possible settings for the selected system.

Figure 10
Edit the company settings
Under the Edit Company Settings section, click the Company Settings link. This opens the screen in Figure 11 where all the system-level configuration settings are maintained. Scroll down the page to look for the Enable Time Off for Leave of Absence Only and Enable Time Off options. Select the requisite check boxes (if they’re not selected already). Then click the save icon to save your changes.

Figure 11
Enable the Time Off functionality in PROVISIONING
Once you’ve completed these simple steps, the Time Off functionality for LOAs is activated in the system for configuration. Log out of PROVISIONING to proceed with the next steps.
Create the Maternity/Paternity Paid Time Type
Figure 1Figure 12
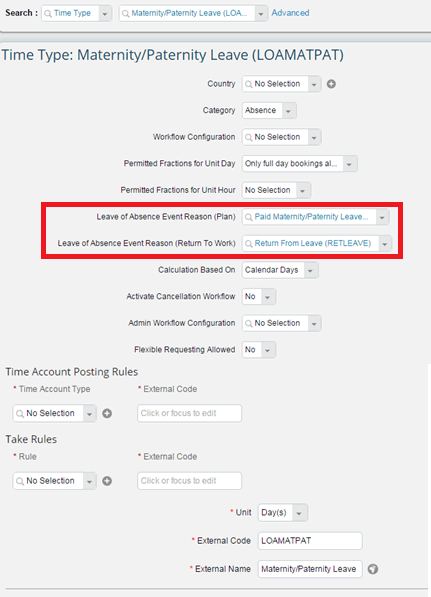
Figure 12
Create the Paid Maternity/Paternity Leave time type
Once the Leave of Absence and Return from Leave reasons have been added to the Maternity/Paternity time type, the Manage Leave of Absence option is deactivated on the Take Action event list. The screen on the left of Figure 13 shows the Manage Leave of Absence option as it appears before the Time Off functionality was integrated, and the screen on the right shows the event list without the Manage Leave of Absence link (after the changes were made in Figure 12). After these settings have been changed, employees need to record their LOAs in the Time Off portlet of Employee Central.

Figure 13
Event lists with and without Time Off integration for LOAs
As Time Off is used only for recording LOAs, the time recording profile is not required on the Job Information portlet. This is because, by default, the LOA time type is activated for all employees.
Recording the LOA
Employees needs to record the leaves of absence under the Time Off portlet. Follow menu path Home > Employee Files > Public Profile > Time Off (Figure 14).
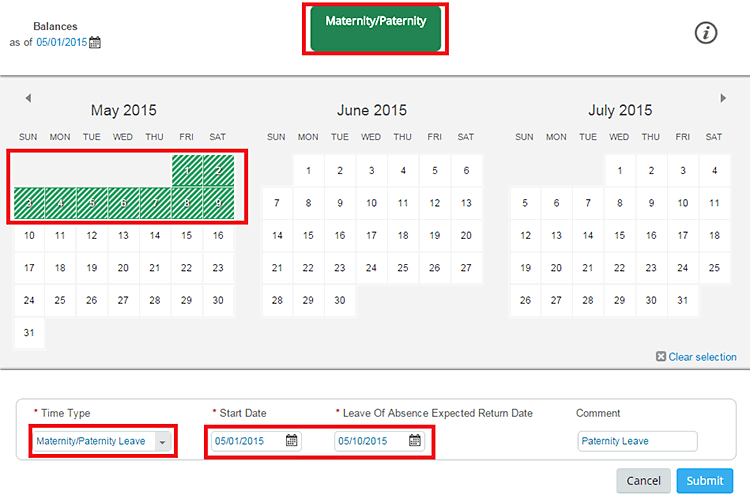
Figure 14
Record the LOA in the Time Off screen
In this Time Off screen users can now only see the Maternity/Paternity Leave time type option in the Time Type field. Select the start date and expected return date and click the Submit button. The selected dates are shaded in a different color on the calendar at the top of the screen. Once the request is submitted and approved, an LOA is recorded for the employee and the status changes to Paid Leave (Figure 15) as configured.

Figure 15
The recorded LOA
Recording the Return from Leave
Once the employee returns to work, the Return from Leave can be recorded in the Time Off portlet using the same menu path: Home > Employee Files > Public Profile > Time Off (Figure 16).
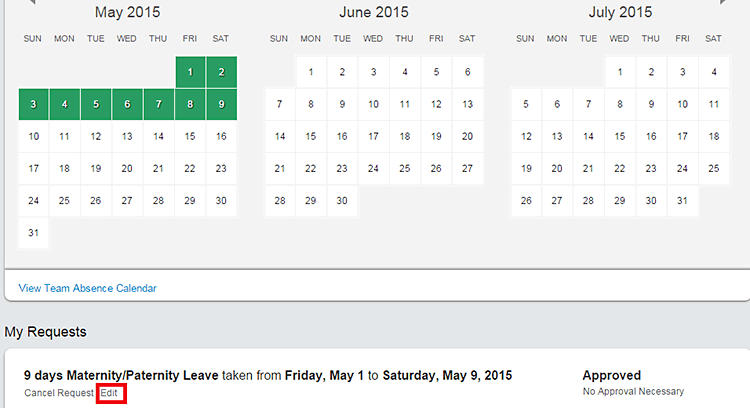
Figure 16
Record the return from LOA
Click the Edit link to open the screen to record the return to work information (Figure 17).
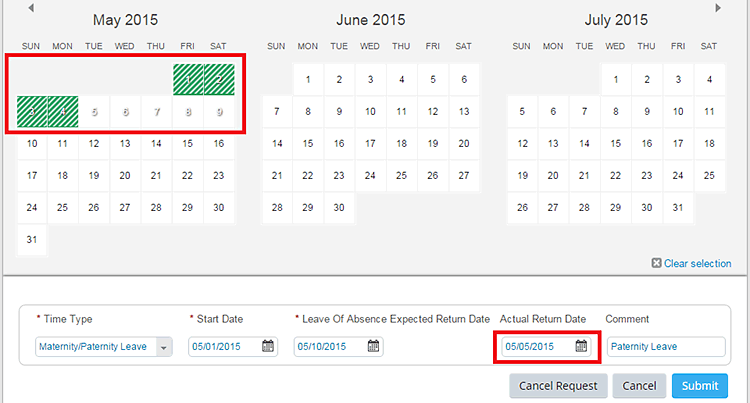
Figure 17
Record the Actual Return Date from the LOA
Enter the Actual Return Date and click the Submit button. The shaded area of the calendar shows the recorded leave dates for the employee. Once the request is submitted and approved, the employee status is changed back to Active for payroll (Figure 18).

Figure 18
The employee’s status is changed after the return from leave
Scenario 3: The LOA Functionality Integrated with the Time Off Functionality
In this scenario, I discuss the behavior of LOAs when the Time-Off functionality is used for recording all time types such as sick leave, PTO, and jury duty leave, and LOA. To achieve this, follow the steps outlined below, and complete the configuration to activate the full Time Off functionality before recording the LOAs.
First, untick the Enable Time Off for Leave of Absence Only check box and tick the Enable Time Off and Enable Time Sheet check boxes in Provisioning as shown in Figure 19. Once this configuration is saved, log out from PROVISIONING.

Figure 19
Enable Time Off for all time types
Create the Time Type Profile with all the Time Types that are allowed for employees to record. In Figure 20 three time types have been added for employees to record from their Time Off portlets. These time types appear on the employee’s Time-Off screen to record the absences.
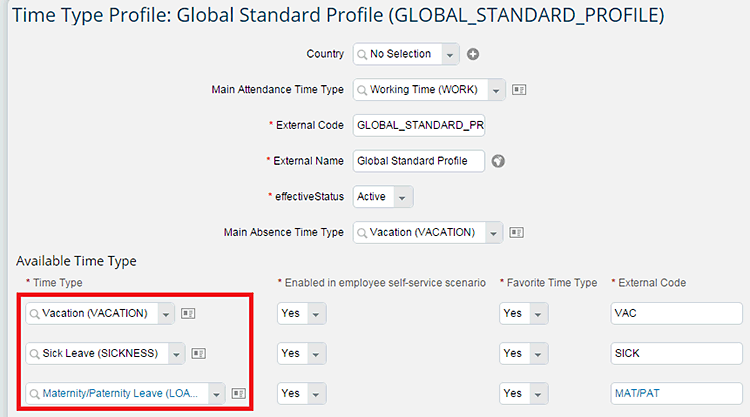
Figure 20
Add the time types to the time type profile
Finally, update the Time Information in the employee’s Job Information profile to activate the recording of the respective time type and accrual rules. Figure 21 shows the Time Information that has been added to the employee record, including the Global Standard Profile, which allows the employee to record the time types added in Figure 20.

Figure 21
The updated Time Information portlet
Recording the LOA
Next, the employees need to record LOAs in the Time Off portlet. Follow menu path Home > Employee Files > Public Profile > Time Off. On this screen (Figure 22), all the time types that are assigned to the time type profile appear.
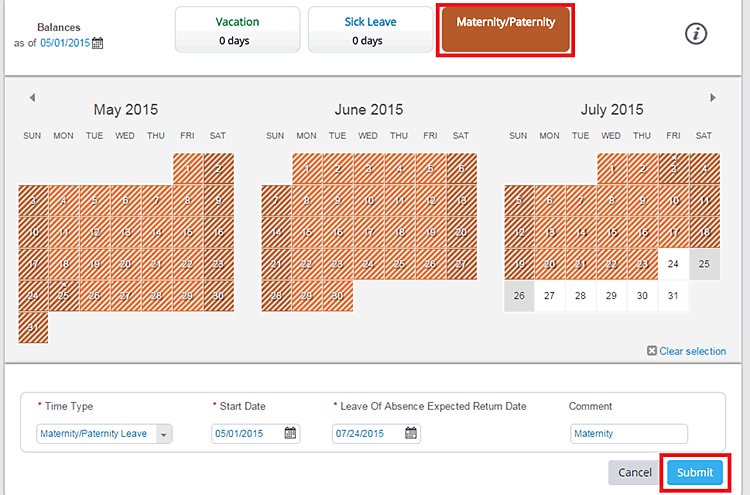
Figure 22
Record the LOA
In this example, you are recording the maternity/paternity leave with a start date of 05/01/2015 and an end date of 07/24/2014. Once you enter the dates in the screen (in Figure 22), the calendar dates are updated and are shown shaded (e.g., the leave dates). Click the Submit button to record the Maternity/Paternity Leave time type, and the status of the employee is changed to Paid Leave.
To record the Return from Leave to change the status of the employee, follow the same steps as explained in scenario 2.
Manjunath Bannur
Manjunath Bannur has been in the IT industry for over 13 years working in various areas of HR, including SAP ERP HCM (for 7 years) and now SuccessFactors Employee Central. He is experienced in implementing SAP ERP HCM and Employee Central globally.
You may contact the author at mbannur@gmail.com.
If you have comments about this article or publication, or would like to submit an article idea, please contact the editor.


